In this guide, we’ll show you the complete walkthrough of Brookhaven Hospital Part 2 of the game Silent Hill 2 Remake, released on September 8th Oct 2024. Click here for Brookhaven Hospital Part 1 Walkthrough.
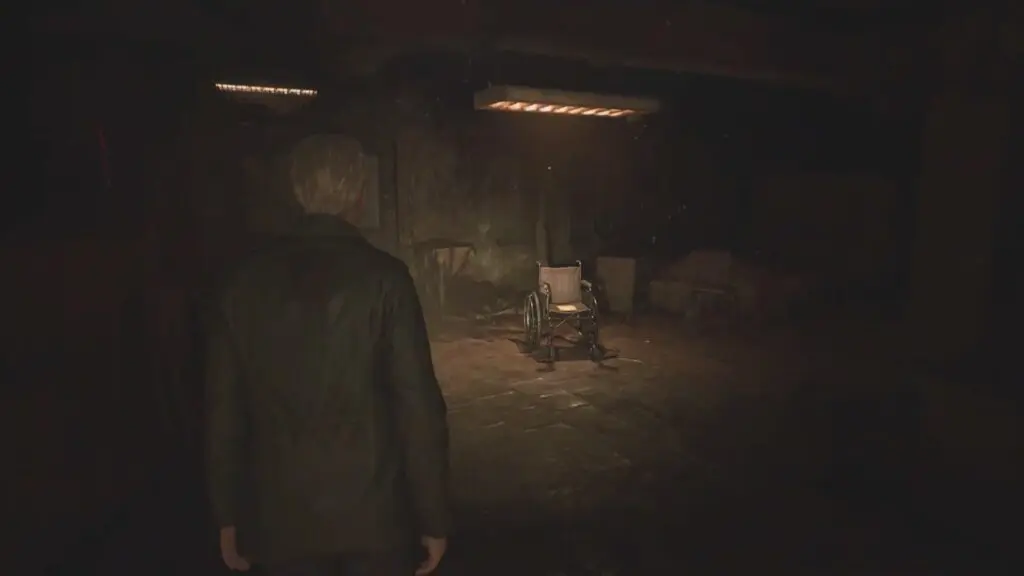
After the Flesh Lip Boss Fight, there will be a cutscene. After the cutscene, you will be on the 1st floor of the Hospital, and the entire environment will be changed. Enter the room in front of you and collect the Evaluation Card, Patient #3141 from the Wheelchair.
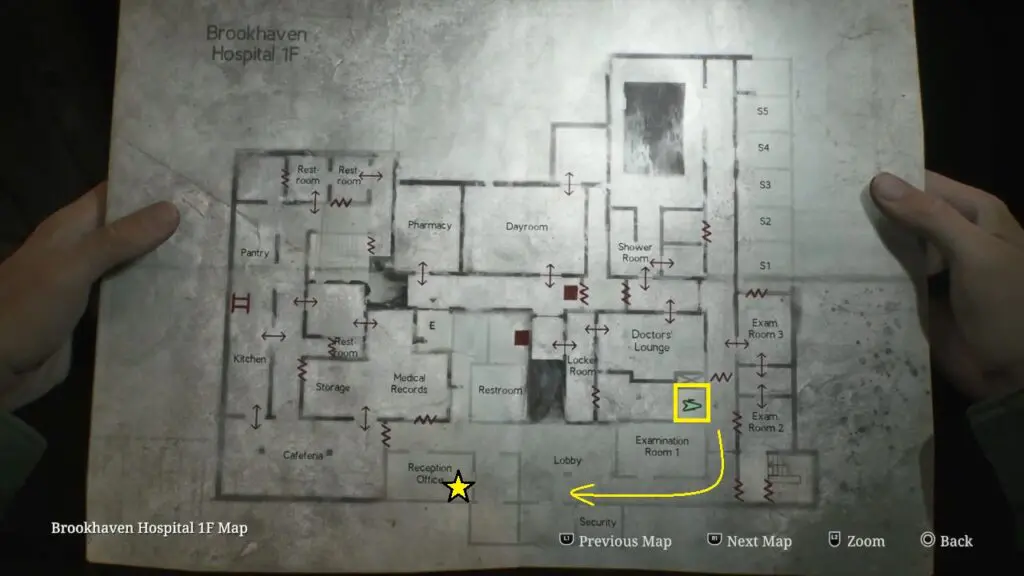
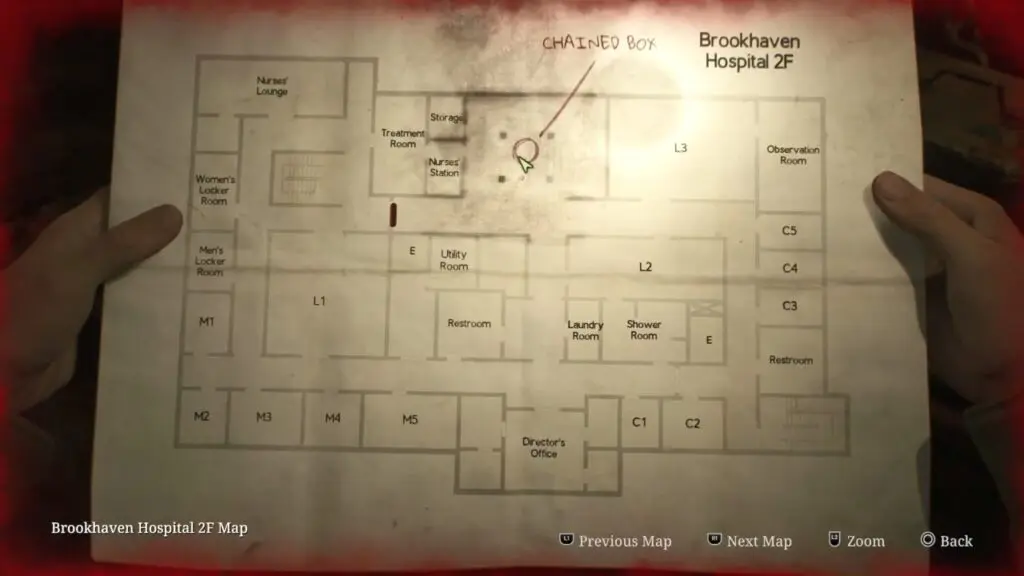
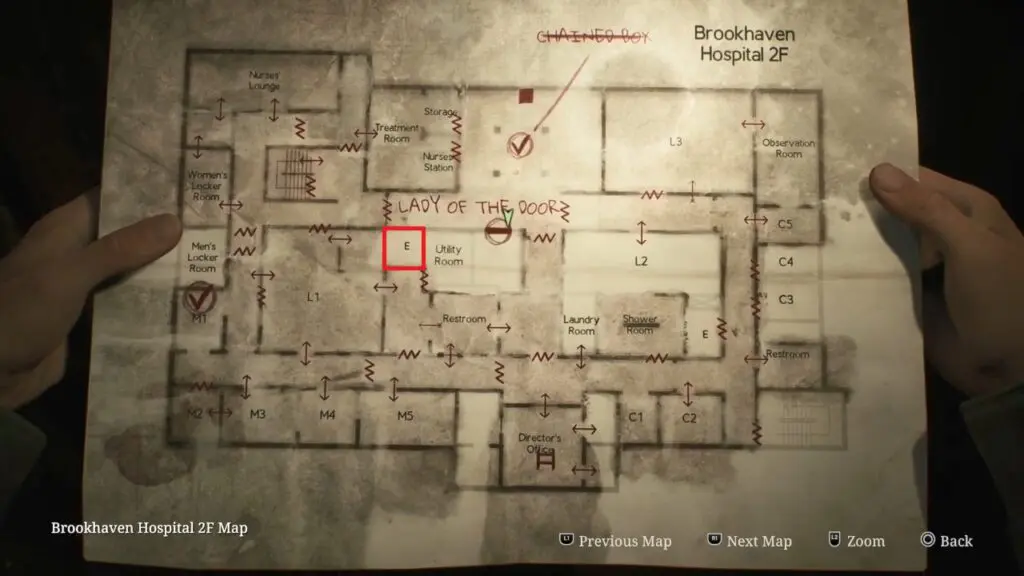
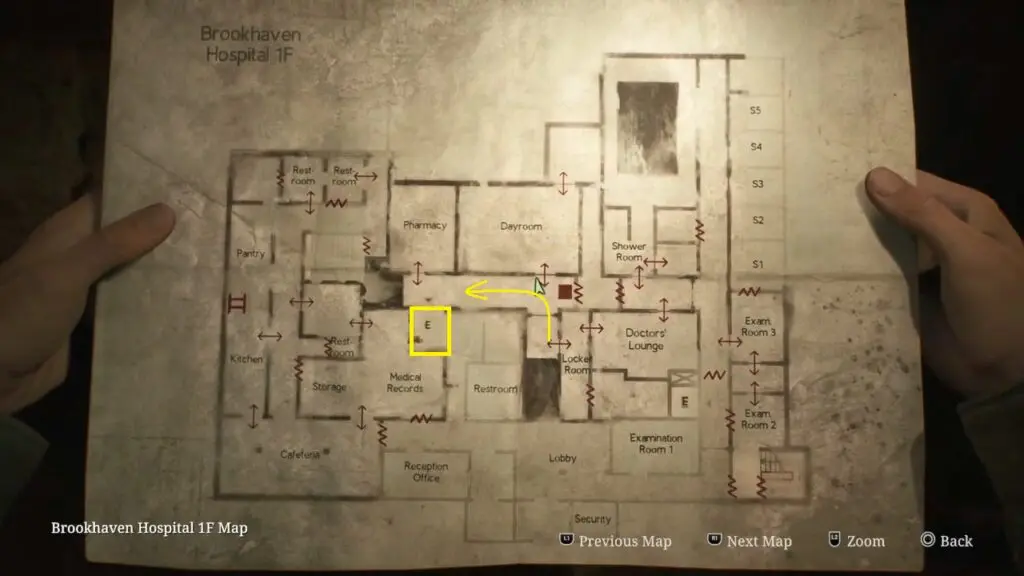
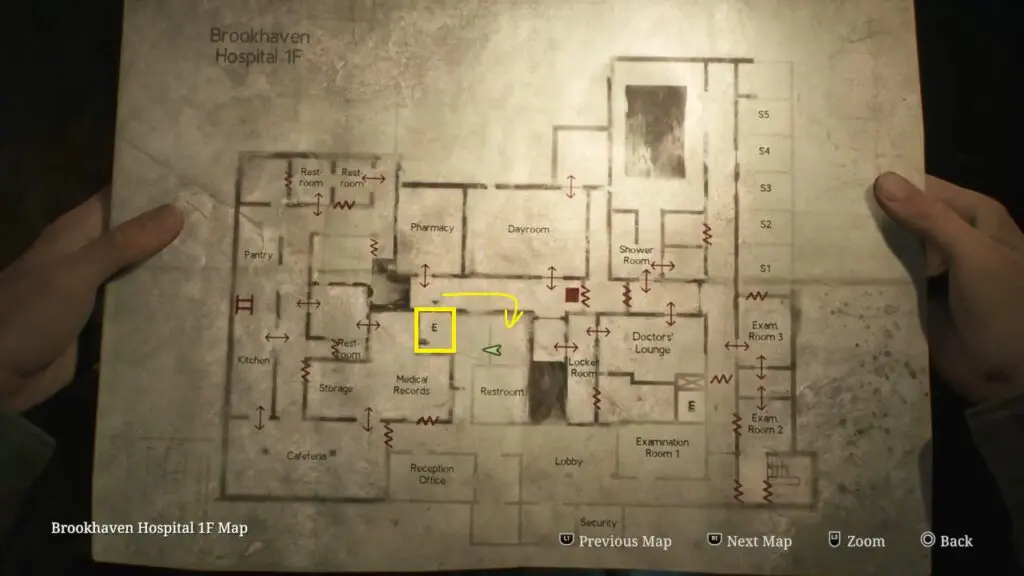
Next, use the elevator to reach the 2F floor and head to the Chained Box Room, as shown in the image below.
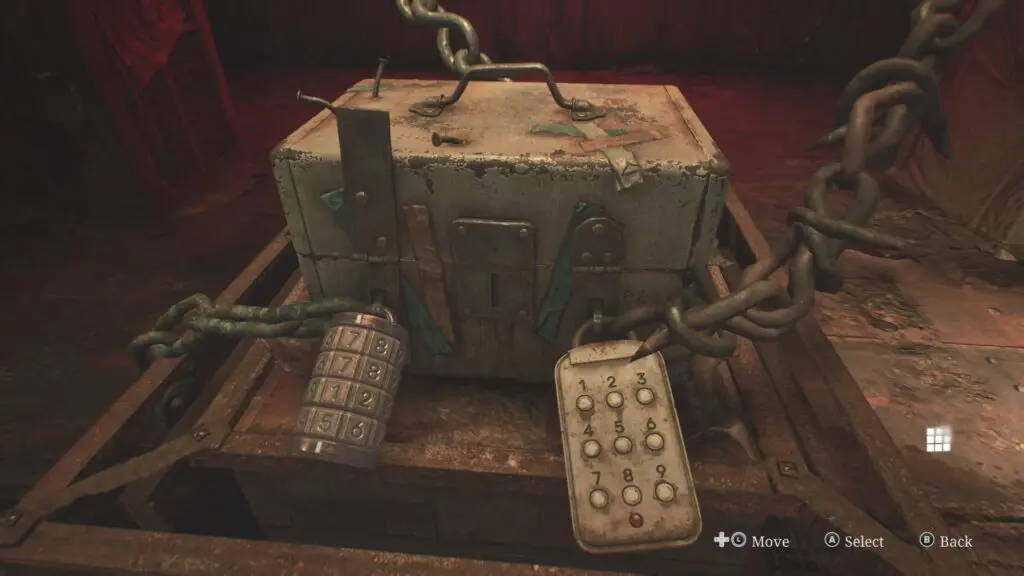
In this room, you will find a Chained Box. To unlock this box you need to remove three chains.
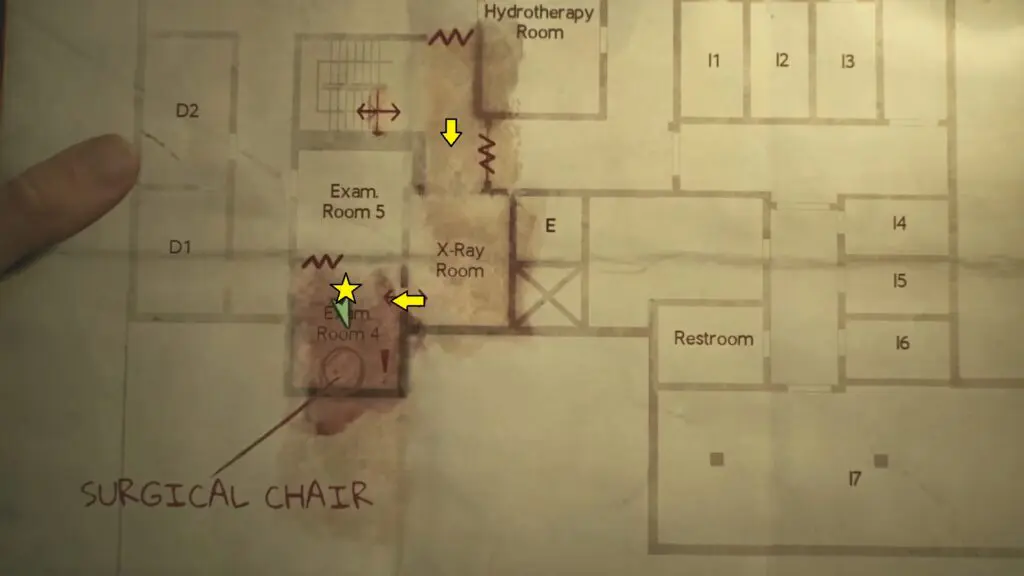
1) Go to the Surgical Chair (Exam Room 4)
Starting at the Chained Box, head west (to your left) and follow the linear path until you arrive at the staircase. Proceed upstairs (3F) to continue your journey.
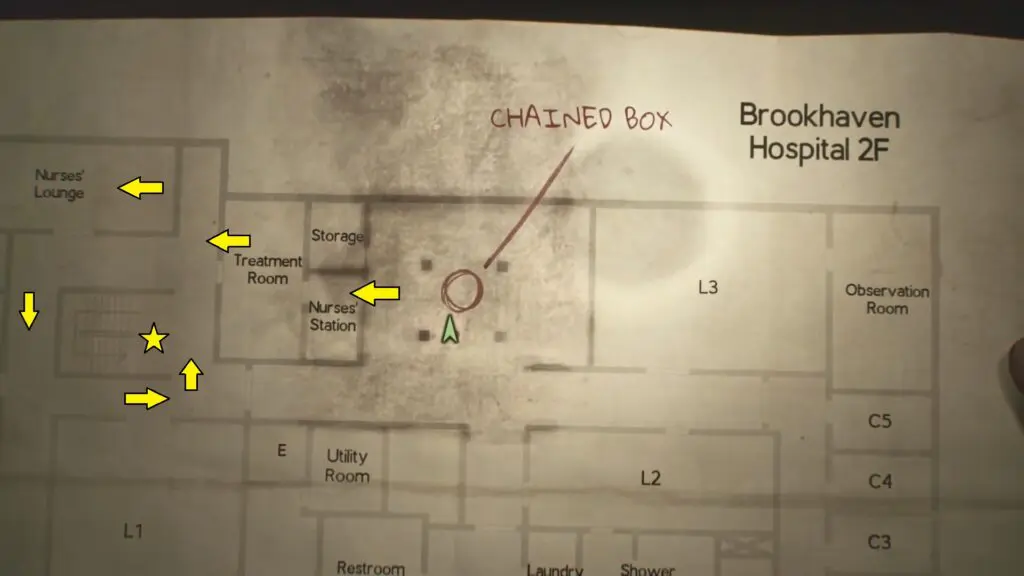
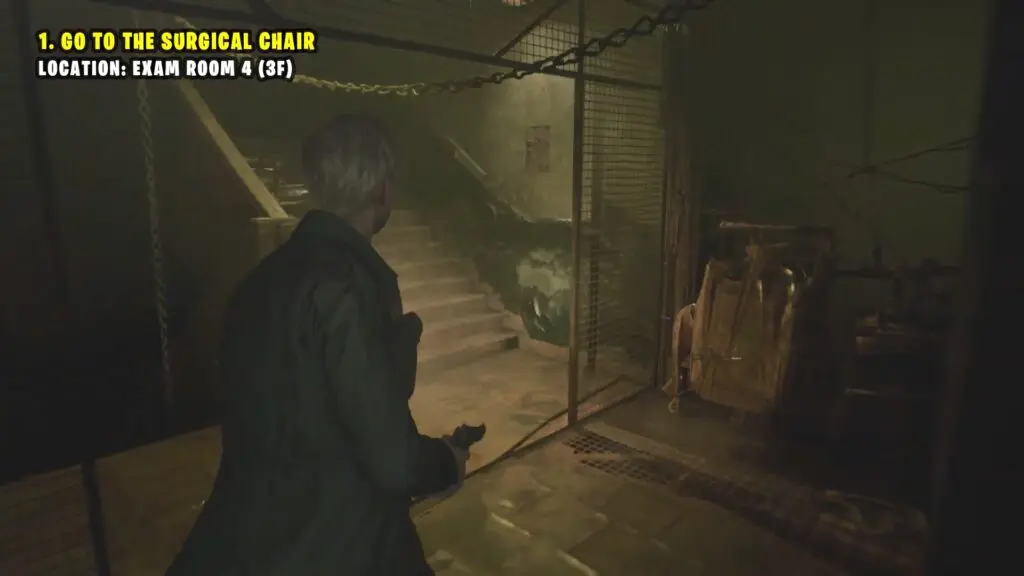
In the 3F level, proceed to your right to reach Exam Room 4.
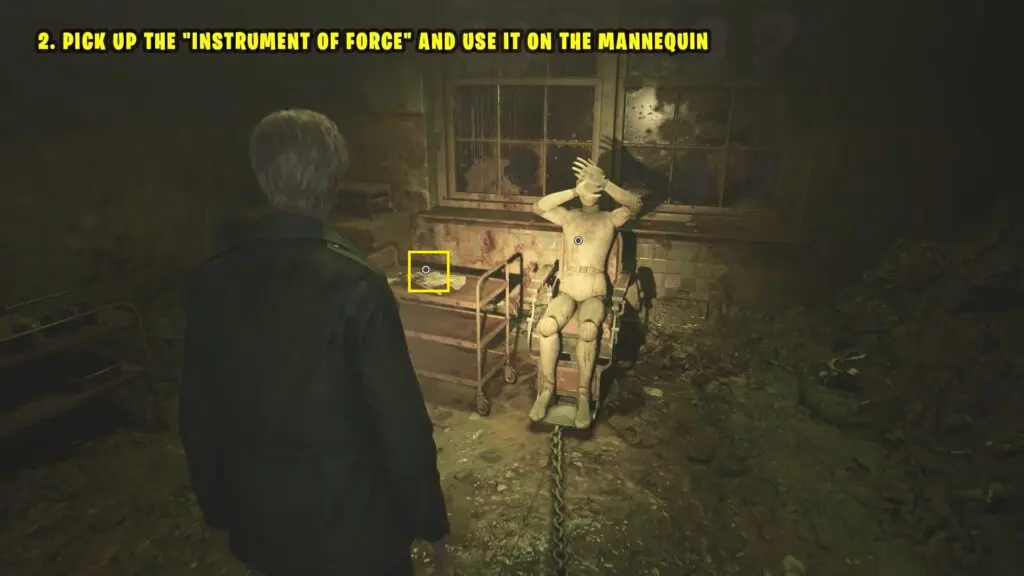
2) Pick up the Instrument of Force and use it on the Mannequin
Pick up the Instrument of Force from the tray table and use it on the Mannequin.
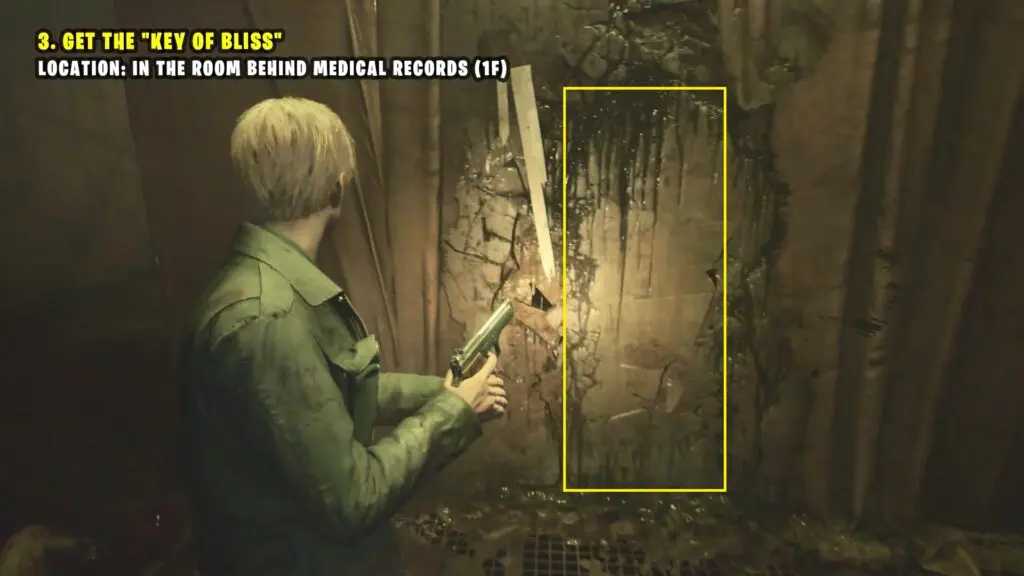
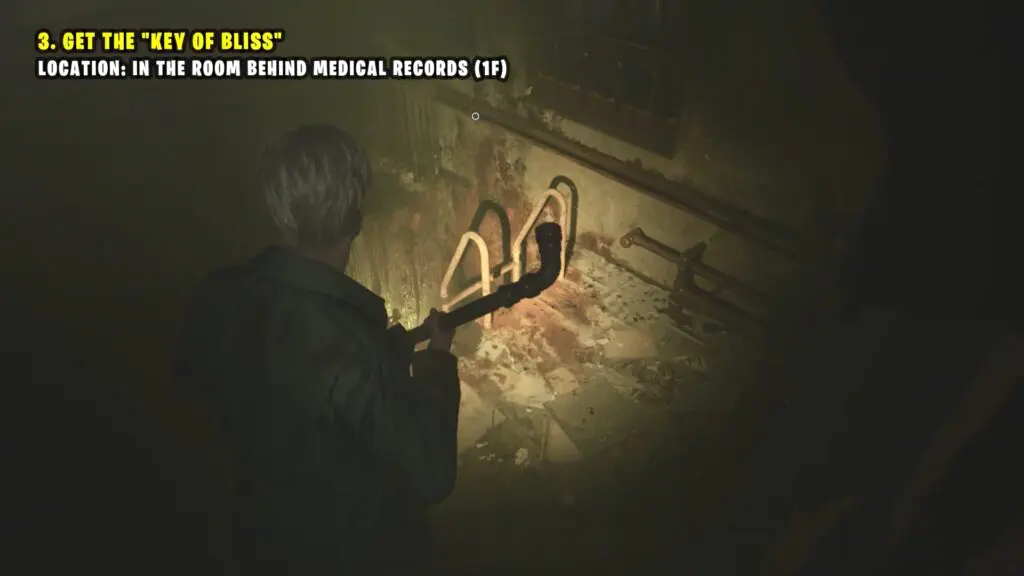
3) Get the Key of Bliss
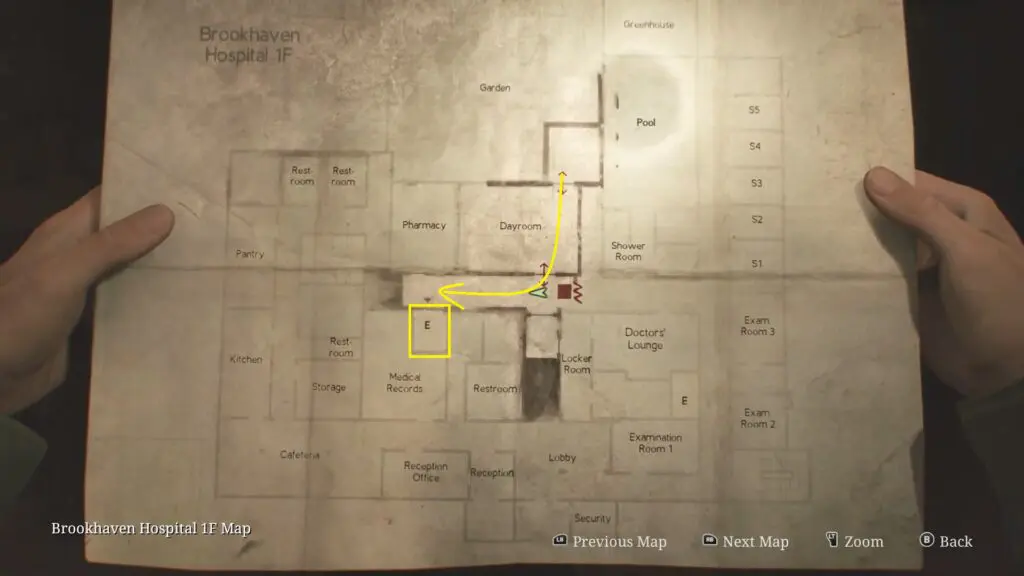
The player’s next objective is to reach the 1F level and obtain the Key of Bliss. Climb over the low wall to access Exam Room 4 and head north. Follow the path shown on the map.
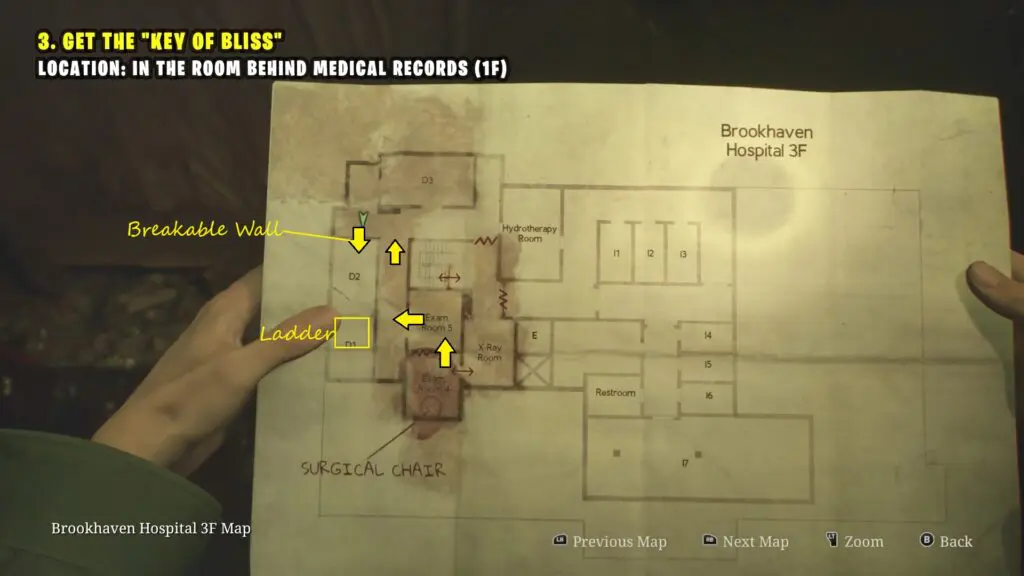
Break through the wall to enter Room D2, then descend the ladder to reach the 1F level.
Go through the Kitchen, then the Cafeteria, and pass through the broken wall section near the Restroom.
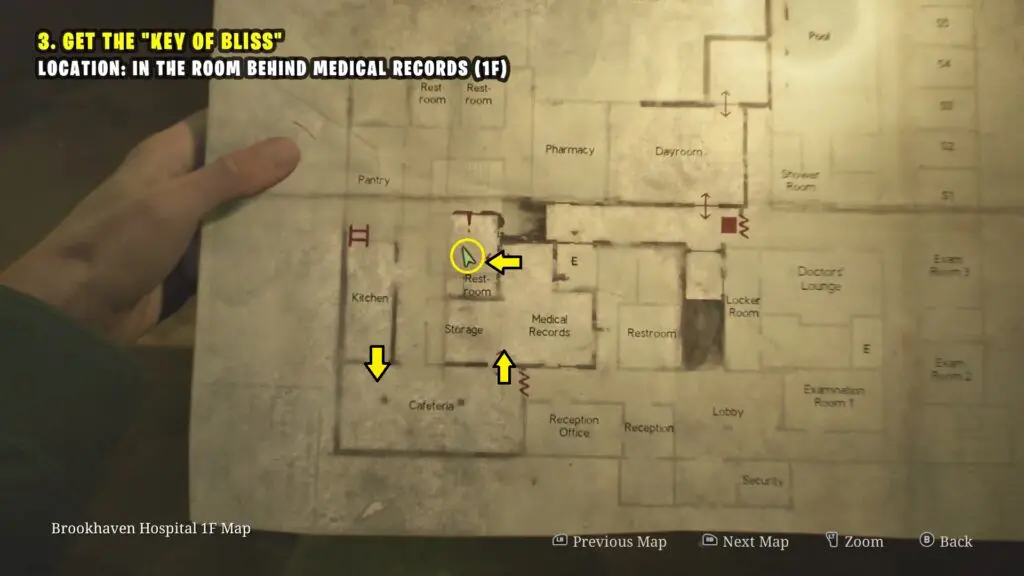
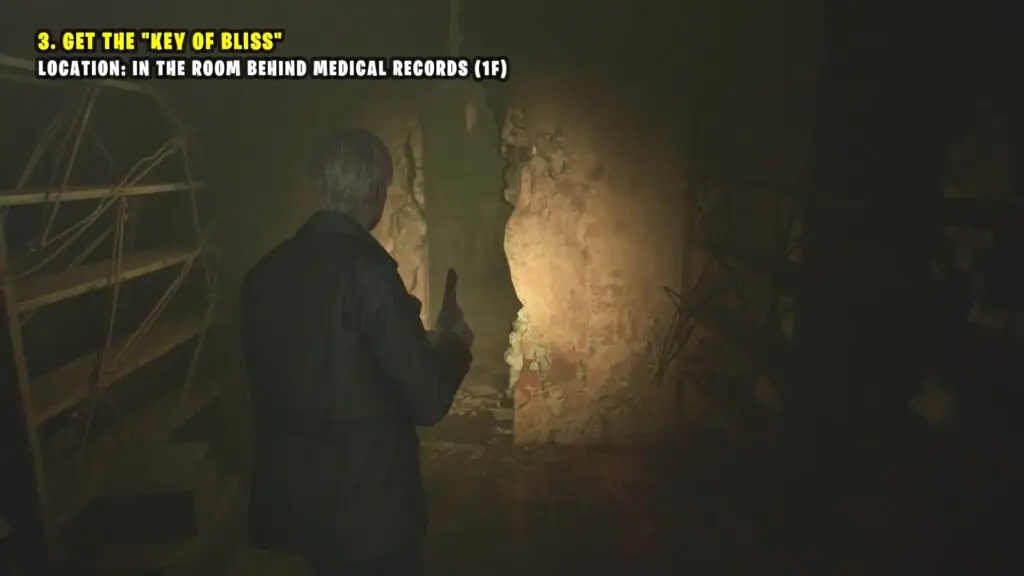
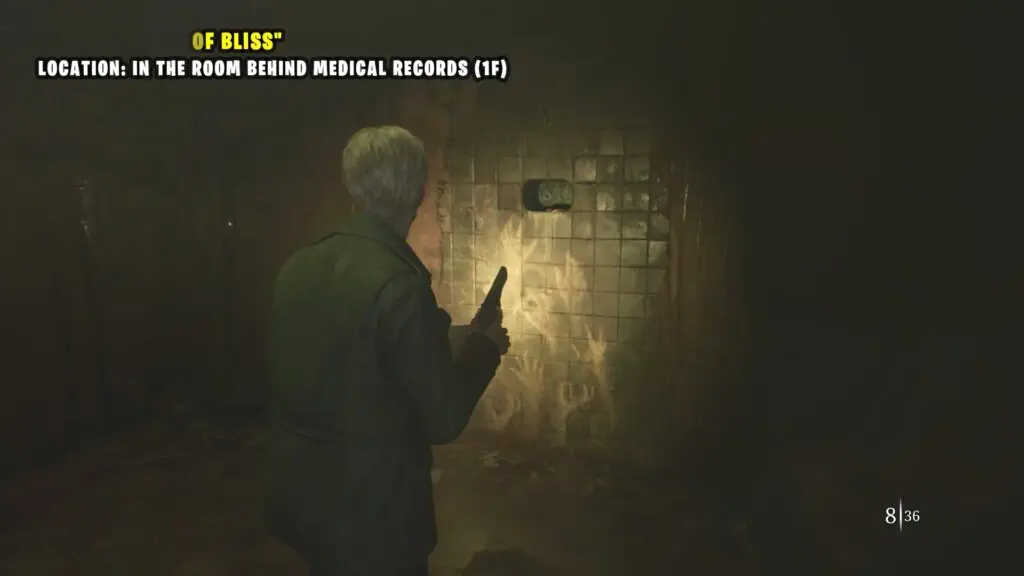
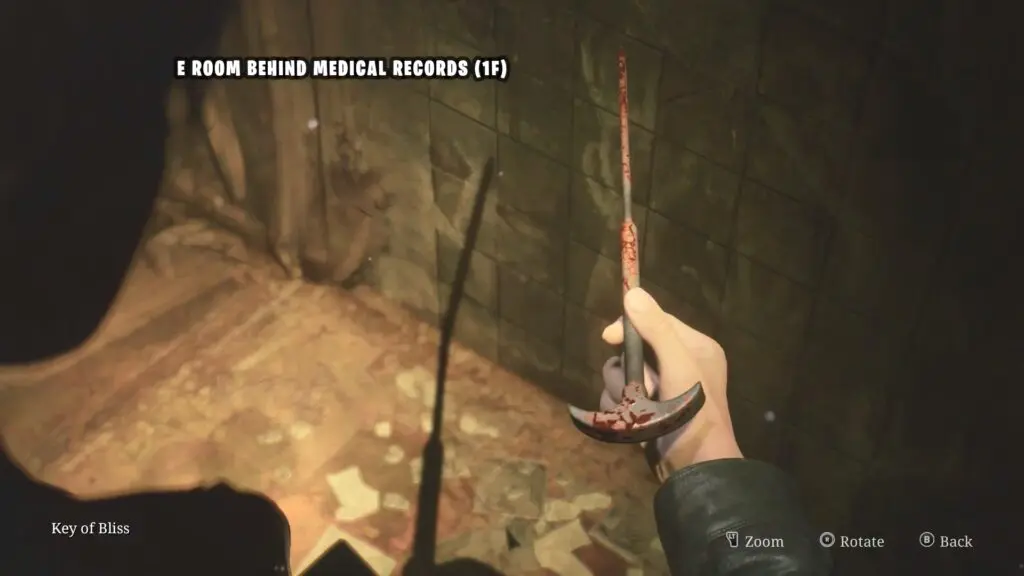
Once inside the room, interact with the wall opening to obtain the “Key of Bliss“
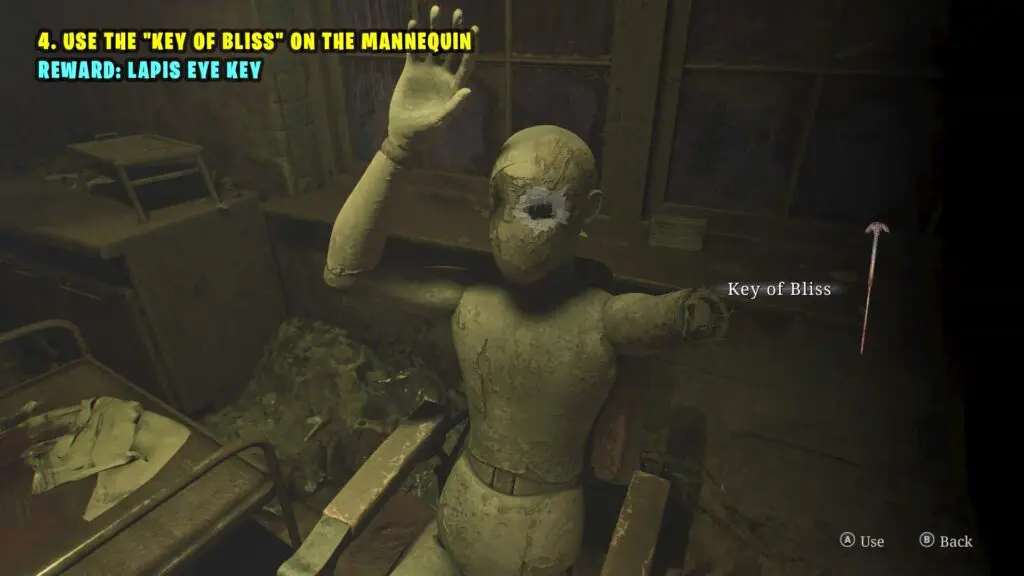
4) Use the Key of Bliss on the Mannequin to get the Lapis Eye Key
After obtaining the Key of Bliss, leave the room through the door and climb the ladder to reach the 2F level. (Alternatively, you can backtrack to the ladder’s location).
Go back to the Mannequin and use the Key of Bliss on it to get the Lapis Eye Key.
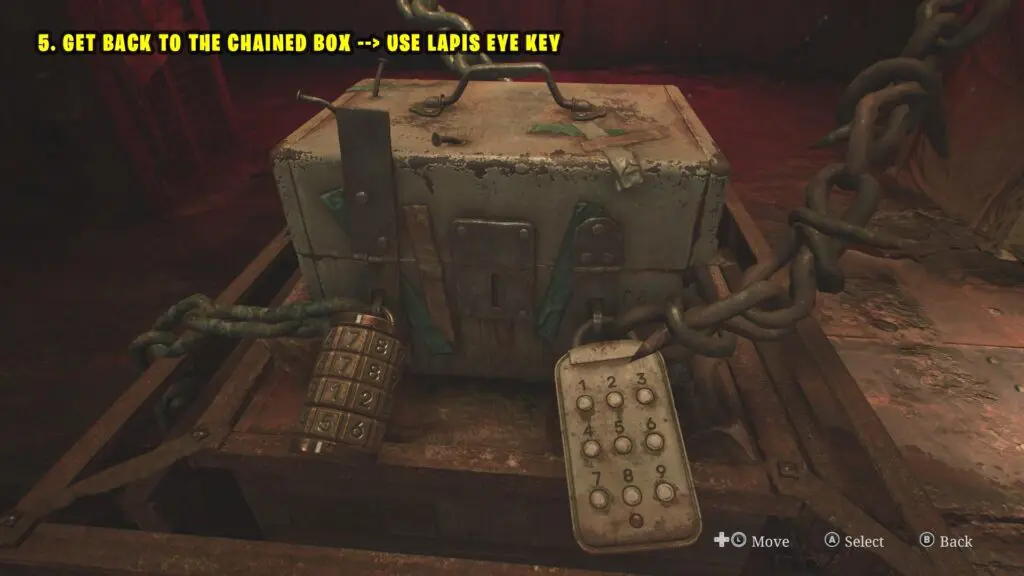
5) Use Lapis Eye Key on the Chained Box
Return to the Chained Box and use the Lapis Eye Key on the Chained Box to break the first chain.
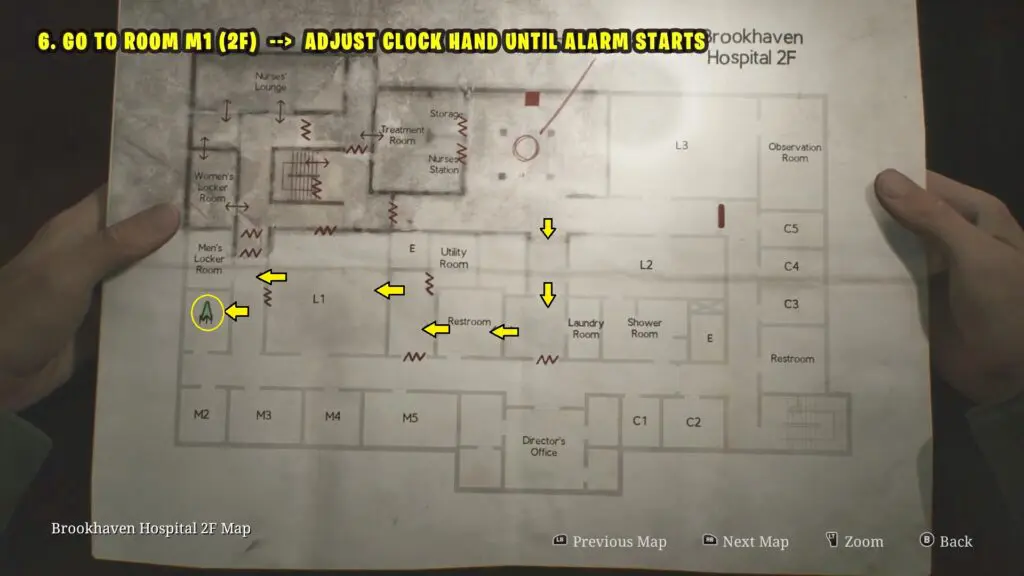
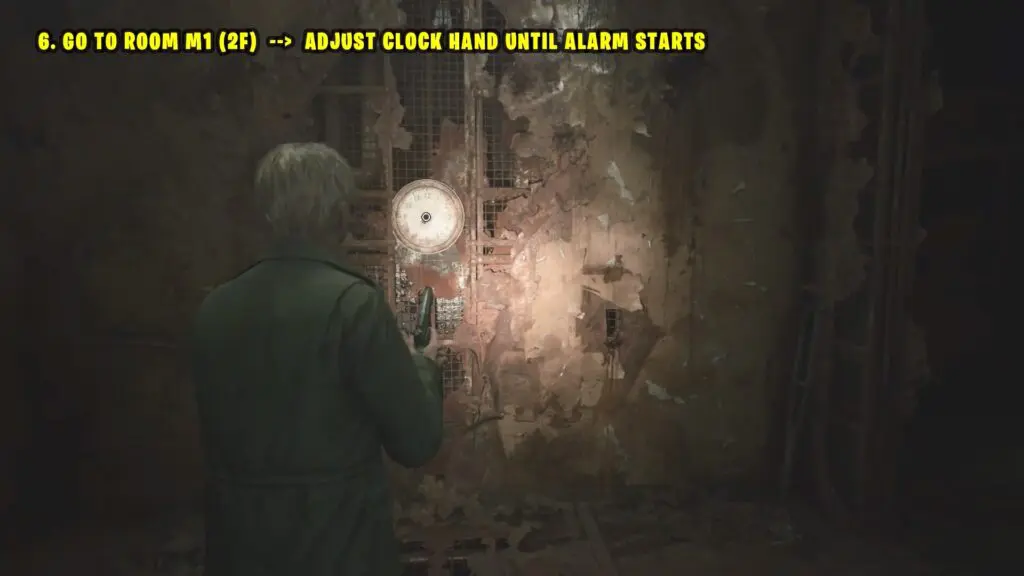
6) Go to room M1 and Adjust the Clock to start the Alarm
Next, go to Room M1 on the same floor and adjust the clock until the alarm starts.
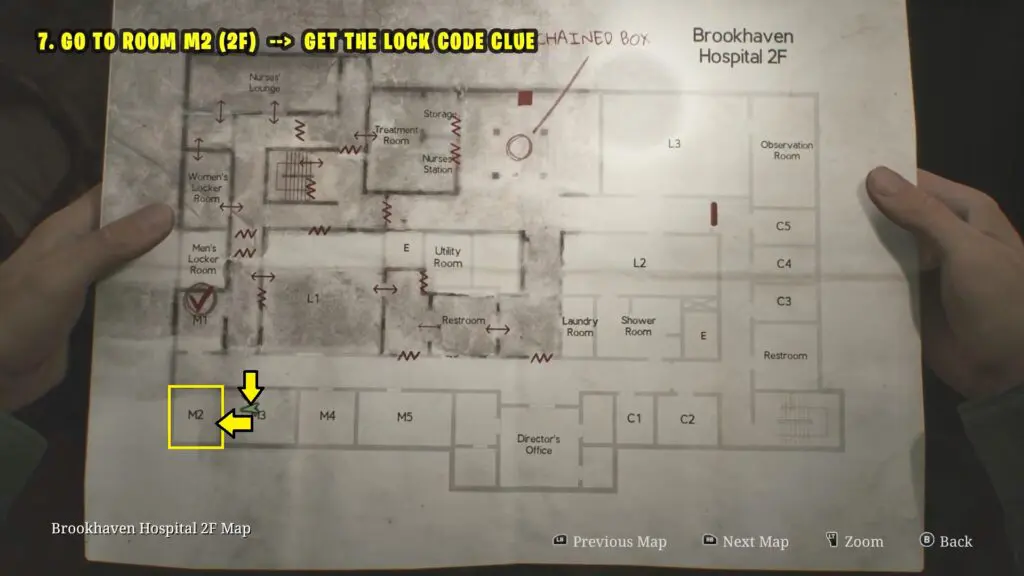
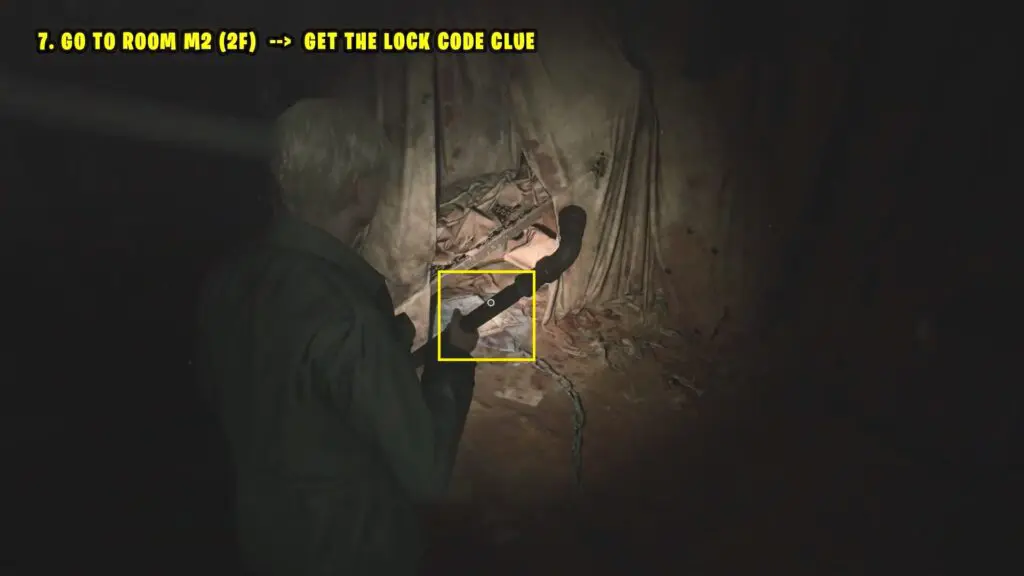
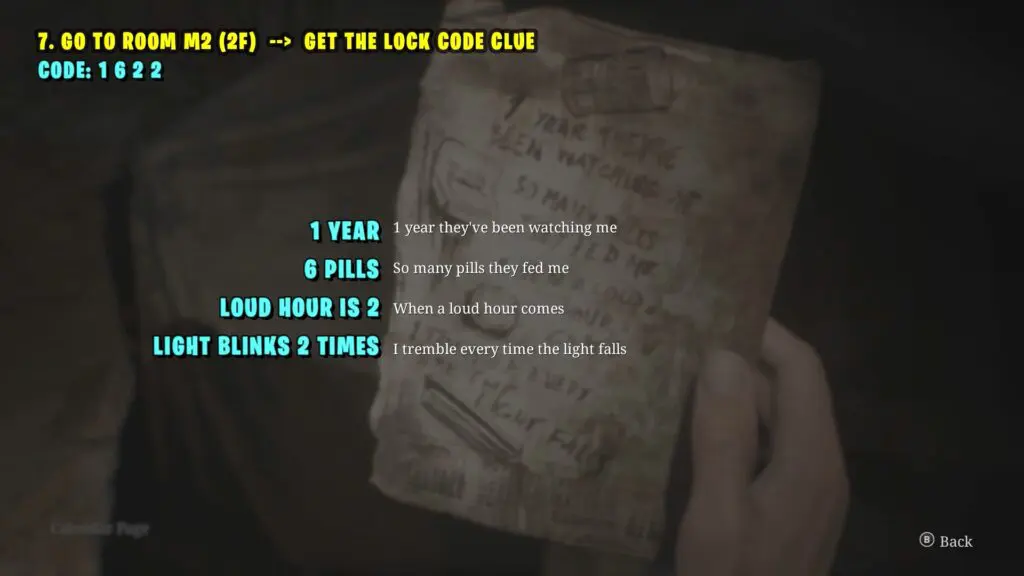
7) Go to Room M2 – Get the Lock Code Clue
Next, go to room M2 to get the Lock code.
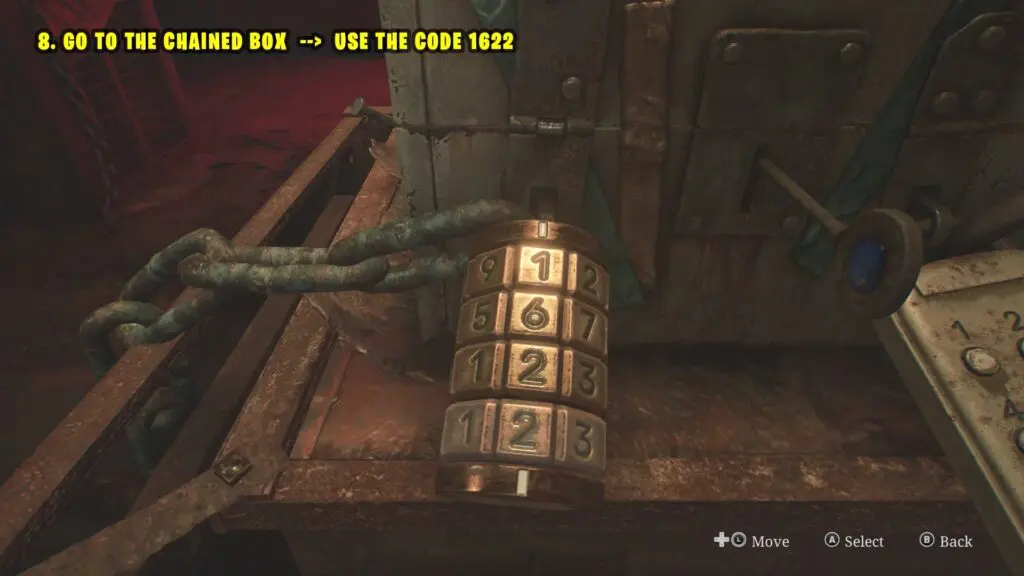
8) Use Code 1622 on the Chained Box
Finally, return to the Chained Box and enter the code 1622 to unlock the second Lock.
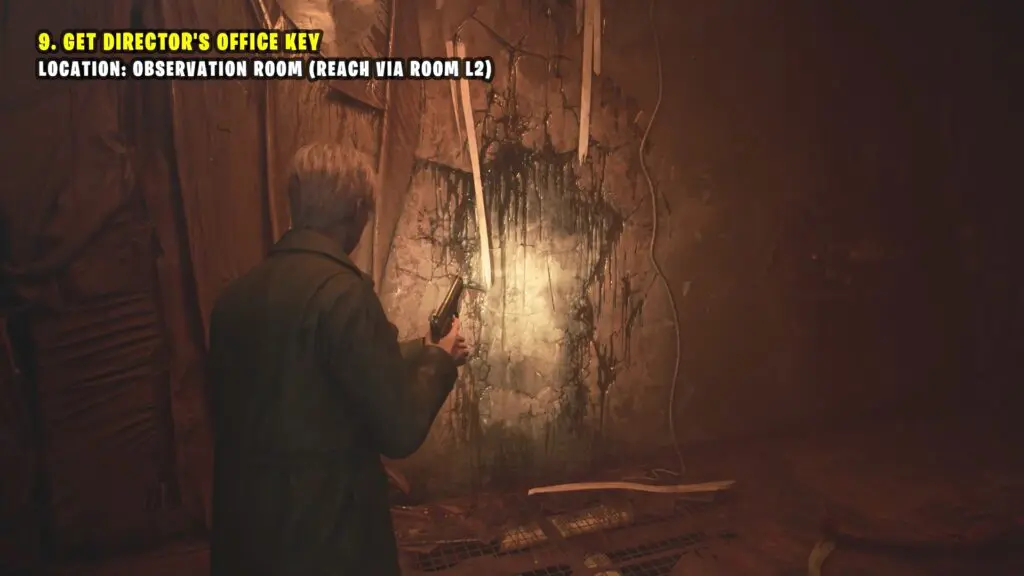
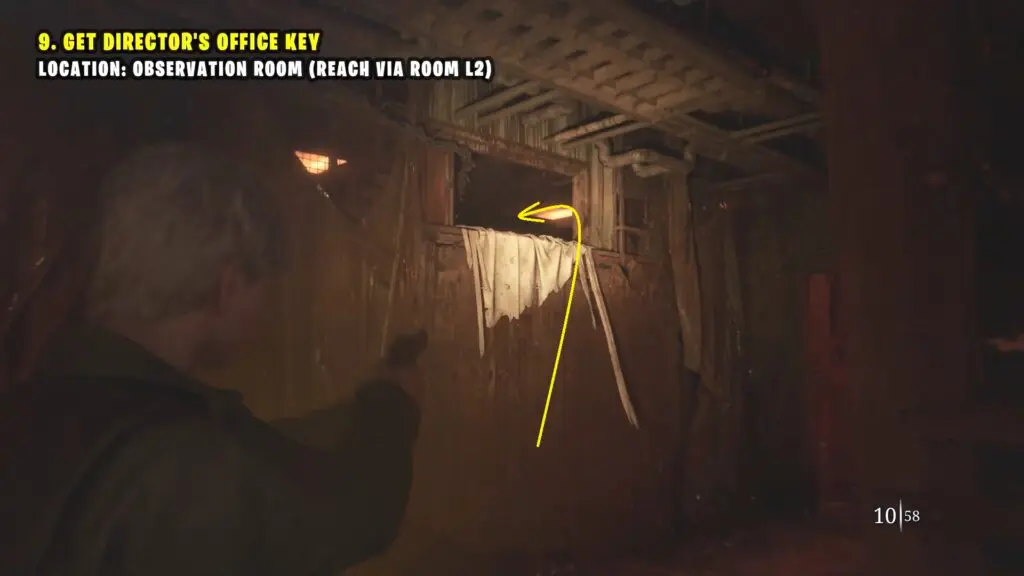
9) Get Director’s Office Key
The next objective is to obtain the Director’s Office Key from the Observation Room. To access the Observation Room, the player can retrieve a climbable box from Room L2.
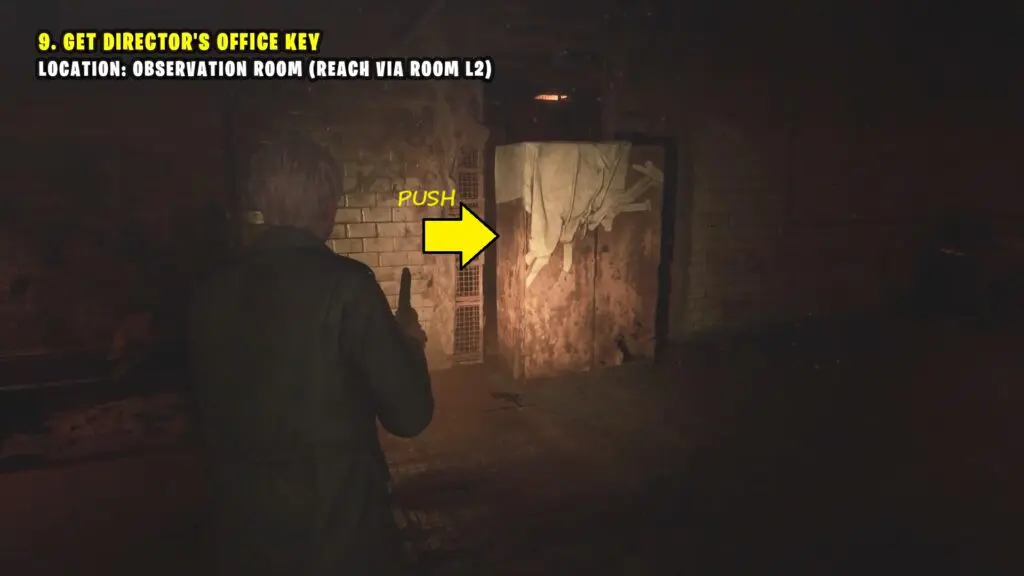
Follow the path shown on the map below to enter the Laundry room by breaking the Wall.Enter the L2 Room.

In the L2 Room, move the wardrobe that is blocking the hallway access.
Move the box from the corner of the L2 Room and position it beneath the vent in the hallway, then climb up to access the L3 Room. Refer to below image and map.
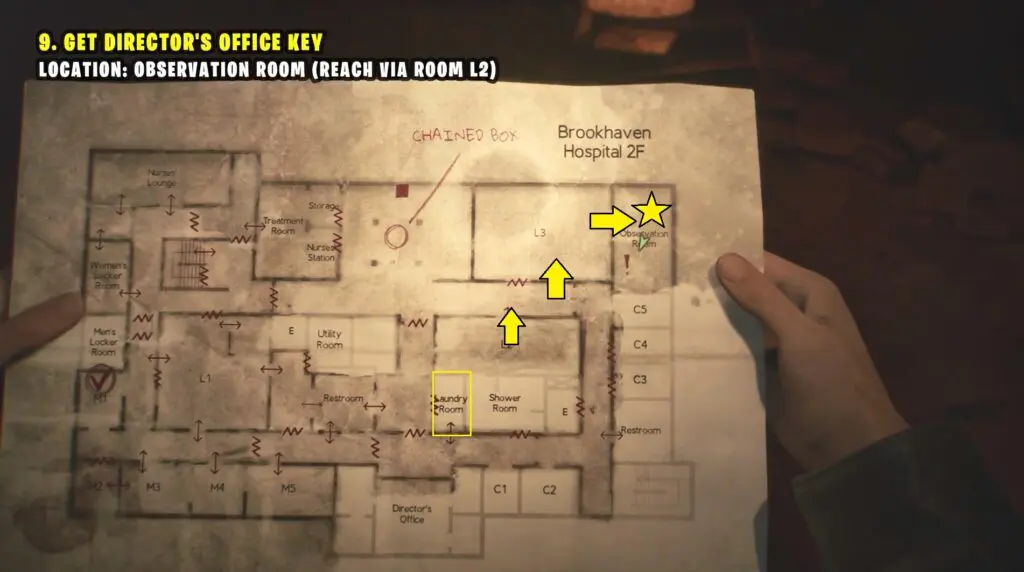
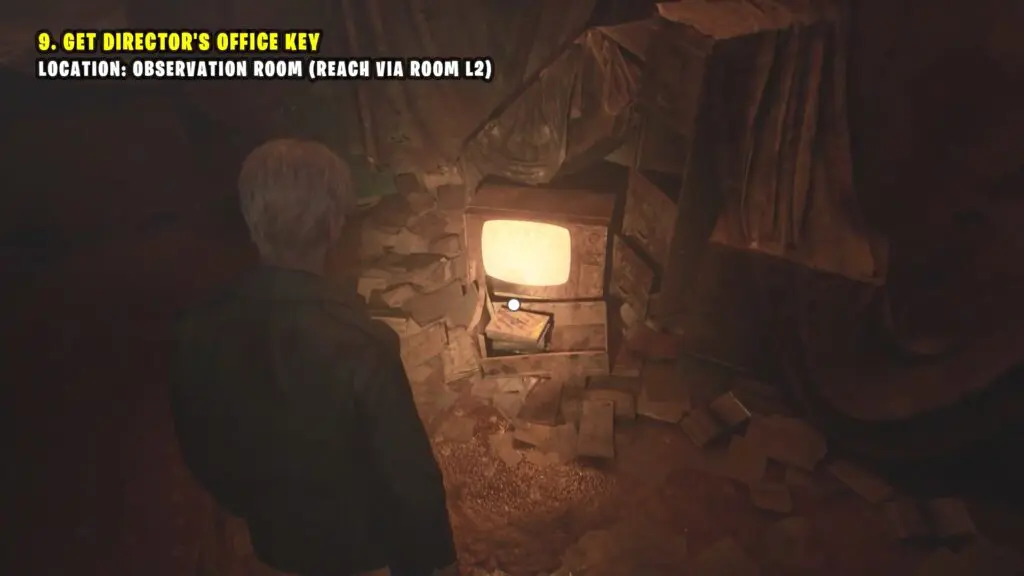
Enter the L3 room to access the Observation room.
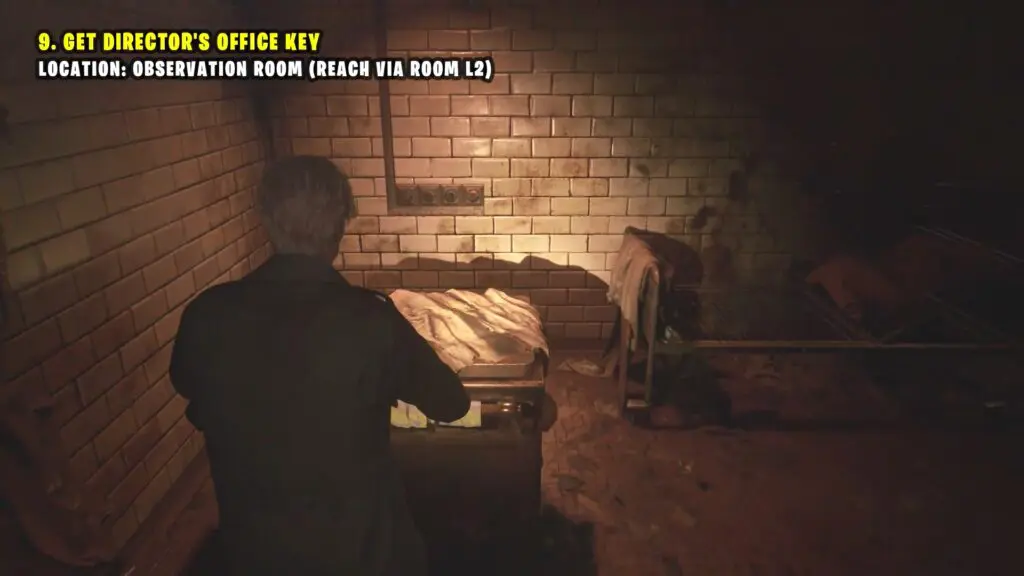
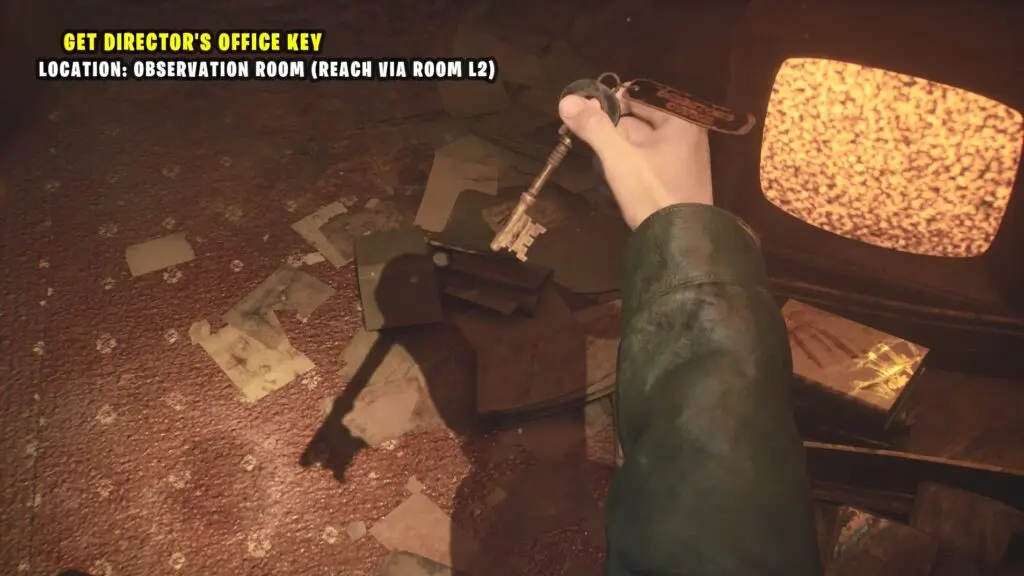
Collect the Director’s Office Key located in front of the TV.
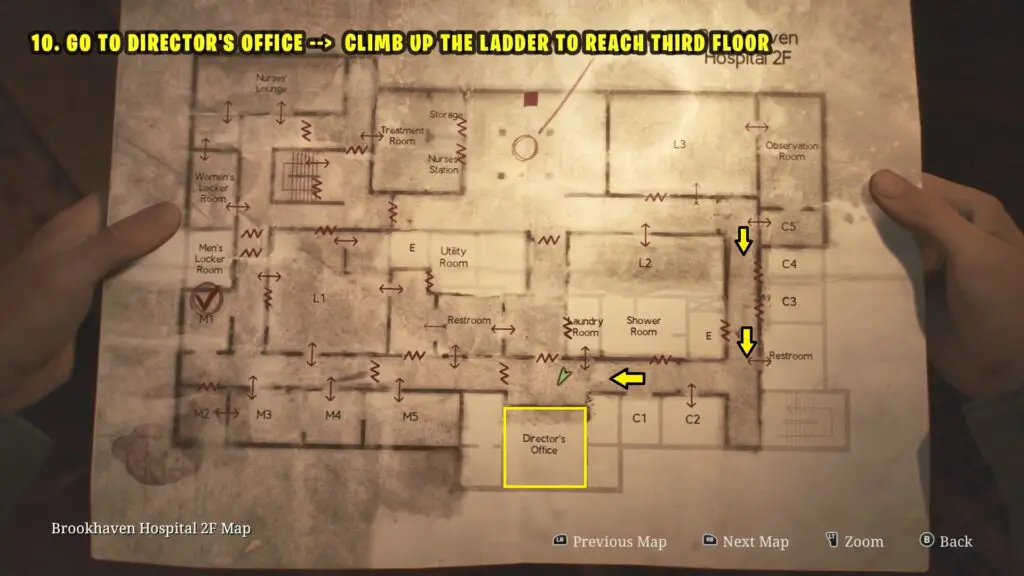
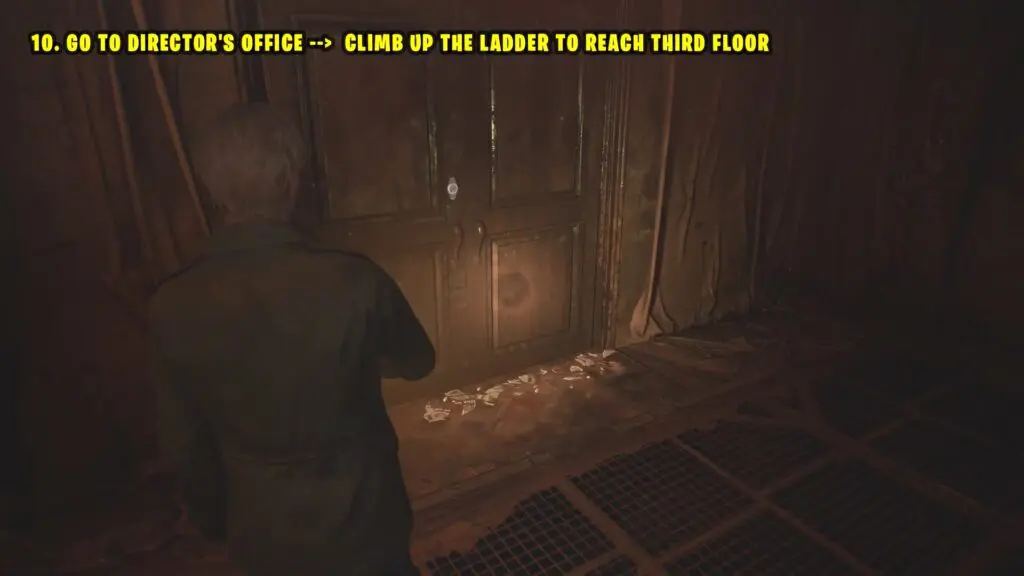
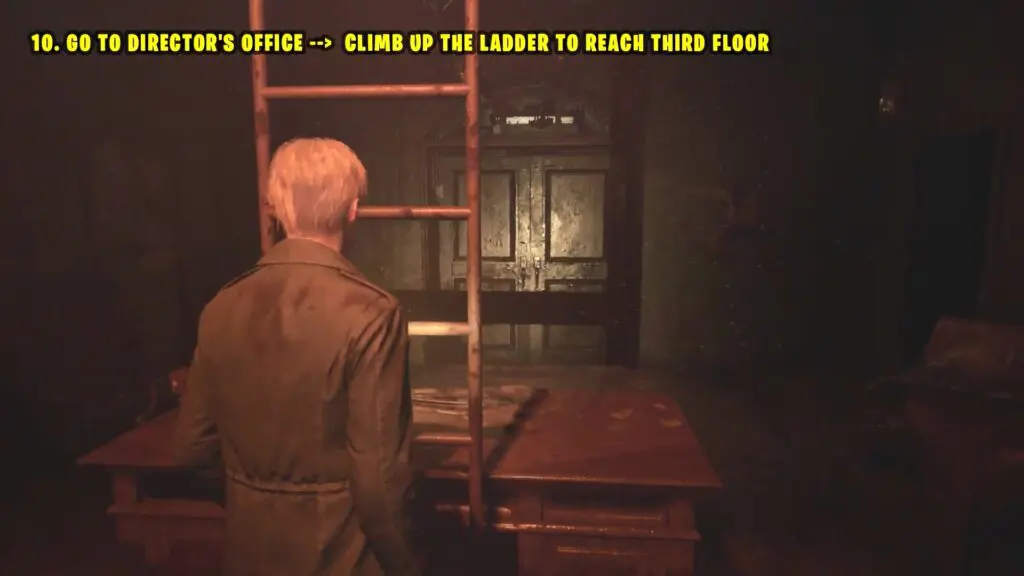
10) Go to the Director’s Office: Use Ladder to read 3F
Use the Director’s Office Key to enter the Office and climb up the ladder to reach the 3F level.
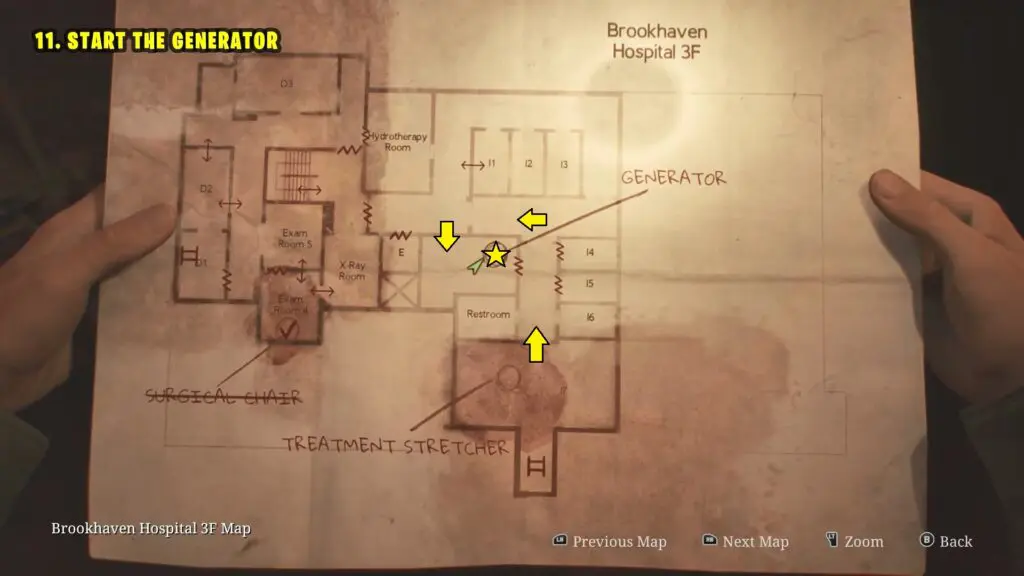
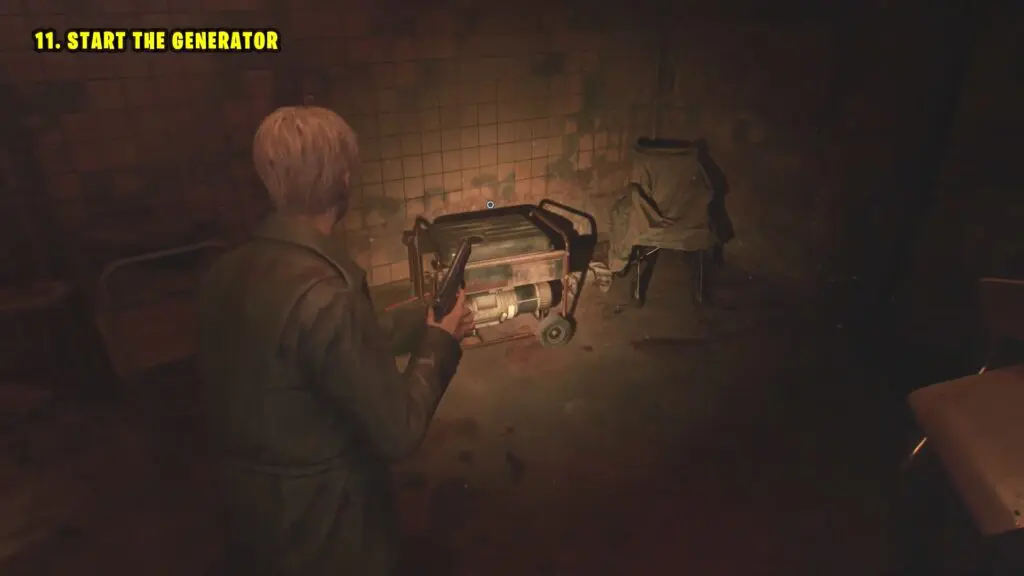
11) Start the generator
On the 3F level, you will find a Treatment Stretcher, but it requires power to operate.
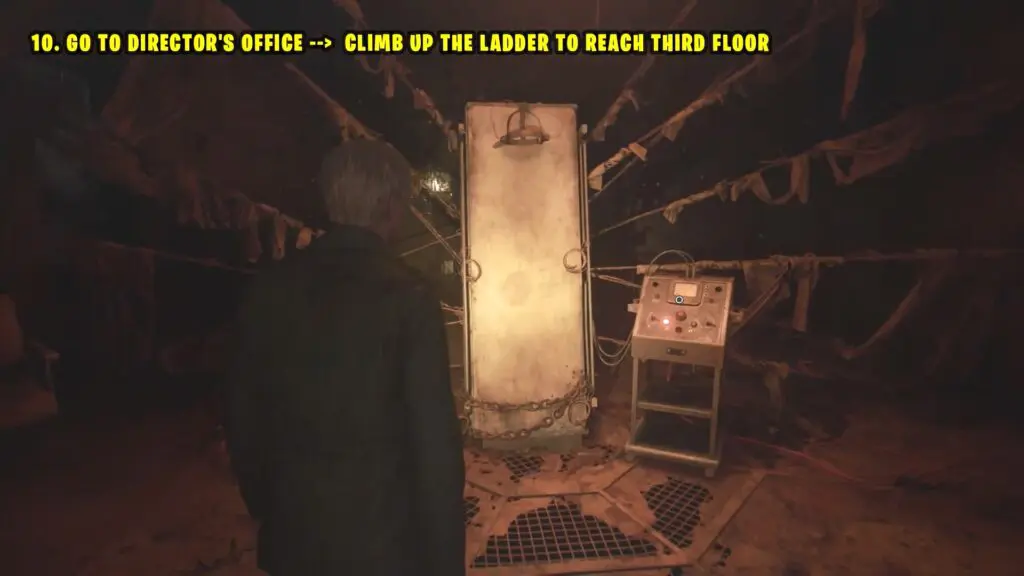
Next, access the room near the elevator by going through the cracked wall. Inside the room start the generator.
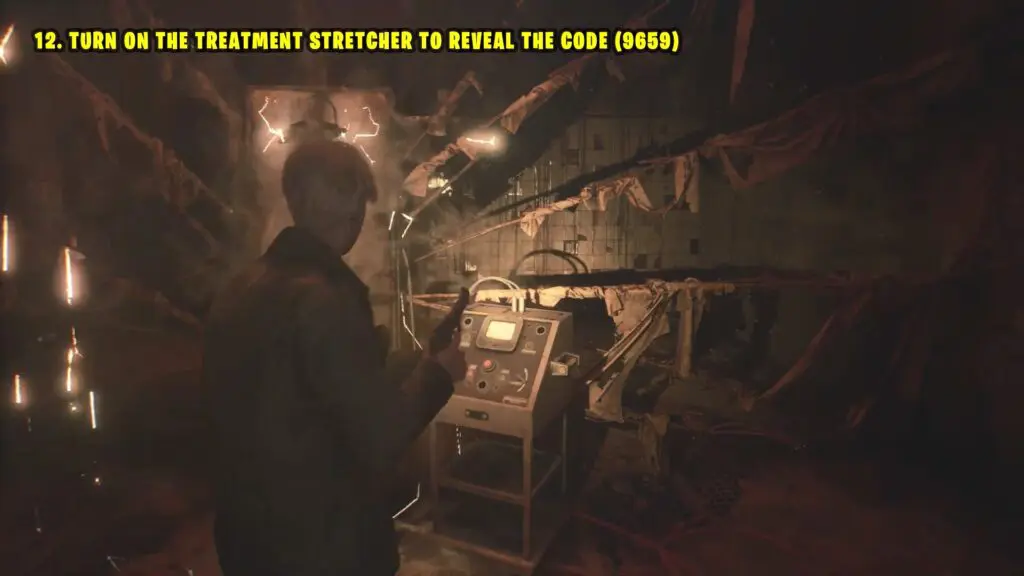
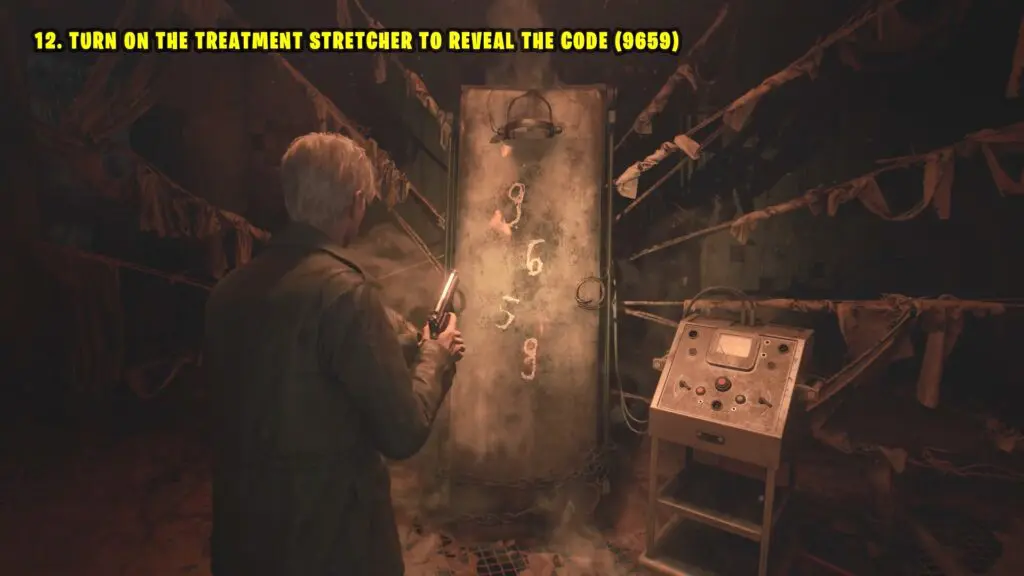
12) Turn on the Treatment Stretcher To Reveal the Code 9659
Return to the Treatment Stretcher and activate the machine to reveal the code.
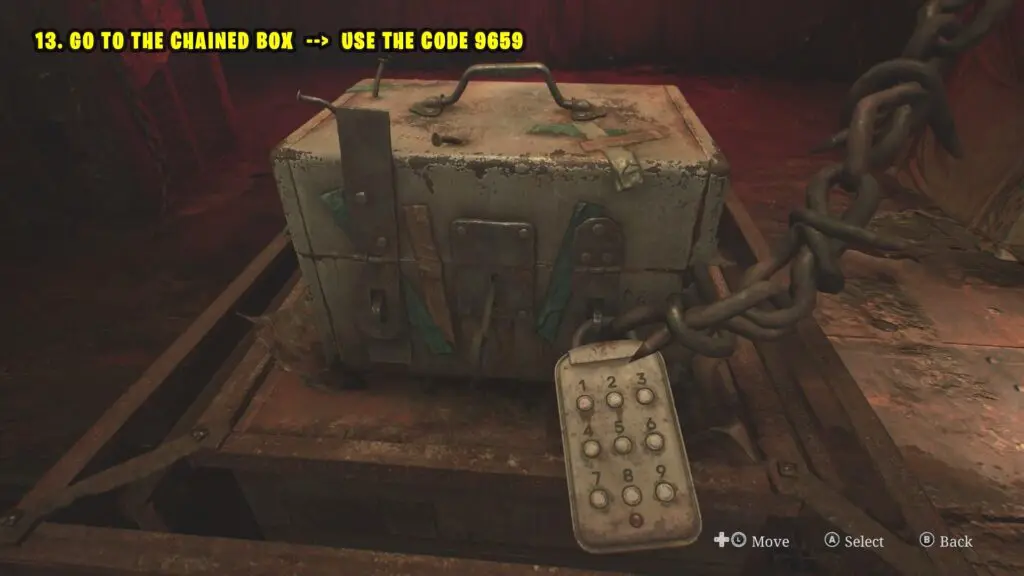
13) Go to Chained Box – Use Code 9659
Finally, go back to the Chained Box and enter the code 9659 to unlock the last lock. Open the Box to collect coin -1.
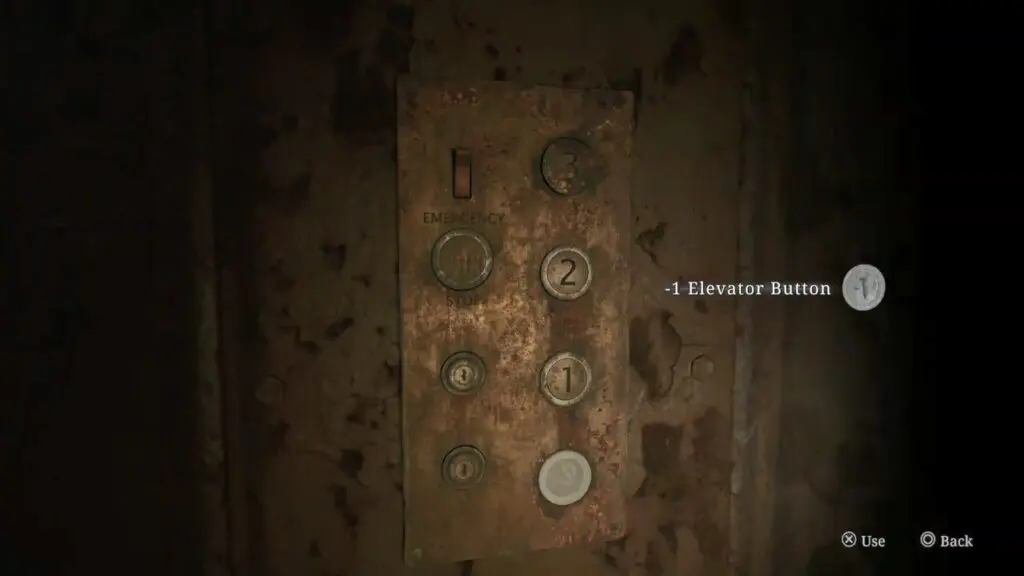
14) Use the Elevator to reach the Basement
At this time ‘Lady of the Door’ chapter begins. Enter the elevator. Press -1 to go down to the basement.
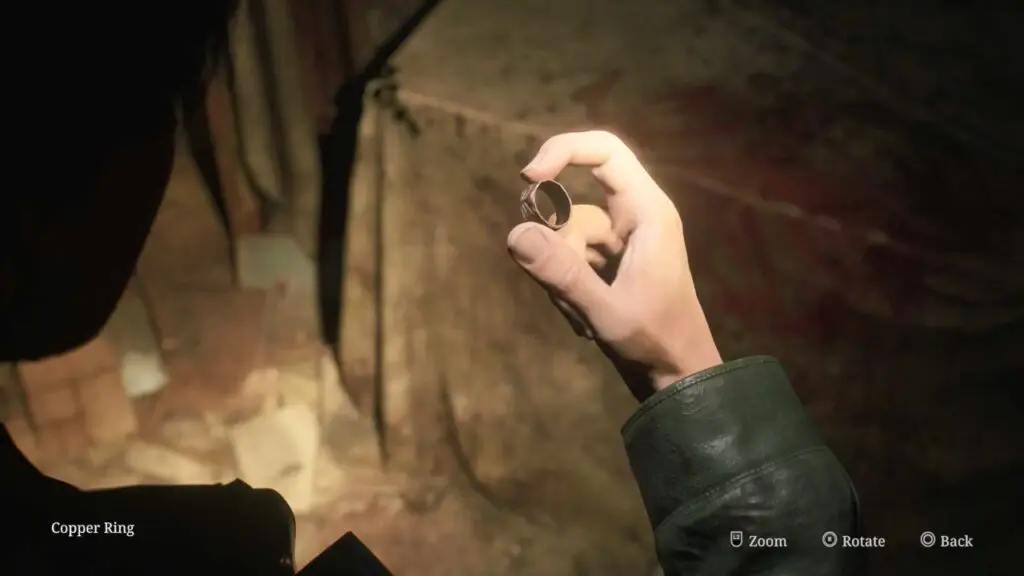
15) Get the Copper Ring
Once in the basement, go left and then turn right to enter the 02 Maintenance Room. Pass through the broken wall in the southeast corner to reach the 03 Generator Room. Refer to the below image.
Leave the 03 Generator Room and enter the only available room on the right side of the hallway, labeled 05 Laundry Storage.

From the 05 Laundry Room, proceed to the 08 Laundry Room and exit into the corridor. Head south and enter the 010 Boiler Room through the cracked wall on the southern side. Refer to the image below.
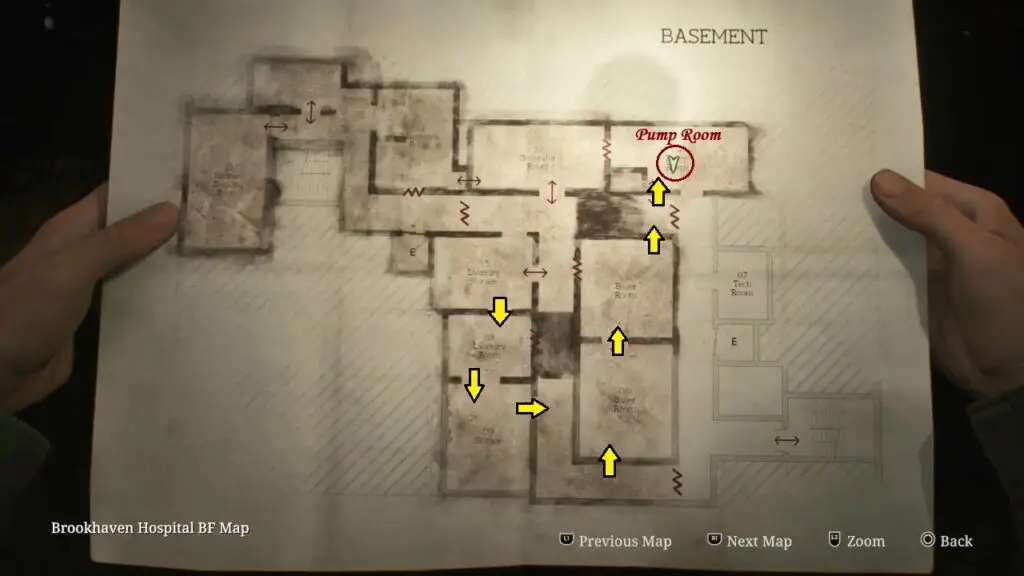
Defeat the enemy, then head to the 010 Boiler Room. Climb through the vent on the northern wall to reach the 04 Pump Room.
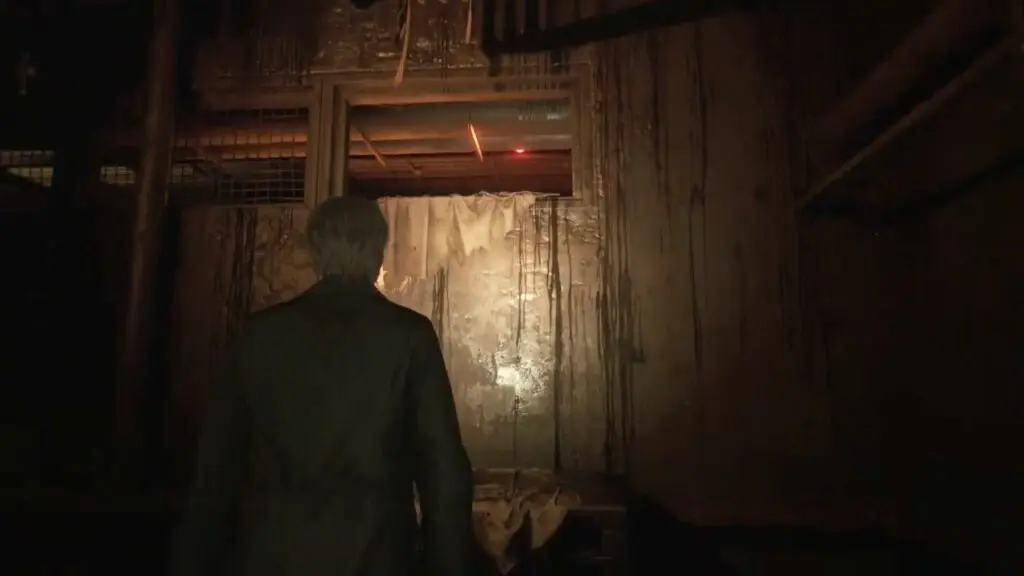
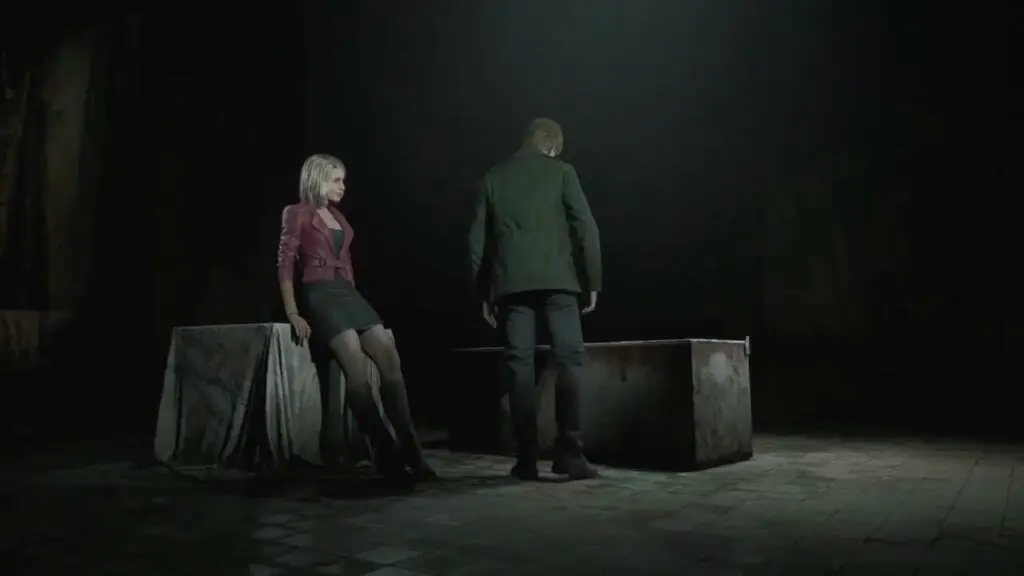
Inside, you’ll find a Copper Ring on a table near the north wall, and this is where you’ll reunite with Maria.

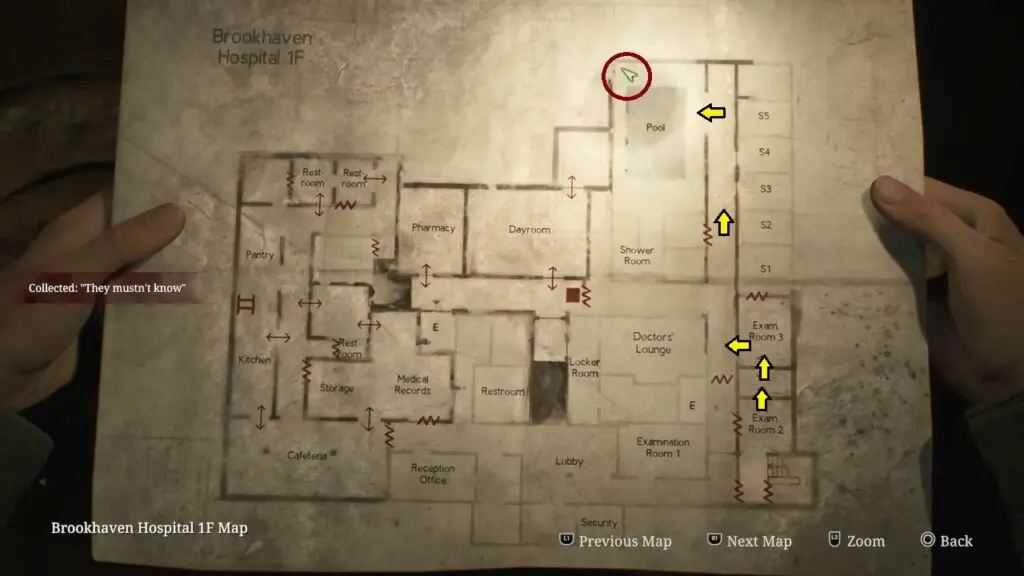
16) Get Lead Ring
Leave the Pump Room, follow the corridor to the stairs, and head up to reach the 1F level.

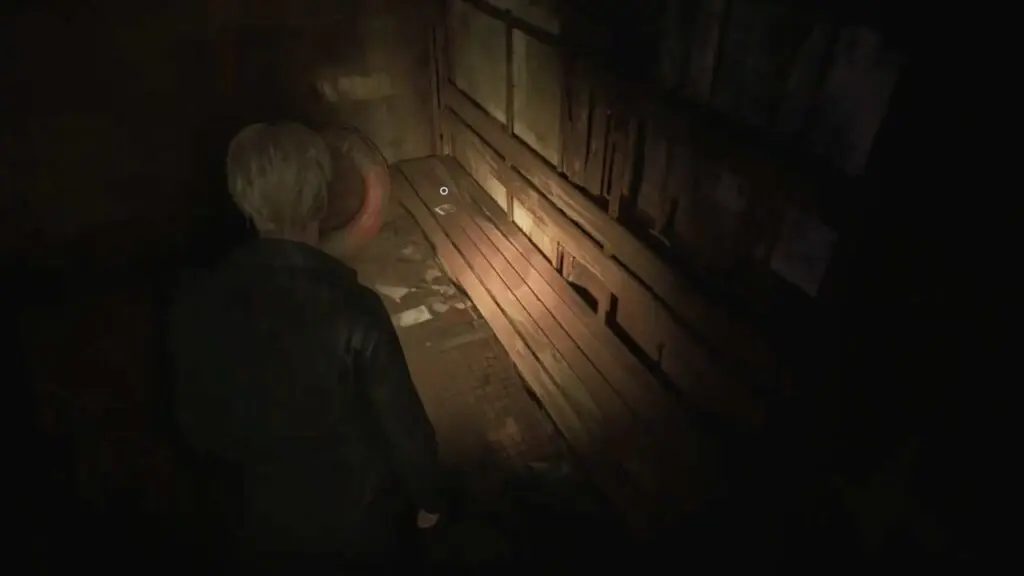
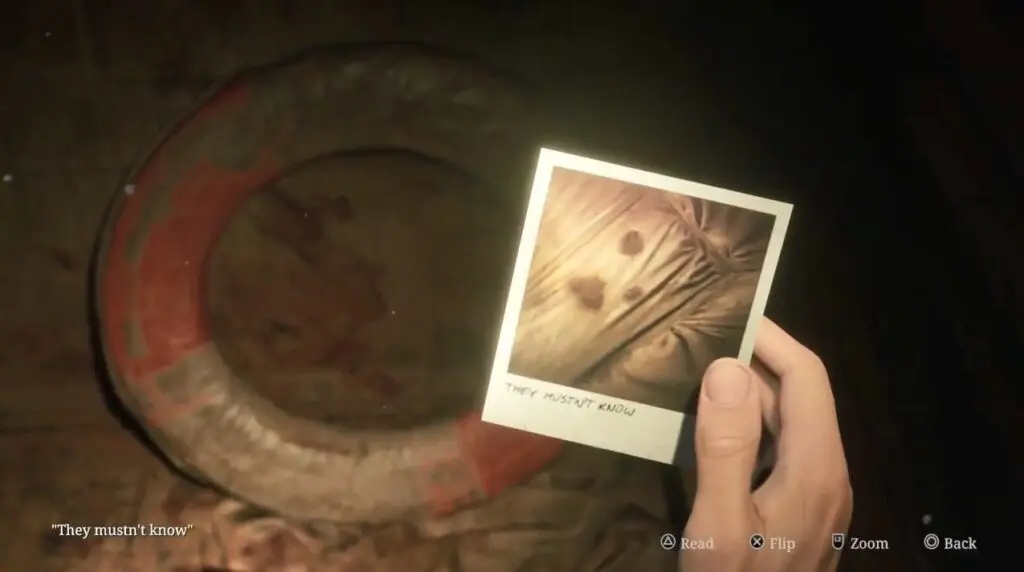
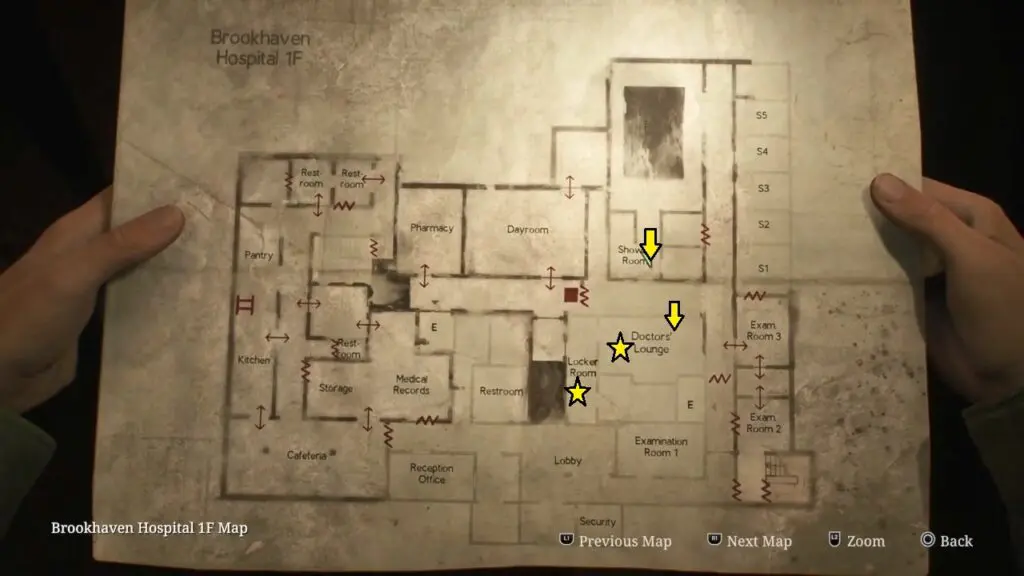
Follow the path shown in the image below. Collect Photo: ‘They mustn’t know’ is on a wooden bench in the pool area on the 1st floor.
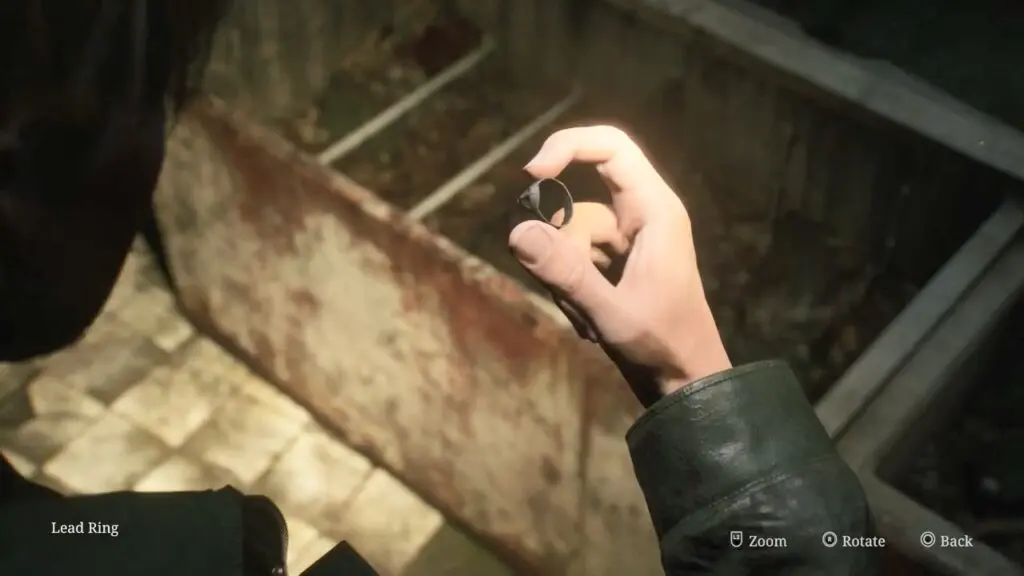
Head south to reach the Doctor’s Lounge. Open the large box with Maria’s help to find a Lead Ring.
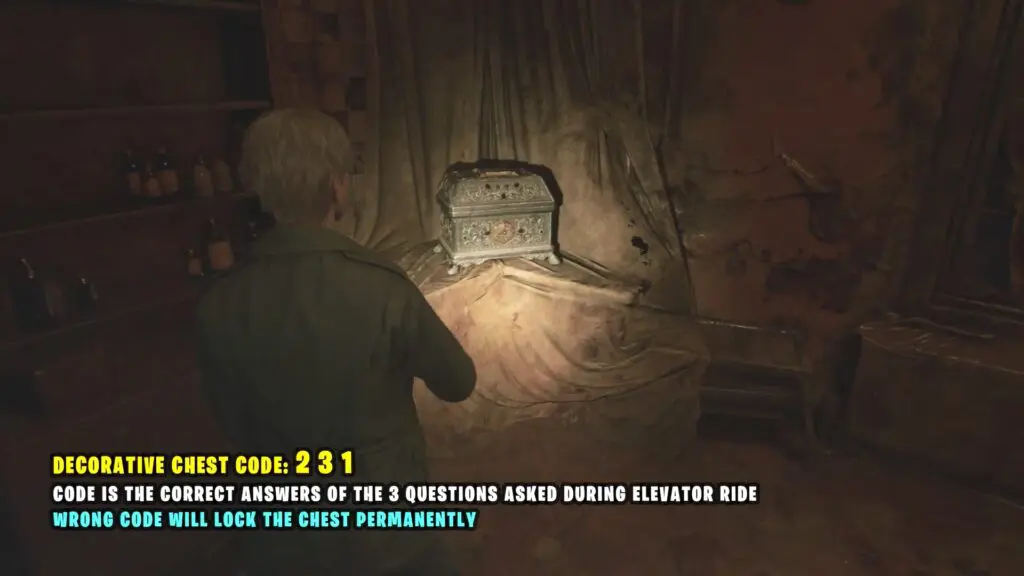
Decorative Chest
Next, go to the pharmacy and open the decorative chest with Code 231
Note: The correct code is the answer to the three questions asked during the elevator ride. If you enter the wrong code, the chest will be permanently locked.

17) Put both rings on the “Lady of the Door”
Head to the elevator. Select ‘2’ to go up to the 1F level.

Exit the elevator and interact with the statue by the door.
Insert the Lead and Copper Ring onto its finger to open the door.

Once inside, go downstairs and continue down the linear path along the red-lit corridor until a monster appears.
Begin running down the corridor with Maria until a cutscene triggers, in which the monster attacks Maria. After the cutscene, you will receive the Trophy: Alone again.
18) Take the Hospital Entrance Key and Exit the Hospital
Once you regain control of the game, follow the corridor to reach the Reception Office. Pick up the Hospital Entrance Key and Exit the Hospital near the security to end the chapter.