Silent Hill 2: Brookhaven Hospital Walkthrough
This guide shows the walkthrough of the Brookhaven Hospital in the Silent Hill 2 game, which was released on 6th October 2024. Click here for a video walkthrough.
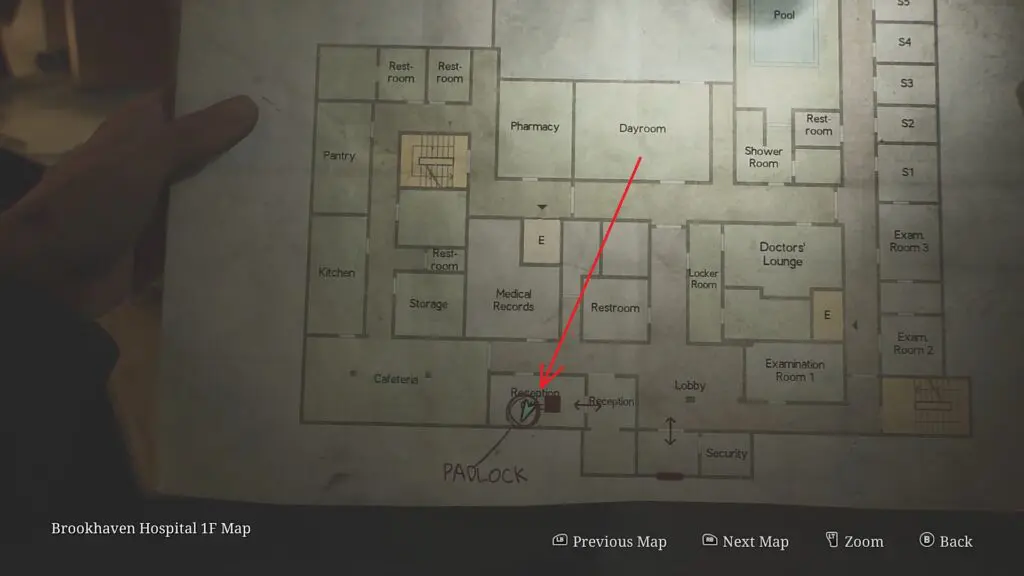
1) Open Padlock to get Basement Key
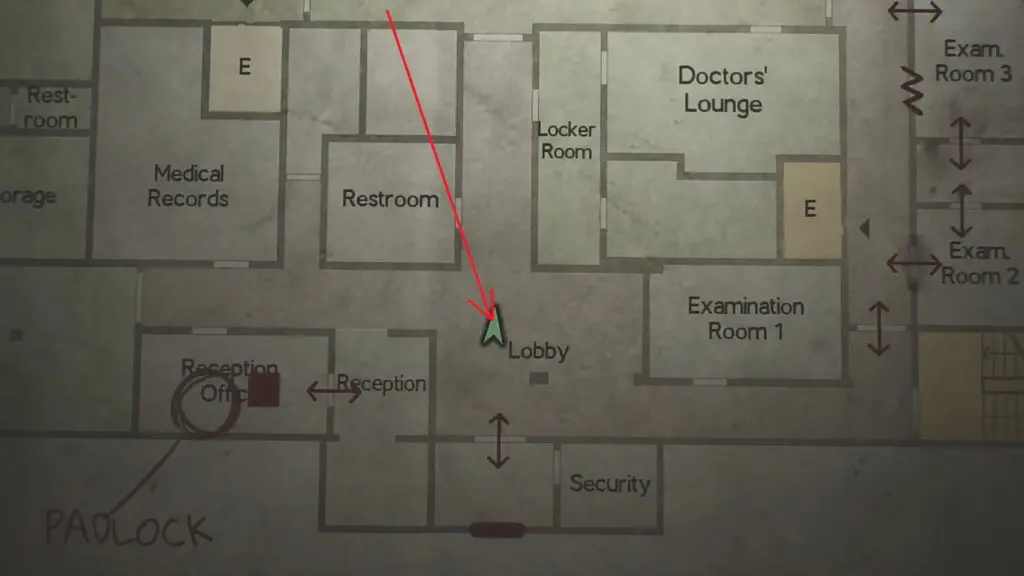
As the level starts, go straight into the lobby and collect the map from the board on the wall. Now make your way to the Reception Office at the location shown in the picture below. There you will see the Basement Key locked behind a Padlock. Your next objective will be to get the Padlock code.
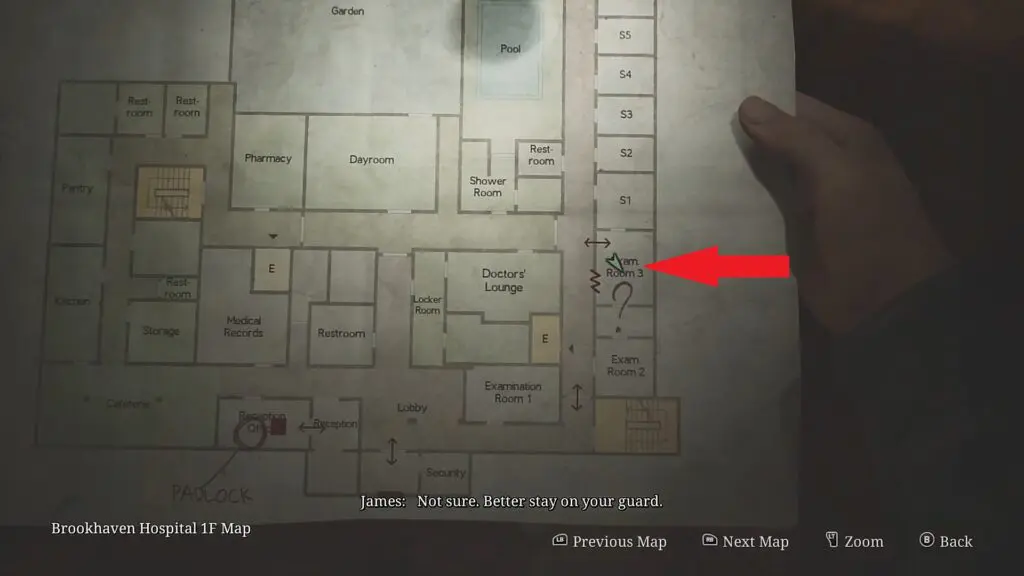
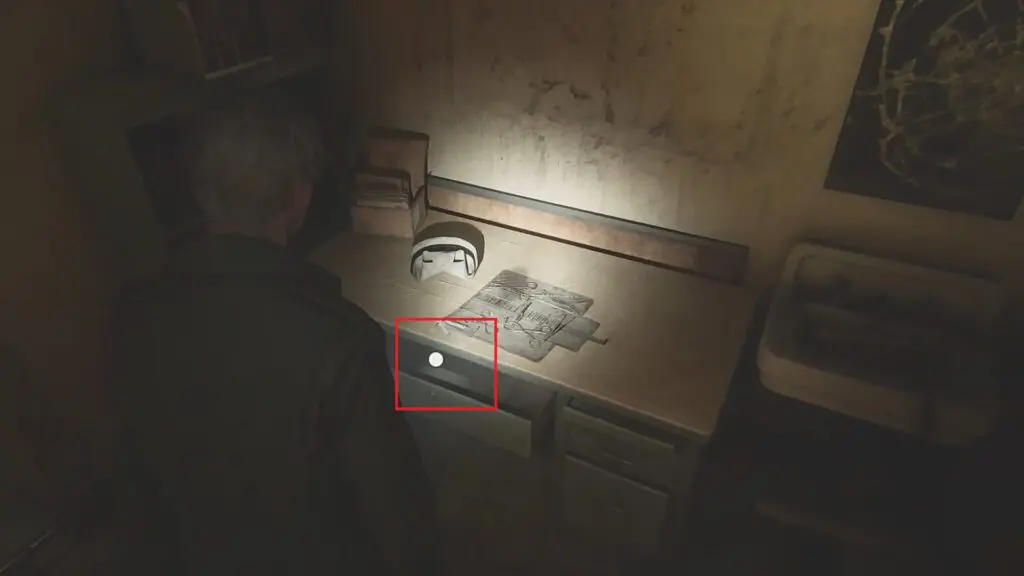
Exit the Reception Office, and read the note on the board on the right side. The note will tell you that the Padlock code can be found in Examination Room 3. Go to Examination Room 3, and open the desk as shown in the second picture below. Read the note inside the desk for the clue for the code. The note will tell you to go to the lobby and count the Nurses, Doctors, and Trees for the code.
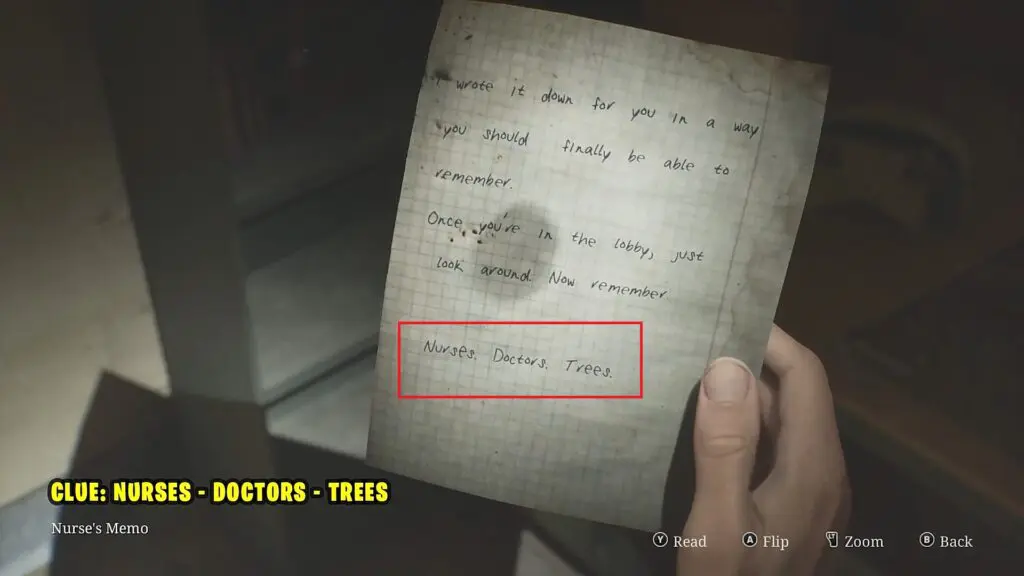
Go to the lobby as shown in the picture below. Look for three paintings in the lobby. Count the Nurses, Doctors, & Trees in the painting to get the code for the Padlock.
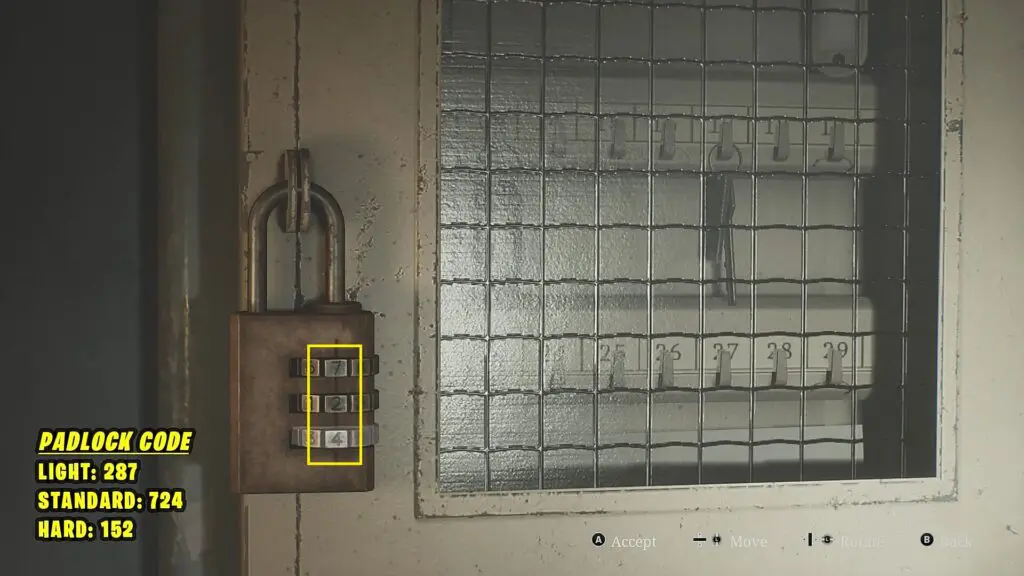
The Padlock Code for all the difficulties is shown below. Unlock the Padlock and get the basement Key.
Light: 287
Standard: 724
Hard: 152
2) Go to the Basement
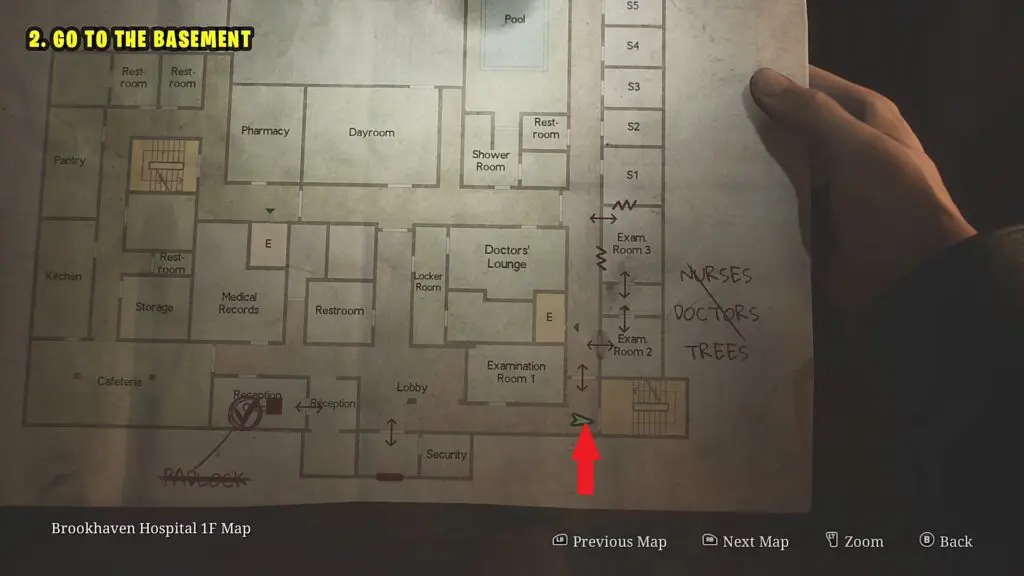
Go to the bottom right corner of the room and use the Basement Key to open the door as shown in the picture below. Go down till you reach the basement. As you reach the basement, you will find the basement map on the wall straight ahead.
3) Start the Generator
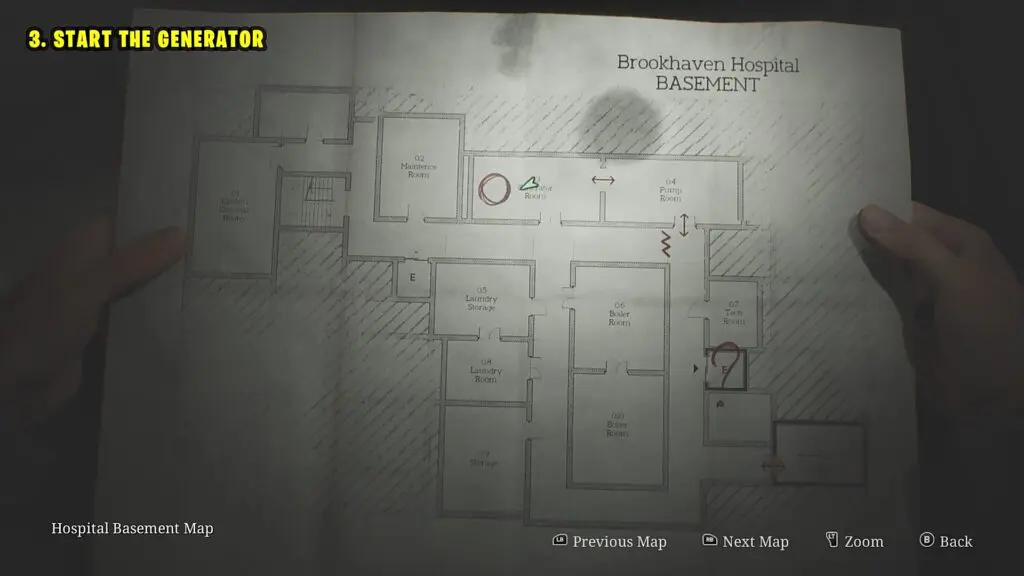
After reaching the basement, make your way to the Generator Room as shown in the map below. Your objective here is to get the generator started after fuelling it up.
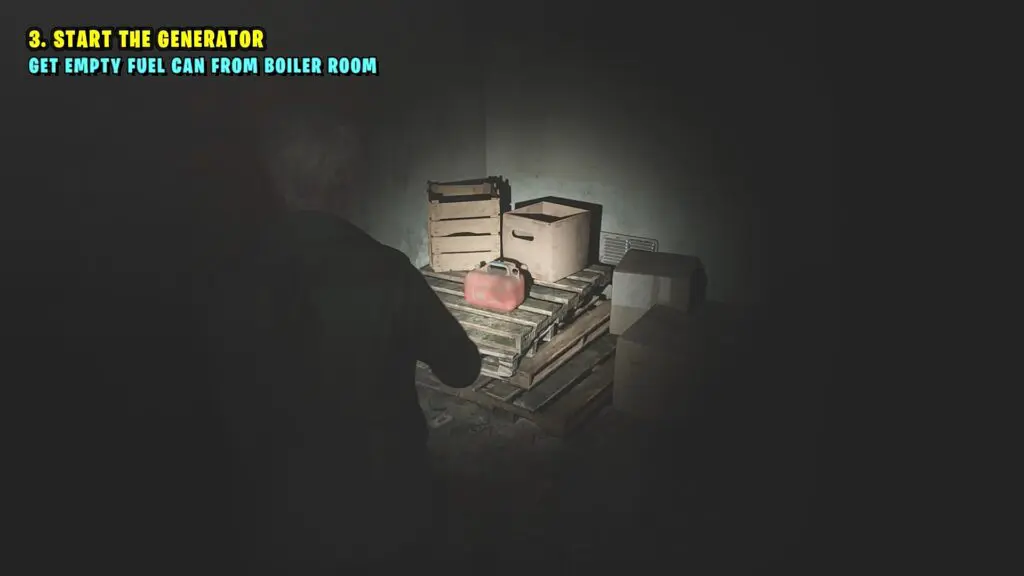
Exit the generator room and make your way to the Boiler Room. There you will find an Empty Fuel Can in the corner. Pick it up.
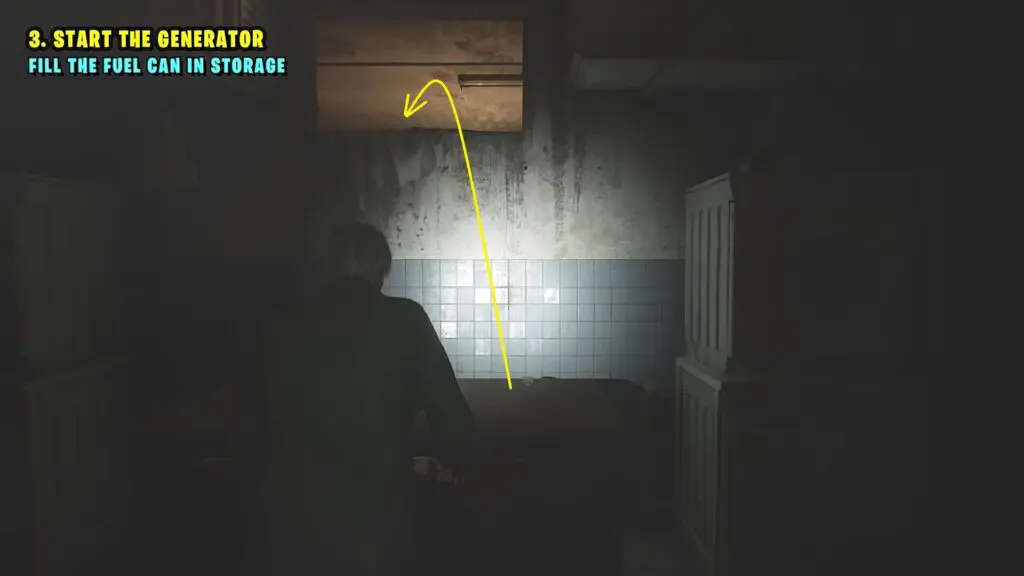
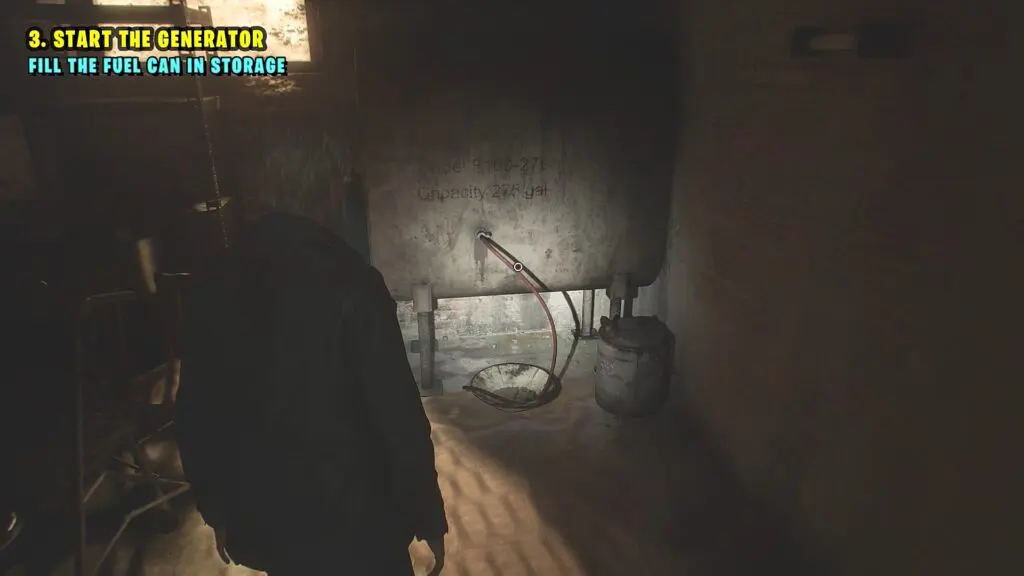
Now go to the Laundry Storage room. Grab the cart there and push it to the Laundry Room. Place the cart underneath the hole in the wall as shown in the picture below. Then climb through the hole to reach the Storage room. Fill the Empty fuel Can there from the pipe in the corner as shown in the second picture below.
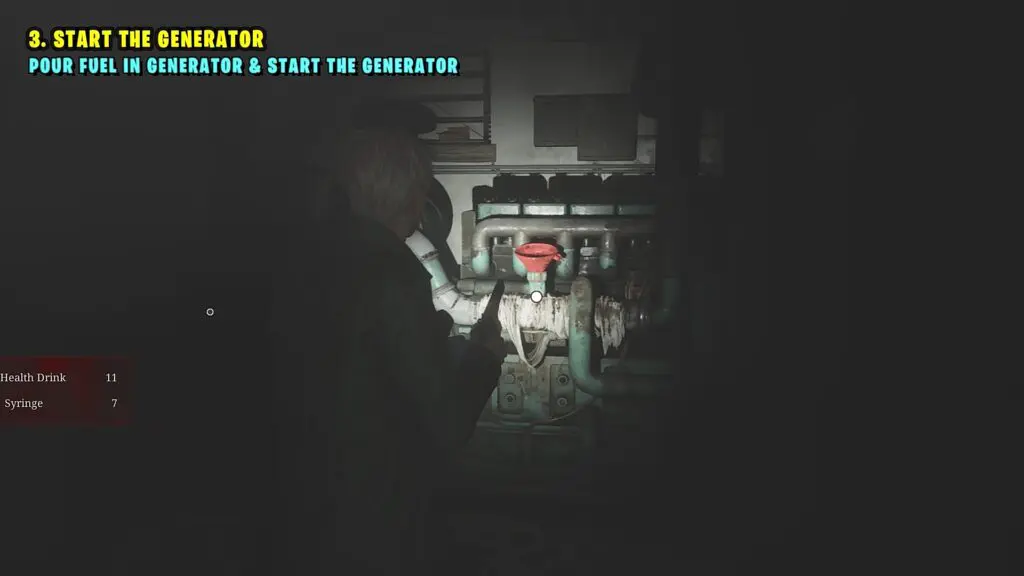
Make your way back to the Generator Room. Fuel up the generator by interacting with the funnel as shown in the picture below. Then Flip the Switch to Start the Generator. This will activate the Elevator.
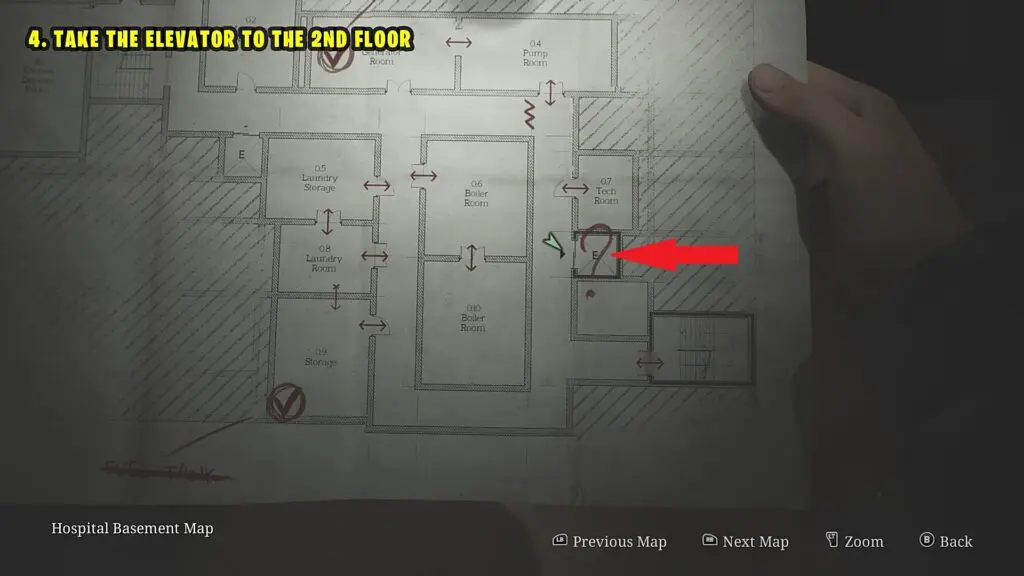
4) Take the elevator to the 2nd Floor
After the power is up, go to the location shown in the picture below. ENter the elevator and take it to the second floor.
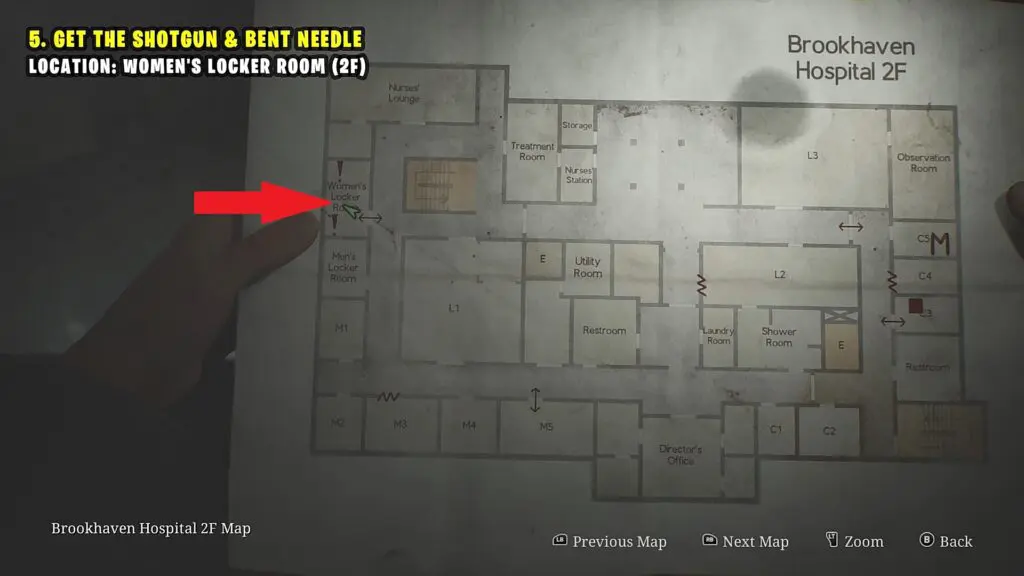
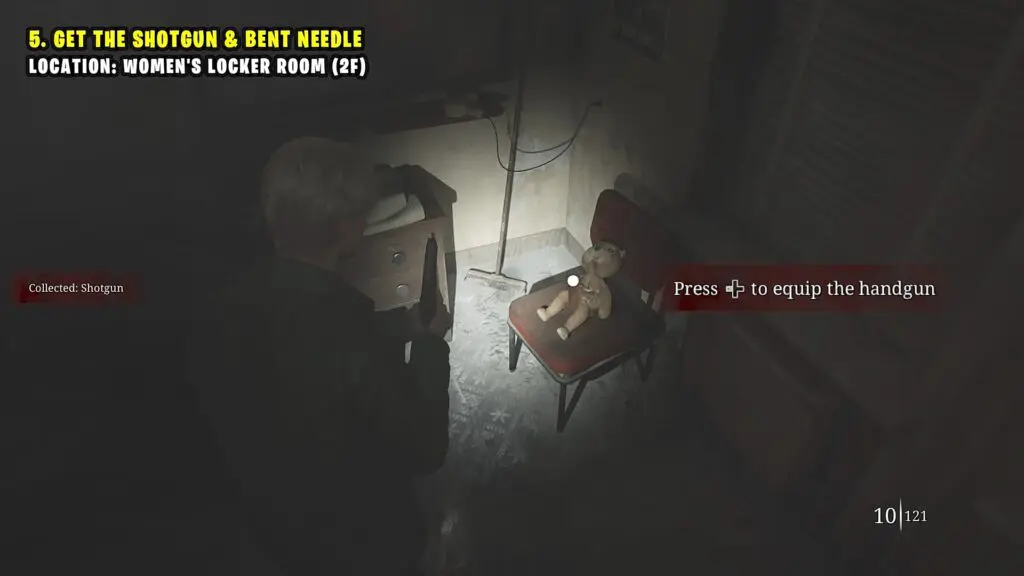
5) Get the Shotgun & the Bent Needle
Make your way to the Woman’s Locker Room on the 2nd Floor as shown in the picture below. Take the Shotgun from the locker there. Then interact with the teddy sitting on the chair as shown in the second picture below to get the Bent Needle, which you will be needing later.
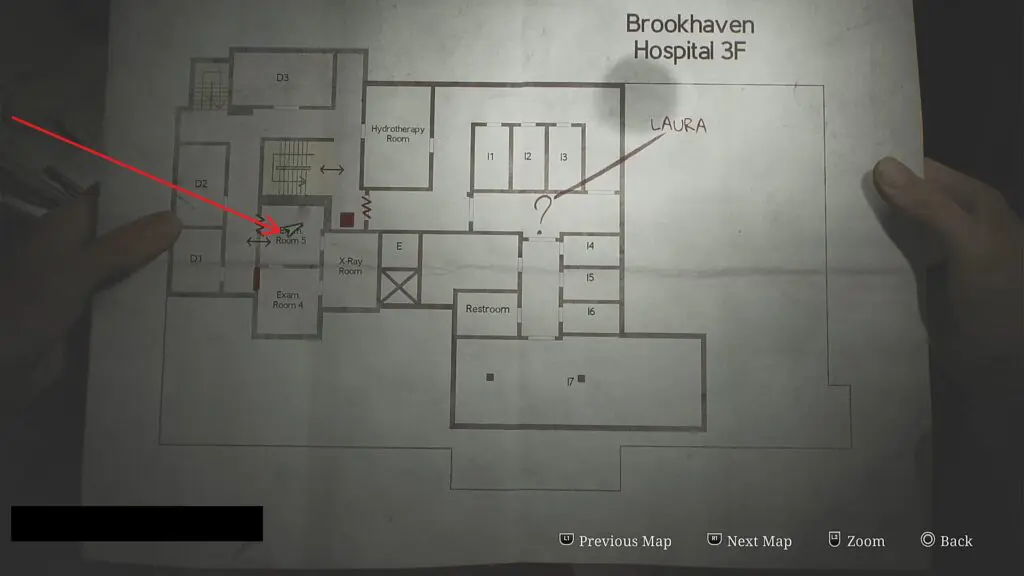
6) Get 1F Inner Ward Key
Take the stairs to the third floor. Make your way to Examination Room 5 and collect the 1F Inner Ward Key from the table as shown in the pictures below.
7) Collect the Radiograph of a Pelvis
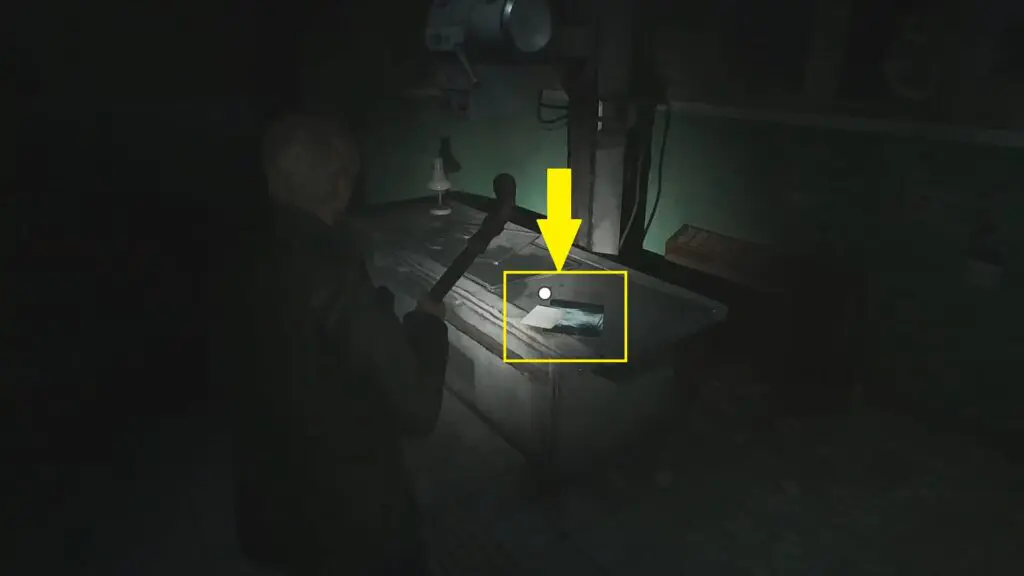
From Exam Room 5, make your way to the X-Ray Room and collect the Radiograph of a Pelvis from the table as shown in the picture below.
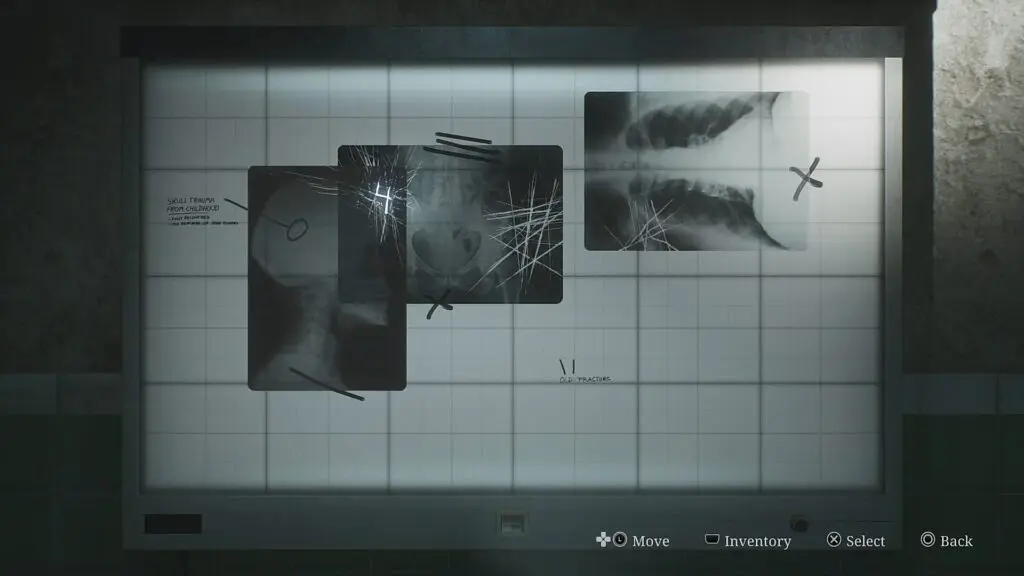
Place the Radiograph on the X-Ray screen. There are already two radiographs on the screen. Rearrange the three Radiographs on the screen as shown in the picture below. But this does not complete the puzzle as one radiograph is still missing.
8) Collect Moldy Radiograph
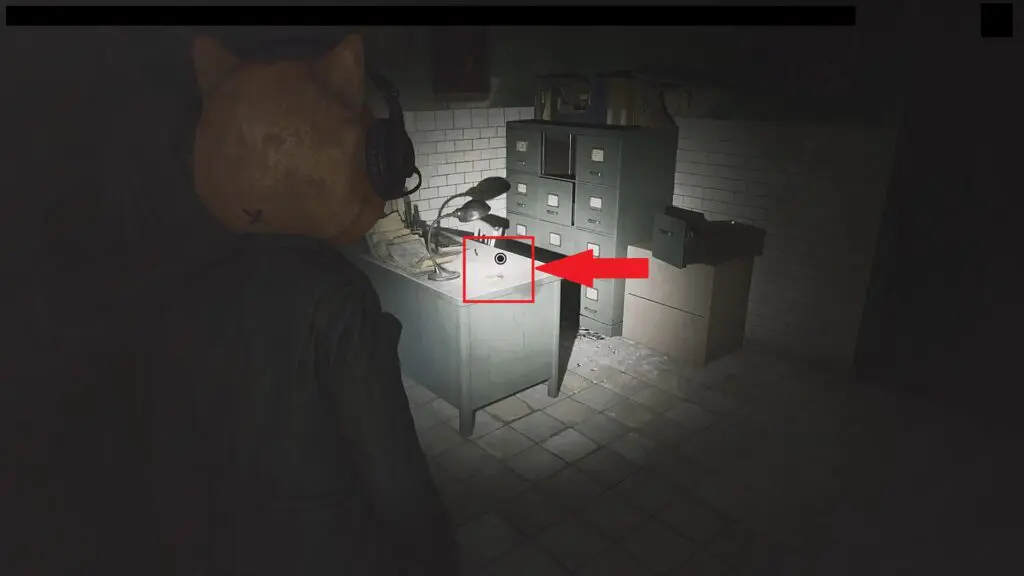
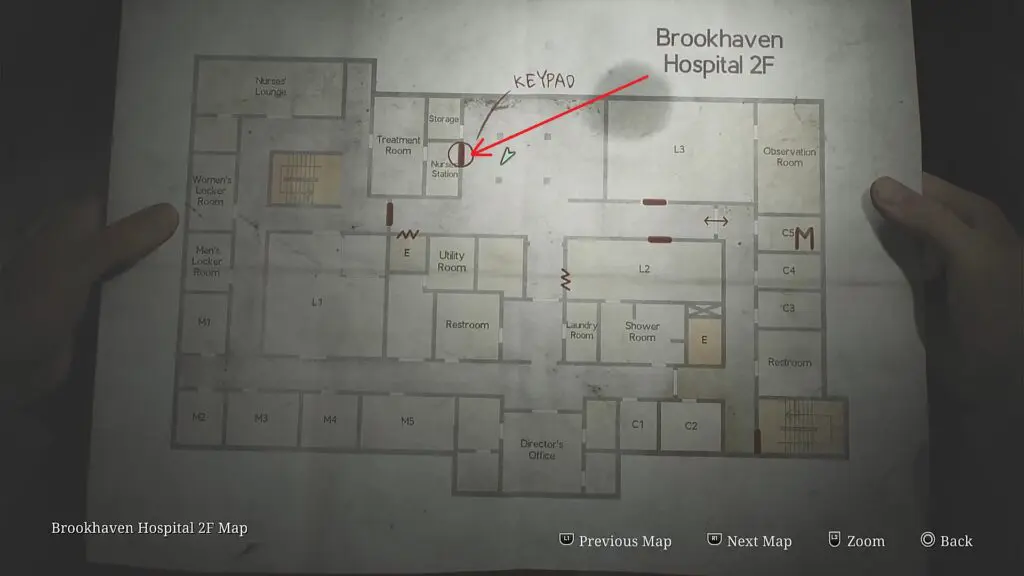
The Moldy Radiograph is in the Nurses Station at the location shown in the picture below. Nurses Station keypad code for different difficulties is mentioned below. Click here to see how to get Nurses Station Door Code.
Light: 3578
Standard: 3578
Hard: 7456
Enter the Nurses Station and go to the treatment room. There you will find the radiograph in one of the tubs as shown in the picture below.
9) Collect Mold Remover from the pantry
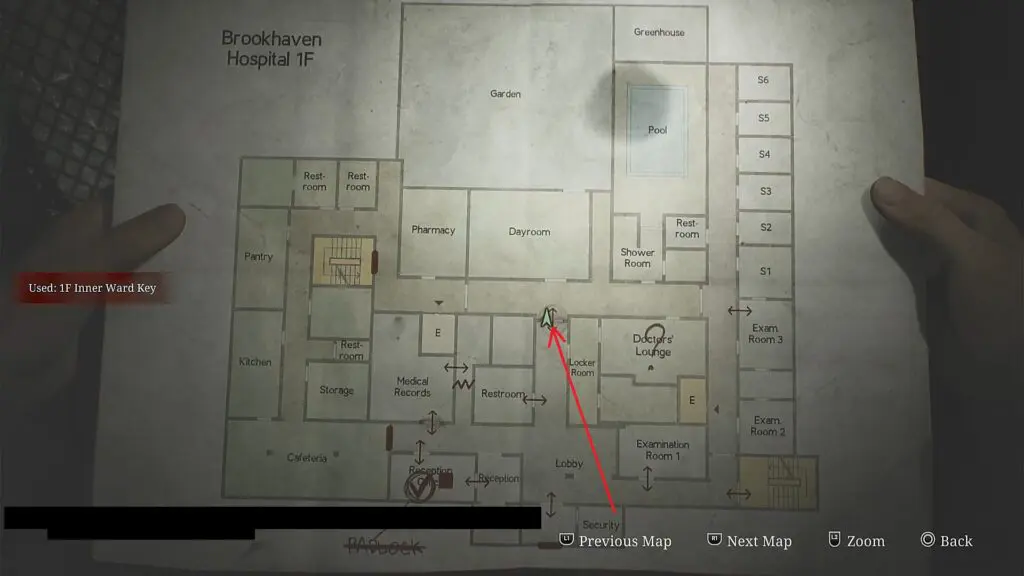
Go to the first floor at the location shown in the picture below and use the 1F Inner Ward Key to open the door there as shown in the pictures below.

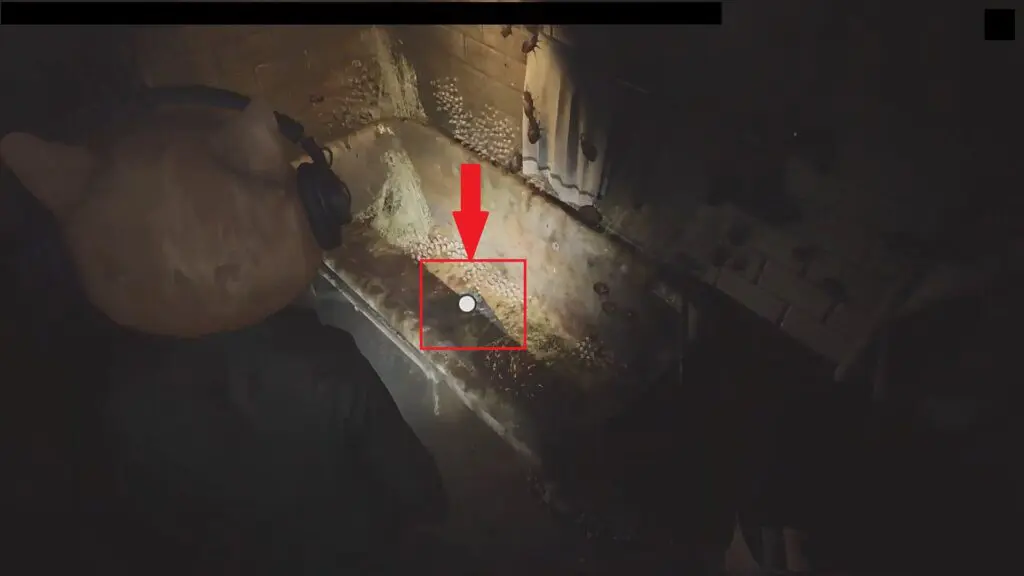
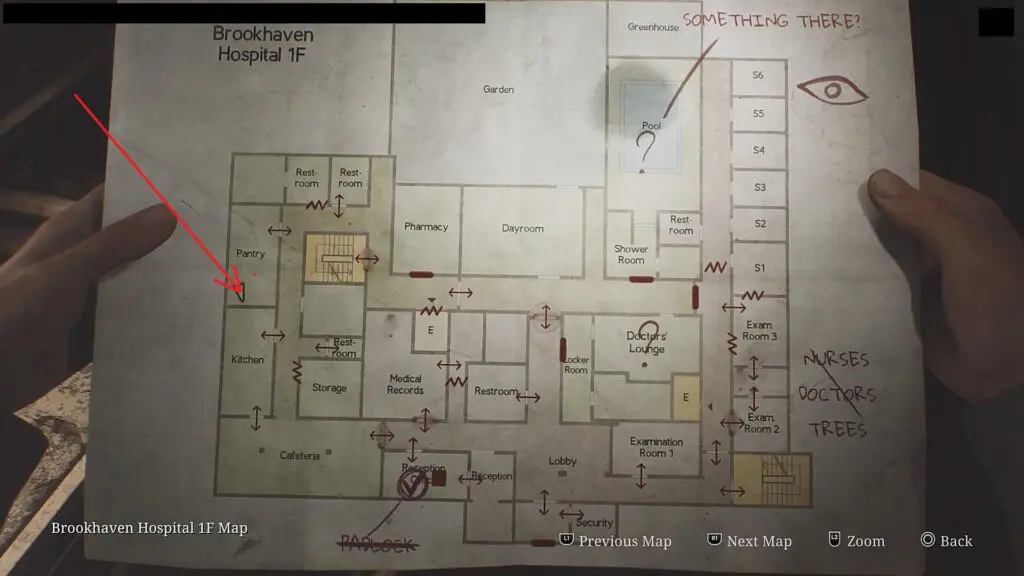
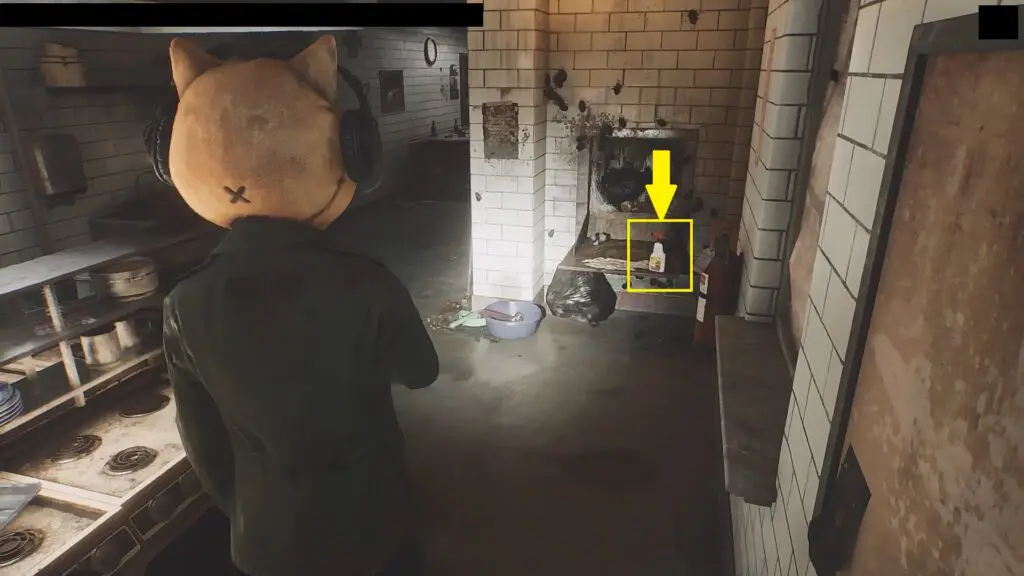
Now make your way to the pantry and collect the Mold Remover from the corner as shown in the pictures below. Now open the inventory and combine the Mold remover and the Moldy Radiograph to get the cleaned-up radiograph.
10) Solve the X-Ray Puzzle
Go back to the X-ray room and place the cleaned-up radiograph on the X-ray screen. Then arrange the radiographs correctly as shown in the picture below to complete the puzzle. Upon completion of the puzzle, you will get a code as shown in the picture below.
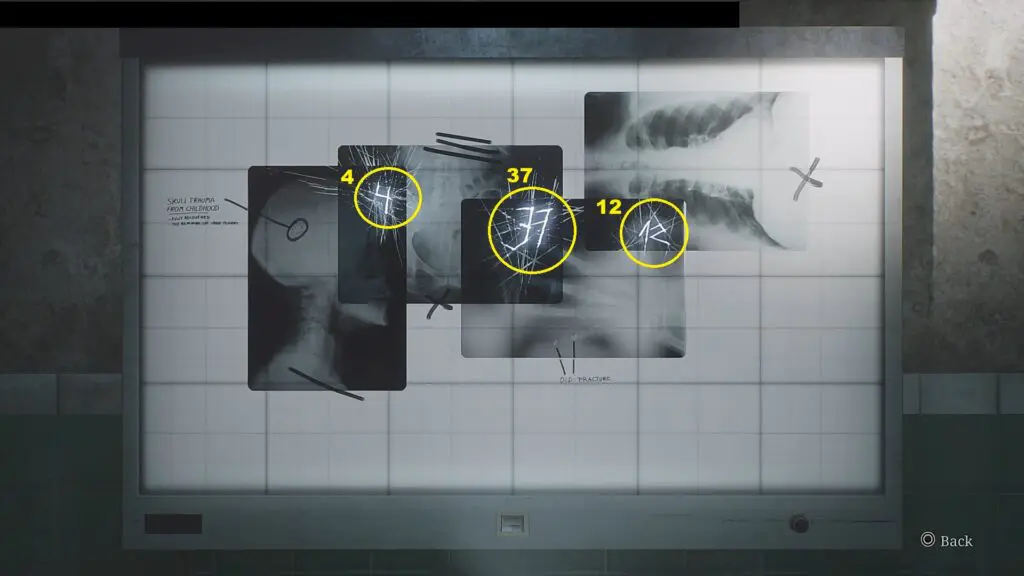
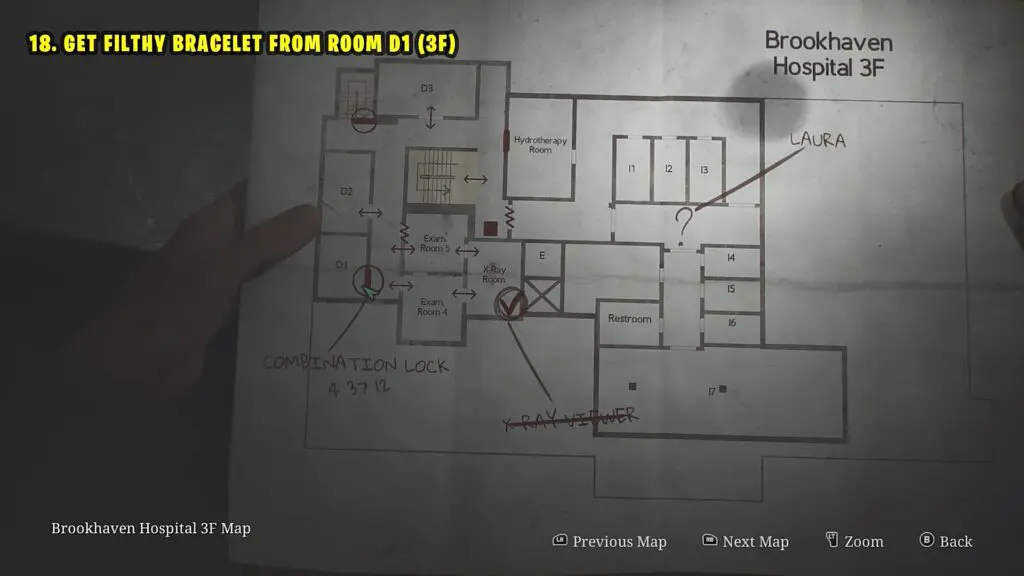
11) Get the Filthy Bracelet (Room D1 Combination Lock Code)
Use the code you got by solving the X-Ray puzzle to unlock the Room D1 combination lock as shown in the picture below. The code is the same for all the difficulty levels. Now go inside and interact with the bed to get the Filthy Bracelet. There are two more bracelets that you need to find.
12) Get Marked Bracelet (Medical records Room – 1F)
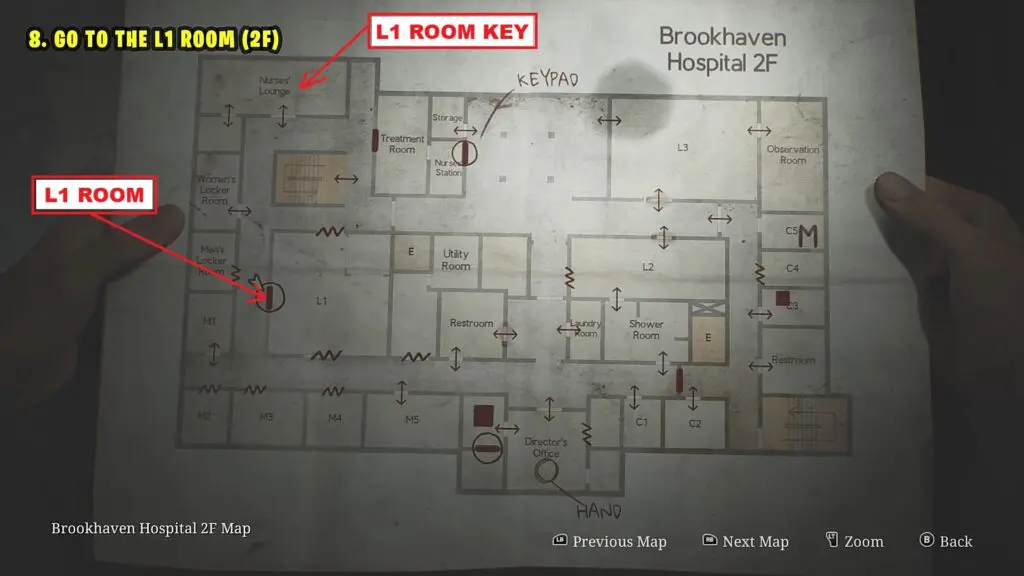
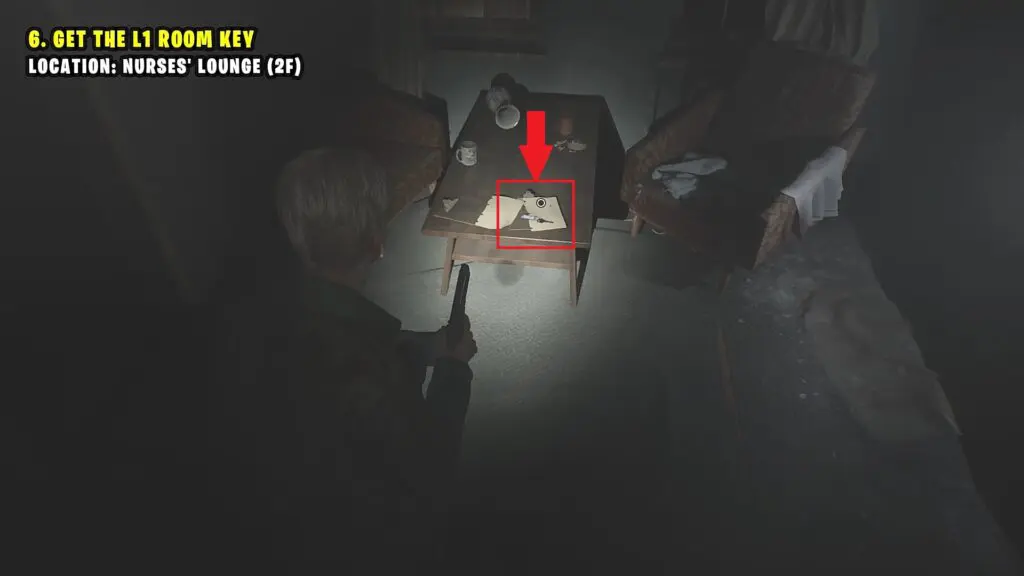
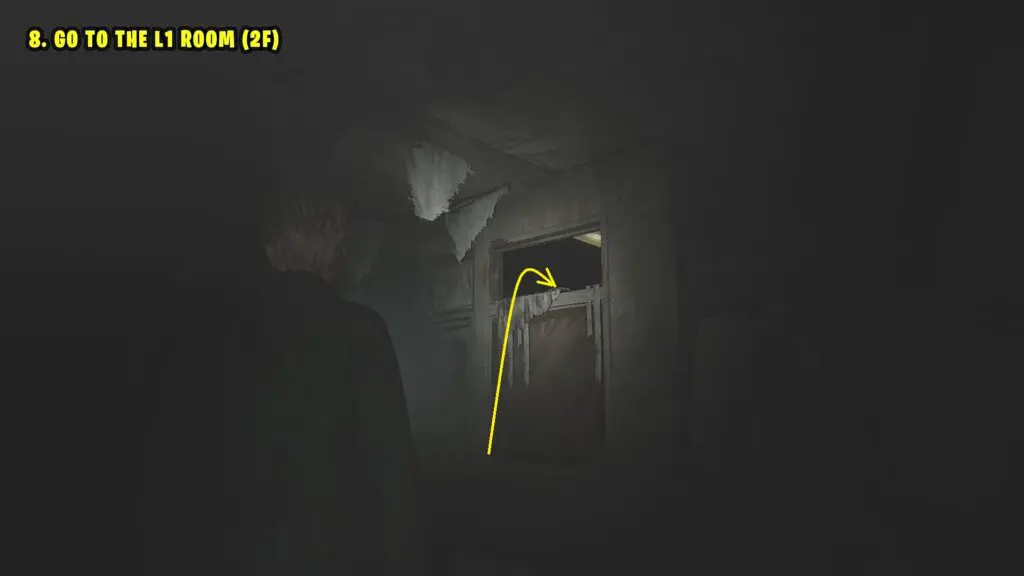
Go to the Nurses’ Lounge on the second floor and get the L1 Room key from the table as shown in the pictures below.
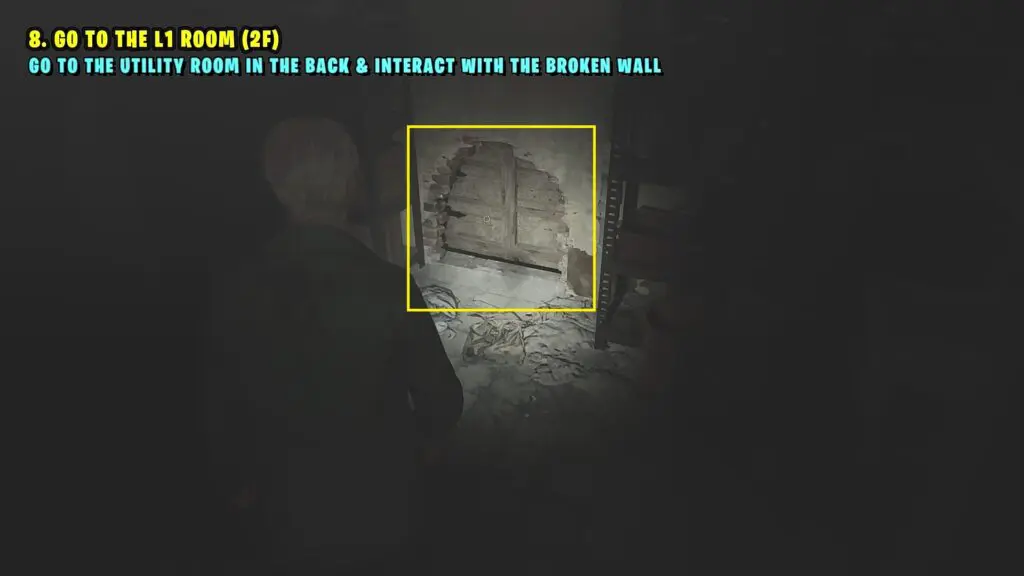
Use the Key to enter the L1 Room. Move the cart there underneath the hole in the wall as shown in the picture below. Then climb through the hole to reach the other side. Then proceed to reach the utility room, where you will find a hole in the wall as shown in the second picture below. Interact with the hole. This will start a cutscene.
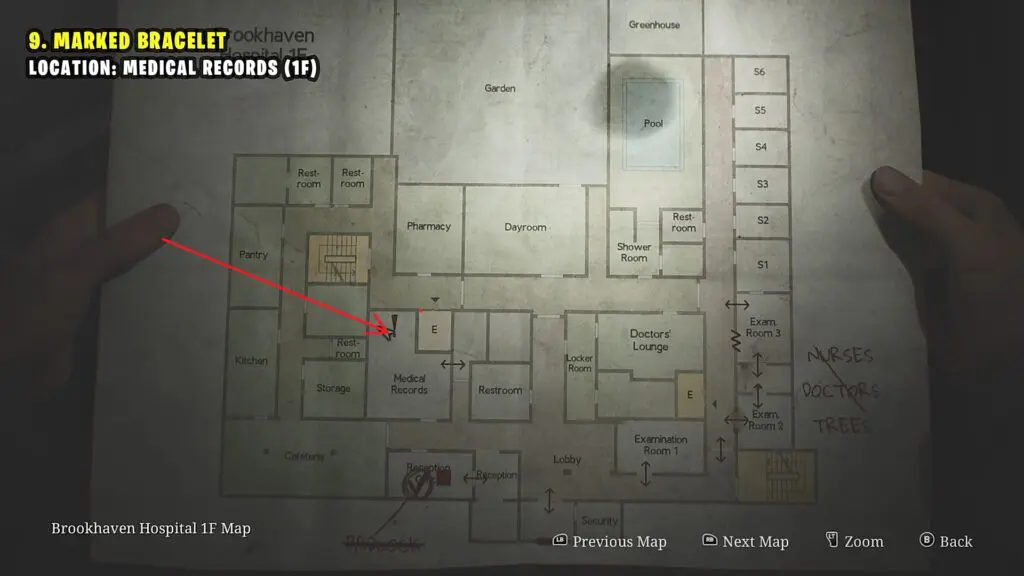
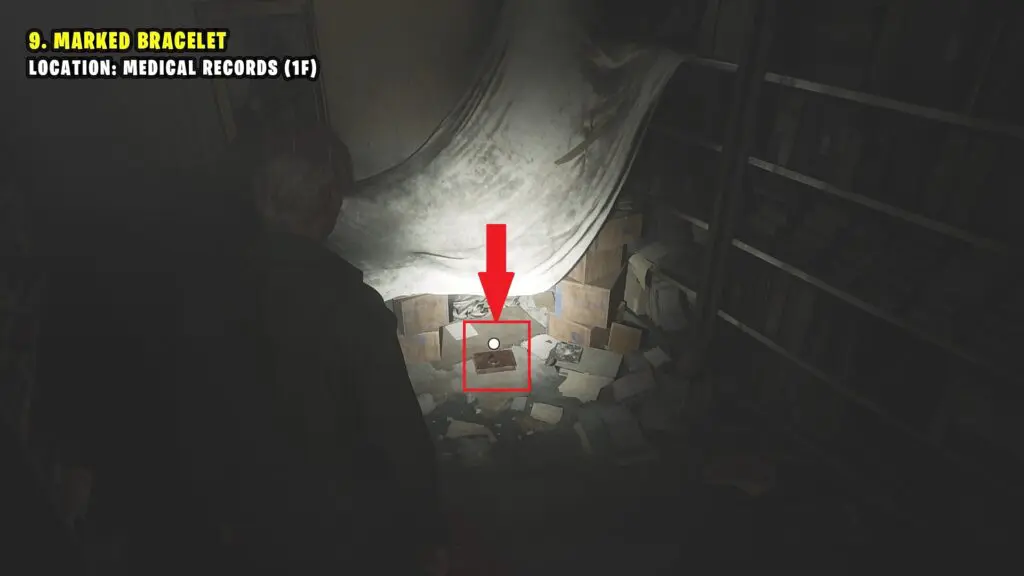
After the cutscene, you will find yourself on the 1st floor in the small room marked ‘E’ near the Medical Records room as shown in the picture below. Crawl through the hole in the wall to reach the Medidal records room and collect the Marked Bracelet from there as shown in the second picture below.
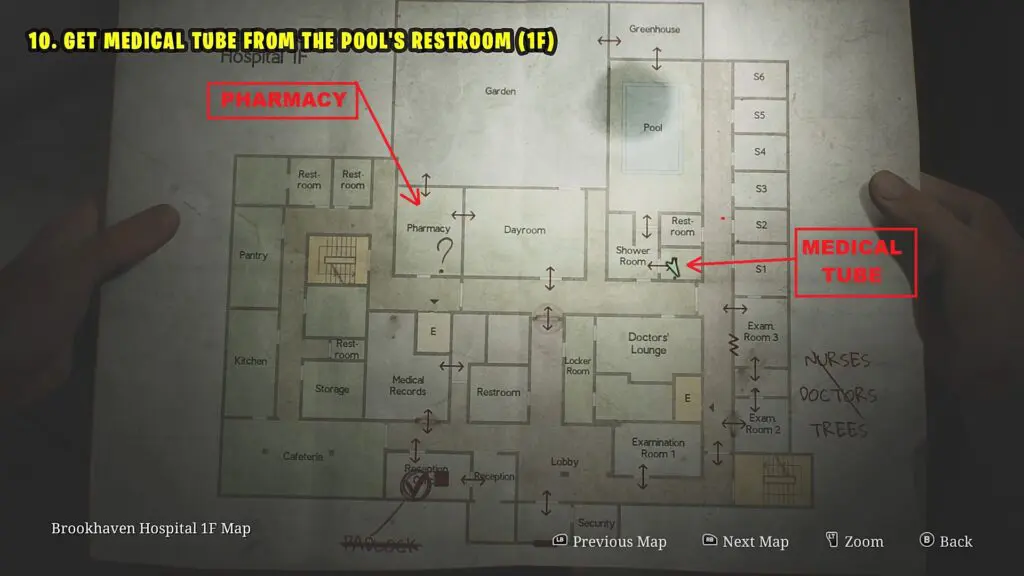
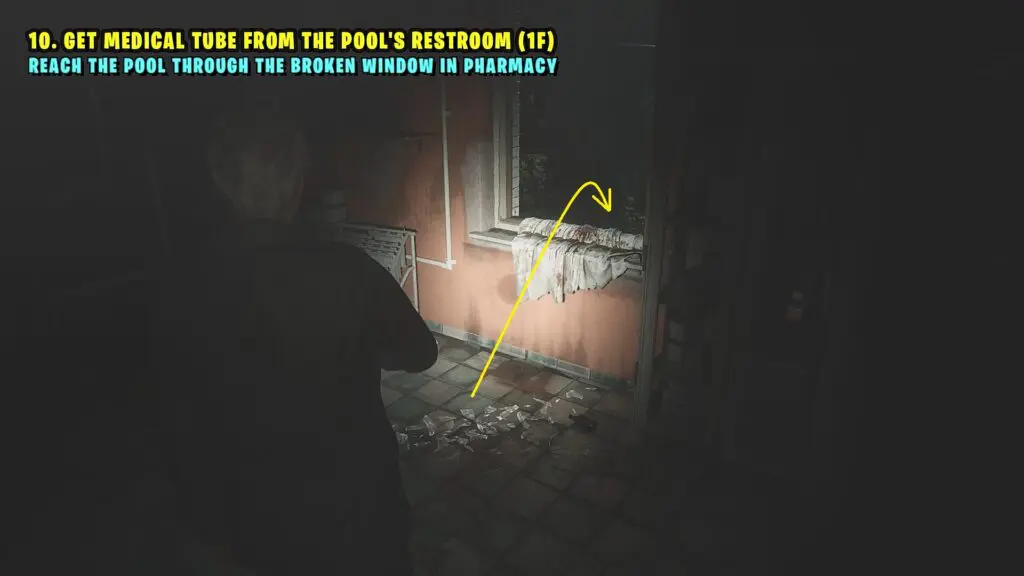
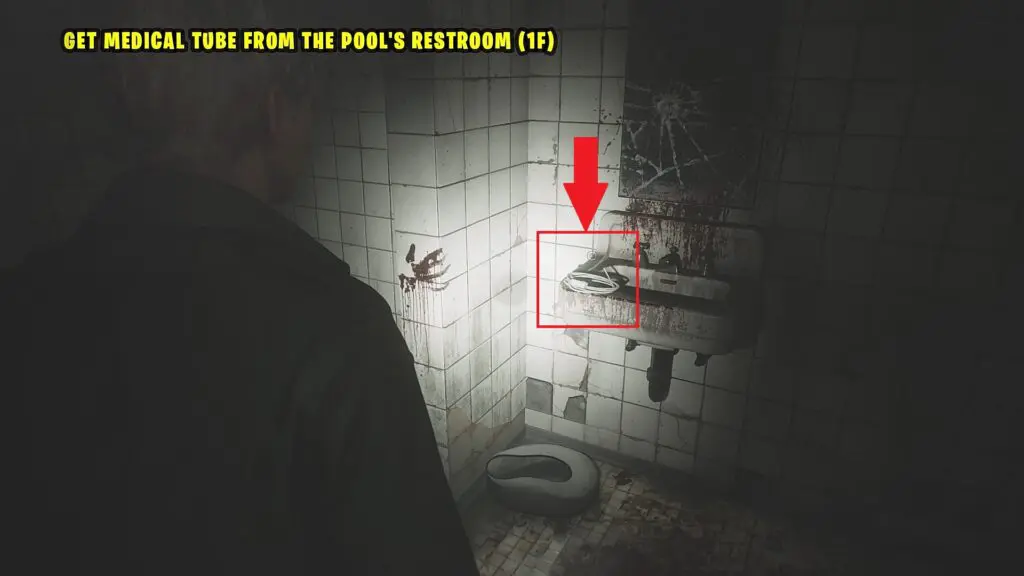
13) Get Medical Tube from the Pool’s Restroom (1F)
Go to the pharmacy on the 1st floor as shown in the pictures below. Jump out from the window to reach the Garden. Then make your way to the pool. From there, go to the Pool’s restroom and get the Medical Tube as shown in the third picture below.
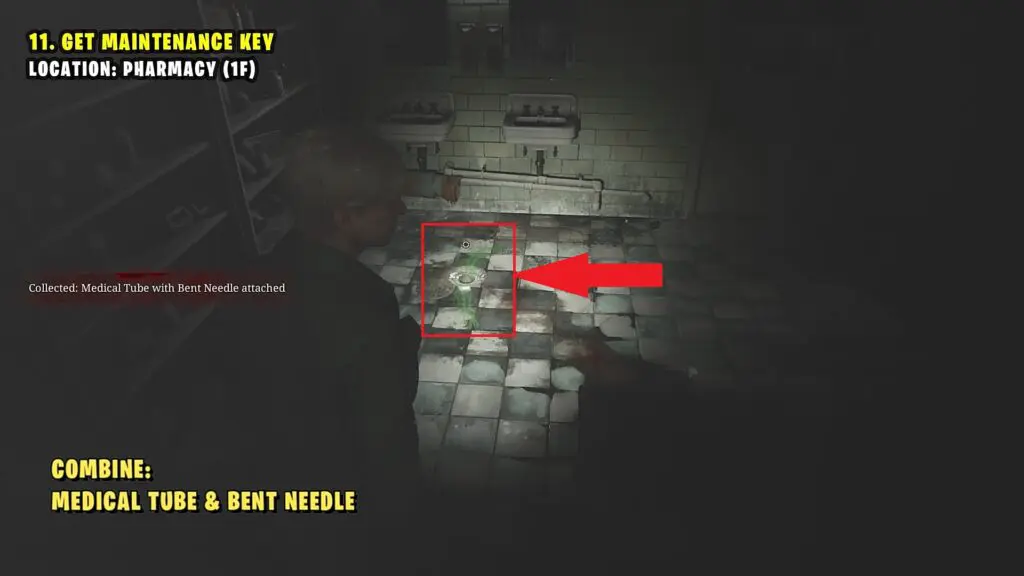
14) Get Maintenance Key
Go back to the Pharmacy. Open the inventory and combine the Bent Needle and the Medical Tube. Now go next to the hole on the ground as shown in the picture below. Interact with the hole and use the combined item. This will get you the Maintenance Key.
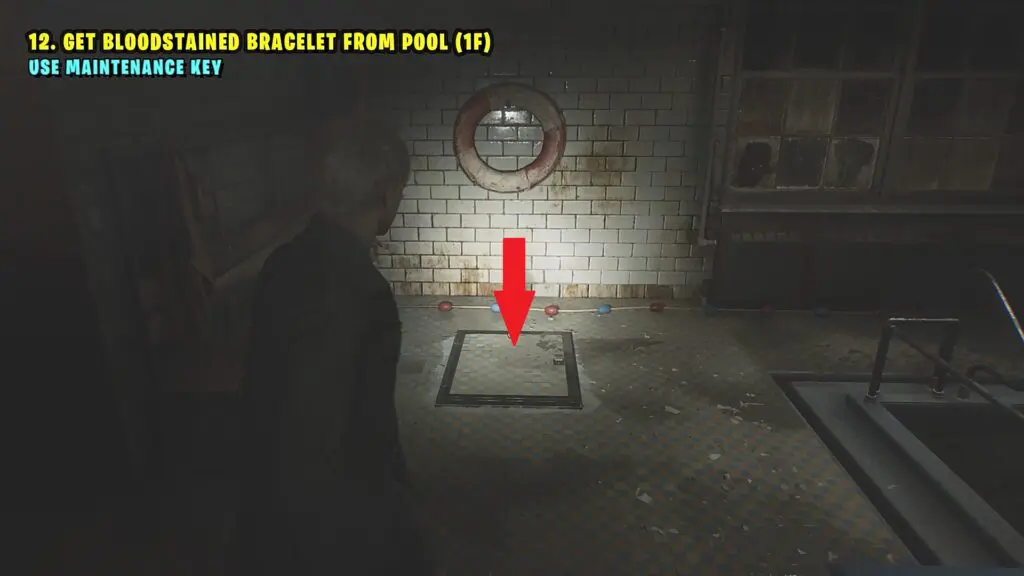
15) Get Bloodstained Bracelet from the Pool
Go to the pool and use the Maintenance key to open the hatch as shown in the picture below. Then rotate the valve inside to drain out the water from the pool.
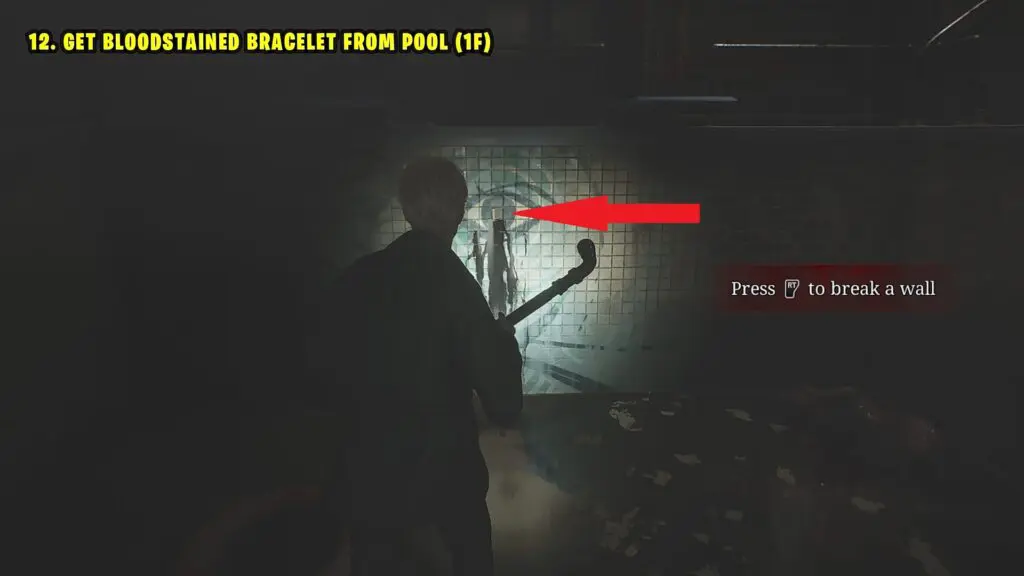
Once the water is drained out, jump into the pool. Then break the pool wall as shown in the picture below to get the Bloodstained Bracelet.
16) Solve the Director’s Office Hand Bracelet Puzzle
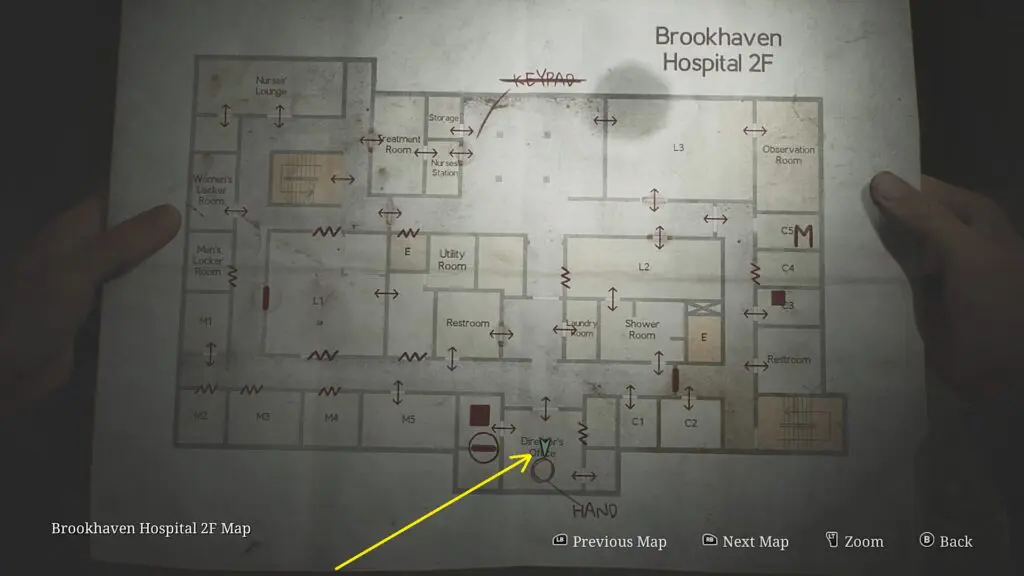
Once you have the three Bracelets, go to the Director’s Office on the second floor as shown in the picture below.
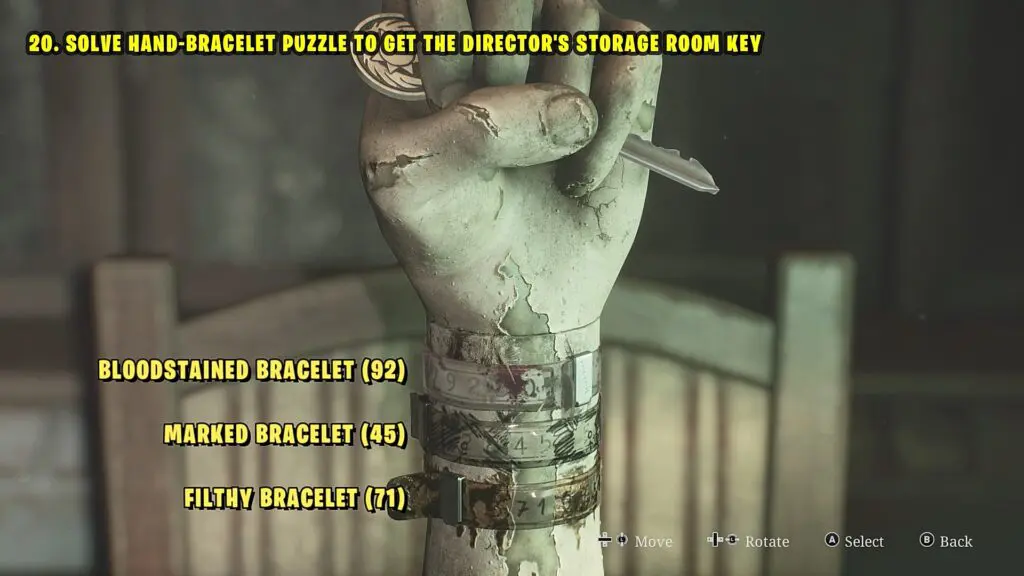
Interact with the hand sculpture on the table. Then insert the Bloodstained Bracelet on the top, the Marked Bracelet in the middle, and the Filthy Bracelet at the bottom. Rotate the bracelets so that the numbers 92, 45, and 71 are on the front from the top to bottom as shown in the picture below. This will open the hand and you will get the Director’s Storage Room Key. The code is the same for all the difficulties.
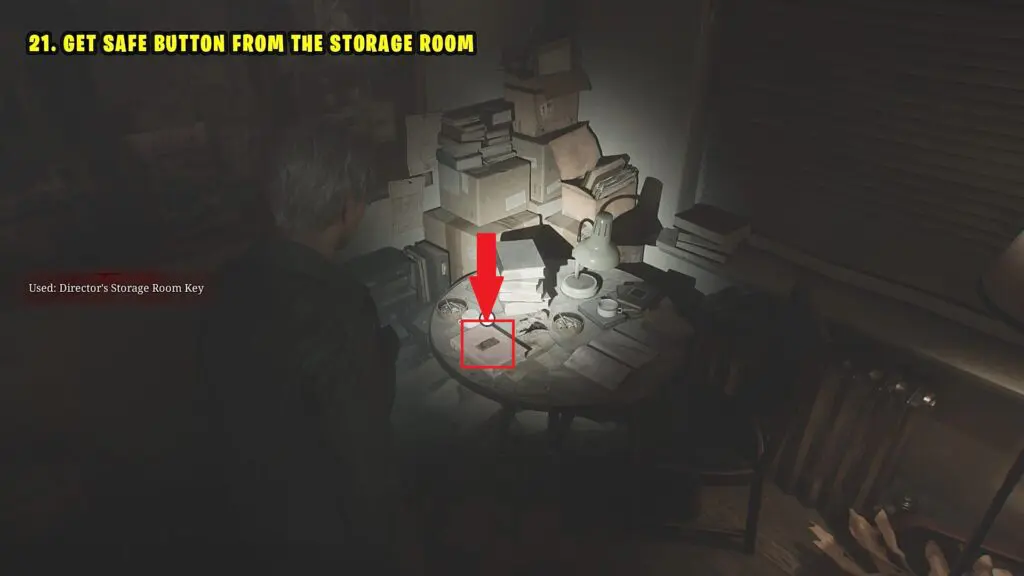
17) Get the Safe Button from the Storage Room
Go to the Director’s Office storage room and use the key to open it. Go inside and pick up the safe button from the table as shown in the picture below.
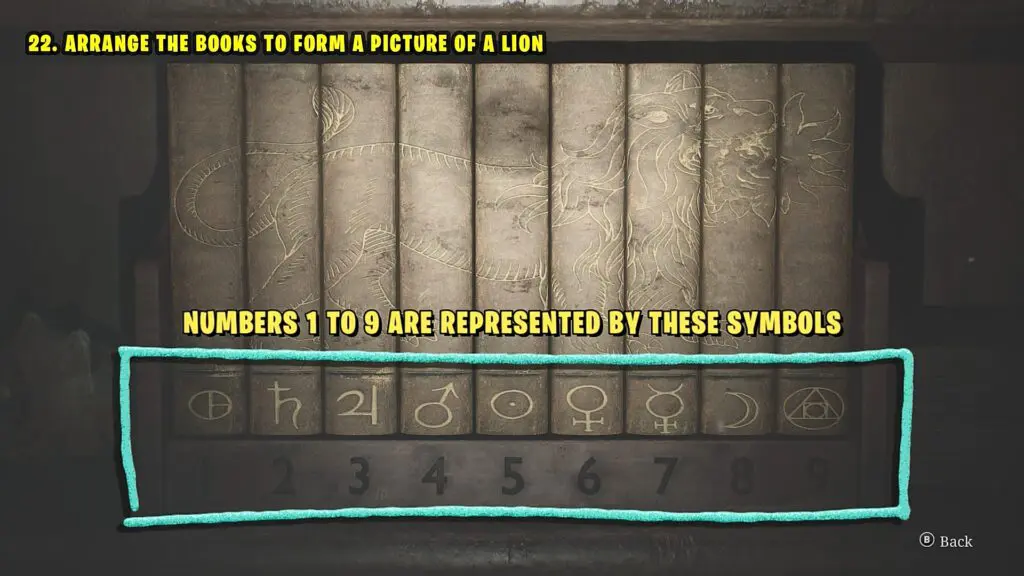
18) Director’s Office Book Puzzle
After picking up the safe button, turn around and interact with the bookshelf in the storage room. Arrange the books to form a picture of a lion as shown in the picture below. Once the books are arranged correctly, the symbol at the bottom of the book represents the numbers 1 to 9 from left to right as shown in the picture below.
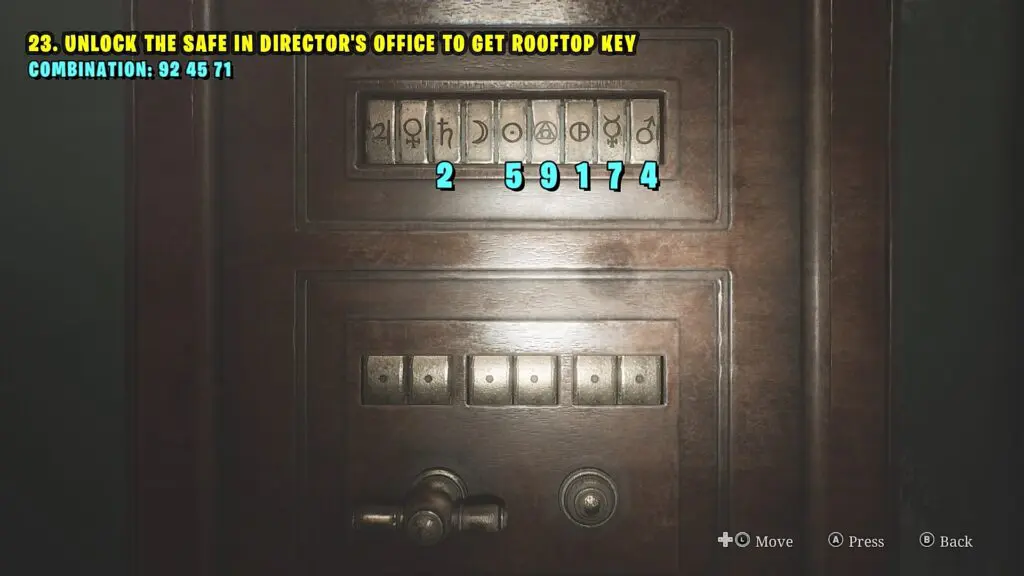
19) Director’s Office Safe Puzzle
Go to the Safe Room attached to the director’s office and interact with the safe. Place the safe button in the missing button’s slot. The code to unlock the safe is 92-45-71. This code is the same for all the difficulty levels. The numbers the symbols represent are also shown in the picture below. Press the correct symbol to insert the code. This will unlock the safe and you will get the Rooftop Key.
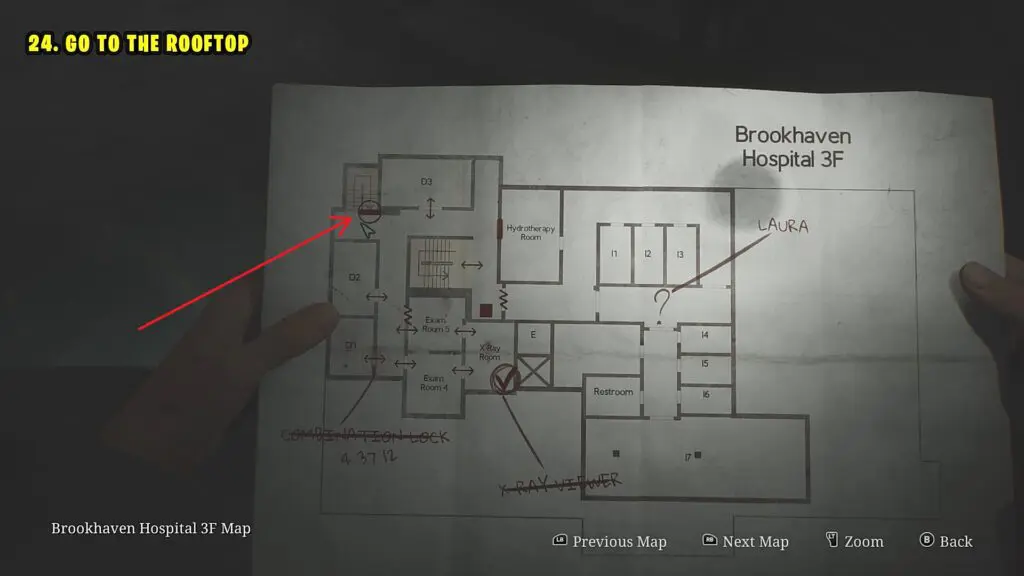
20) Go to the Rooftop
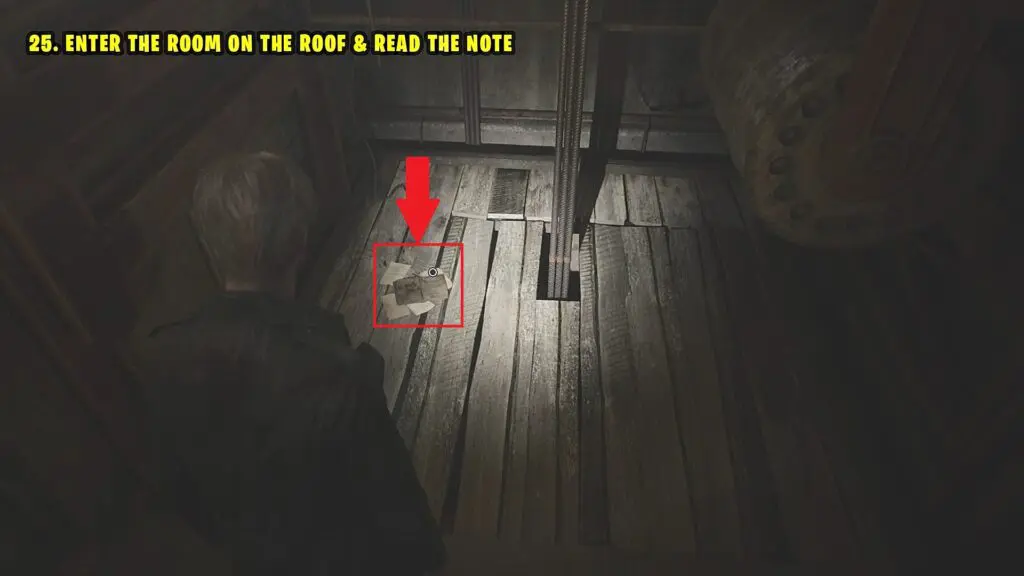
Go to the stairs on the top left side of the 3rd floor as shown in the picture below. Climb up the stairs and use the key to open the rooftop door.
Enter the room on the roof and read the note there as shown in the picture below. When you exit the room after reading the note, there will be a cutscene.
21) Flesh Lip Boss Fight
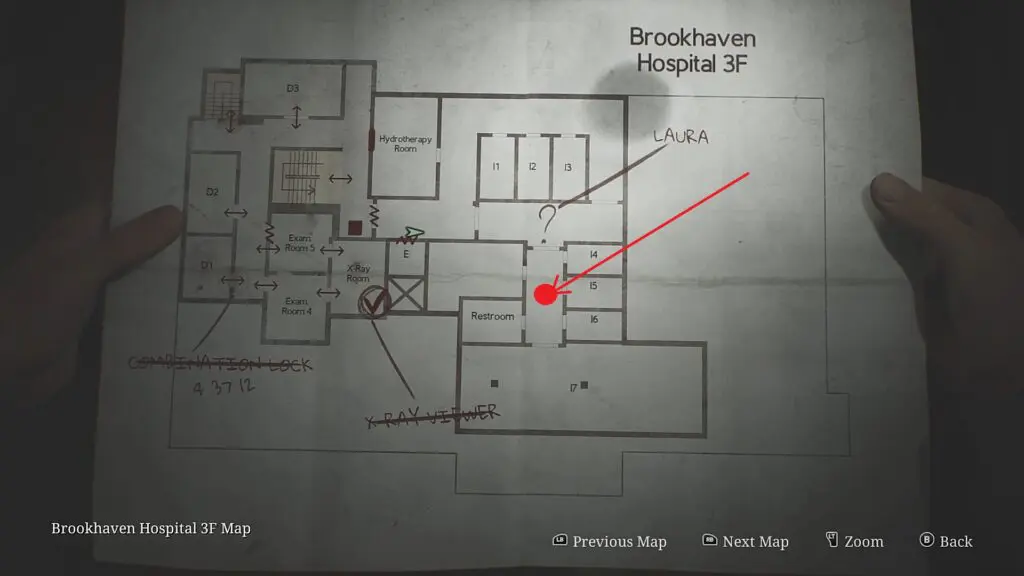
After the cutscene, you will be on the 3rd floor. Now make your way to the location marked with the red arrow in the picture below. As you reach there, the Flesh Lip Boss Fight will start.
After the boss fight, there will be a cutscene. After the cutscene, you will be on the 1st floor of the Hospital, and the entire environment will be changed. Click here for the walkthrough of the modified hospital.