This guide shows the complete Walkthrough of MADiSON required to complete the game. The Guide does not include collectibles or achievements. I have also kept this guide completely spoiler-free. Please check the link below for the video walkthrough of the game.
Starting Area
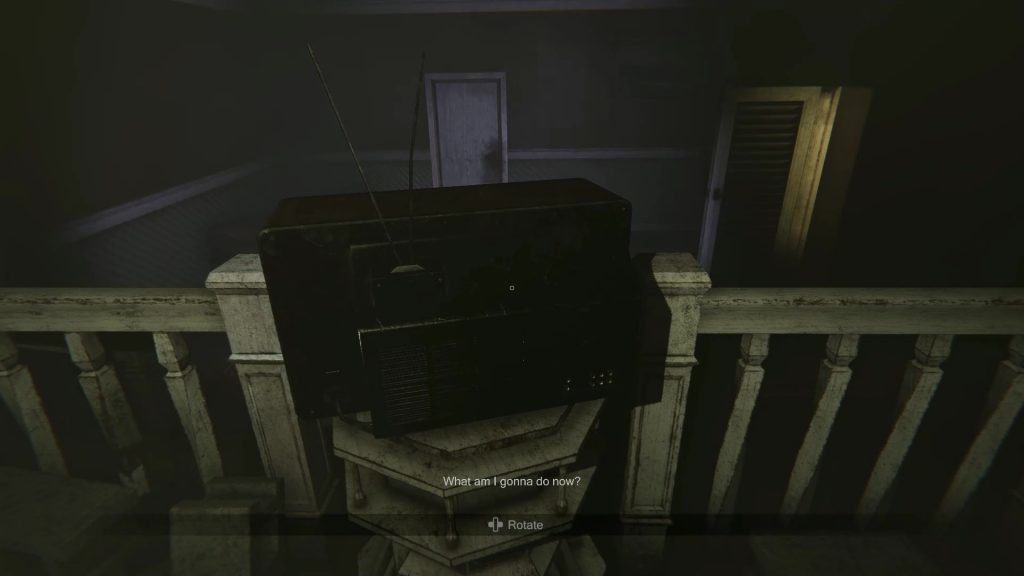
As the game starts, collect the Sunbox lying in front of you. Then climb the stairs and turn the TV towards the sofa as shown in the picture below. Now you will be able to collect the Handle under the sofa. Climb up the stairs again and use the Handle to open the small cabinet on the wall. Collect the Hammer inside the cabinet. Now open the door in the room and use the hammer to clear the wooden planks blocking the path. Proceed ahead and open the door in the front to reach the next area.
Second Area
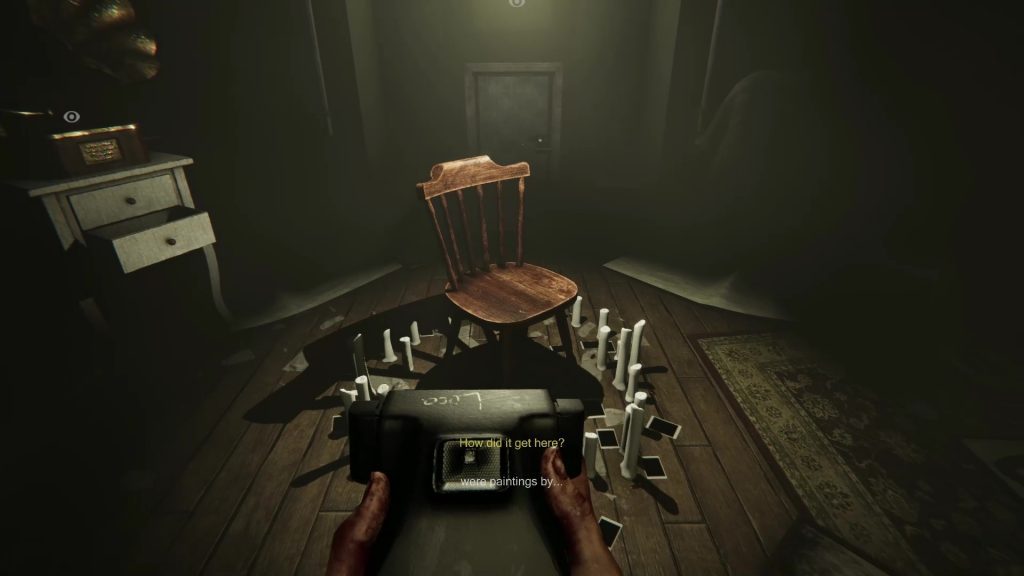
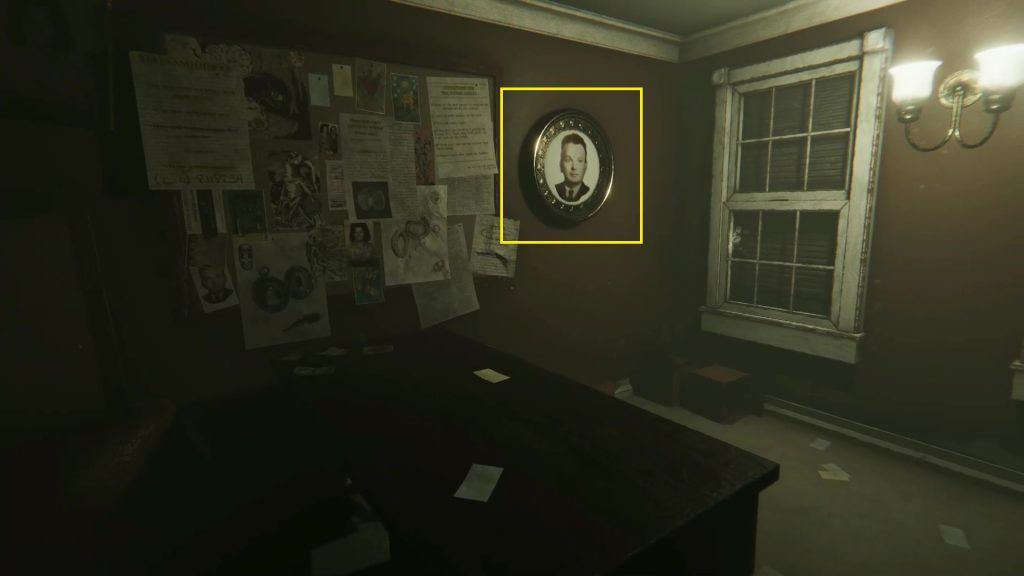
After entering the second area, remove the cloth covering a giant clock. Then enter the room on one side of the hallway. Collect the Study Key from the drawer in the room. Then collect the Oval Portrait of an old man from the wall. Now collect the present kept on the chair at the center of the room. Interact with the present to get a Camera. Use the camera to click a picture of the chair as shown below.
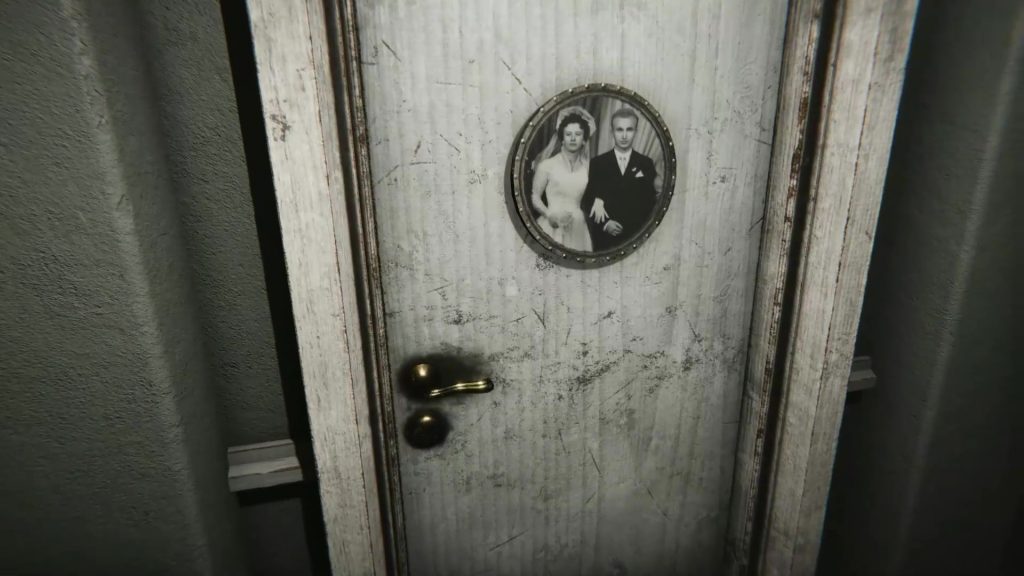
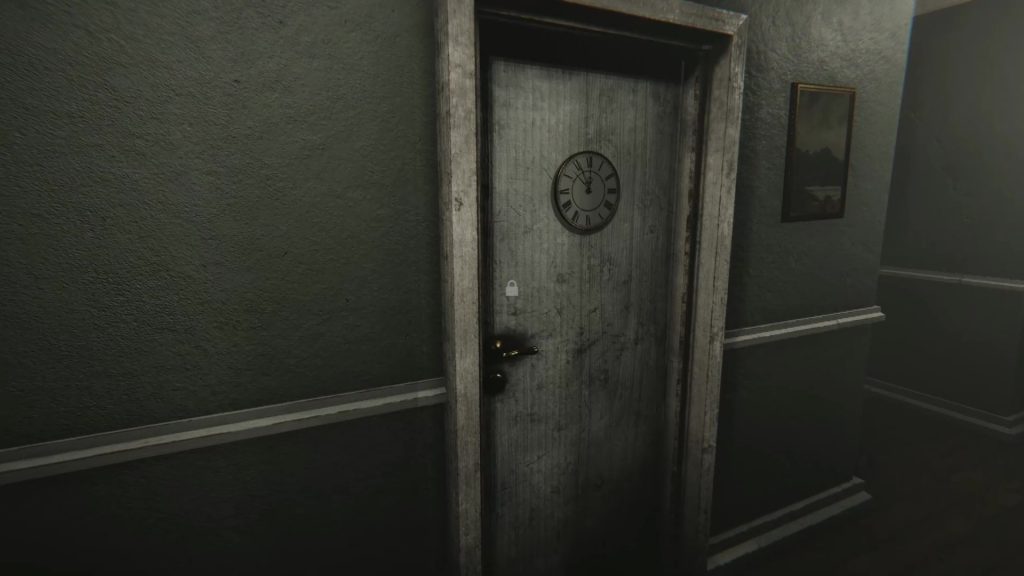
Note: There is also a padlock on the door here, which you won’t be able to open until the end of the game.
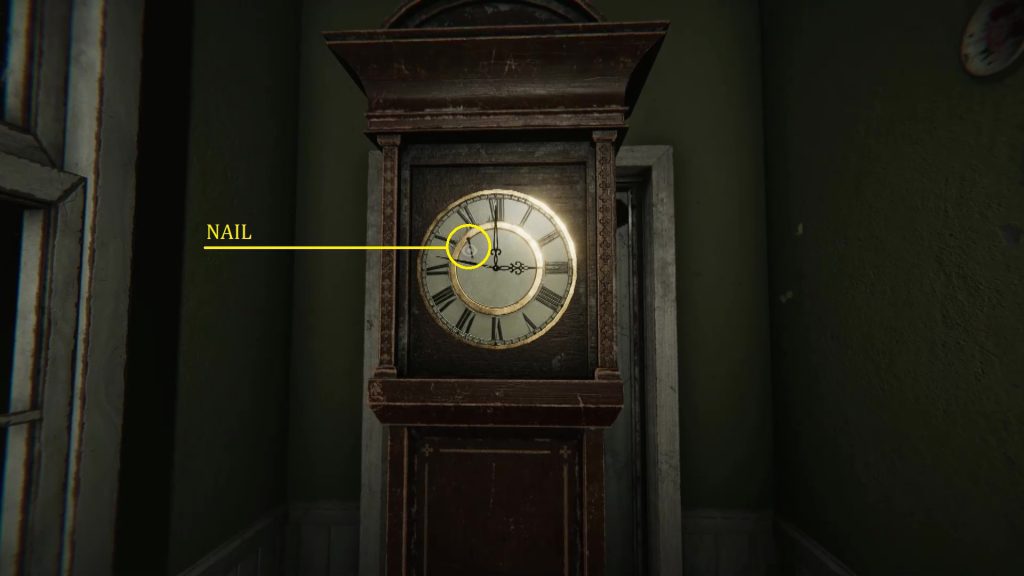
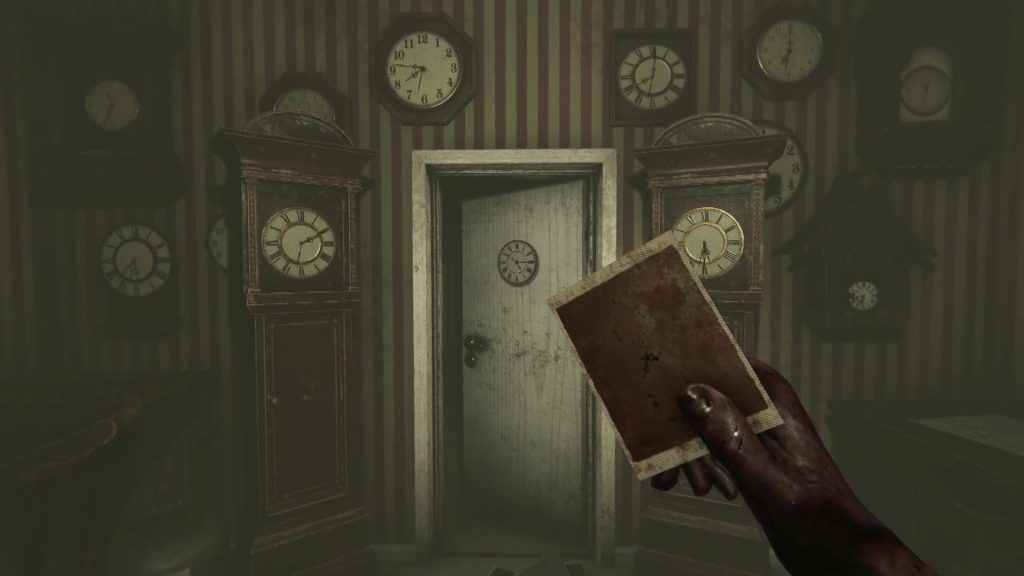
Go back to the hallway and you will find that it is completely dark. When the light comes back, remove the cloth covering the giant clock in the hallway. Go to the other end of the hallway and interact will the oval-shaped mark on the wall. Then go back to the giant clock and collect the Nail from it as shown in the picture below. Hammer the nail on the oval-shaped mark and hang the Oval Portrait there. Then click a photo of the Oval Portrait as shown in the second picture below. This will make a door appear on the opposite wall. Use the Study key to open the door and enter the Study.
Study Room
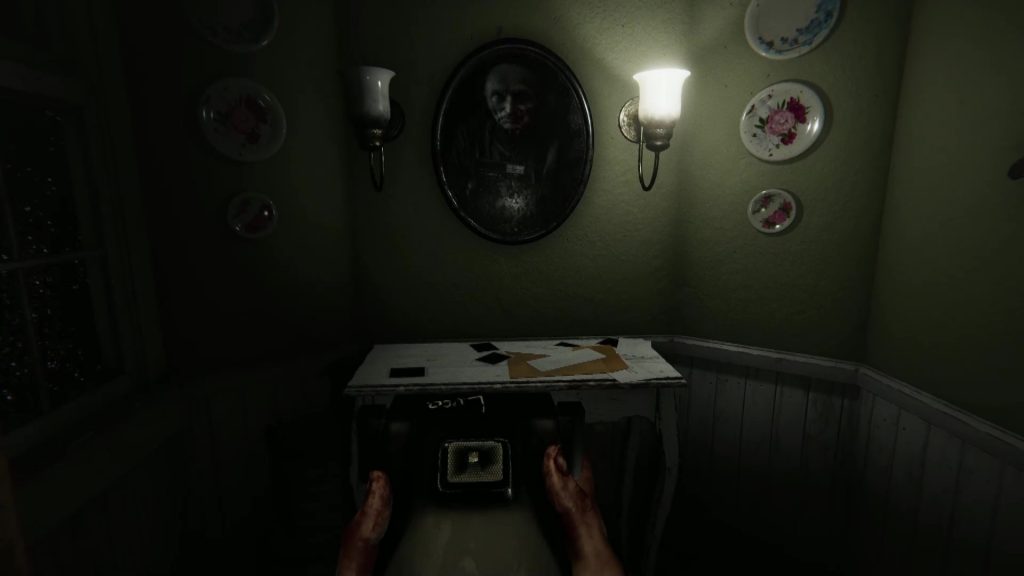
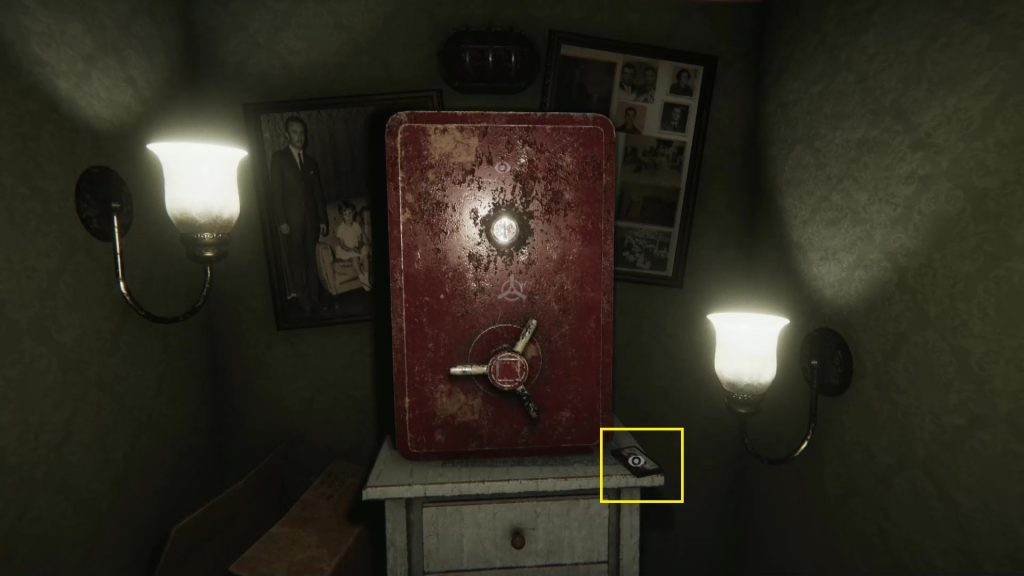
Inside the study, collect the matchbox on the table and interact with it to get a “J” Key. Then open the door to reach a red safe. Use the “J” Key on the safe to open it. Take Luca’s Notebook from the safe and read it. Then collect Cassette #1 next to the safe as shown below. Now come out of the room and the door to the next area will open automatically. As you enter the next area, which is the main hall of the house, the power will go out.
Note: You can store the items that you don’t need in this safe, as your carrying capacity in the game is only 8 items.
How to Power on the Generator
After the power goes out, take the stairs going down at the end of the hallway to reach the basement. As you enter the basement, you will find a generator and a switchboard on the wall next to it. Interact with the switchboard. Here you will need to flip the switches up and down correctly. If you flip a switch in the wrong direction then all the switches will reset back. The picture below shows the correct order of the switches in my game. This order varies from game to game. So, you will have to flip the switches yourselves to learn the correct order for your game. Once all the switches are flipped correctly, interact with the generator to restore the power.

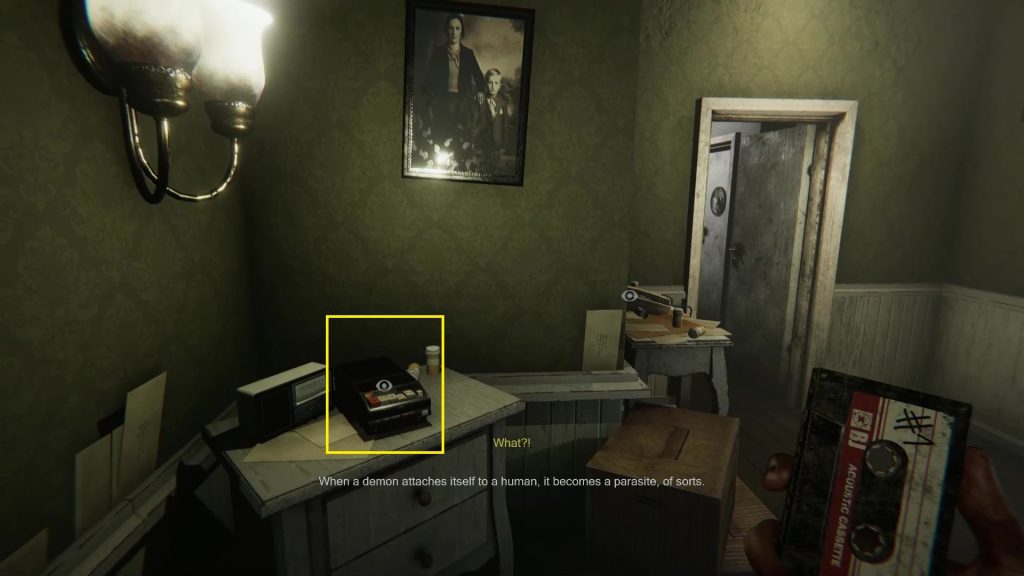
Once the power is restored, go back to the main hall and play Cassette #1 on the tape as shown in the picture below. After listening to the tape, Luca will have an episode and he will draw a red basement door on the notebook.
How to Open the Basement Door
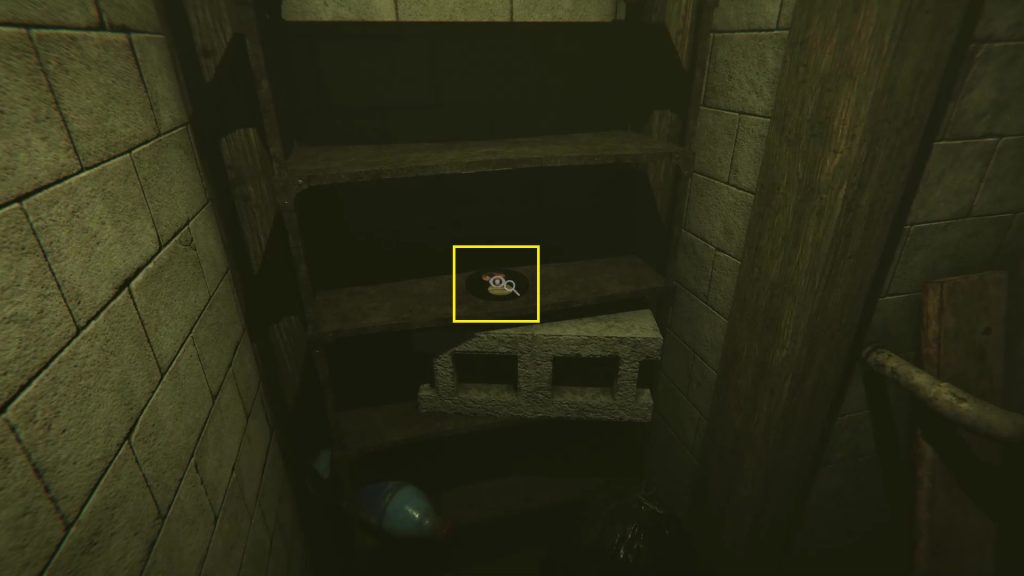
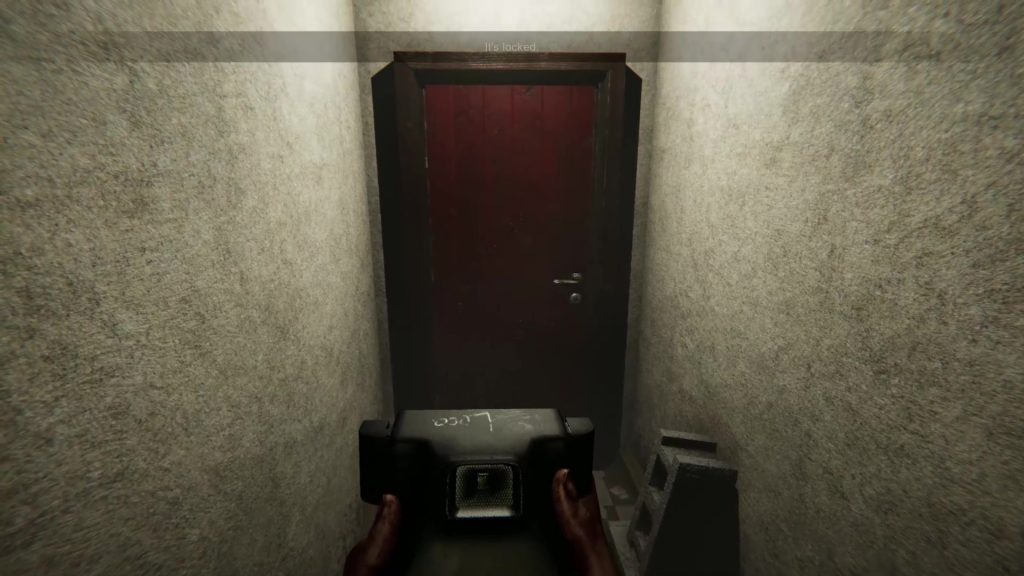
Go to the basement and proceed ahead. In the basement, you will find the First Solar Medallion on the shelf as shown in the picture below. Collect it as you will be needing it later in the game. Squeeze through the small gap in the wall to reach the red basement door as shown in the second picture below. Click a photo of the door to unlock it. Then open the door and proceed ahead to find a locked well.
How to open the Well
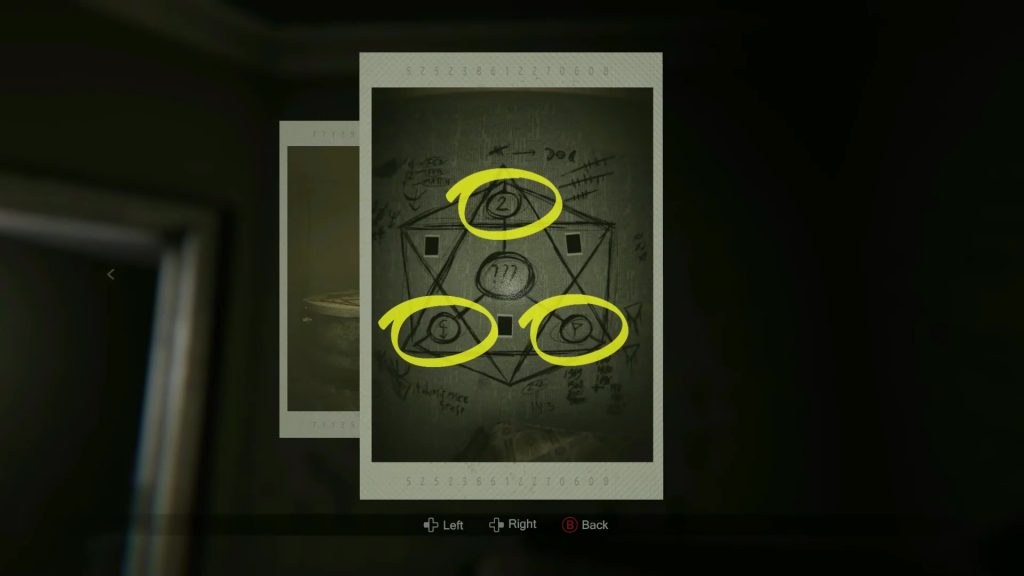
On the well, you will find three padlocks with weird symbols on them. To open the well, you will need to find the correct symbols that need to be input into the padlocks. Go back to the study and click a photo of the drawing on the wall. Open the photo and you will see the correct symbols as shown in the picture below. Input these symbols into the padlocks and then click a photo of the well as shown in the second picture below. This will blow open the well. Now climb down inside the well.
Inside the Well
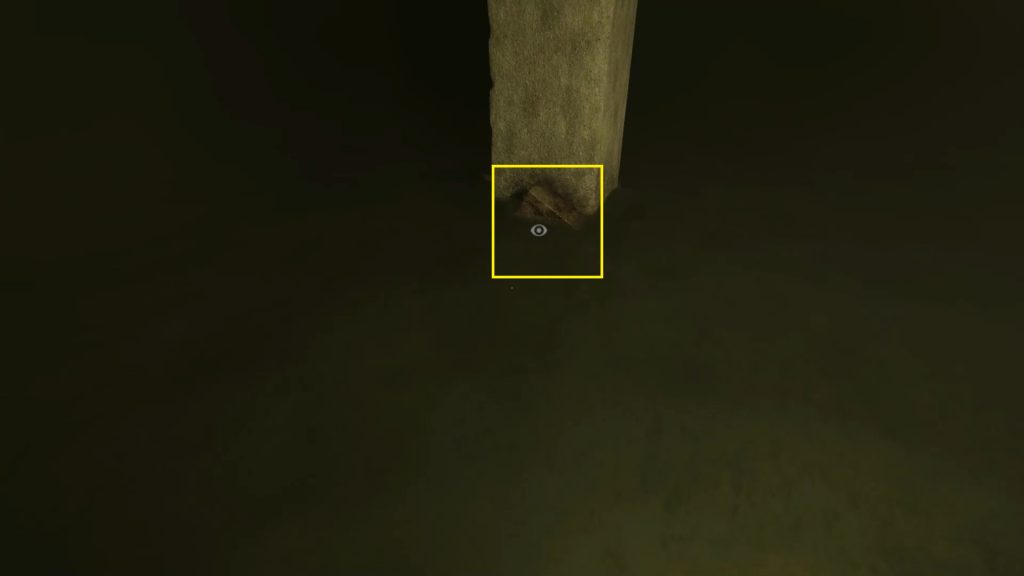
Proceed ahead in the well and collect the Moonbox, which is at the foot of a pillar as shown in the picture below. Now go back to the door through which you came and you will find that the path is sealed. Pick up the Radio Transmitter there and go back to the center of the room.
When you reach the center of the room, you will be locked there. At this point, static noise will start coming from the transmitter. Open the camera and start taking pictures until you see a monster two times in the camera flash. Then a clear voice will start coming from the transmitter. Listen to the complete transmission. When the transmission will finish, the static noise will again start coming from the radio. Click a photo and you will again see the monster in the camera flash. You will be now transported to a room with many red doors.
Open all the red doors in the room. When you have opened all the doors, the room will go black. When the light comes back, you will see that all the red doors are again closed. If you try to open the doors again, you will see that they are locked. Click photos of all the doors one by one and a door will blow open. Go through the door and you will be back in the basement.
Attic Portrait Puzzle & Solar Medallion Puzzle
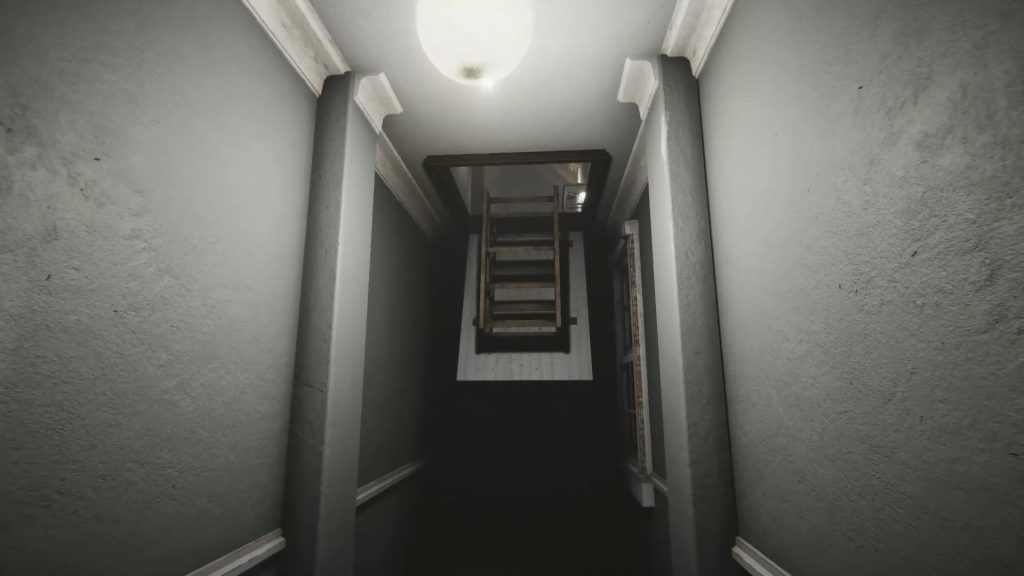
After you are back at the house, Luca will have another episode and he will draw a picture of the attic in his notebook. You will find the ladder leading to the attic in a hallway as shown in the picture below. Climb up the attic. Here you will see a couple of portraits. Leave them for now as you will be needing two more portraits to complete the puzzle. Pick up the Heart Key hanging from a pillar in the attic.
Grandma’s Room
Get down from the attic and use the Heart Key to enter Grandma’s Room as shown in the picture below. Open the cupboard inside the room to get some Old Slides as shown in the second picture below. In the small room attached to this room, you will see the Solar Medallion puzzle panel on the wall. The Second Solar Medallion is in the panel. Collect it.
Projector Puzzle
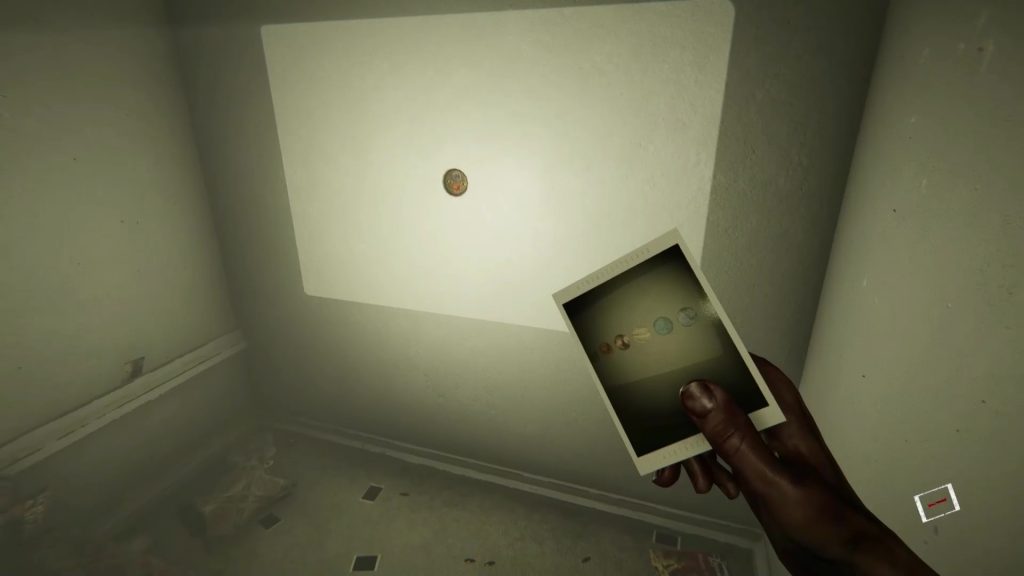
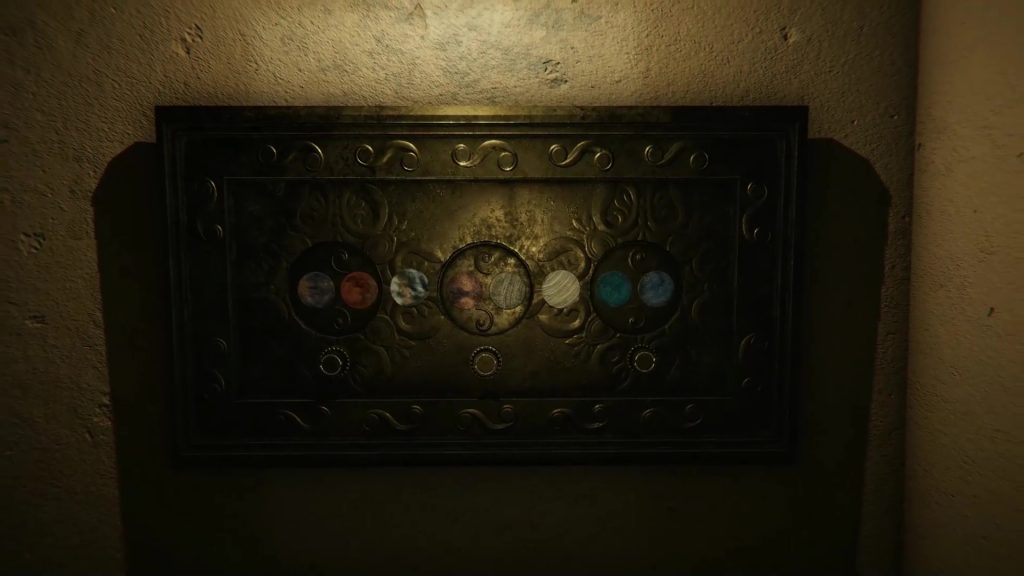
Go to the room with a TV and a Sofa. You will find the door here open now as shown in the picture below. Go through this door and you will reach a room with a projector. Put the old Slides inside the projector. Play all the slides once. Then go near the wall on which slides are being projected. As you approach the wall, the slides will automatically start playing rapidly. Bring up the camera and click a photo of the wall. This will make the Third Solar Medallion appear on the wall as shown in the second picture below. The photo will also reveal the correct order of planets required to solve the Solar Medallion Puzzle.
Go to the red hallway next to the projector. Open the door to enter Grandpa’s Office. Here you will find a Circular Portrait as shown in the picture below. Collect it as you will be needing it for the puzzle in the attic.
Solar Medallion Puzzle
If you followed this guide correctly, you will now be having three Solar Medallions. Go back to Grandma’s room and go to the Puzzle Panel in the small room connected to it. To solve the puzzle, you need to insert the medallions and arrange the planets in the same sequence as revealed in the photo that you clicked in the projector room. The picture below shows the correct sequence of the planets in my game. This sequence changes from game to game. So, you will need to do this yourself based on what planet order you have in your photo.
Once the puzzle is solved, a secret room will open inside Grandma’s room. Use a hammer to clear the path and enter the room. Collect the Hexagonal Portrait inside the secret room. Then open the cabinet behind this portrait and interact with the locket inside the cabinet.
Attic Portraits Puzzle
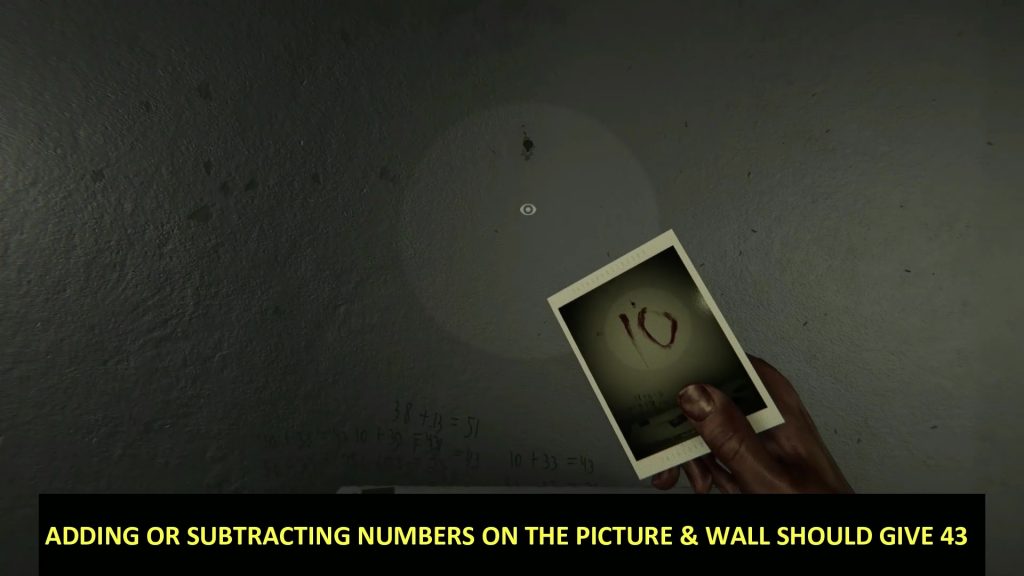
Go back to the attic and collect the two portraits there. Now you will be having all four portraits with you. Each of the portraits has the person’s age written on its backside. Look through the hole in the wall and you will see the number 43 written on the other side. Clicking photos of the portrait’s hanging locations will reveal a number as shown in the picture below. To solve the puzzle, adding or subtracting the number behind the portrait with the number on the photo should give 43. For example, If the photo shows the number 10, then you should hang the portrait with the number 33 on that spot (33+10=43). Hanging the correct portraits at their spots will solve the puzzle. The number on the photos varies from game to game. So, you will need to solve this yourself. Here is a little guide that will help you solve the puzzle.
If the number on the photo is 10, hang the circular portrait (10+33 = 43)
If the number on the photo is 38, hang the square portrait (38+5 = 43)
If the number on the photo is 13, hang the diamond portrait (56-13 = 43)
If the number on the photo is 25, hang the hexagonal portrait (68-25 = 43)
Tunnel Labyrinth & Graveyard
After solving the puzzle, look through the hole in the wall. You will see a door there now instead of the number 43. The door will open automatically and the wall will break. Go through the wall and collect the lighter there. Now open the door to enter the tunnel section. This section is very dark and you will need to use the lighter to continue ahead. This is a labyrinth and there is no easy way to explain the path. Check out the video guide at the top of the page if you are unable to come out of the labyrinth. Even without checking the video, if you take random paths in the tunnels, you will eventually come out of it. Once you are out of the tunnel, you will reach a graveyard. Stick to a wall of the graveyard and continue ahead and eventually, you will reach a well. Climb inside the well and you will be transported to a Cathedral.
Cathedral: Biblical Art Mazes
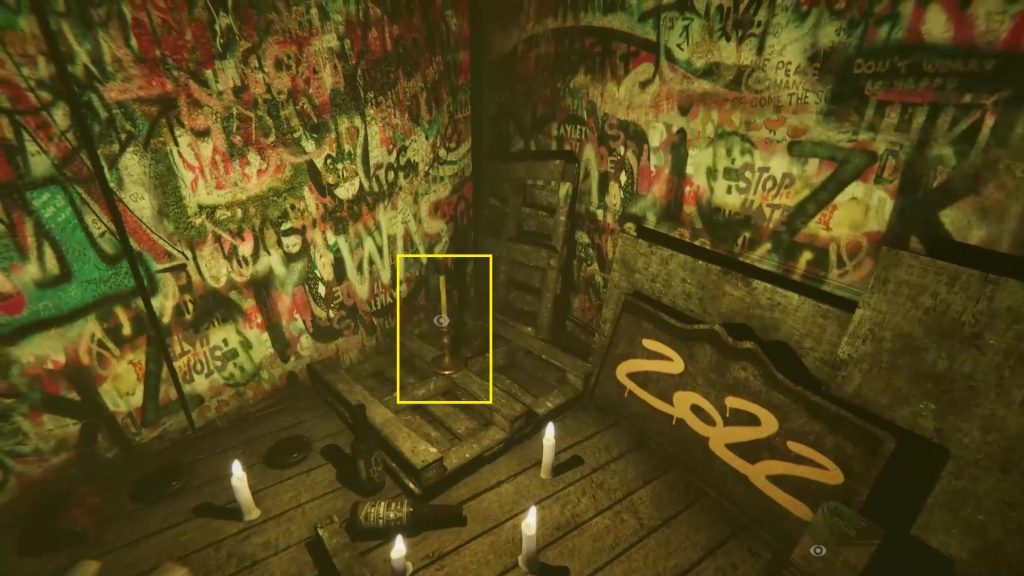
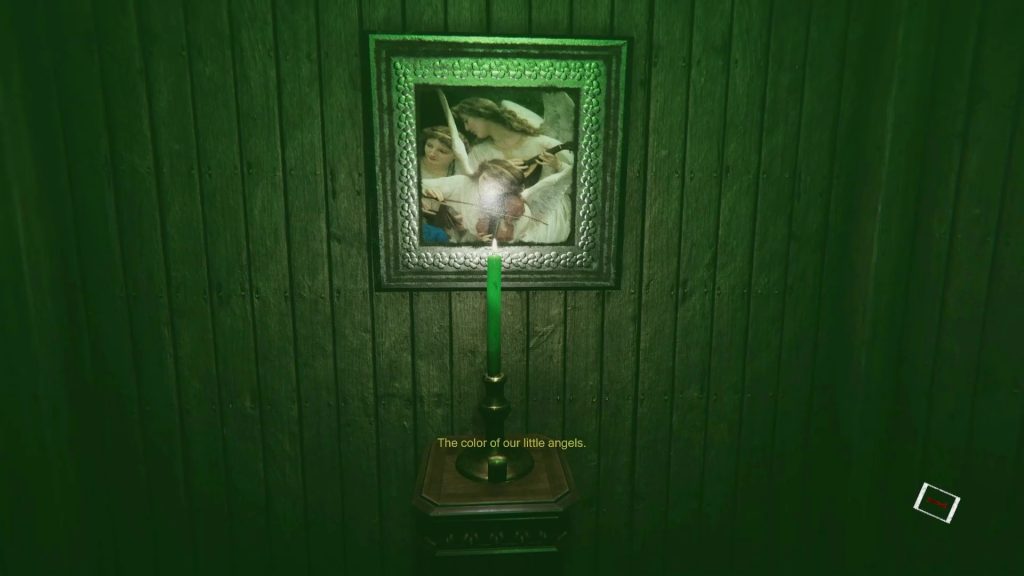
As you wake up in the cathedral, before going out through the door, collect the Yellow Candle next to it as shown in the picture below. There are a total of 4 colored candles in this area, which you will be needing to solve the puzzles.
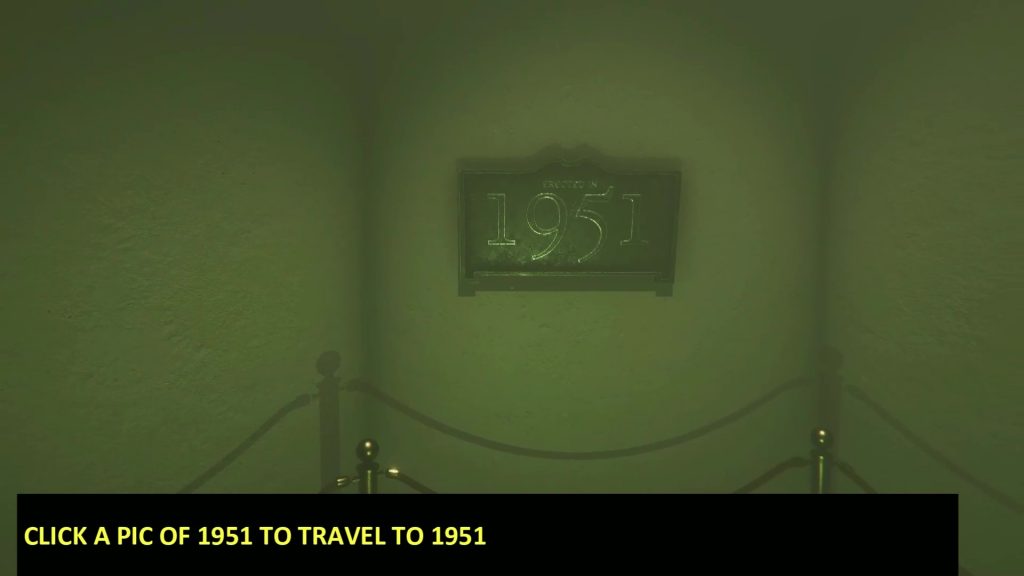
After collecting the candle, go through the door and you will reach a small room with the number 1987 written on the wall. Take a photo of the number 1987 and you will time travel to the year 1987. Here you will see three numbers (1951, 1987, & 2022) written on the wall. Taking a photo of the number on the wall will make you time travel to that year. First, take a photo of 1951 to reach the year 1951 as shown in the picture below. Pick up the Blue Candle kept on the chair there. Then go out of the room and enter the cathedral.
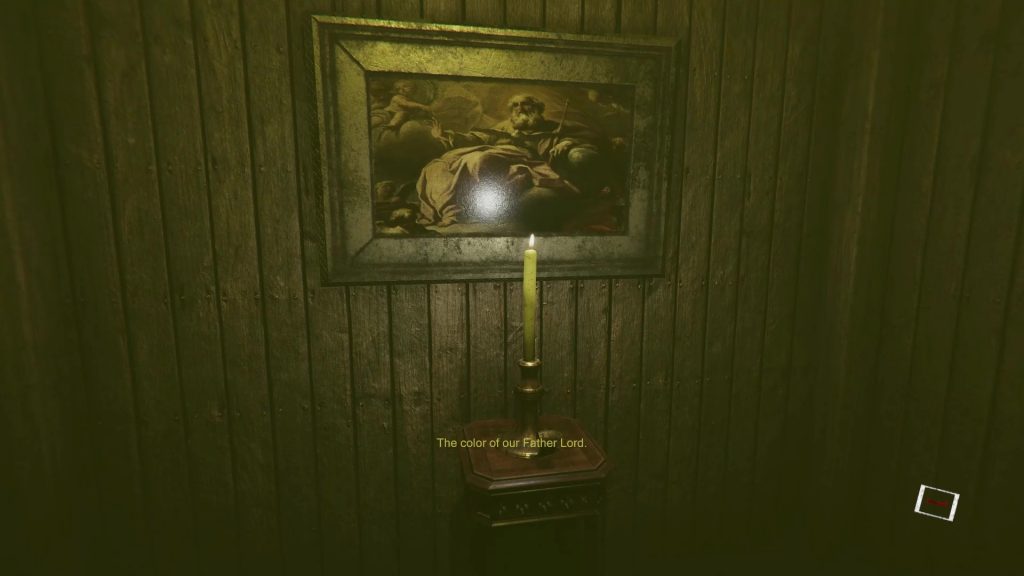
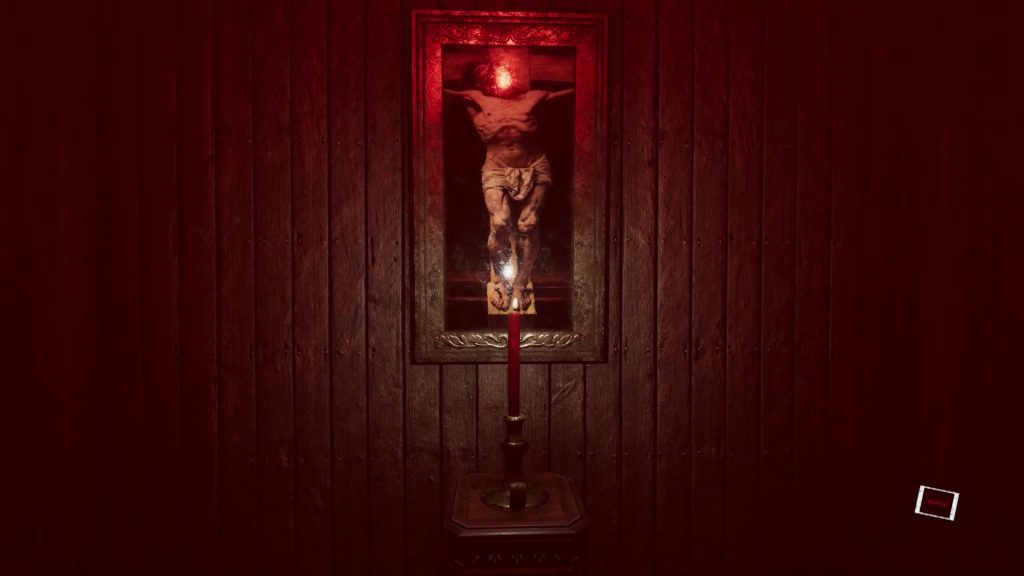
After entering the cathedral, go straight ahead and go through the door on the opposite side. Here you will see two pictures with planks in front of them giving hints about the candle that goes with the painting. Now go back to the main hall of the cathedral. Here you will find four mazes. Enter the yellow maze and continue until you reach a small room with three tables kept in front of three paintings. Place the yellow candle on the table in front of the painting shown in the picture below. If the correct painting is not there, that means you need to time travel to a different year to solve this maze.
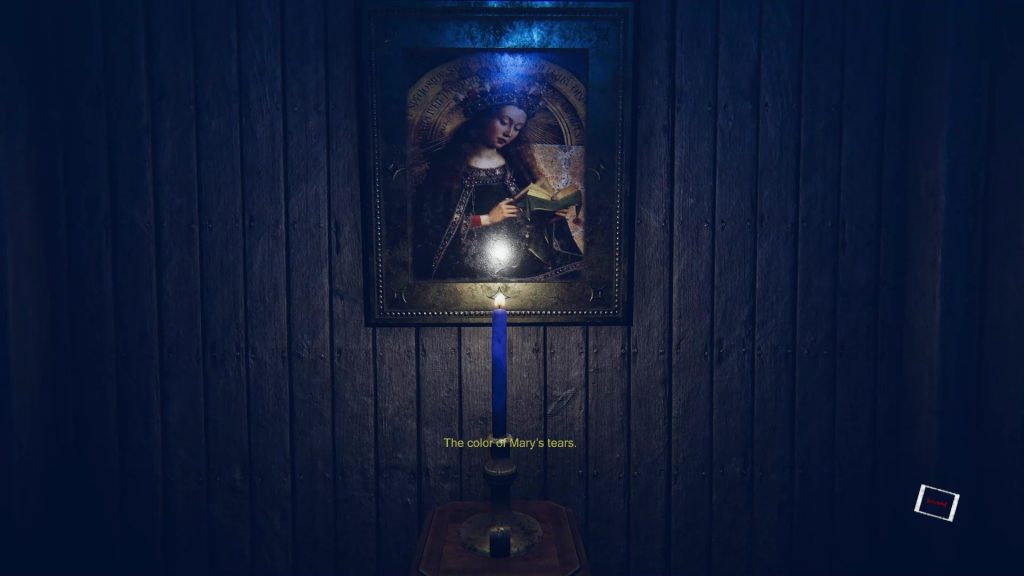
Go back outside. Enter the blue maze and continue until you reach a small room with three tables kept in front of three paintings. Place the blue candle on the table in front of the painting shown in the picture below. If the correct painting is not there, that means you need to time travel to a different year to solve this maze.
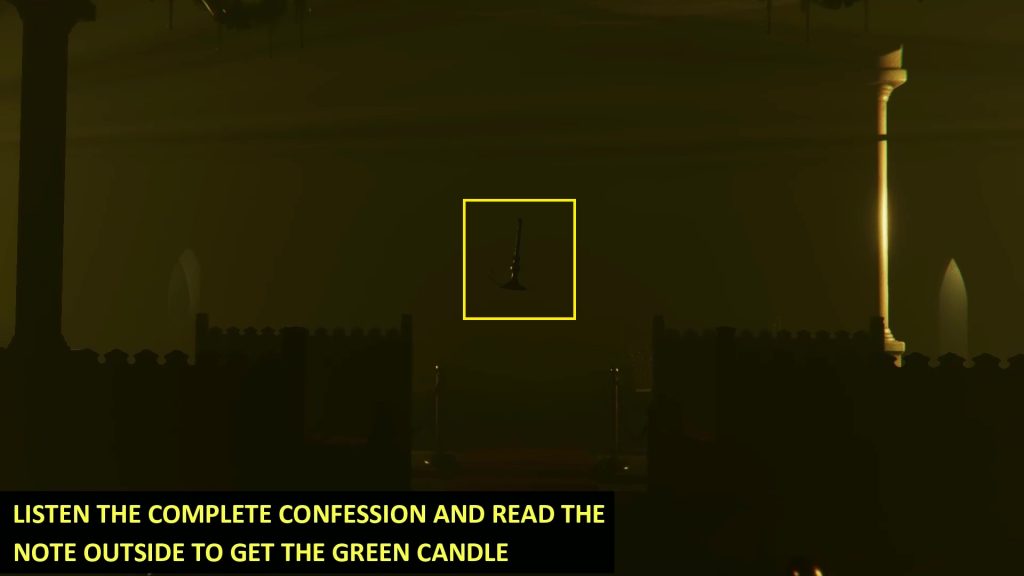
Go back outside and listen to the confession of the woman inside the confessionary. After the confession is complete, pick up and read the note outside the confessionary door. This will make the Green Candle appear mid-air in the cathedral. Pick it up.
Enter the green maze and continue until you reach a small room with three tables kept in front of three paintings. Place the green candle on the table in front of the painting shown in the picture below. If the correct painting is not there, that means you need to time travel to a different year to solve this maze.
Now time travel to 1987. Go to the cathedral and take the path leading to the bell room. As you enter the bell room, you will find the Red candle on the path. Now go back to the main hall and enter the red maze and continue until you reach a small room with three tables kept in front of three paintings. Place the red candle on the table in front of the painting shown in the picture below. If the correct painting is not there, that means you need to time travel to a different year to solve this maze.
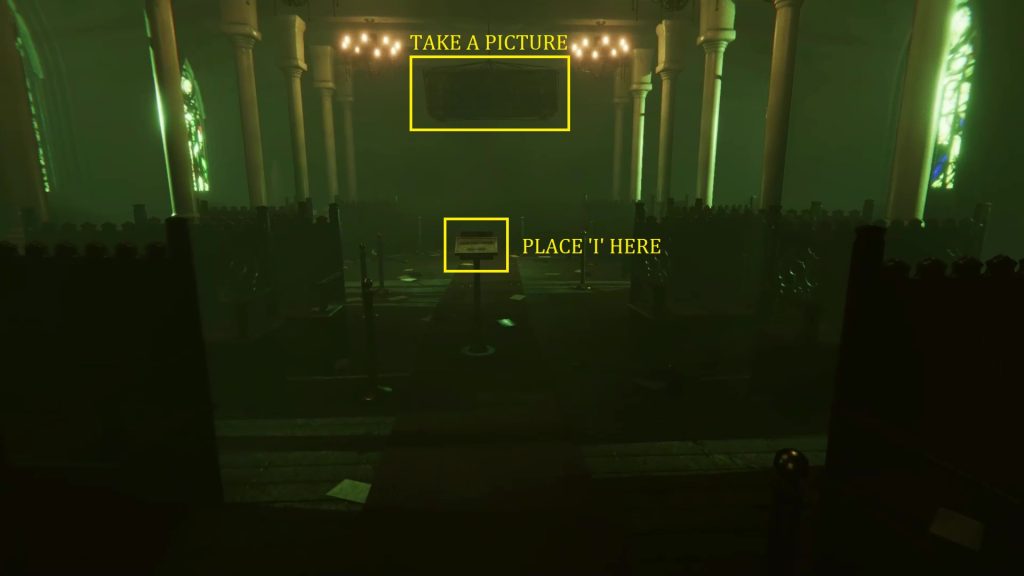
Once you have solved all the four mazes, travel to 1987 and go to the bell room. There you will find the Confessionary Key under the bell. Pick up the key and then travel to 1951. Use the key to open the confessionary. Inside the room, you will find a nameplate. Interact with the nameplate and collect the Letter ‘I’ from it. Now travel back to 1987 and place the letter I on the podium as shown in the picture below. Then click a photo of the coffin as shown in the picture below. This will make the coffin fall down. Collect Madison’s Skull dropped from the coffin.
After you have collected the skull, a door will appear in the front. Go through the door and you will reach a hallway. Go to the other side of the hallway and open the door there. You will find that the path is blocked. Turn back and go to the other side of the hallway and open the door there. Keep doing this until a monster appears from the door. As soon as the monster appears, turn around and sprint through the hole in the wall ahead. You will be back in the attic now.
Getting Crowbar in the Basement
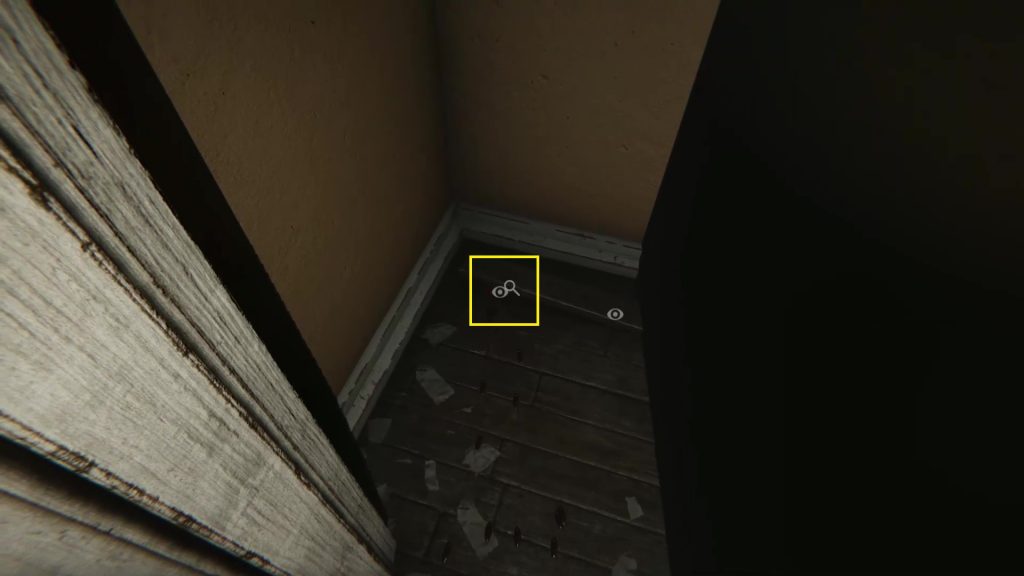
As you get down from the attic, the phone will start ringing. Go to the phone in the main hall and listen to the entire message. After the call is over, go to Grandma’s room and enter the small room in it. Collect the Basement Key under the wooden plank here as shown in the picture below.
Go to the basement and use the key to open the red door. Go through it to reach a small room. As you enter the room, the light will go out. When the light comes back, you will see that the arrangement of the shelves in the room has changed. The light will start flickering and the arrangement of the room will keep changing until it stops at one particular arrangement. Hitting the bulb at the center of the room will change the arrangement of the shelves. Keep hitting the bulb until the red storage safe appears. Hit the bulb again and a new arrangement of the shelves will appear. This time you will find the crowbar on one of the shelves as shown in the picture below.
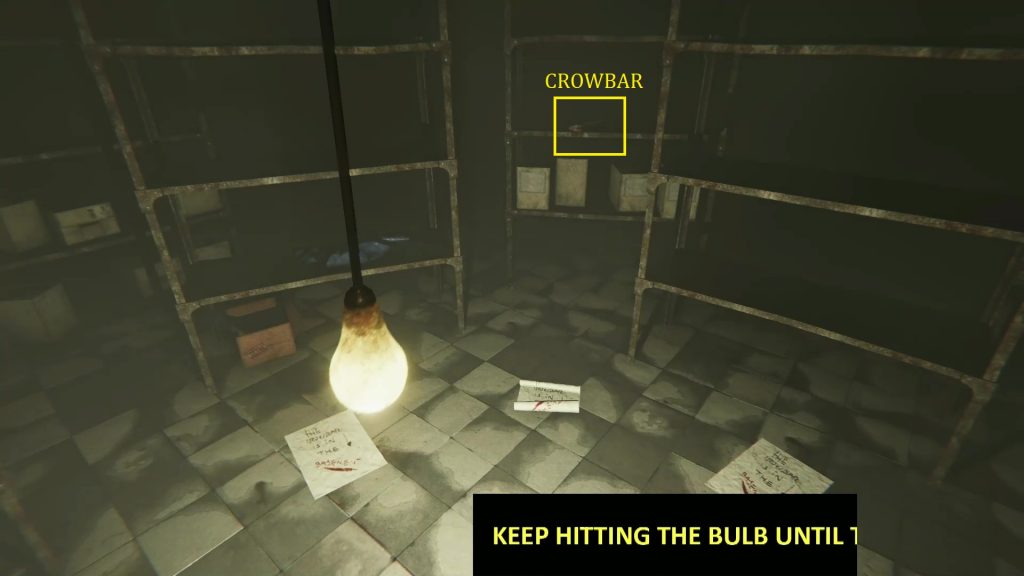
After collecting the crowbar, hit the bulb once again. This will make all the shelves disappear and the possessed statue will appear. Click a photo of the possessed statue, and it will disappear. Then three statues will appear. Here you will need to identify and click the photo of the possessed statue. If you listen carefully, you will hear a breathing sound when you approach the possessed statue. If you click the photo of the correct statues, these statues will disappear. Then another statue will appear. Click its photo. Then many statues will appear. Click a photo and you will be transported back to the basement.
Go back to Grandma’s room and use the crowbar to crank open the wooden plank under which you found the Basement Key. Collect the Wedding Ring underneath the wooden plank.
The Ritual
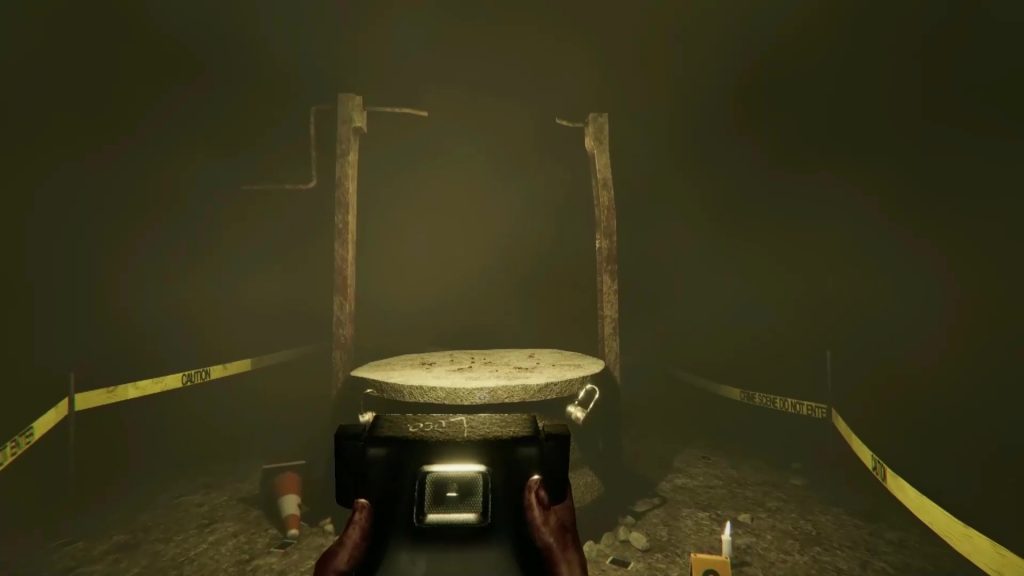
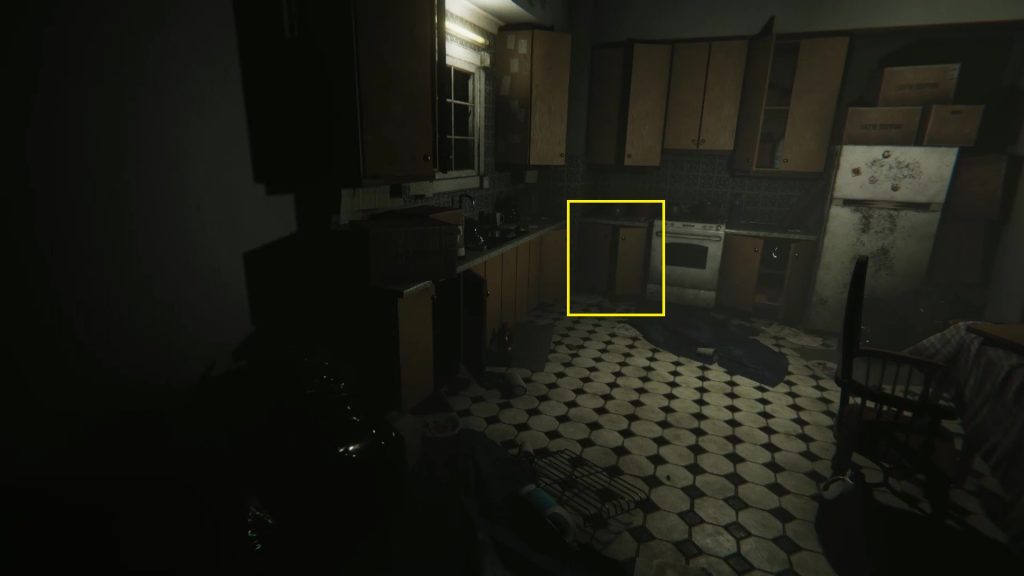
Now you have to complete the ritual. For the ritual, you need to go back to the room where you got the camera. But before going there, collect the First Triangular Key from the cabinet in the kitchen as shown in the picture below. You will be needing this key soon.
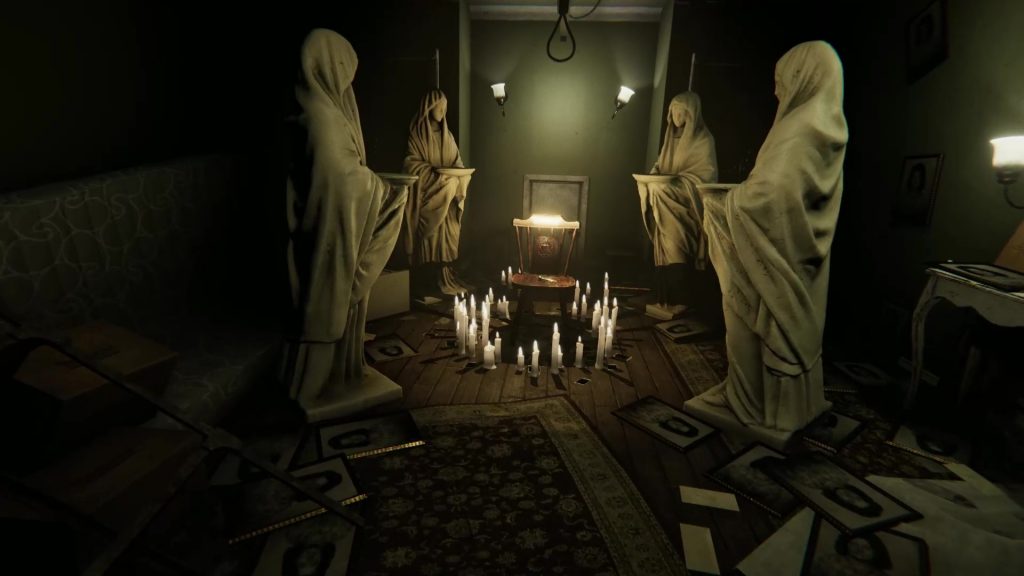
Go to the room where you got the camera. here you will see four statues standing in a circle around the chair as shown in the picture below. Pick up the book from the chair to read about the ritual. Then place Madison’s Skull, Wedding Ring, & Sunbox on three statues. The ritual is not complete yet. You need to open the Moonbox first to be able to place it on the statue.
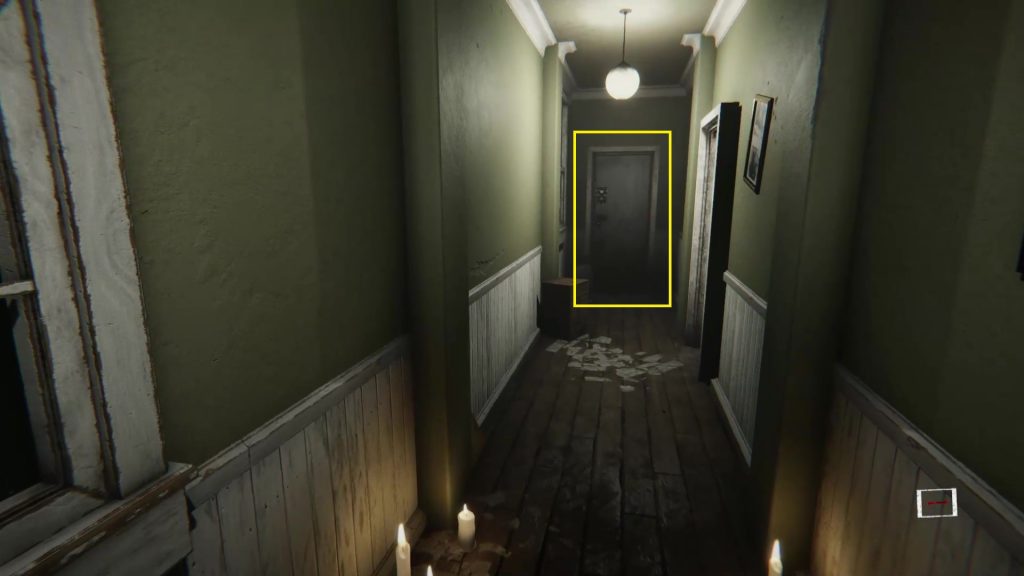
Pick up the Second Triangular Key from the chair at the center. Then come out of the room and use the two Triangular Keys to open the door at the end of the hallway as shown in the picture below.
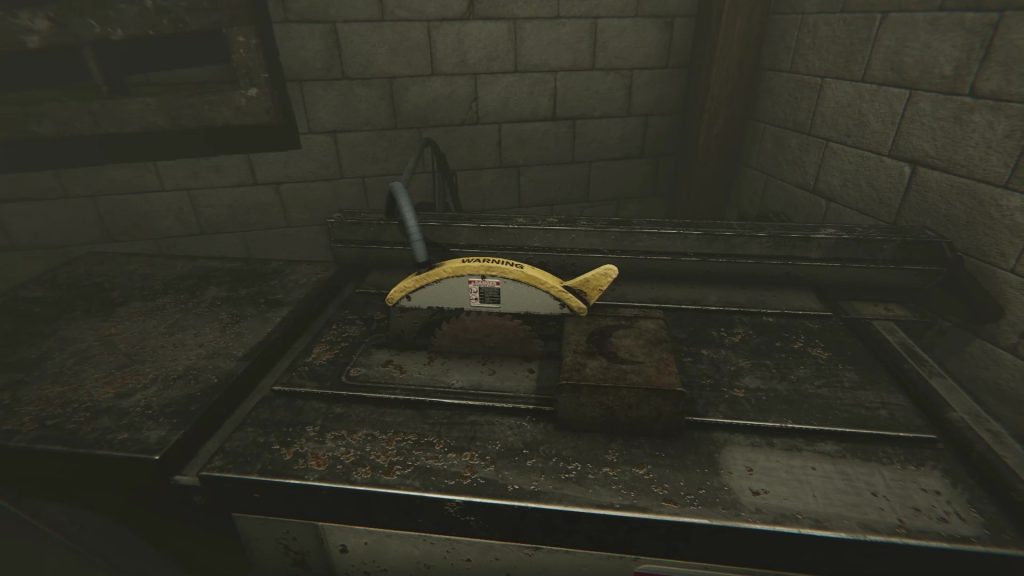
Enter the room and go downstairs. Collect the Bolt Cutter from the wall here as you will be needing it later. In the room, you will see two switchboards. Here you will need to flip the switches up and down correctly. If you flip a switch in the wrong direction then all the switches will reset back. The order in which the switches need to be flipped varies from game to game. So, you will have to flip the switches yourselves to learn the correct order for your game. Flip the switches correctly to start the saw blade. Use the saw blade to cut the Moonbox.
After cutting the Moonbox, go back to the ritual room and place it on the fourth statue. This completes the ritual. Now interact with the padlock on the door in this room, which will start your objective to find the code for the padlock.
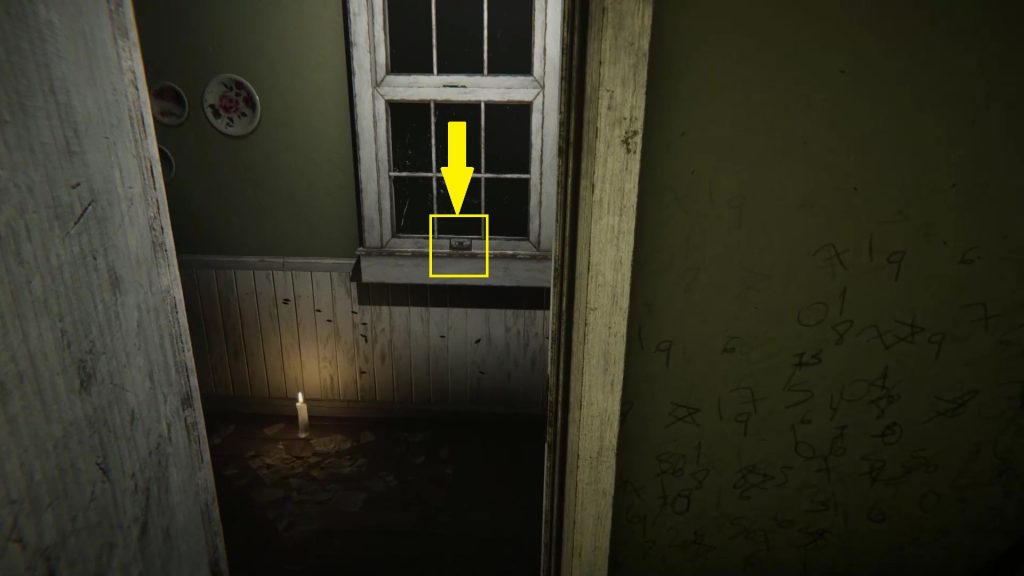
Get out of the ritual room and collect Cassette #3 kept on the window as shown in the picture below. Go to the main hall and play the Cassette. After you are done listening, Luca will have another episode and he will draw Horns in the notebook.
Horns
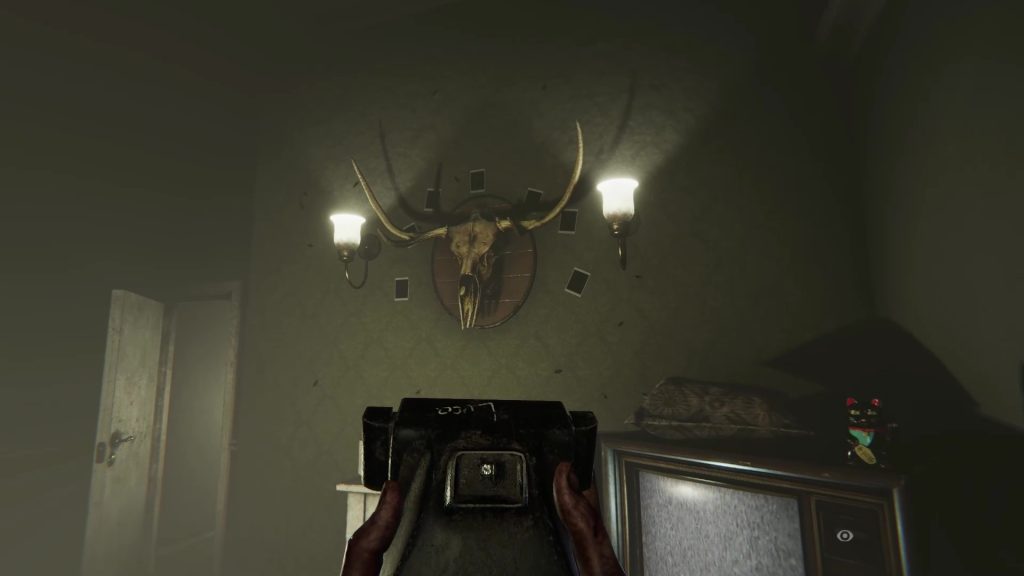
Go to the room with a sofa and a TV. Take a photo of the Horns here as shown in the picture below. This will give you the first digit of the code. The code varies from game to game so you will need to check the photos to know the code for your game.
Red Light (Morgue)
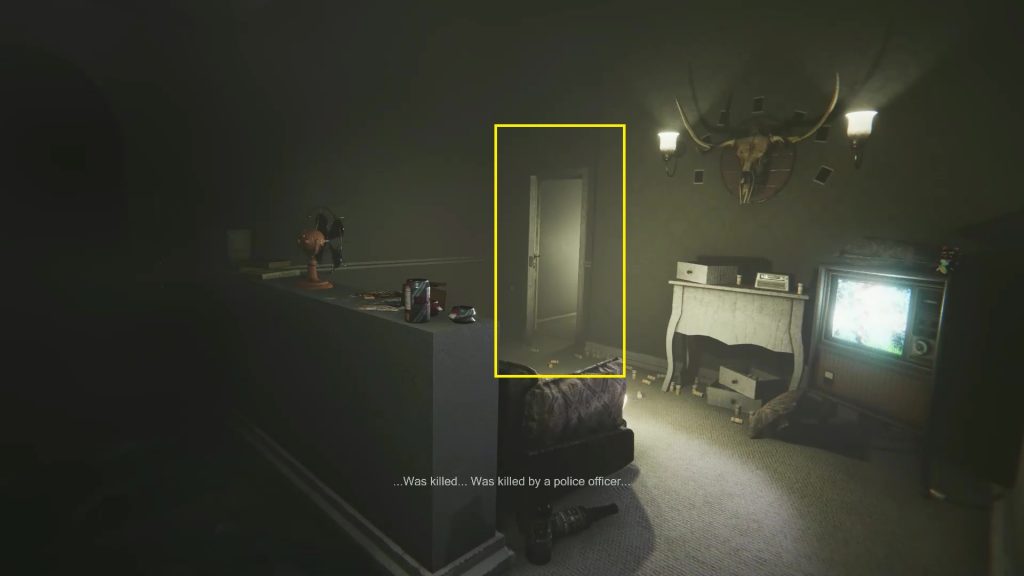
After getting the first code, Luca will have another episode and he will draw a Red Light in the notebook. Go to the basement and switch off the generator. Now go towards the projector room. The hallway will be completely dark. So, stick to a wall, and eventually, you will see some red light. Go there and open the front door to go out of the house. Enter the elevator to reach the morgue.
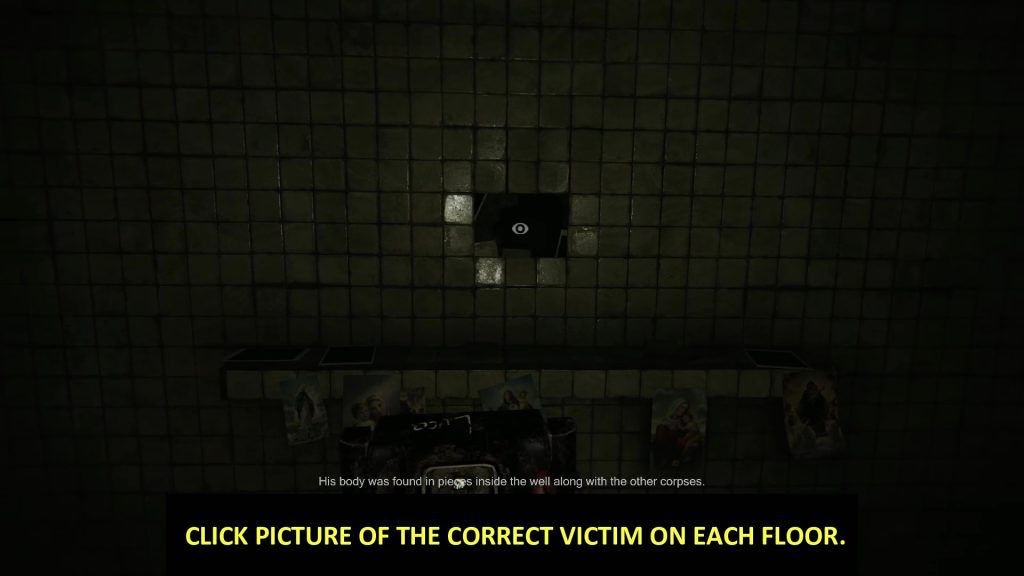
In the Morgue, there will be 5 floors. You need to take a photo of the correct victim on each floor to solve the puzzle. The detail of the victim will be announced on each floor. Listen carefully to correctly identify the victim. The nameplate of the victim is always behind the hole in the wall as shown in the picture. You will need a hammer to open some of these holes. Look through the hole to see the nameplate. When you have identifies the correct victim, click a photo of the wall. The name of the correct victim on each floor is shown below.
Floor 1: Robert Hale (Madison’s 75-year-old father)
Floor 2: Judith Hale (Madison’s 71-year-old mother)
Floor 3: Drake Fletcher (27-Year-Old Man)
Floor 4: Lynn Jamie (35-Year-Old Woman)
Now go to the fifth floor. If you have taken photos of the correct victims on the four floors, then the mirror on the fifth floor will be cracked. Take a picture of the cracked mirror to get the second digit of the code and the Clock Key.
Clock Room
Trace back your way to the basement and switch on the generator. Then use the clock key to enter the clock room as shown in the picture below. As you enter the room, Luca will have another episode and he will draw a clock on the notebook.
Green Safe Combination
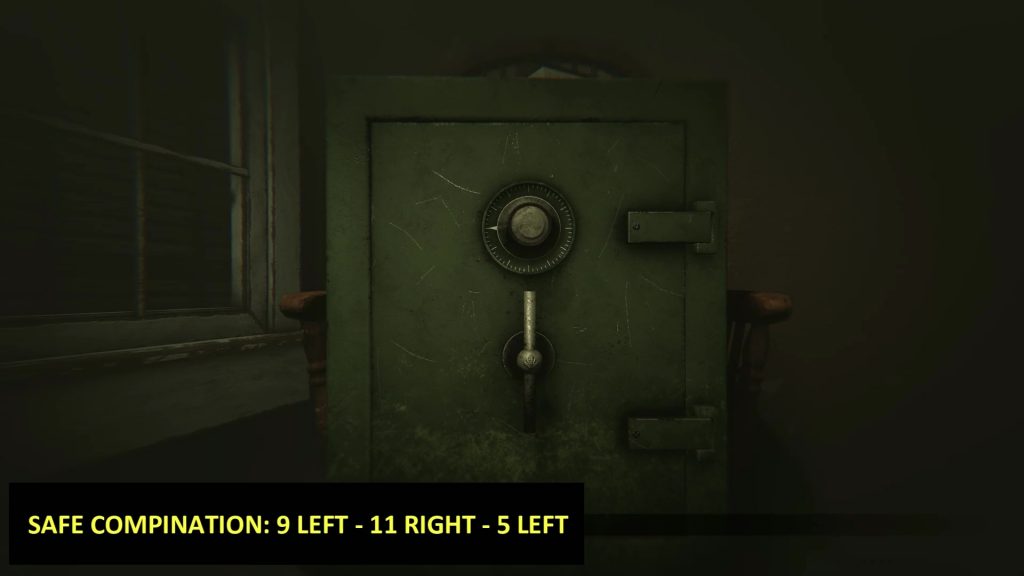
Use the bolt cutter to open a drawer in the clock room. Inside the drawer, you will find a note saying “Combination: 9 Left-11….“. This is one-half of the combination for the green safe in Grandpa’s office. Go to the bathroom to get the note with the second half of the combination. The note in the bathroom says “Combination: …Right, 5 Left“. You will get the safe combination by combining these two notes. The correct safe combination is: 9 Left-11 Right-5 Left. Go to Grandpa’s office and use this combination to open the green safe. Inside you will get a clockpiece.
Clock Room Puzzle
Go back to the clock room. Here you will notice that all the clocks on a wall have the same time except for one. You need to replace this clockpiece with the correct one. For example, in the below picture, all the clocks are at 6:40 except for the one marked with a yellow rectangle. You need to replace this clockpiece with another clockpiece at 6:40. Do this for all 4 walls to complete the puzzle.
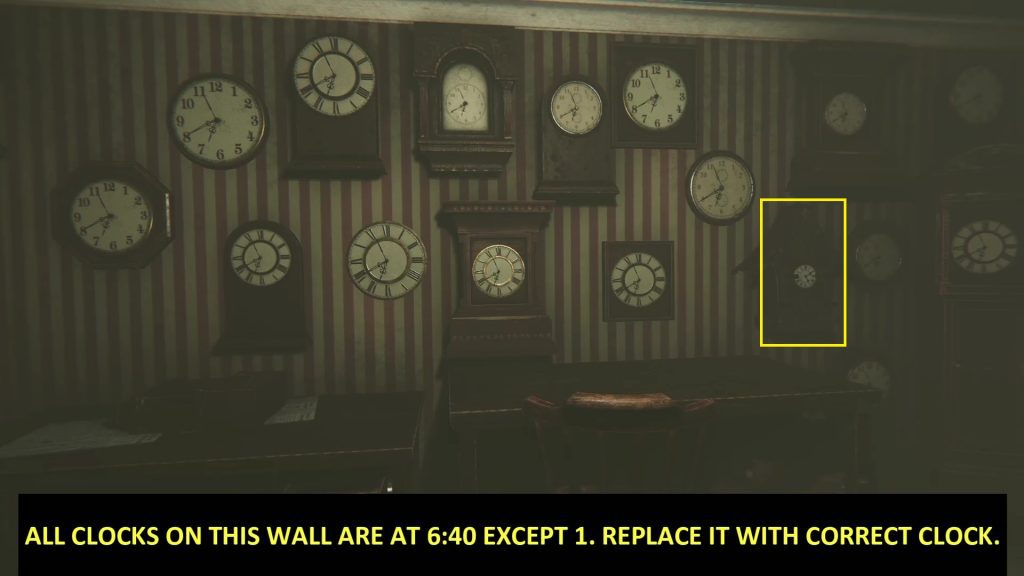
There are total 9 clockpieces in the house that will help you solve the puzzle (1 in Green Safe, 1 in the corridor outside Grandpa’s office, 1 in the attic, 1 in the kitchen, 1 in the hallway outside the ritual room, and 4 in the clock room). After you have solved the puzzle, click a photo of the door in the clock room as shown in the picture below. This will give you the third digit of the code. Enter the room and collect the Unfinished Clock hanging inside.
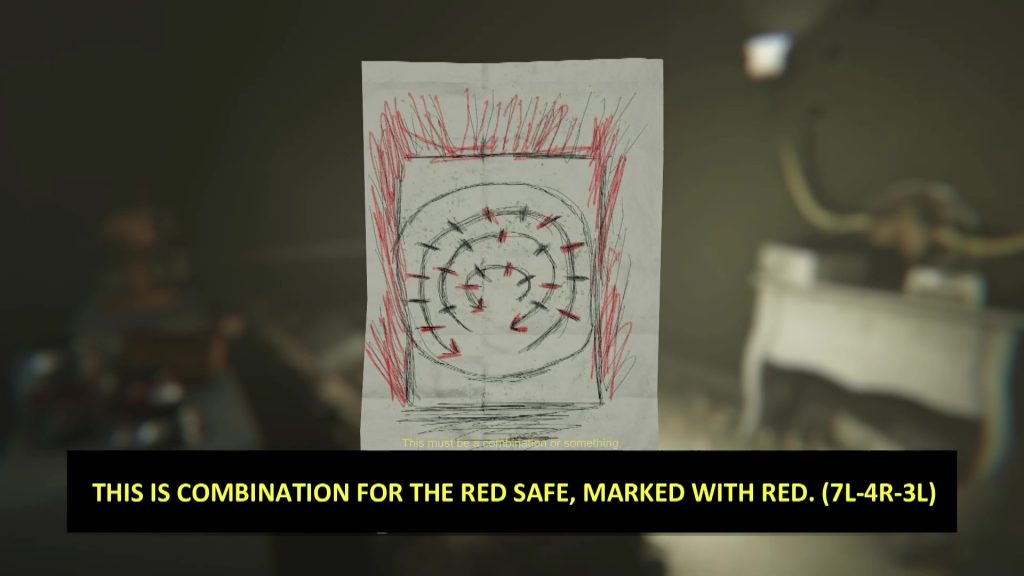
Red Safe Combination
After coming out of the clock’s room, Luca will have another episode and he will draw the combination for the red safe in Grandpa’s office. The red marks in the drawing tell the number of times the dial on the safe need to be rotated in a particular direction. Please note that the red mark on the arrow also needs to be counted. The picture below shows the safe combination for my game (7 Left-4 Right-3 Left). This combination changes from game to game. You need to check the notebook in your game to know the correct combination. Now go to Grandpa’s Office and open the red safe to get Johnny’s Key.
Before heading to Johnny’s Room, go to the bathroom and use the bolt cutter to open the toiler seat as shown in the picture below. Collect the Concrete Block inside the toilet as you will be needing it.

Johnny’s Room Puzzle
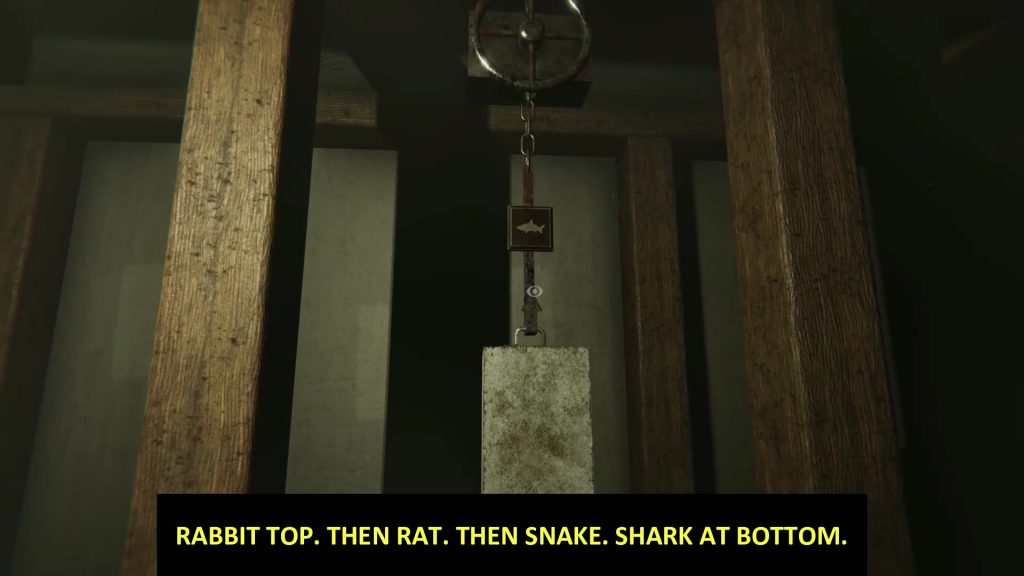
Use the key to open Johnny’s Room as shown in the picture below. Inside the room, you will see a story written on the blackboard. As per the story, the rabbit is at the top. Rat is below the rabbit. Snake is below the rat and the Shark is at the bottom.
To solve the puzzle, you need to hang the weights in such a way that the animals drawn on the lever are in the positions mentioned in the story on the blackboard. Put the highest weight on the Shark as shown in the picture below. Place the next highest weight on the snake. Put the concrete block that you collected from the toilet on the rat. Place the unfinished clock on the rabbit. Now clock a photo of the cage. This will open the cage. Pick up the book inside and read it.
Gramophone Puzzle
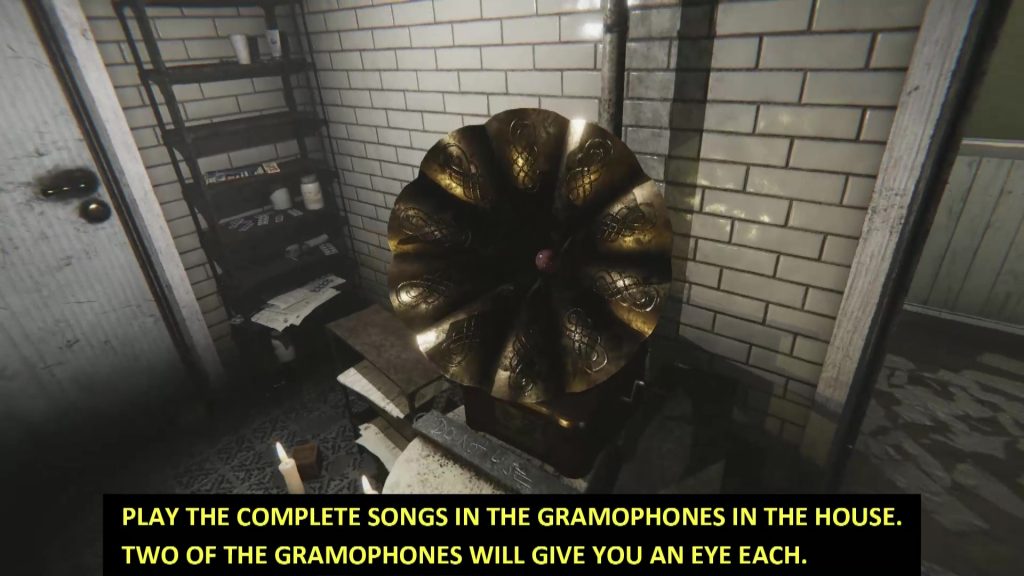
When you put down the book, you will see that Johnny’s room has changed, with a hole on the floor at the center of the room. Click a photo of the hole and the door of the room will open. Go out of the room and you will find various gramophones in the house. Two of these Gramophones have an eye inside them. You need to play the full song on the gramophone to get the eye. The gramophone containing the eye is decided randomly by the game. You need to keep playing all the gramophones until you get the two eyes. Once you have the two eyes, go back to Johnn’s room and throw them inside the hole on the floor. Then take a photo of the hole to get the fourth digit of the code. At this point, you will be attacked by a monster.
Ending
After you wake up, make your way to the ritual room. Now you have all 4 digits of the lock code. Please note that this code is different from game to game. Follow the steps shown in this guide to get the correct codes for your game. Enter the code on the padlock to open the door. Then pull out the pedestal behind the door. Interact with the ashes kept on this table. Now place your camera on the pedestal and interact with the chair at the center of the room to complete the game.