Silent Hill 2: All Lock Codes (All Difficulty)
This guide shows all Lock Codes & Puzzles in the Silent Hill 2 game, which was released on 6th October 2024. The codes might differ based on the difficulty level. This guide shows the codes for all the difficulty levels.
East Side of South Vale Lock Codes & Puzzles
Grand Market Door Code
Light: 4442
Standard: 4444
Hard: 4446
– Click here to see how to get the Grand Market door code.
Jukebox Puzzle
– Click here for the Jukebox Puzzle
Wood Side Apartments Lock Codes & Puzzles
Golden Apple Handle Puzzle
– Refer to sections 4 & 8 of the Wood Side Apartments walkthrough
Apartment 206 Safe Code
Light: 15-11-13
Standard: 13-7-11
Hard: 13-7-11
Coin Puzzle
– Click here to see how to solve the coin puzzle
Apartment 201 Key
– Click here to see how to get the apartment 201 Key
Blue Creek Apartments Lock Codes & Puzzles
Clock Puzzle
– Click here for the Clock Puzzle walkthrough
Radio Puzzle/ Valve Puzzle
– Click here to see how to solve the radio Puzzle
Room 202 Door Code / Moth Puzzle
Light: 582
Standard: 373
Hard: 522
– You will get the door code by solving the Moth Puzzle.
Birds Seesaw Puzzle
– Refer to Section 10 of the Blue Creek Apartments walkthrough.
West Side of South Vale Lock Codes & Puzzles
Jack’s Inn Safe Combination
Light: 0451
Standard: 0451
Hard: 0533
Near the safe, you will see a note with a clue that you need to go to Apartment 107. Go to Apartment 108 and break the window to enter inside. Then break the wall to enter Apartment 107. There you will find a note with an aritmatic equation. Solving the equation gives you the code.
Pete’s Bowl O Rama Safe Code
Light: 1887
Standard: 1887
Hard: 1887
You will find the code on a Bloody note on the top left edge of the map.
Brookhaven Hospital Lock Codes & Puzzles
Reception Office Padlock Code
Light: 287
Standard: 724
Hard: 152
– Click here to see how to get the padlock code
Nurses’ Station Door Code
Light: 3578
Standard: 3578
Hard: 7456
– Click here to see how to get the door code
X-Ray Puzzle
– Click here to see how to solve the X-Ray Puzzle
D1 Room Lock Combination
Light: 4-37-12
Standard: 4-37-12
Hard: 4-37-12
– You get the code by solving the X-Ray Puzzle
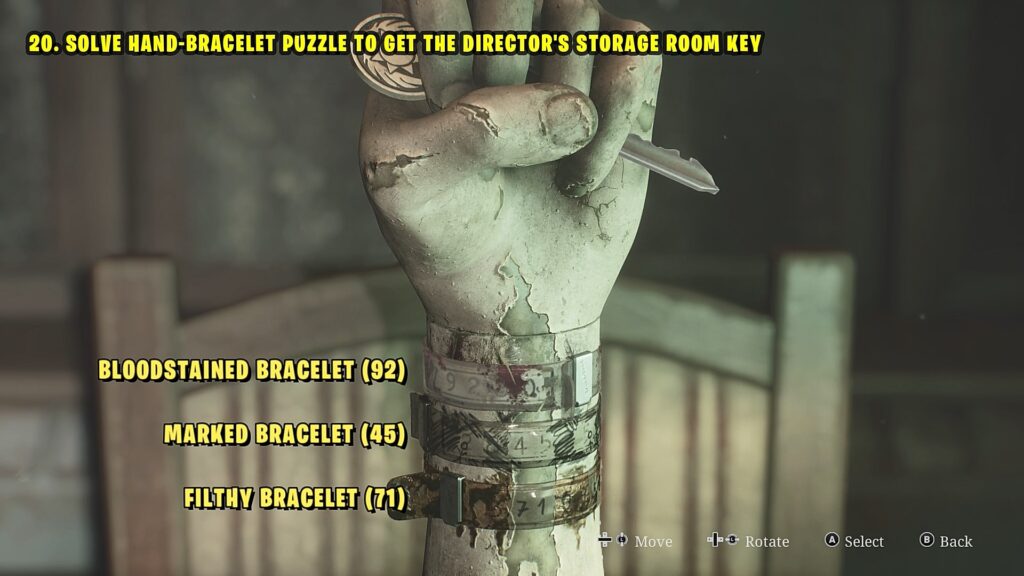
Director’s Office Hand Puzzle
To solve the Director’s Office puzzles, you will first need to collect the three bracelets. Then insert the Bloodstained Bracelet on the top, the Marked Bracelet in the middle, and the Filthy Bracelet at the bottom. Rotate the bracelets to get the code as mentioned below, from top to bottom.
Light: 92-45-71
Standard: 92-45-71
Hard: 92-45-71
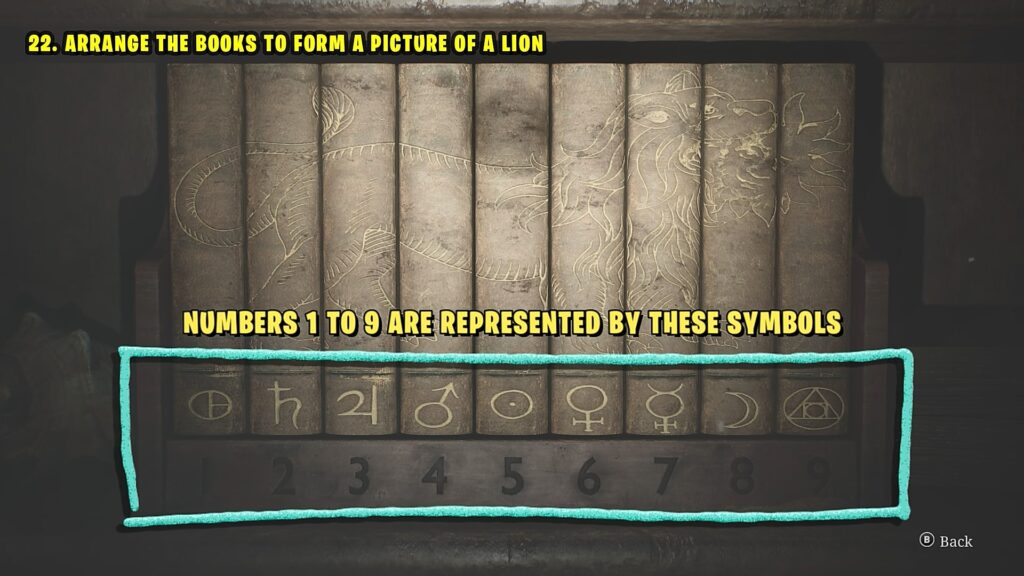
Director’s Office Book Puzzle
Arrange the books to form a picture of a lion as shown in the picture below. Once the books are arranged correctly, the symbol at the bottom of the book represents the numbers 1 to 9 from left to right as shown in the picture below.
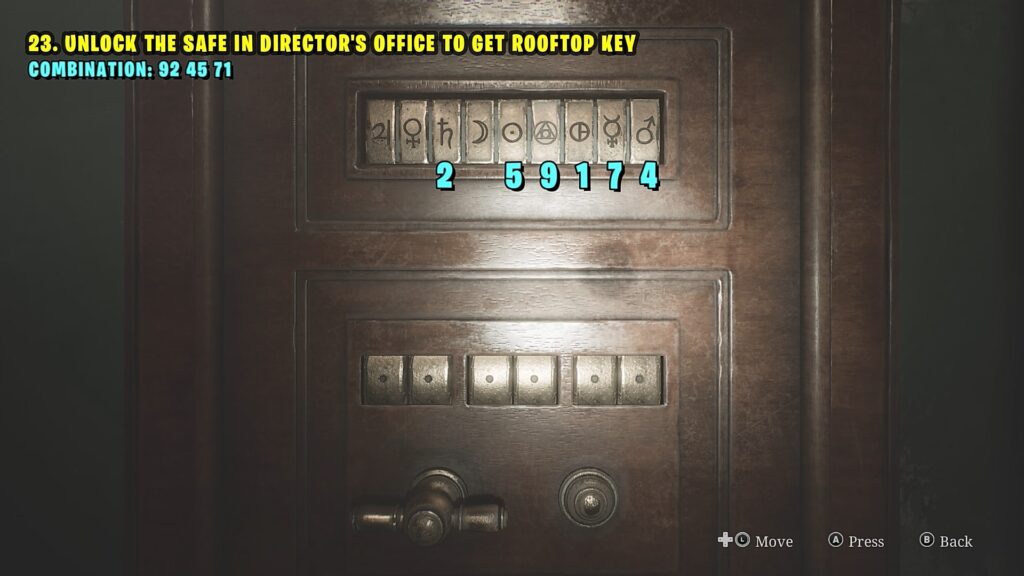
Director’s Office Save Code Puzzle
Interact with the safe and place the safe button in the missing button’s slot. Now input the code as mentioned below. The numbers the symbols represent are also shown in the picture below. Press the correct symbol to input the code.
Light: 92-45-71
Standard: 92-45-71
Hard: 92-45-71
Chained Box Puzzle
– Click here for Chained Box Puzzle
Lady of the Door Puzzle
– Click here for the Lady of the Door Puzzle
Decorative Box Code
The code is the answer to the quiz questions that you get on your way down to the basement. You only get one chance to open the box. If you input the wrong numbers, then you won’t be able to open the box.
Light: 2-3-1
Standard: 2-3-1
Hard: 2-3-1
Historical Society Lock Codes & Puzzles
Spiral-Writing Key Keypad Code
You get the code by trial and error using the numbers 2,3, & 9. The list of all 6 possible codes is mentioned below.
2-3-9
2-9-3
3-2-9
3-9-2
9-2-3
9-3-2.
Toluca Prison Lock Codes & Puzzles
Prison Generator Puzzle
– Click here to see how to solve the puzzle
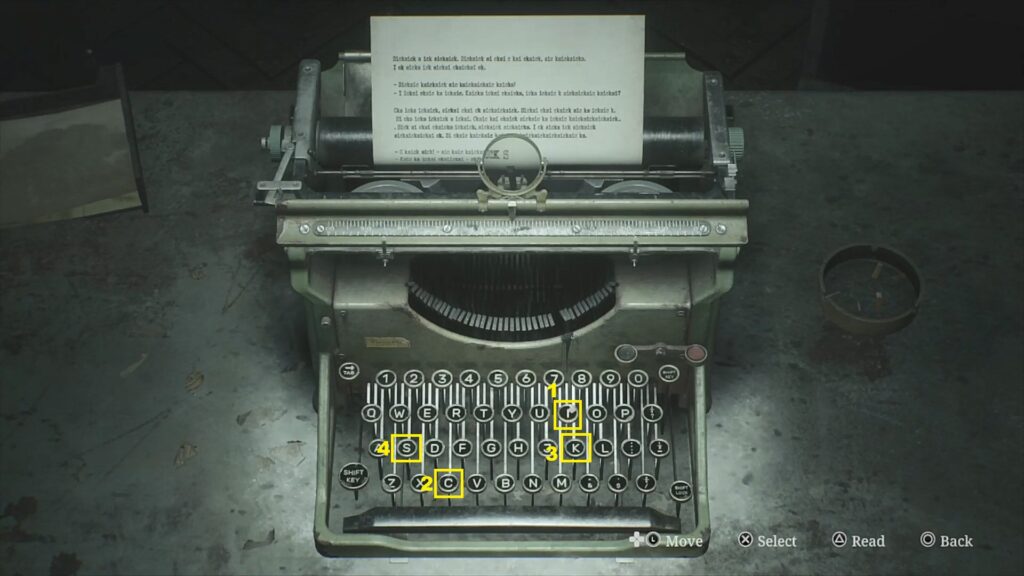
Prison Typewriter
Press the buttons I-C-K-S (Sequence shown in the picture below) to type SICK. This will solve the puzzle and the drawer underneath the typewriter will open. The solution is the same for all the difficulty levels.
Toluca Prison Weights Puzzle
The solution is the same for all the difficulty levels. Solving the puzzles opens 4 animal doors. Solving the final puzzles gets you an Execution Lever (Quest Item).
– Click here to see how to solve the puzzle
Gallows Puzzle
To solve the puzzle, place the plaques in the correct position. Then go near the correct rope and select it. If you select the wrong rope then you will have to fight your way back up. The correct plaques for each position is mentioned below along with the correct rope.
Light & Standard Difficulty:
Position I: I Watched them burn….
Position II: What were those reasons….
Position III: My only daughter….
Position IV: So my guilt is plain to see….
Position V: You were oh so kind to me….
Position VI: In truth, he was less man than beast….
Select Rope: IV
Hard Difficulty:
Position I: As the spark of life from her eyes….
Position II: With hands atremble, he seizes what he must….
Position III: Amidst the moon’s glow a desperate truth….
Position IV: A contorted chill dances on his spine….
Position V: The victim’s eyes wide with terror and fright….
Position VI: A tragic fruition a mother’s despair….
Select Rope: II
Lakeview Hotel Lock Codes & Puzzles
Bookshelf Puzzle
Pick up the four red books lying around in the Reading Room. Then see the painting on the wall for the clue. Interact with the bookshelf and place the books in the correct position as mentioned below to solve the puzzle. The puzzle is the same for all the difficulty levels. Click here for a detailed walkthrough.
Top Left: Revelations: A New Understanding
Top Right: The One Who Soared
Bottom Left: Stalwart to the End
Bottom Right: Pride Before the Fall
Mirror Puzzle
– Click here to see how to solve the Mirror Puzzle
Vanity Mirror Lightbulb Puzzle
– Click here to see how to solve the puzzle
Suitcase Code
Light: DEED DONE
Standard: DEED DONE
Hard: LOVE LUST
You get the code by solving the Vanity Mirror puzzle.
Gem Box Puzzle
Place the gems on the box at the location shown in the picture below to solve the puzzle. Click here for the gems’ locations. The puzzle is the same for all the difficulty levels.
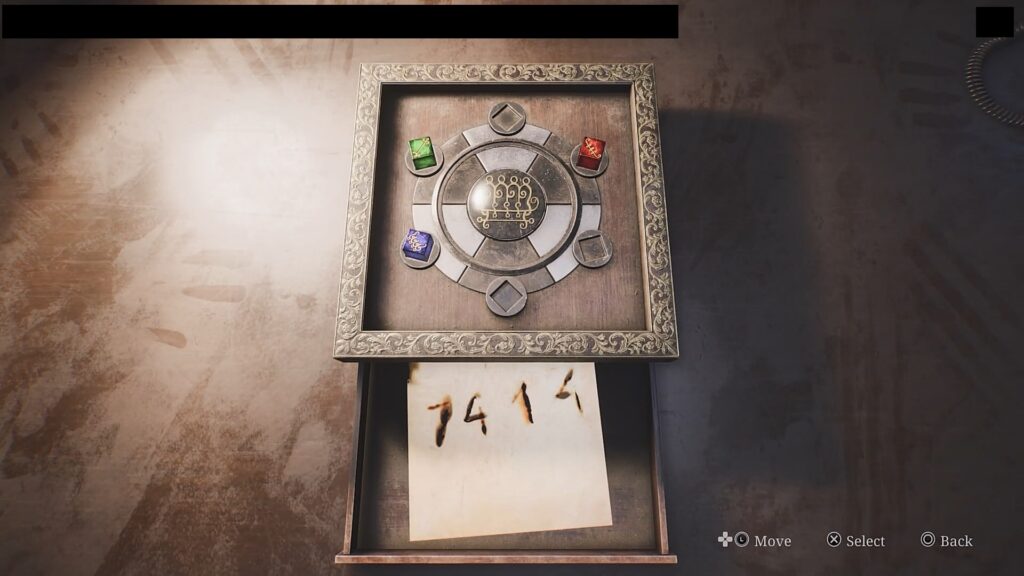
Break Room Keypad Code
Light: 7414
Standard: 7414
Hard: 7414
You get the code by solving the Gem Box puzzle.
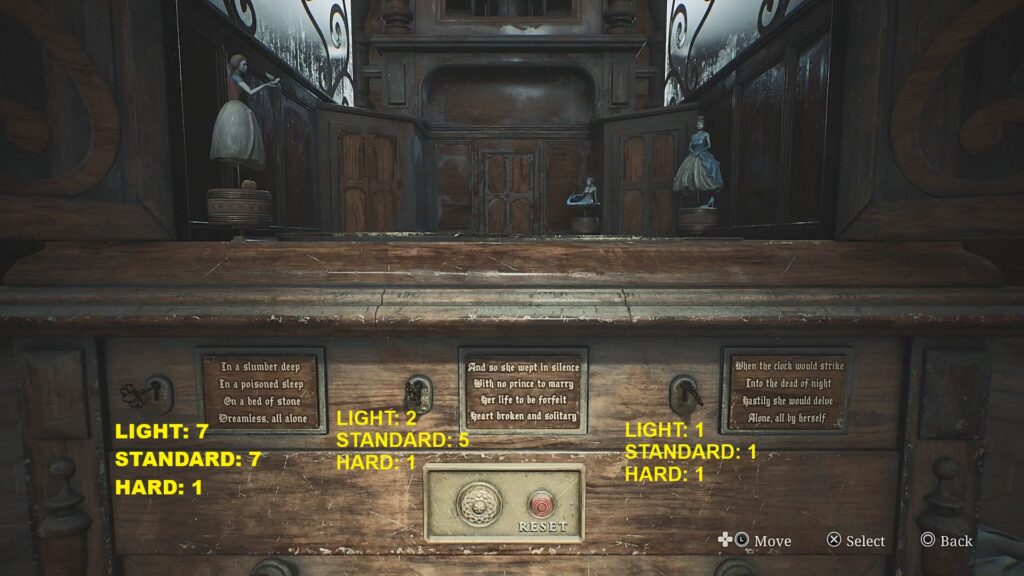
Music Box Puzzle
Open the cabinet using the Ornamental Key. Then place the three princess figurines in their positions. Now you need to rotate the discs so that the princesses have a path to a door. The picture below shows the correct arrangement of the discs. It is the same for all the difficulty levels. Once the discs are in the correct position, press the button at the bottom right corner.
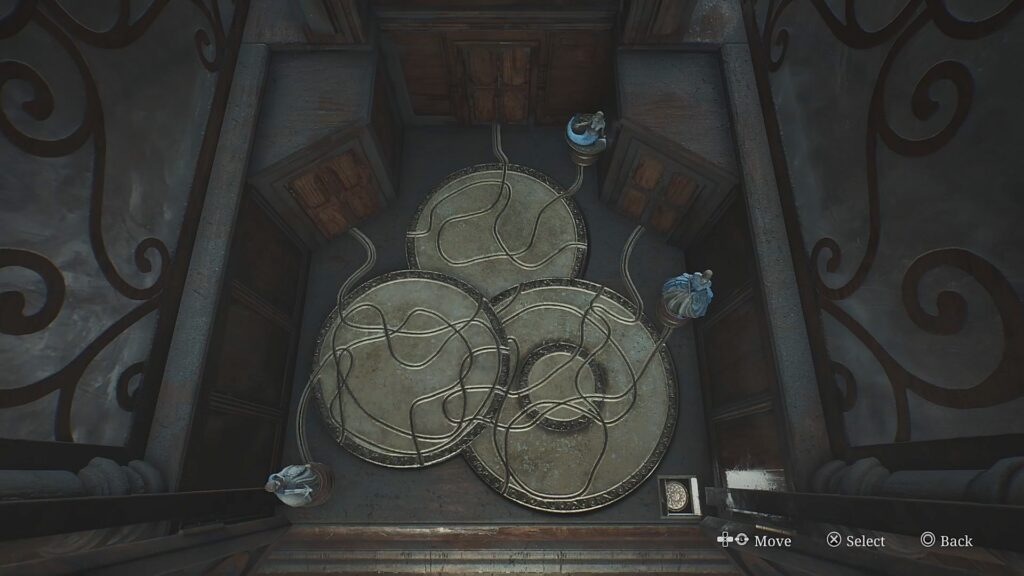
Now you need to turn the three keys a certain number of times. The number of times you need to turn each key for different difficulty levels is mentioned below and also shown in the picture below. After turning the keys, press the button to complete the puzzle.
Light: 7-2-1
Standard: 7-5-1
Hard: 1-1-1