This article will walk players through completing the objective “Ascend through the lands of Pharloom and reach the Citadel at the kingdom’s peak” of the quest “The Great Citadel” in Act 1 of Hollow Knight: Silksong.
STEP 1: Get Mosslands Map and The Marrow Map
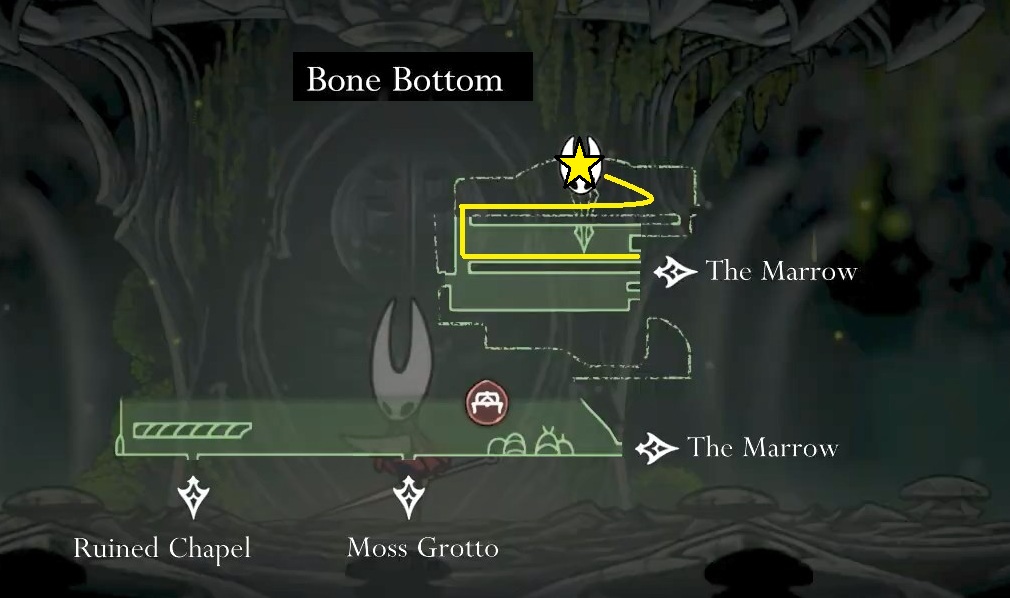
After the opening cutscene, head through The Moss Grotto until you reach the first boss, Moss Mother. Defeat her to unlock access to the next area.
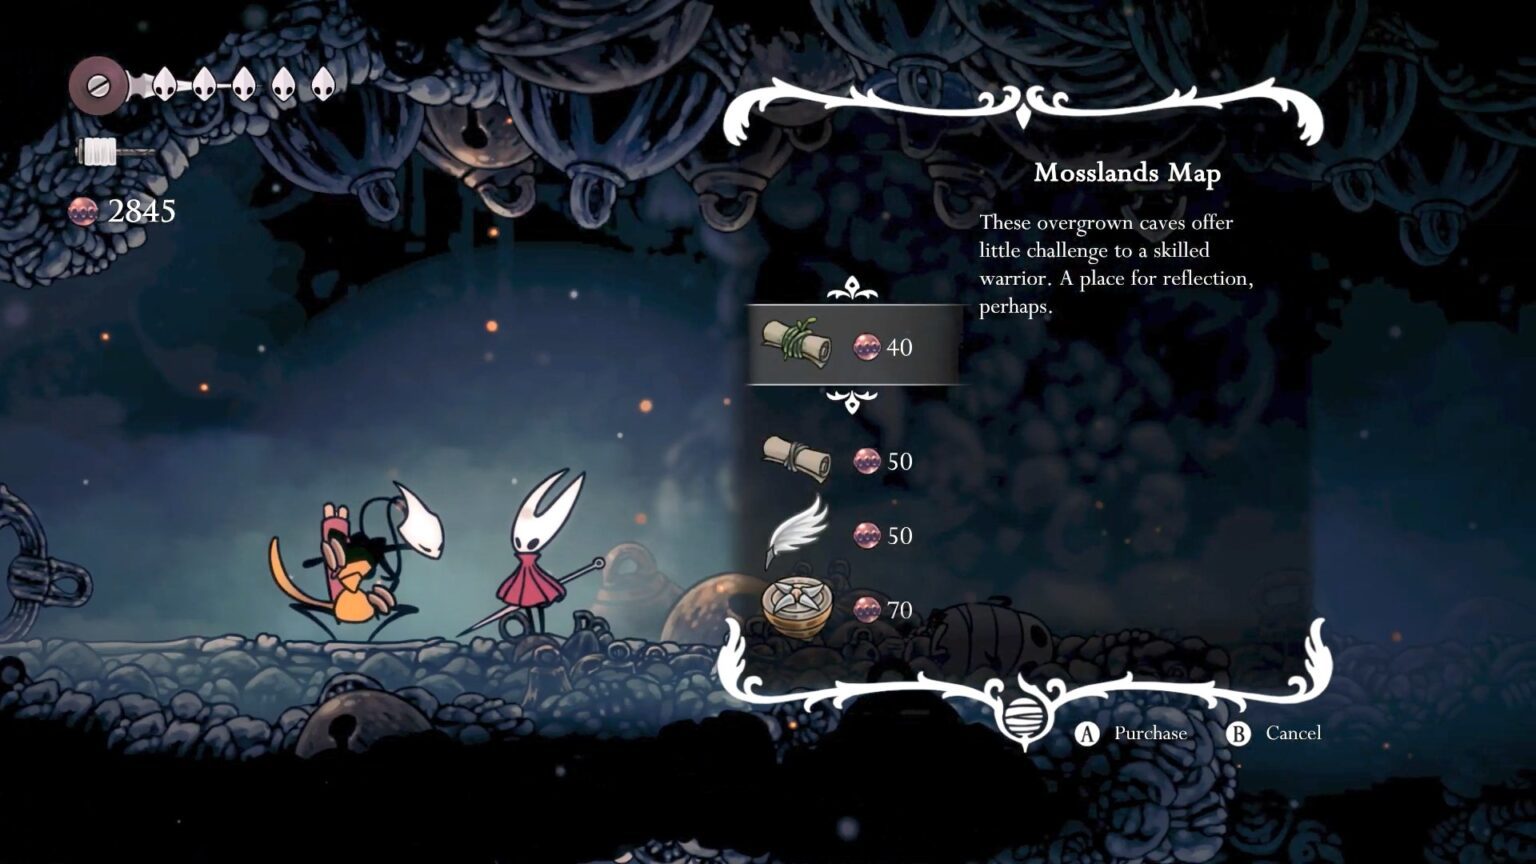
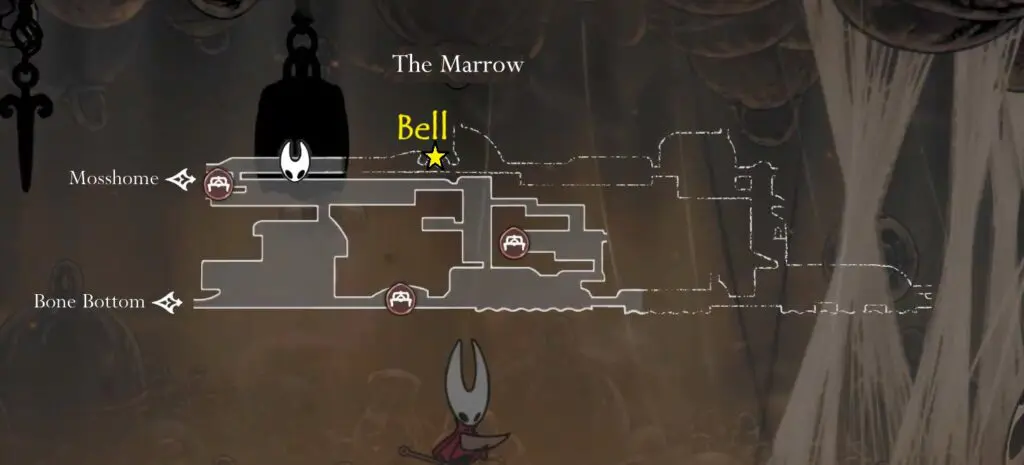
Next, continue your journey through the town of Bone Bottom and proceed into ‘The Marrow‘ area. Along the way, you’ll encounter Shakra, a merchant who trades maps in exchange for Rosary Beads. Buy the maps of regions such as the Mosslands and ‘The Marrow’.
Also Read: Mosslands Maps & The Marrow Maps Location
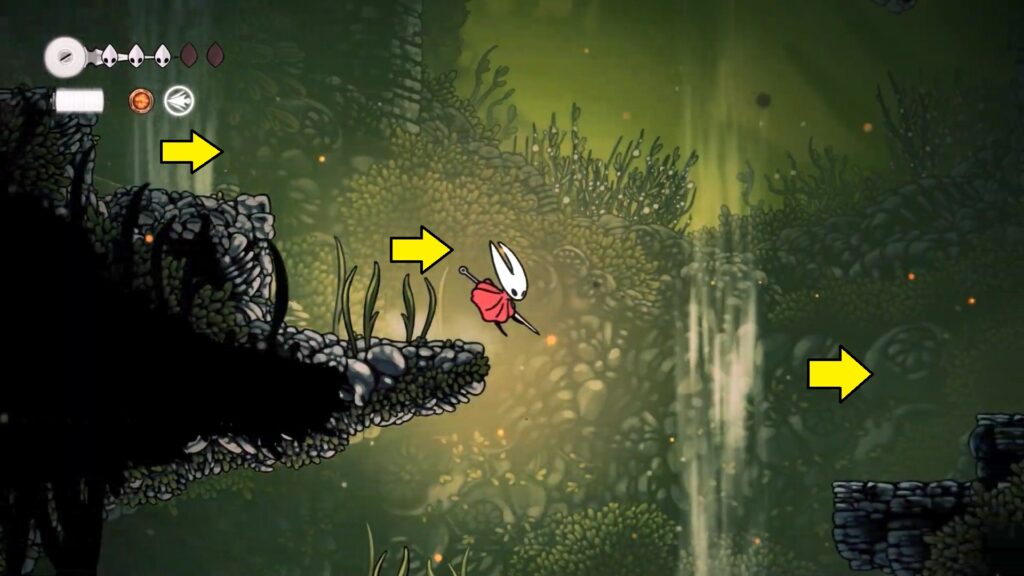
STEP 2: Get Silkspear
Your next main objective is to acquire a Silkspear in Mosshome. You can find this skill at the location marked in the image above. Silkspear is required to free the Bell Beast. From Shakra’s location, take the path to the left to enter The Marrow, then continue onward into Mosshome. Follow the route shown in the image below to reach the location of the Silkspear skill.
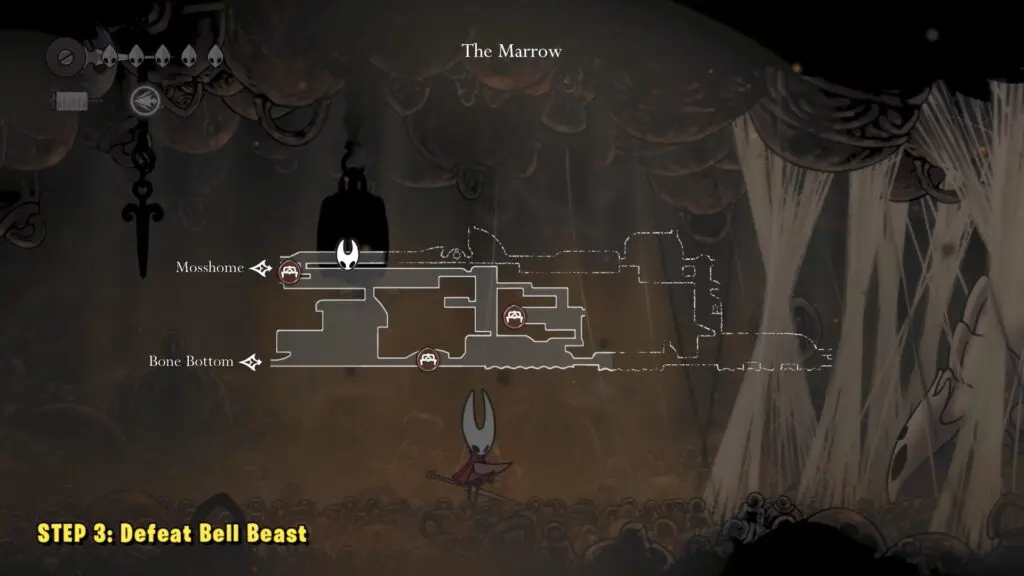
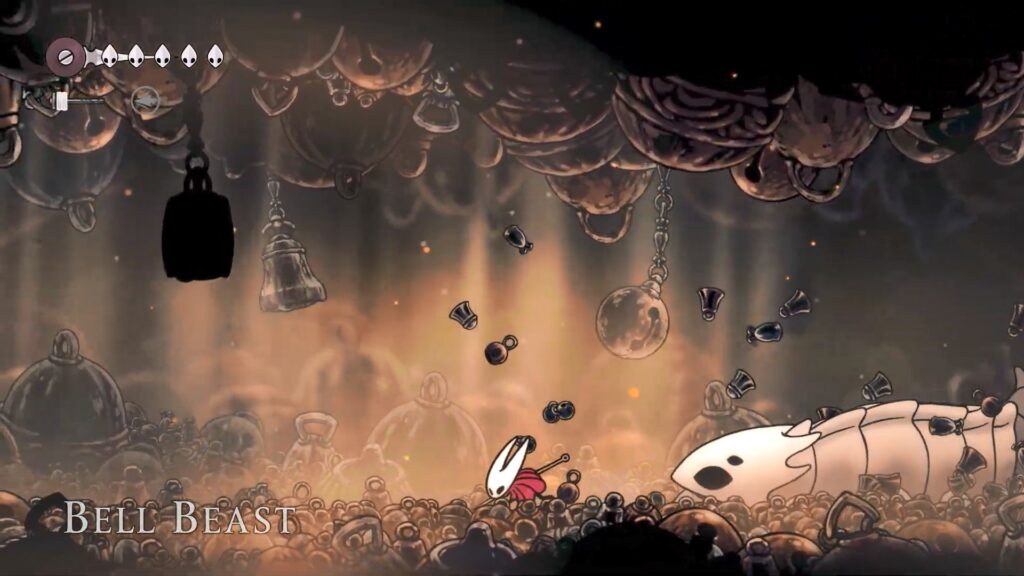
STEP 3: Defeat Bell Beast
Now, follow the path back to “Tha Marrow”, then head to the location marked in the image above. Once inside the room, break the silk trap to release the Bell Beast. This will trigger a boss fight, so be prepared.
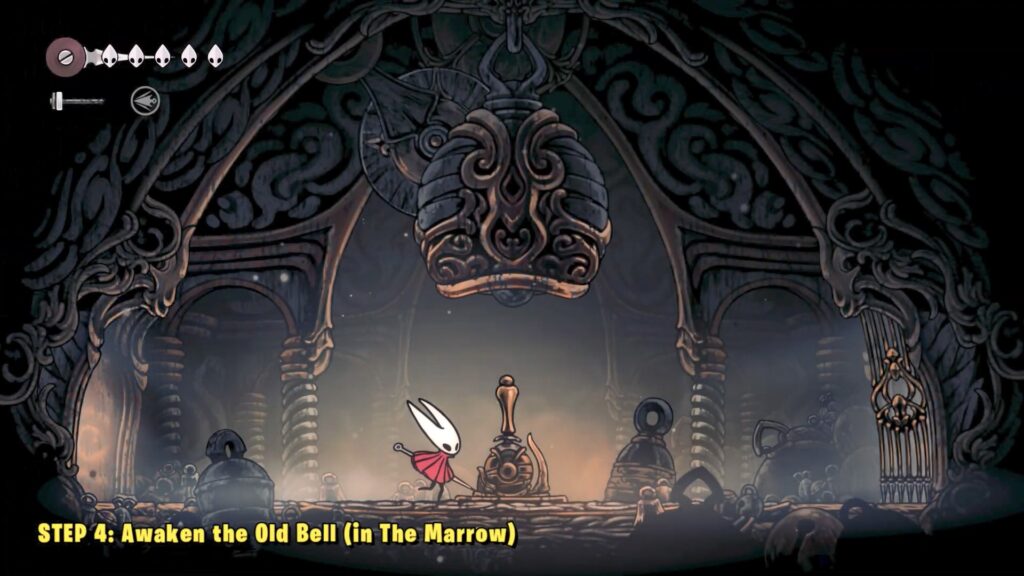
STEP 4: Awaken the Old Bell (The Marrow)
After defeating the Bell Beast, head right along the straight path until you come across an Old Bell. Interact with the lever several times to ring the giant bell and progress further.
STEP 5: Reach Deep Docks
Next, continue moving to the right. When you reach the end of the path, head downward and enter the Deep Docks.

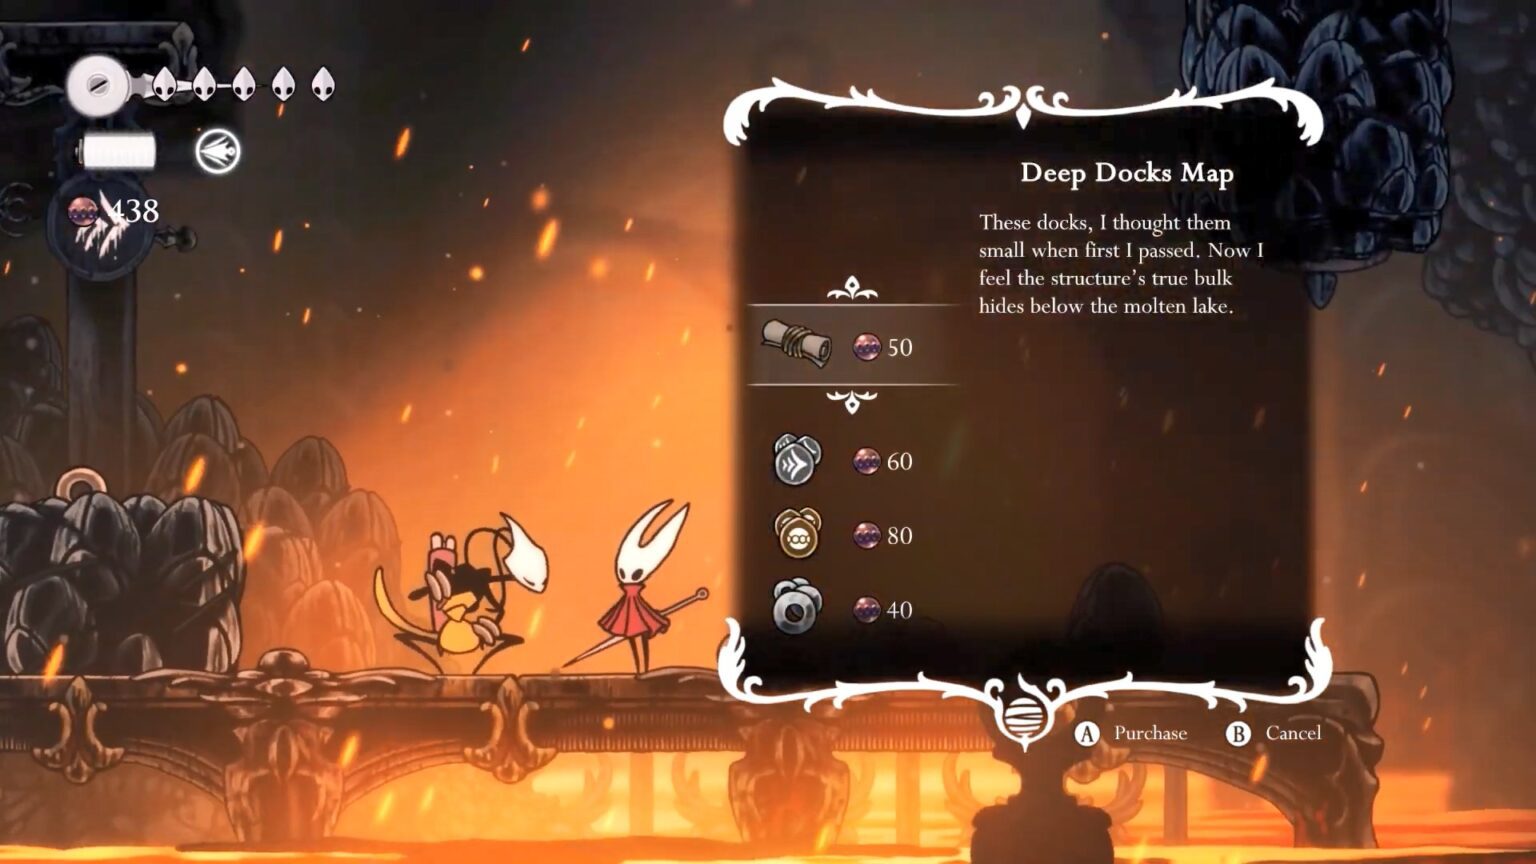
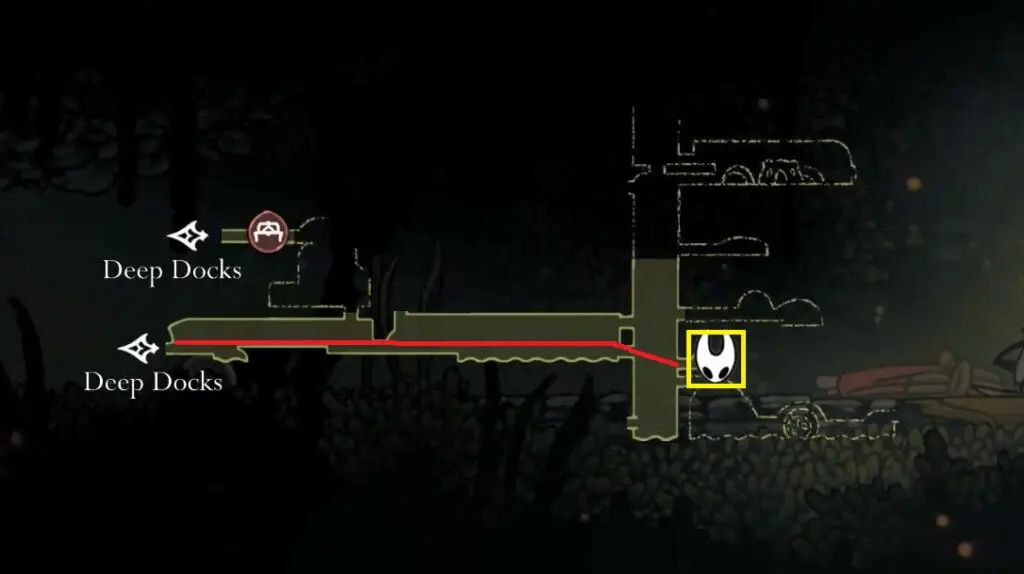
STEP 6: Buy the Deep Docks Map
Once you enter the Deep Rocks region from the southeastern section of The Marrow, follow the path straight ahead. The route here is fairly simple. Just keep moving forward until the ground suddenly gives way beneath you. Drop into the lower section and continue along the path until you find Shakra. Speak with her, and she will offer to sell you the Deep Docks Map.
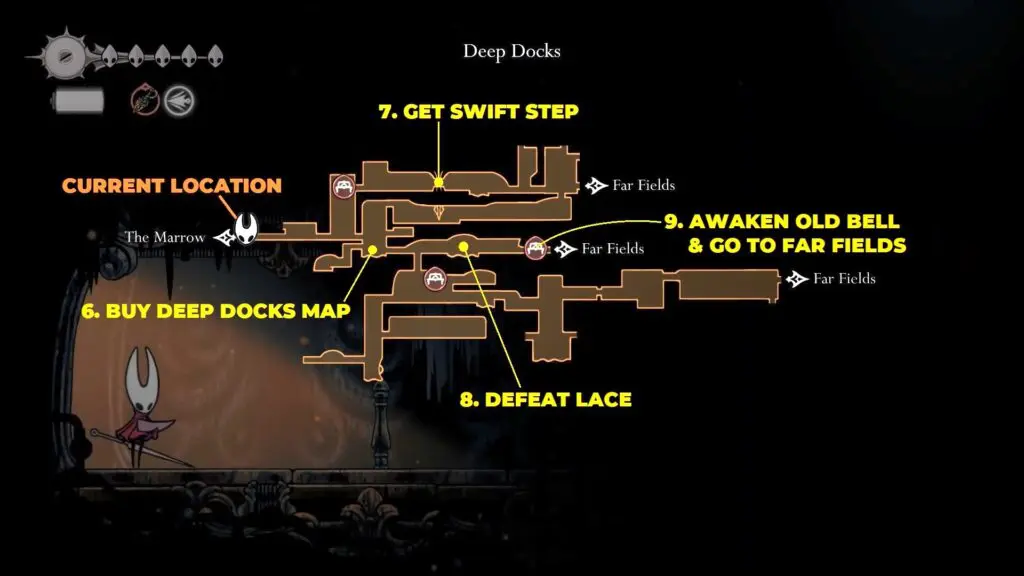
STEP 7: Get Swift Step
After purchasing the map, start climbing upward through the Deep Docks. Keep going up until you reach a point where the ledges are too far apart to continue.
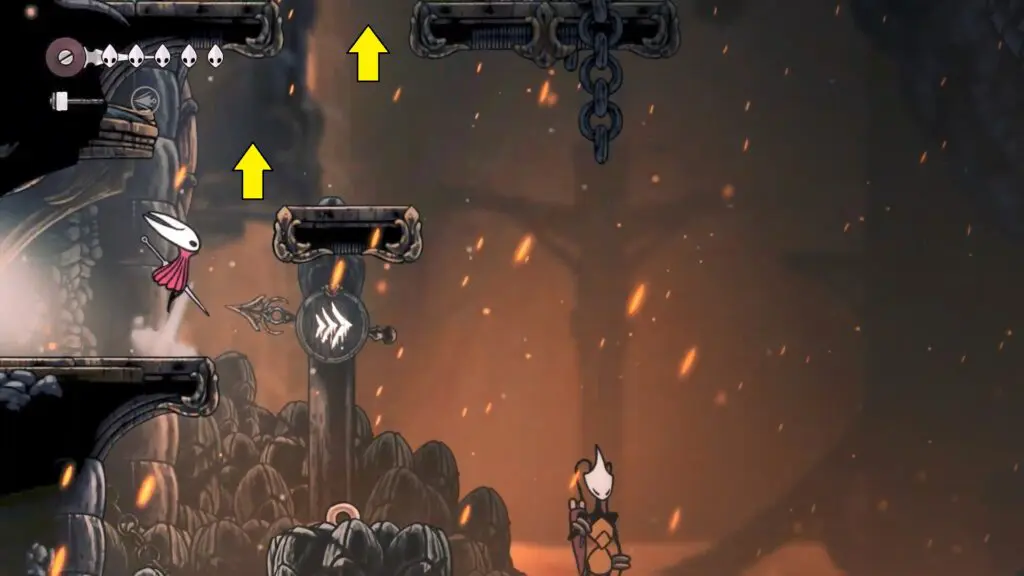
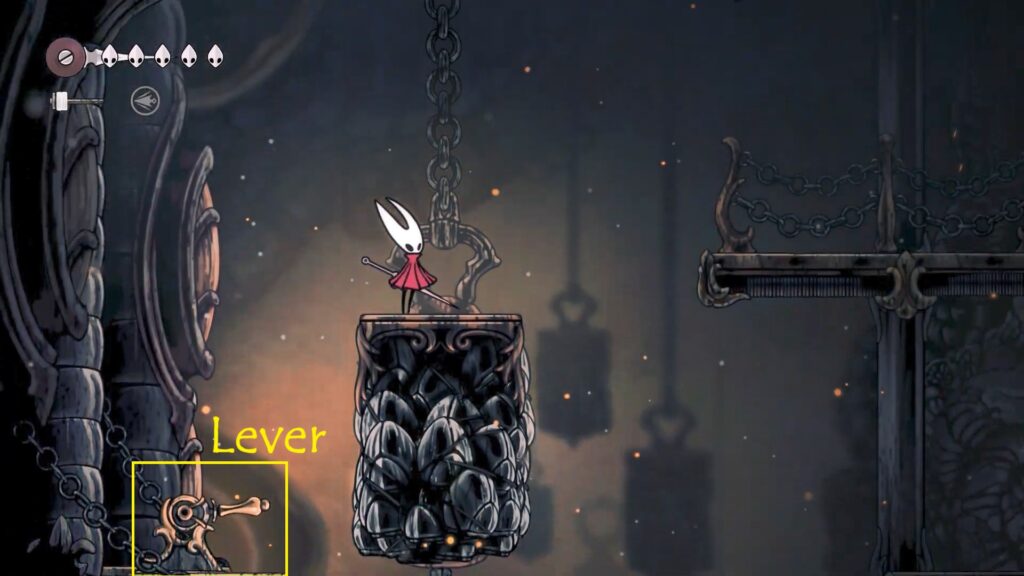
Look for a lever on the left-hand side and strike it to activate a moving platform. Then jump on the moving platform to ride it to a higher level. From there, continue climbing upward until you reach the next section, then head to the right.
When you reach the lava area, your character can stand on it for a short time before taking damage. To cross safely, keep jumping so you don’t stay on the lava for too long.
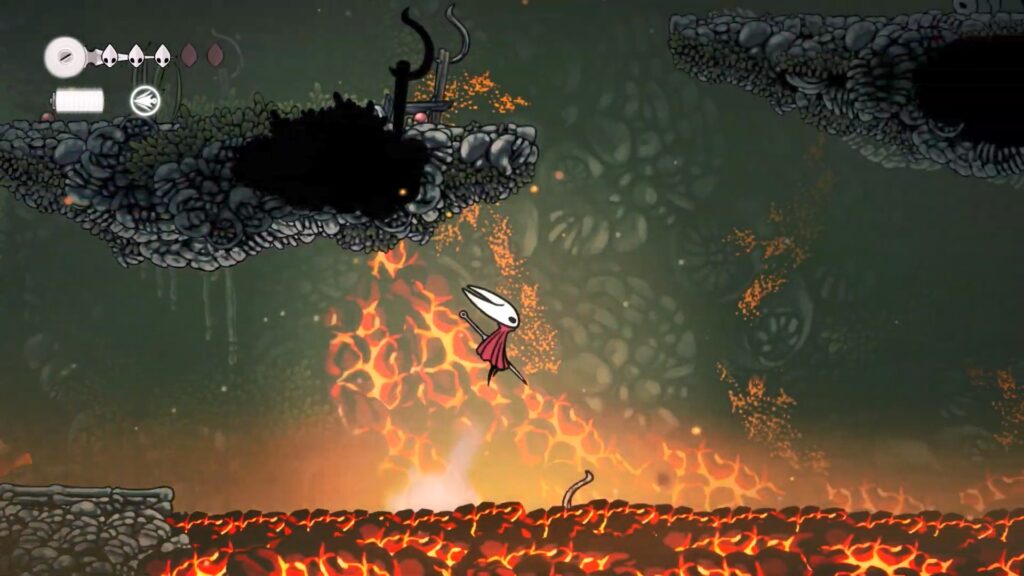
After crossing the lava lake, continue climbing up the platforms to reach the top. Break the lava ball at the top and go through it to enter the next section.
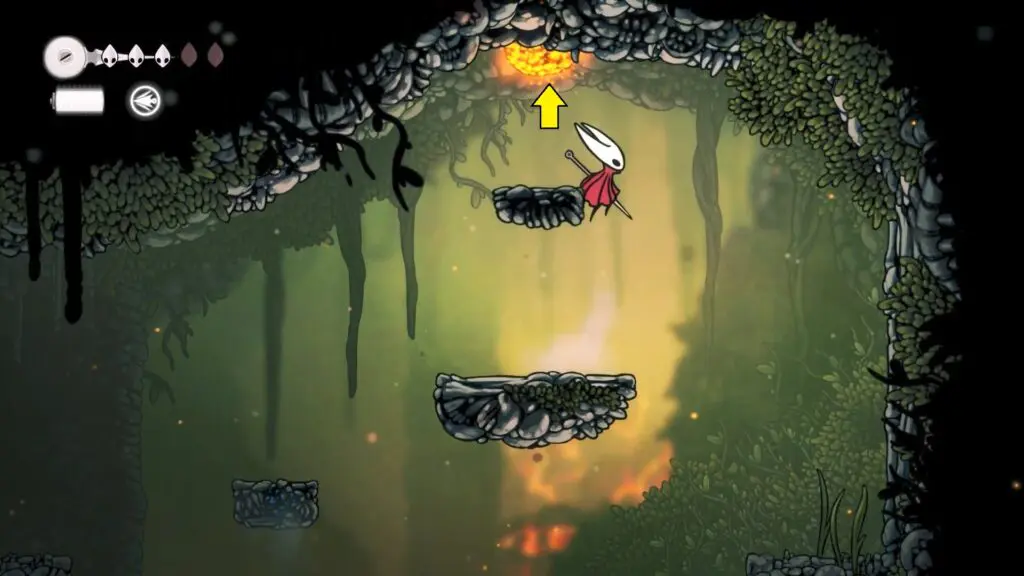
In this new area, if you have opened the left path, then keep moving left until you reach a big ledge.
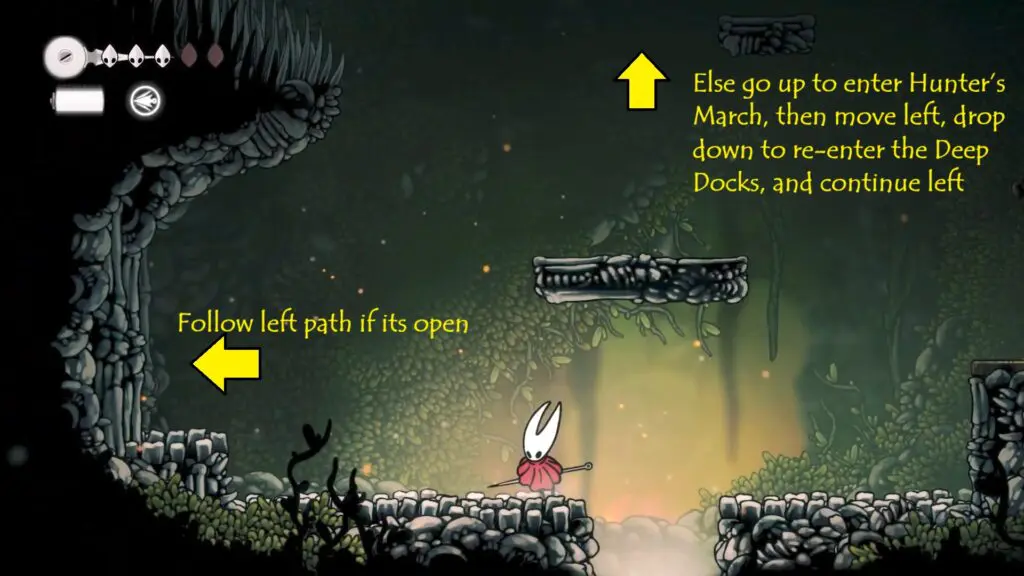
Alternatively, another way is to keep going upward to enter Hunter’s March. From there, move left and drop down at the next open spot to re-enter the Deep Docks. Then, keep going left until you reach a big ledge.
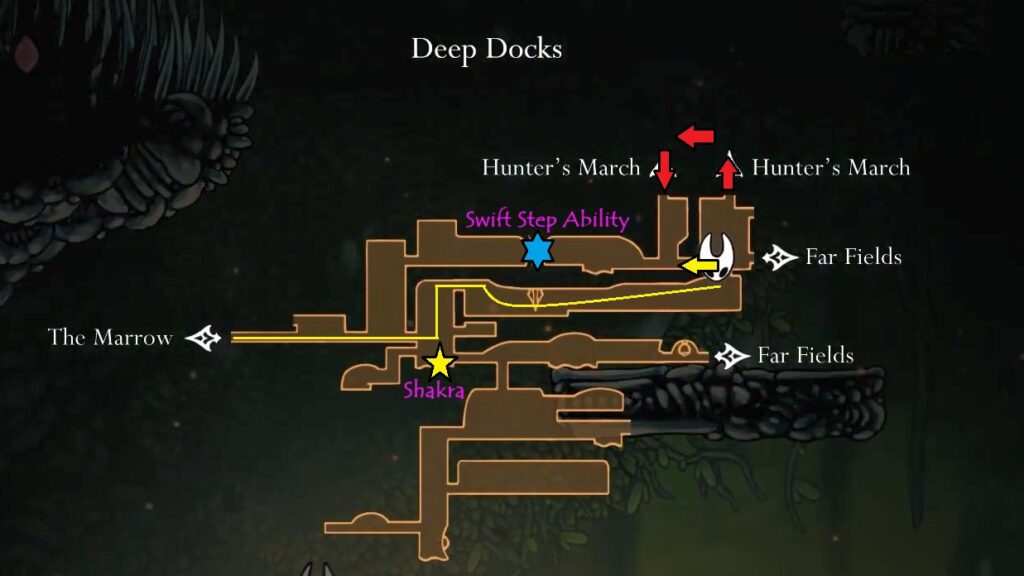
On this ledge, you’ll find the Swift Step skill waiting for you. Interact with it to unlock both Sprint and Dash.
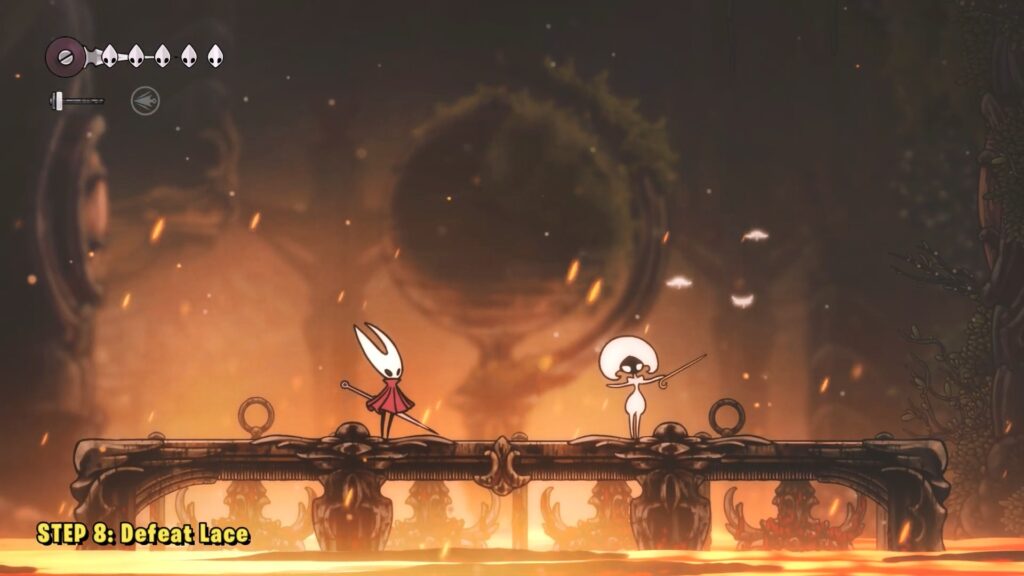
STEP 8: Defeat Lace
After obtaining the Swift Step ability, head left and interact with the lever to open the nearby door. From there, travel downward to return to the area where you previously met Shakra.

Next, move straight to the right until you come across a locked door. Turn back and climb the ledge above. Follow the upper path to find a lever, then activate it to unlock the door.
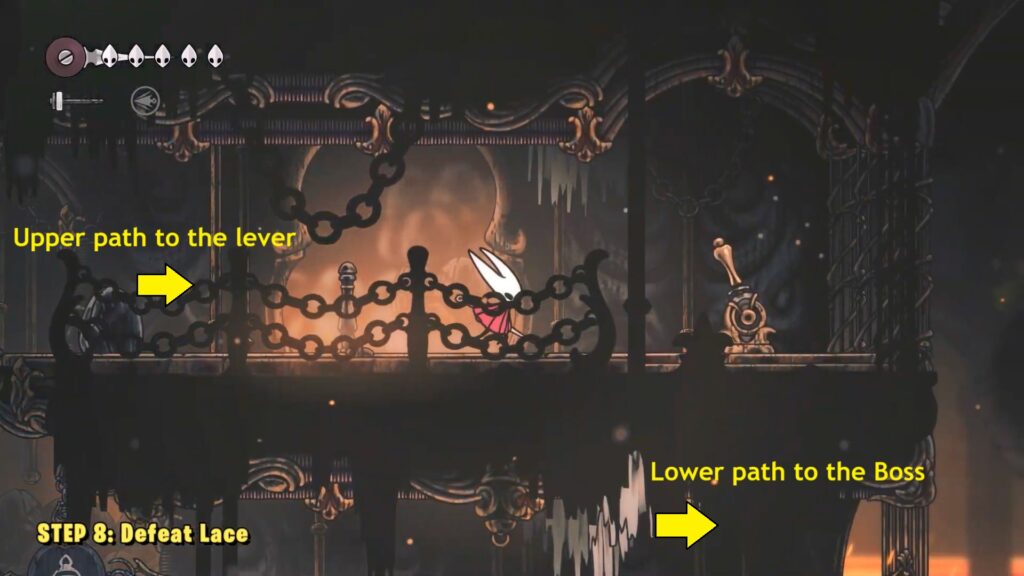
Once the gate is open, return to the lower path and pass through to trigger the boss encounter.
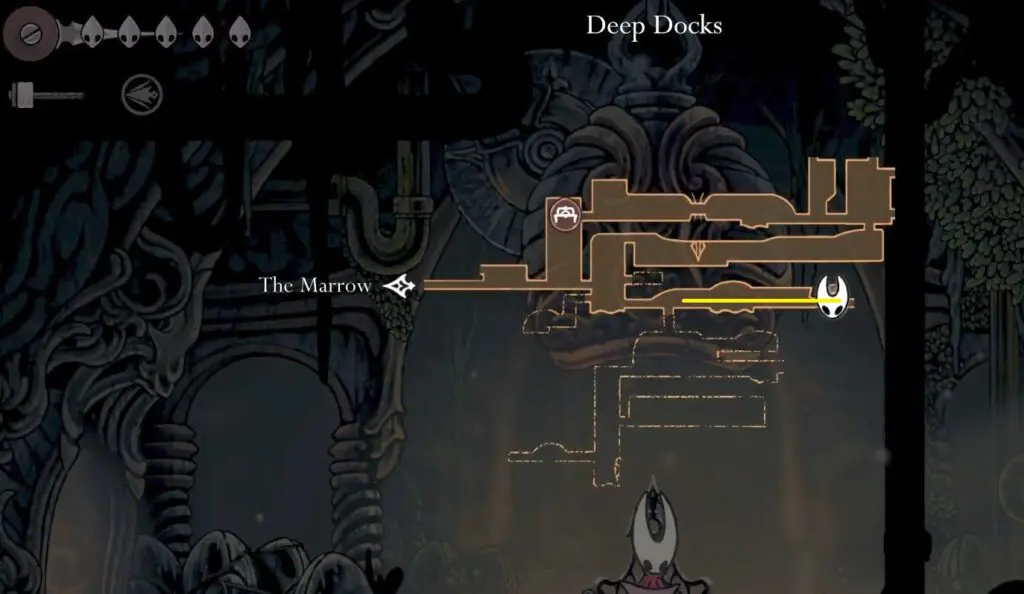
STEP 9: Awaken the Old Bell & Reach Far Fields
Proceed to the right to reach the Old Bell and interact with the lever. Afterward, continue along the same path to arrive at the Far Fields.

STEP 10: Buy the Far Fields Map
To get the map in the Far Fields, start by entering the area from the right side of the Deep Docks. Use the lower right entrance and follow the path forward. The route here is mostly simple, so keep moving straight ahead.
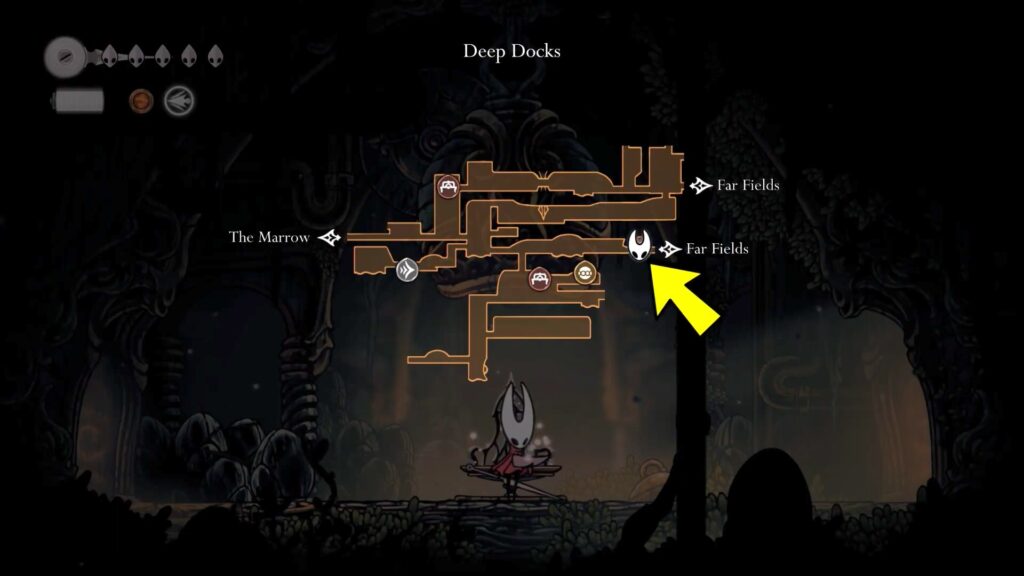
After some time, you will reach a section with strong wind currents. Carefully jump across the gap and continue traveling to the right.
Keep going until you find the NPC Shakra waiting further ahead. Speak to her, and she will sell you the Far Fields map.
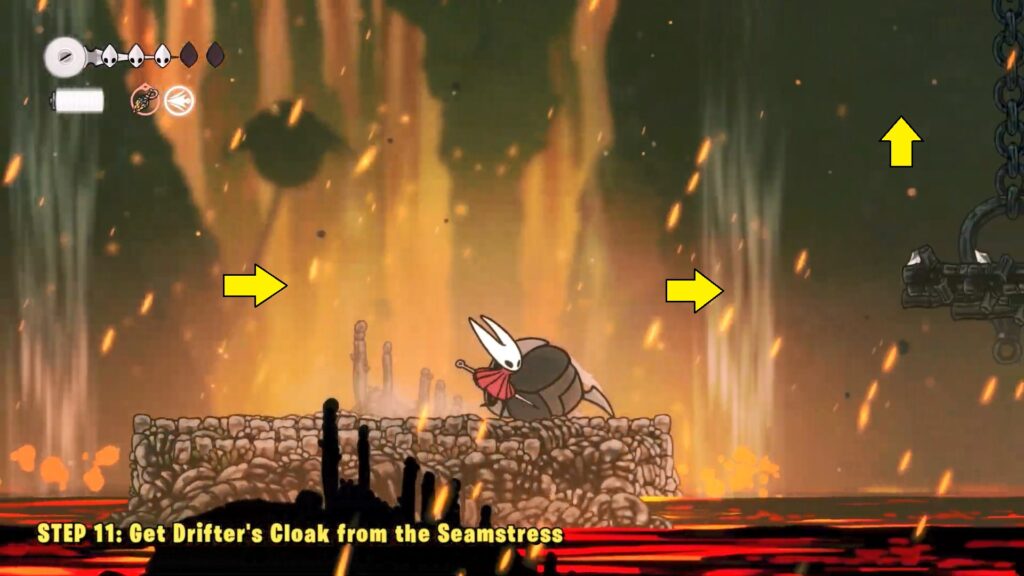
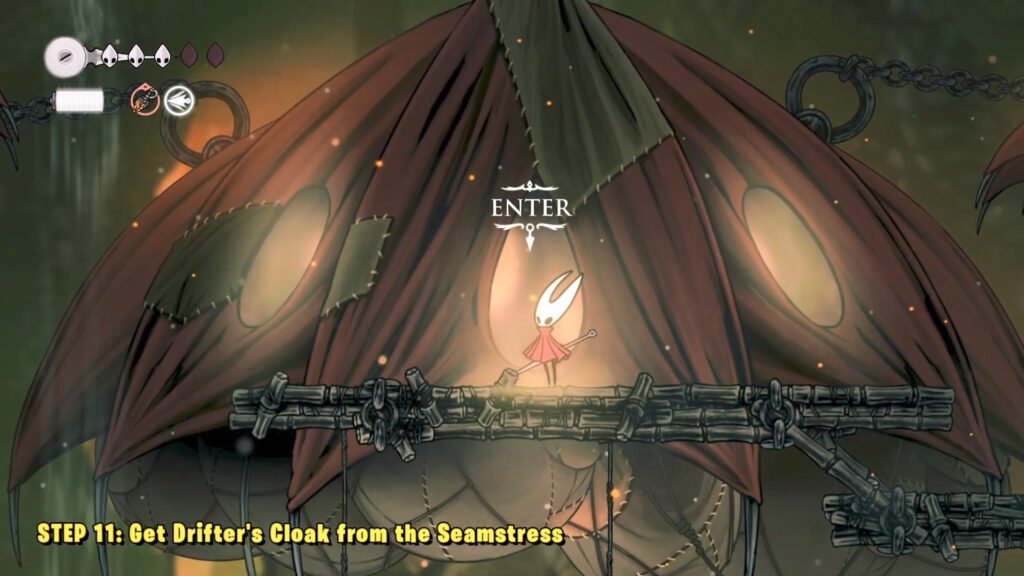
STEP 11: Get Drifter’s Cloak from the Seamstress
After obtaining the Far Fields Map, head back and drop down, then move left to enter the right-hand path. From here, follow the lower route toward the right, using the map above as a reference.
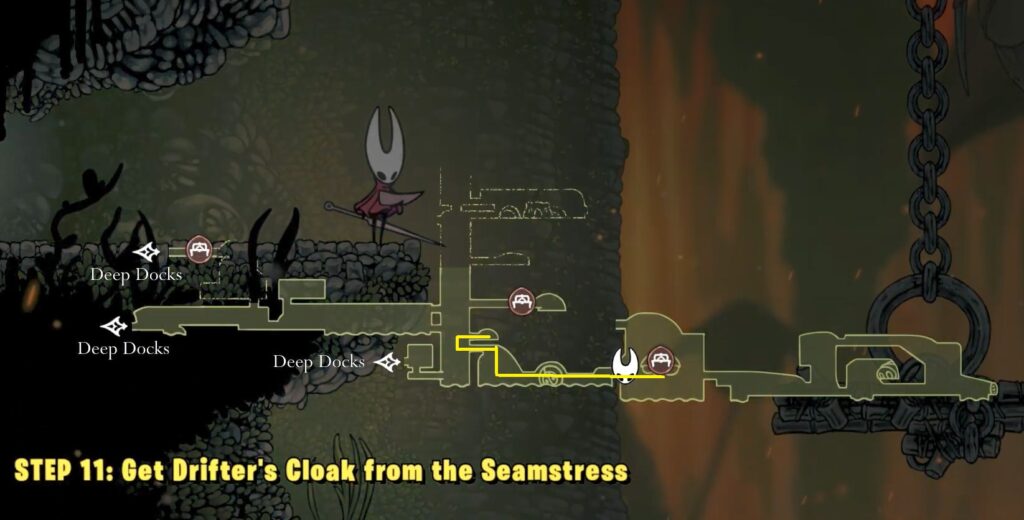
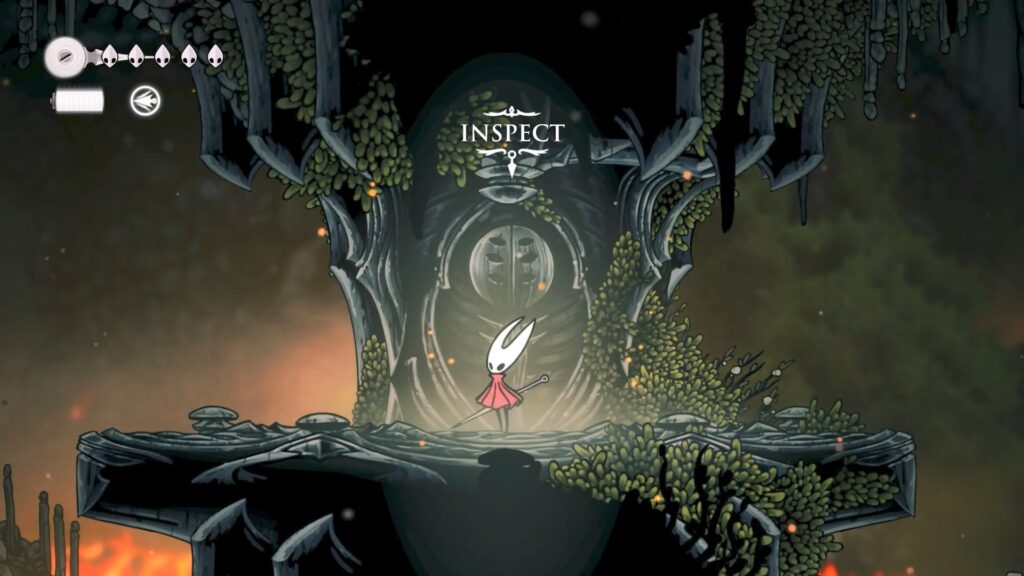
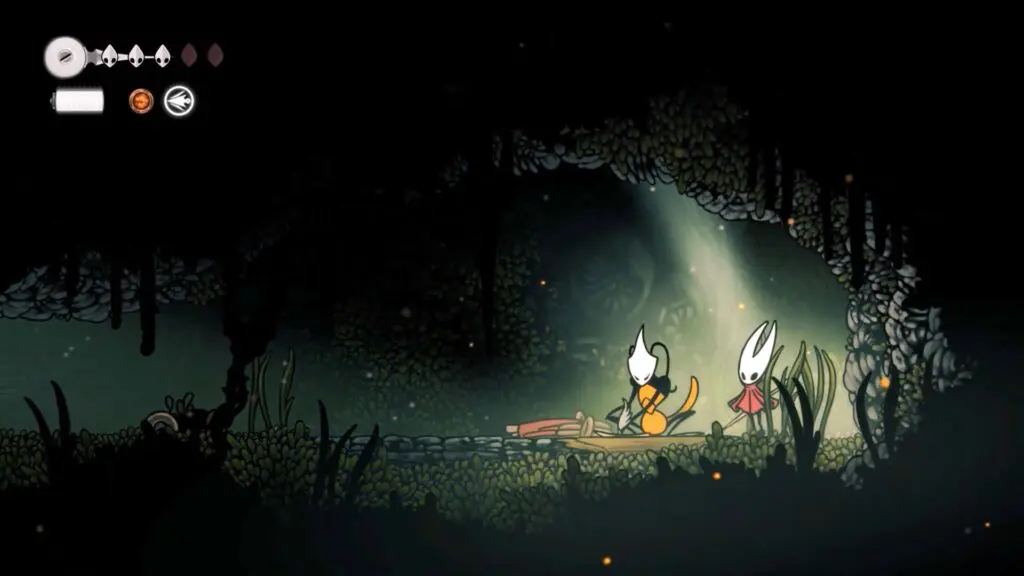
Continue along this path until you reach the marked location. After crossing the lava, start to climb the ledges to find a balloon-shaped tent. Interact with it to receive Drifter’s Cloak from the Seamstress.
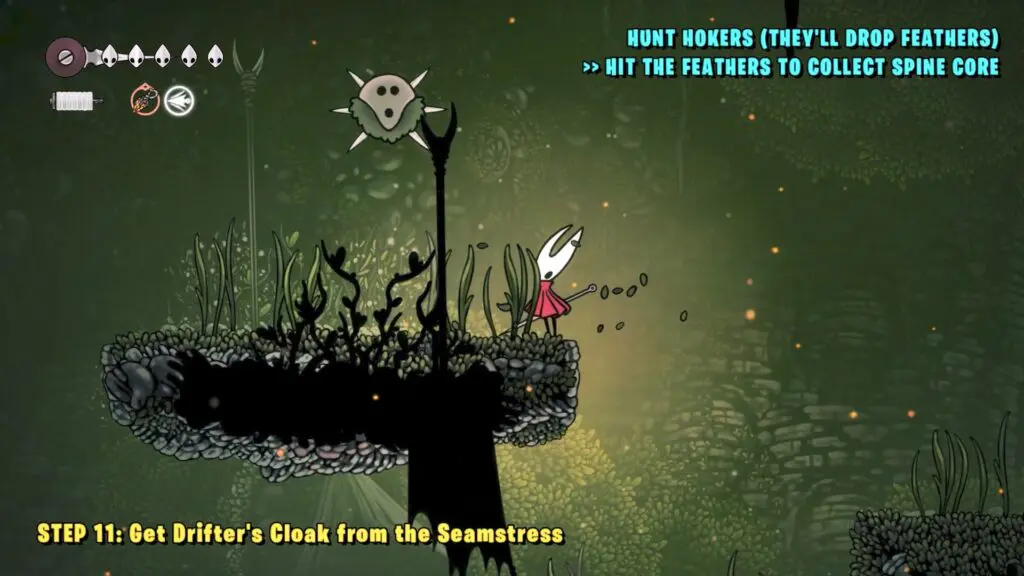
You need to collect 25 Spine Cores to get the Drifter’s Clock.

You can collect Spine Core by defeating Hokers, as shown in the image below.
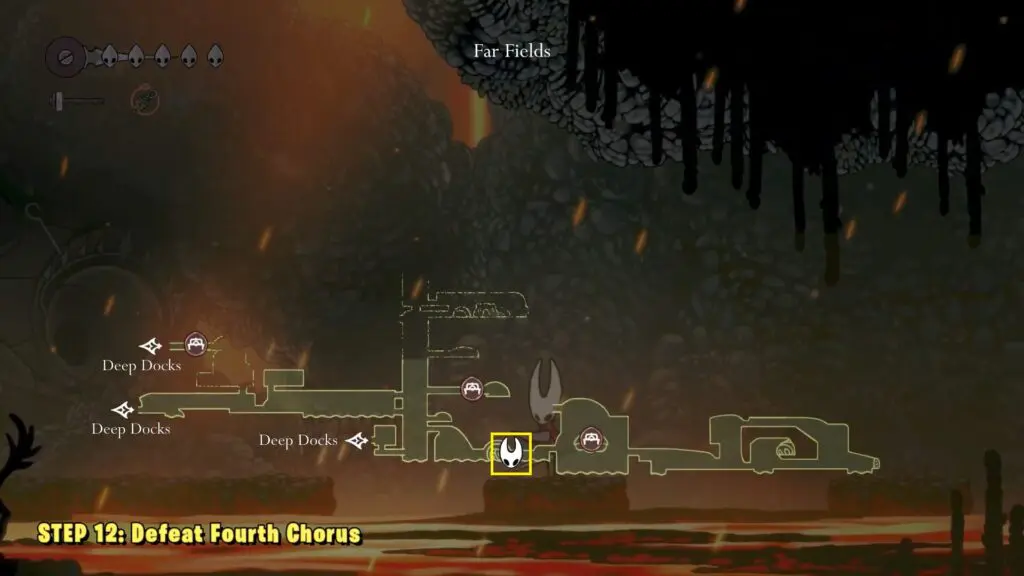
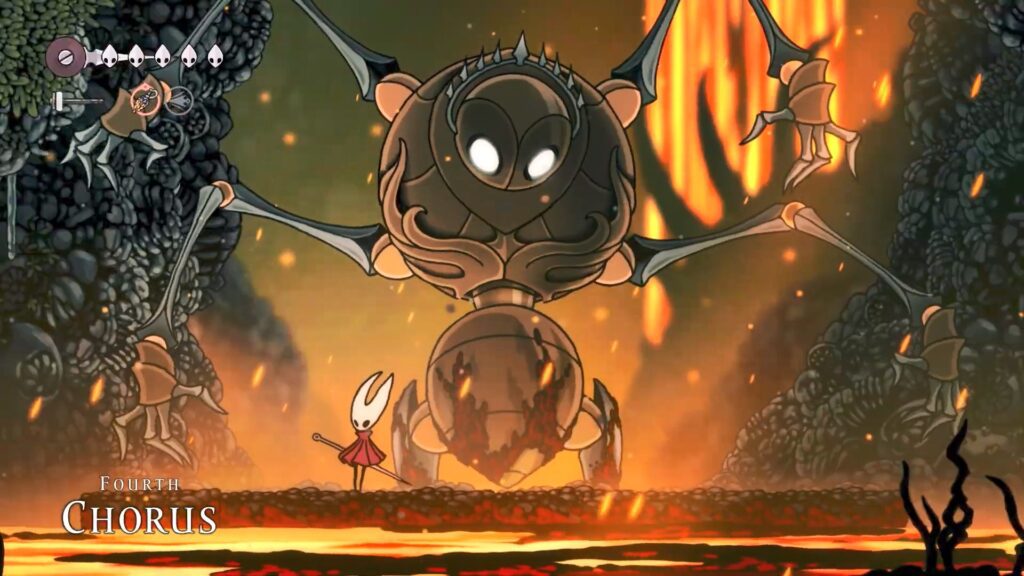
STEP 12: Defeat Fourth Chorus
After obtaining the Drifter’s Cloak, drop down to the lower level where the lava is located and head right, following the same path you traveled earlier. Continue to the location marked on the map to encounter the boss – Fourth Chorus.
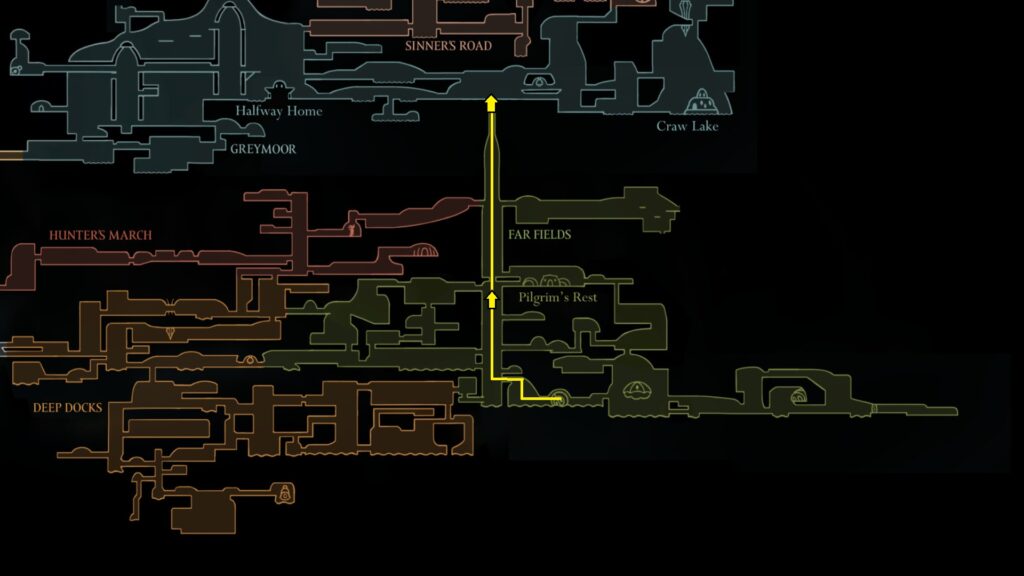
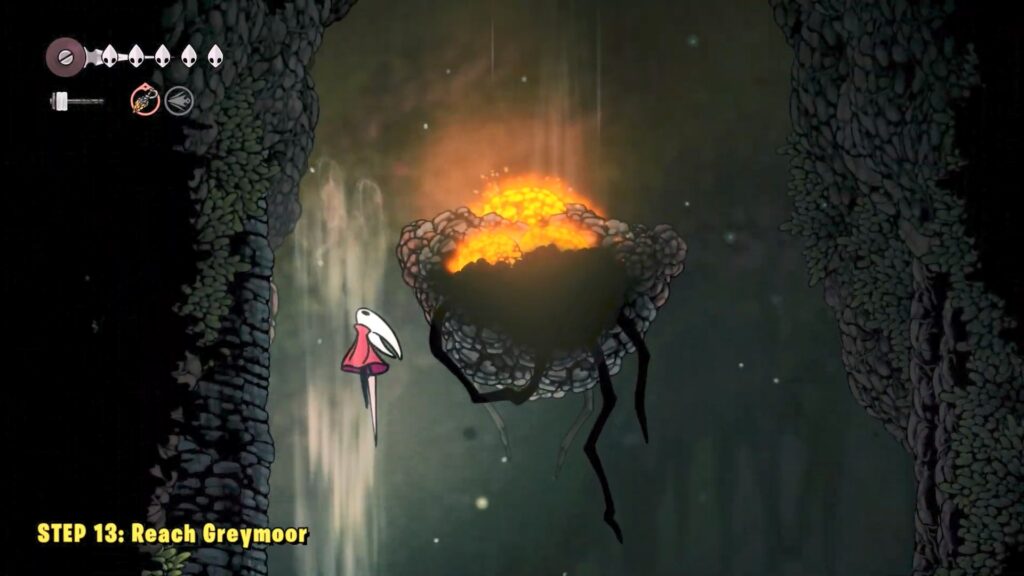
STEP 13: Reach Greymoor
After defeating Defeat Fourth Chorus, your next goal is to reach Greymoor. Head west from the Boss location and use the air current to reach the higher ledges. Path to Greymoor is pretty straightforward. Refer to the map. As you use air current to travel upward, you will need to destroy all the molten orbs to activate the cave’s air vents. Continue to progress upward until you reach Greymoor.
STEP 14: Buy Greymoor Map
After reaching Greymoor, head east to find Shakra. Speak with her and buy the map for Greymoor.
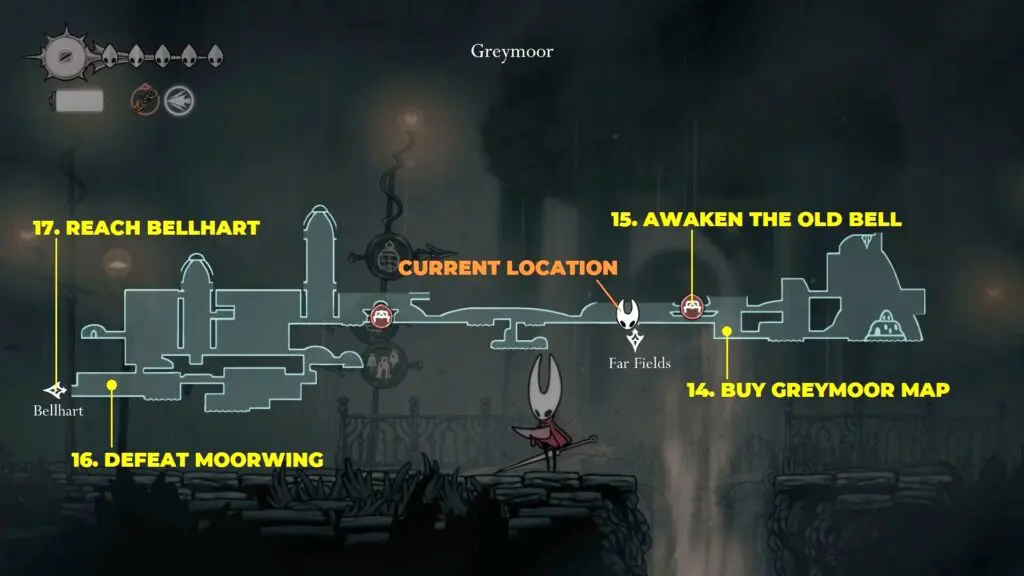
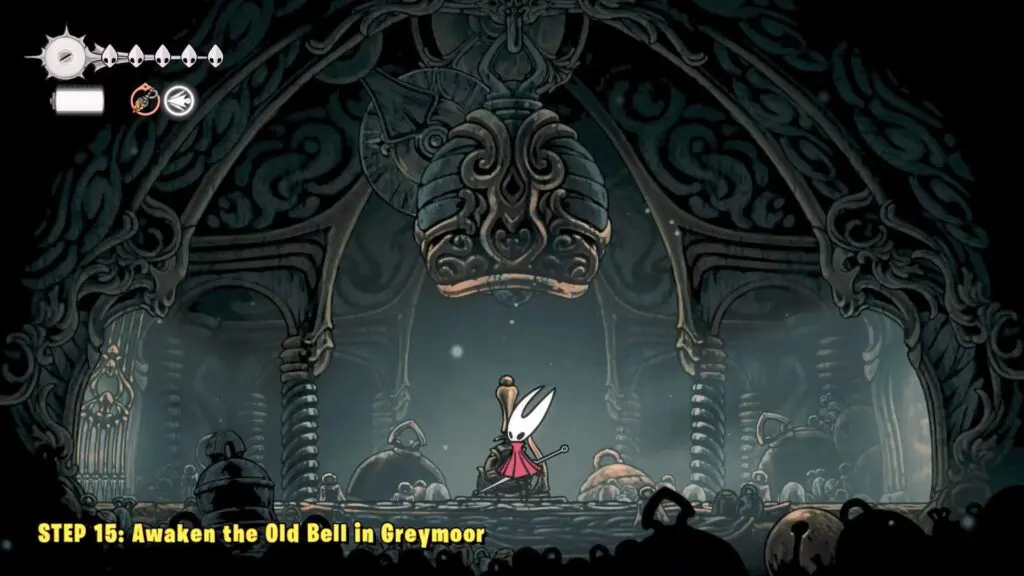
STEP 15: Awaken the Old Bell (Greymoor)
After obtaining the Greymoor’s map, proceed to the right side and then travel upward. Finally, proceed to the left to reach the location of the Old Bell in Greymoor.
On your way, you will need to perform a Pogo jump on enemies to reach higher ledges.

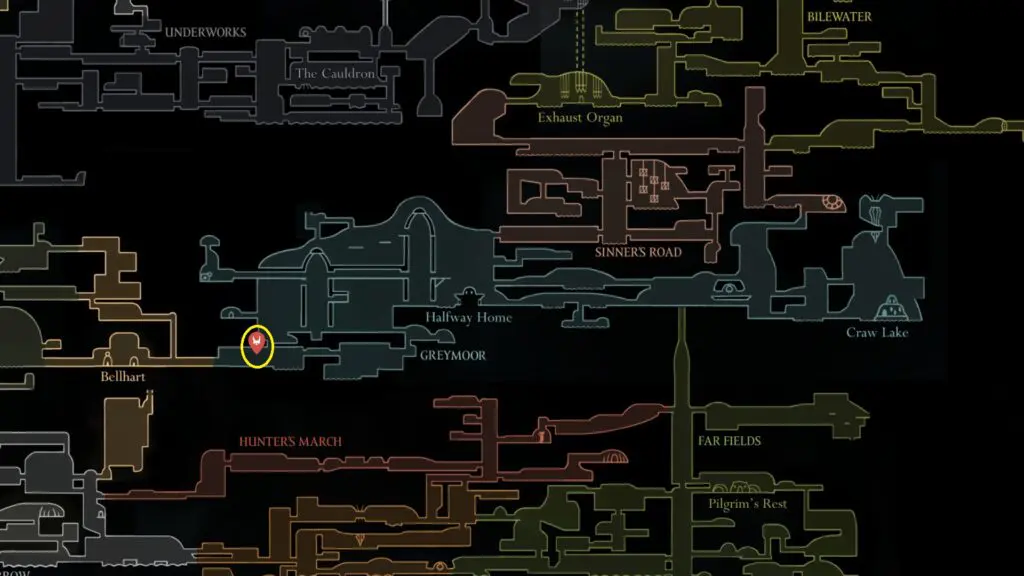
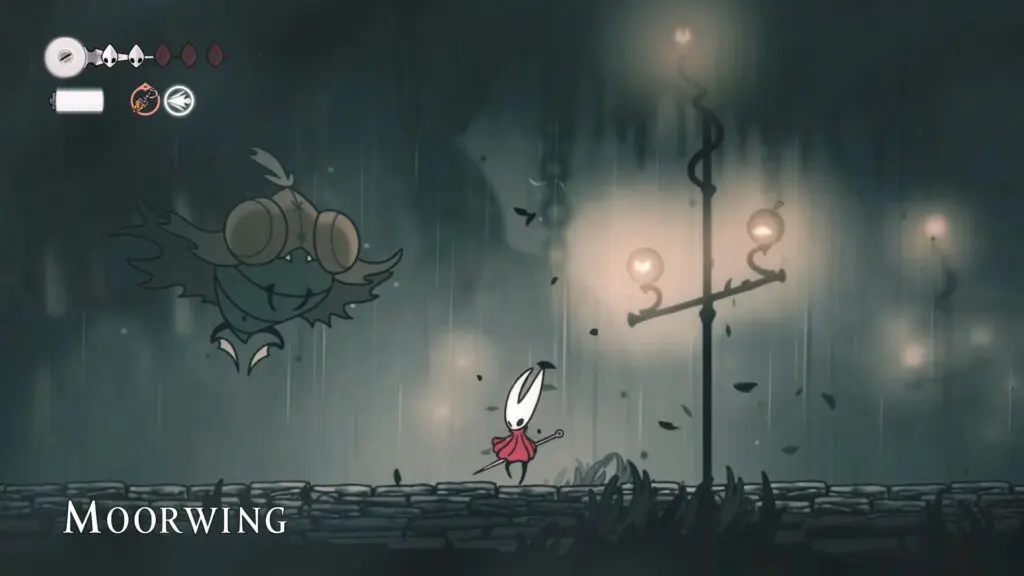
STEP 16: Defeat Moorwing
Head to Moorwing’s spot, located in the western part of the Greymoor.
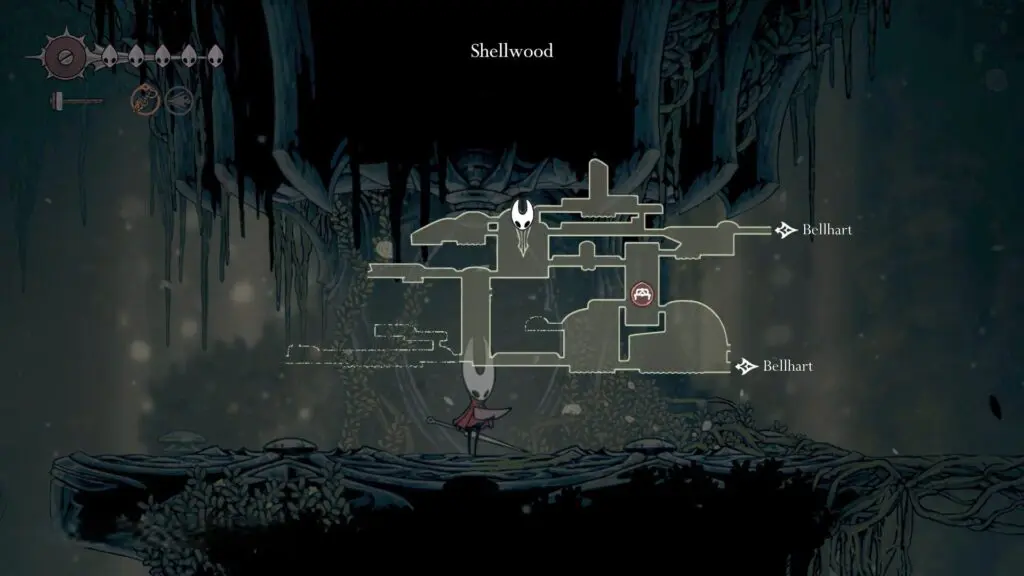
STEP 17: Reach Bellhart
After defeating the Boss Moorwing, proceed to the left to enter Bellhart. When you go into Haunted Bellhart, you will automatically get the quest “Save the Threadspun Town.” You need to finish this quest before you progress further.

STEP 18: Buy Bellhart Map & Shellwood Map
Set out from the lower-left section of Bellhart. From there, continue westward, crossing the waters to enter Shellwood.
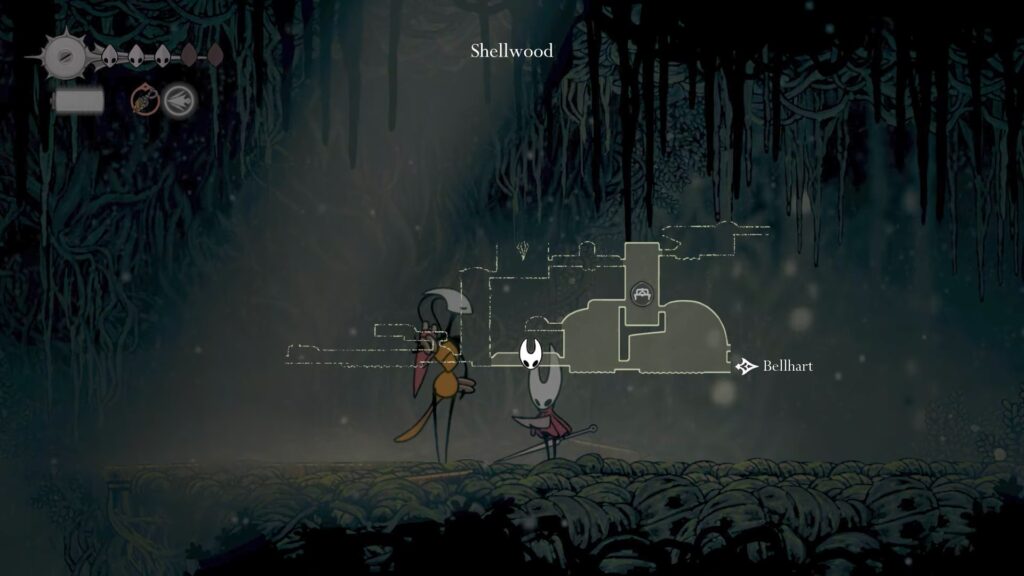
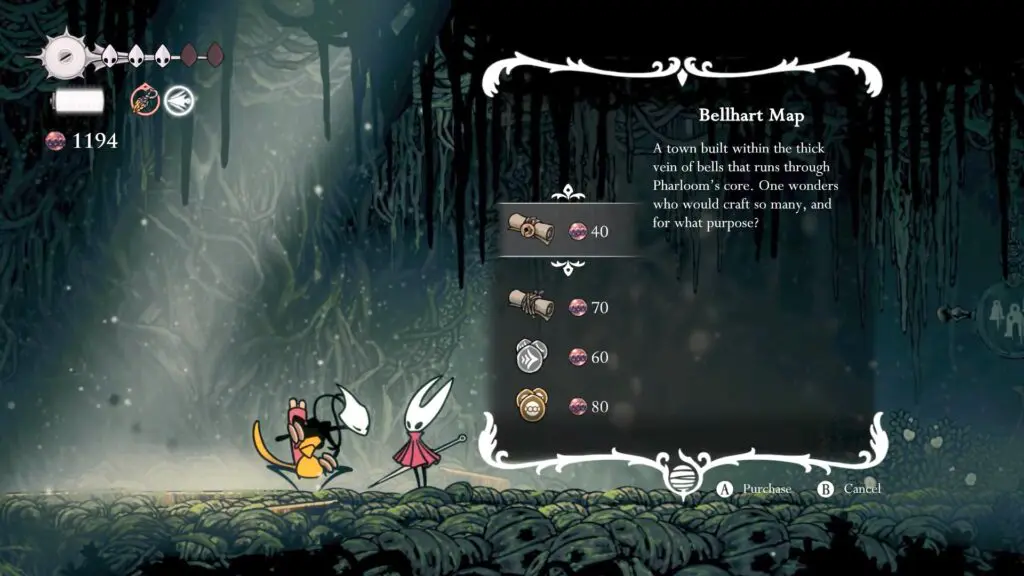
Once inside, make your way upward and follow the winding path until you reach the western edge of Shellwood. Here, you’ll find the merchant Shakra, who sells maps of both Shellwood and Bellhart.
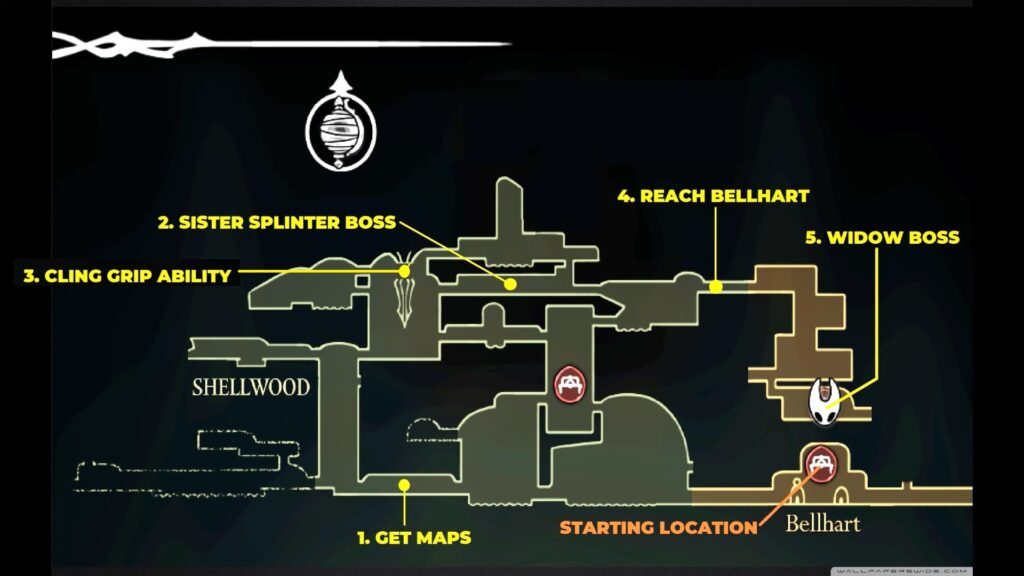
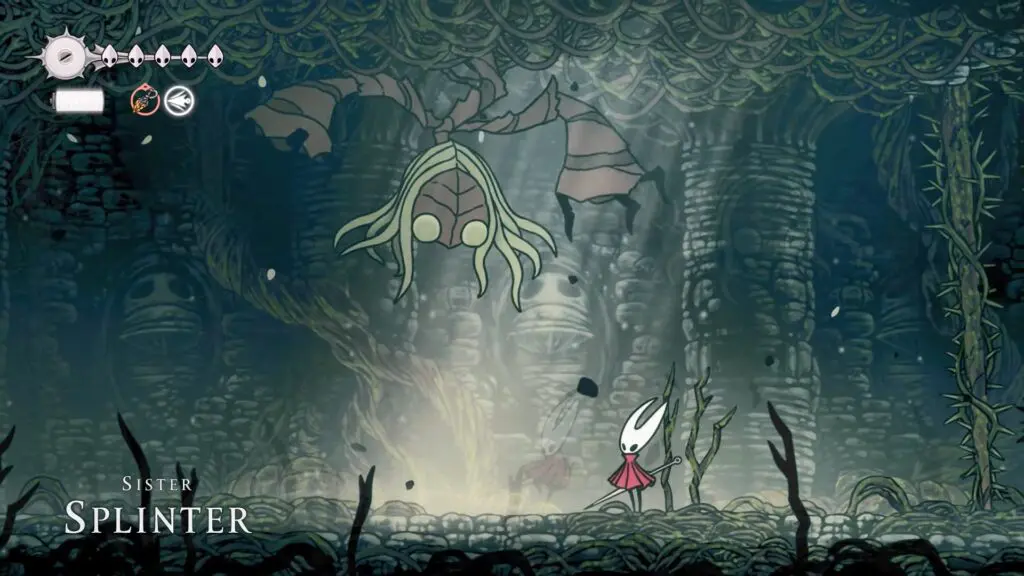
STEP 19: Defeat Sister Splinter
After purchasing the map, continue left from the NPC Shakra and take the first available path upward. Use the provided map to locate the area where the Sister Splinter boss is located. Once you reach the location, defeat Sister Splinter to progress further.
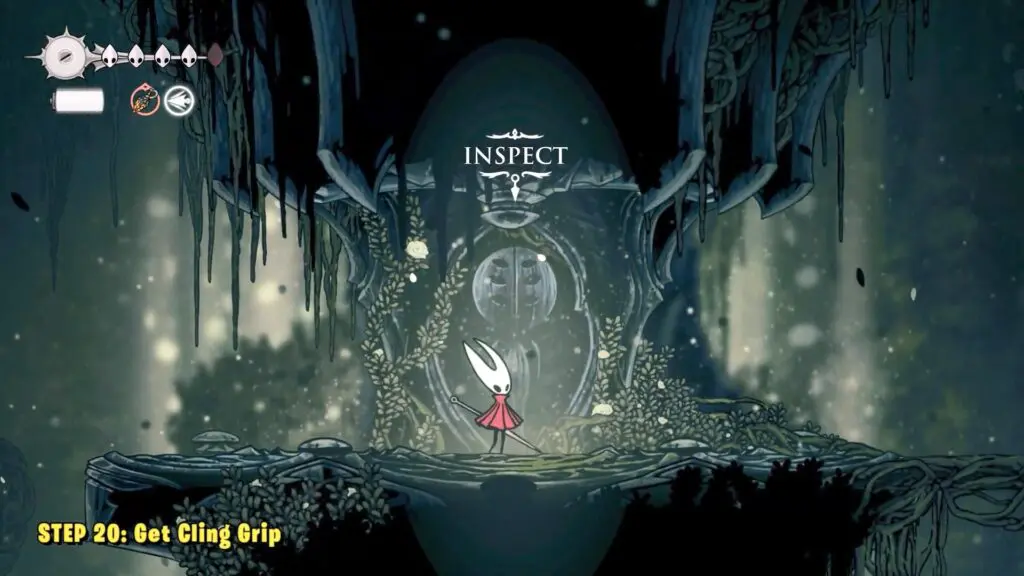
STEP 20: Get Cling Grip
Next, you’ll need to obtain the Cling Grip ability. This ability is located at the top of Shellwood, and its exact position is shown in the image above. You need to progress left after defeating “Sister Splinter” Boss and then move upward to reach the top of the Shellwood.
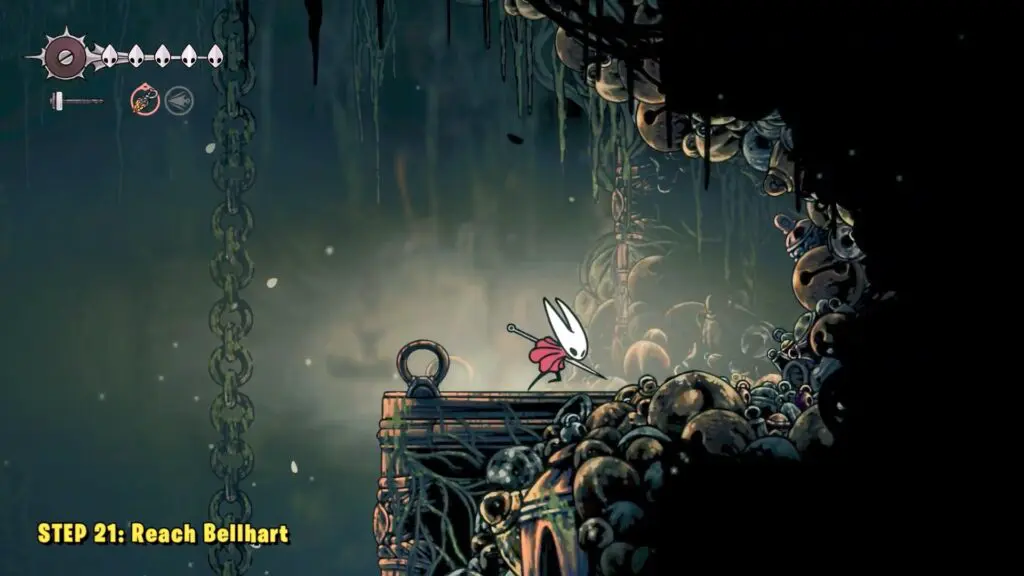
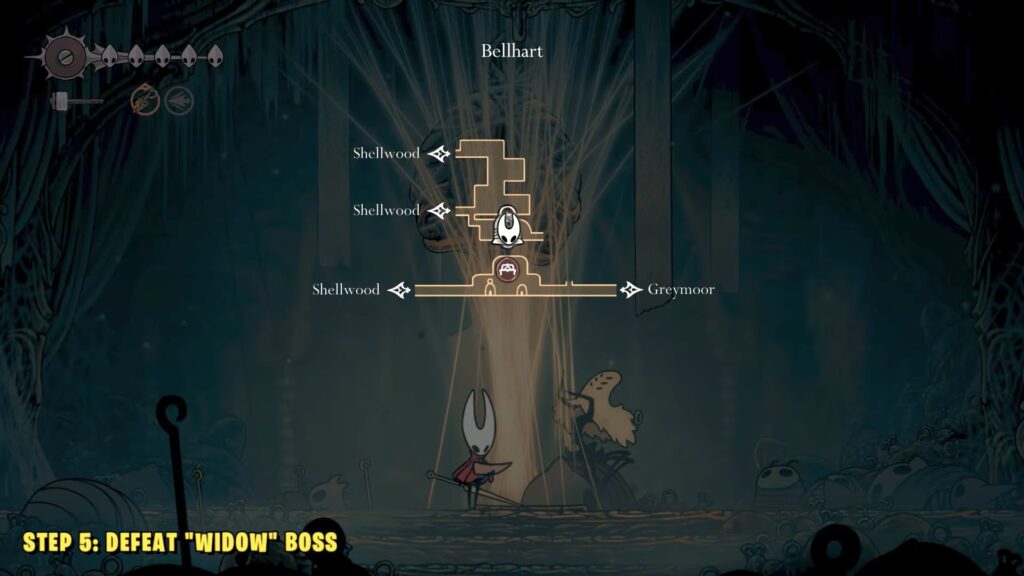
STEP 21: Reach Bellhart (from top)
Starting from the spot where you obtained the Cling Grip ability, head eastward and continue along the path until you arrive back in Bellhart.
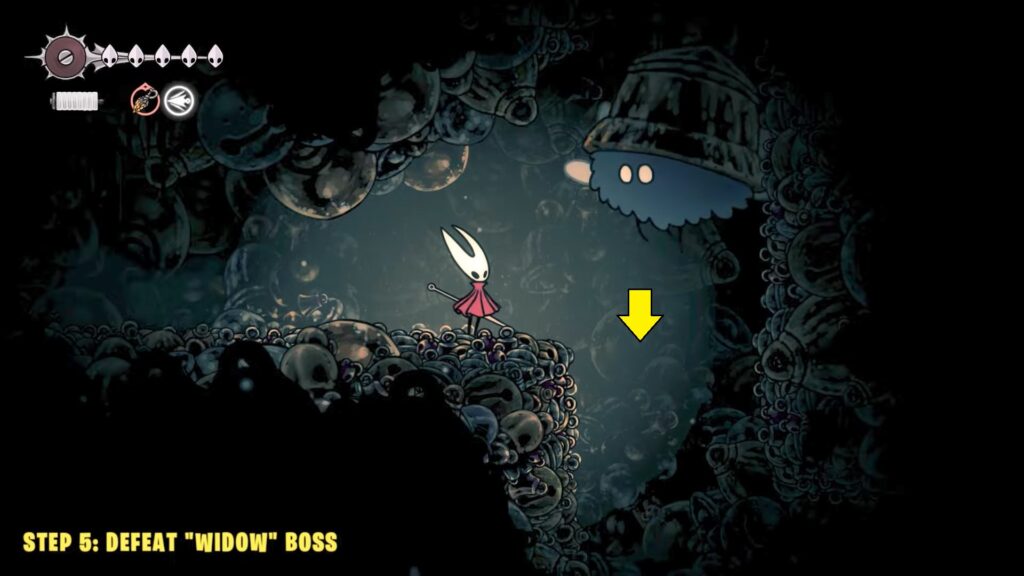
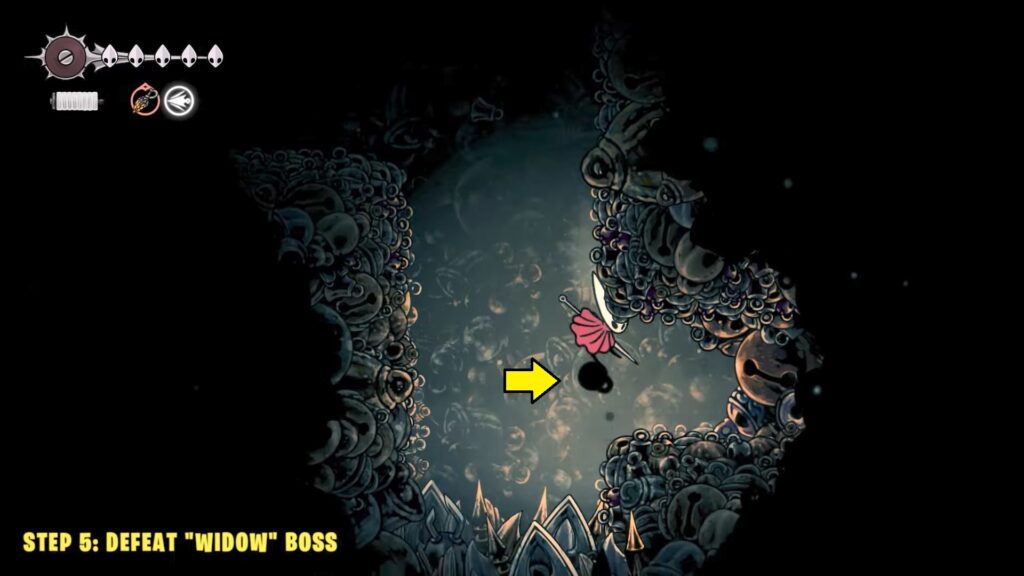
STEP 22: Defeat Widow & Get Needolin
In this section, you’ll encounter two types of enemies. Small creatures crawl along the ground and walls, while the larger creatures move up and down through vertical passages. Progress toward the right side until you reach the location where you need to jump down. Wait for the enemy to rise out of the way, then carefully drop onto the ledge to the right. Break through the bell wall and drop further into the pit.
At the bottom, move left and you’ll find another vertical path blocked by an enemy. Carefully observe its movement, then move behind it and slip into the left opening.
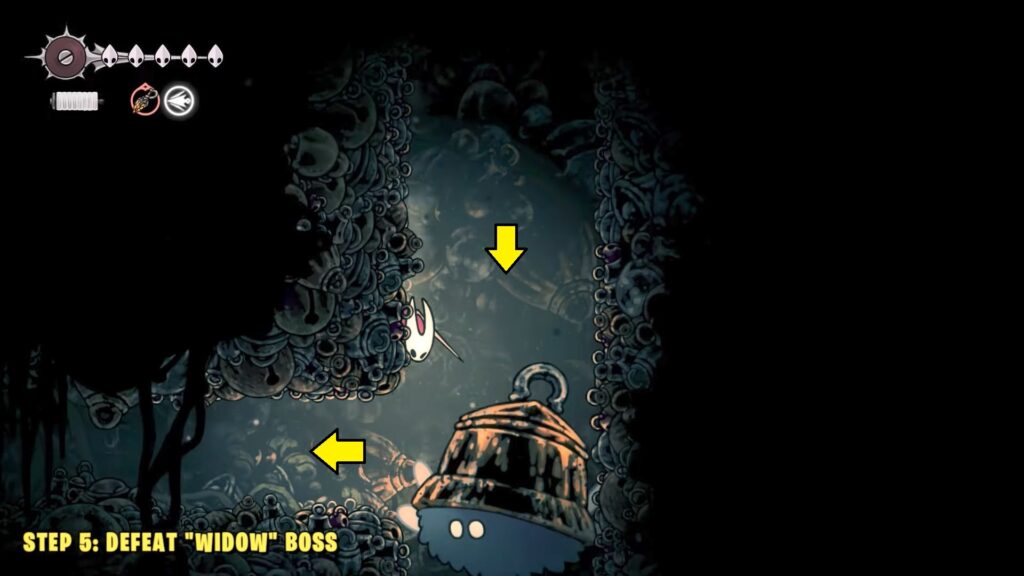
There are actually two bigger enemies in this vertical path. When both enemies move away, time your drop carefully and slip into another small gap on the left side. Break the wall within this passage and follow the path downward.
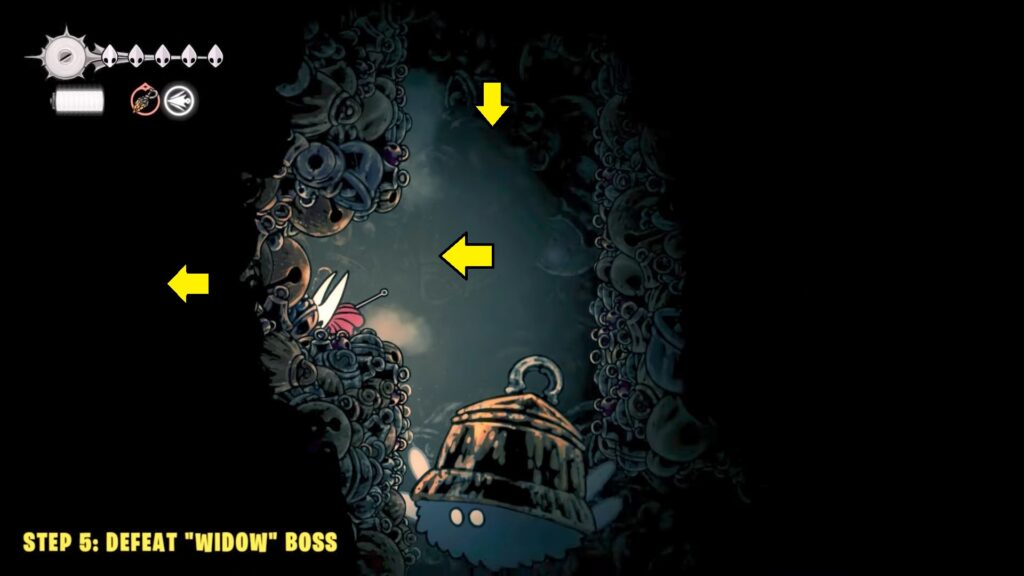
From here, continue moving right and drop down once more, and you’ll soon arrive at the boss arena. Defeat the Boss to obtain Needolin.
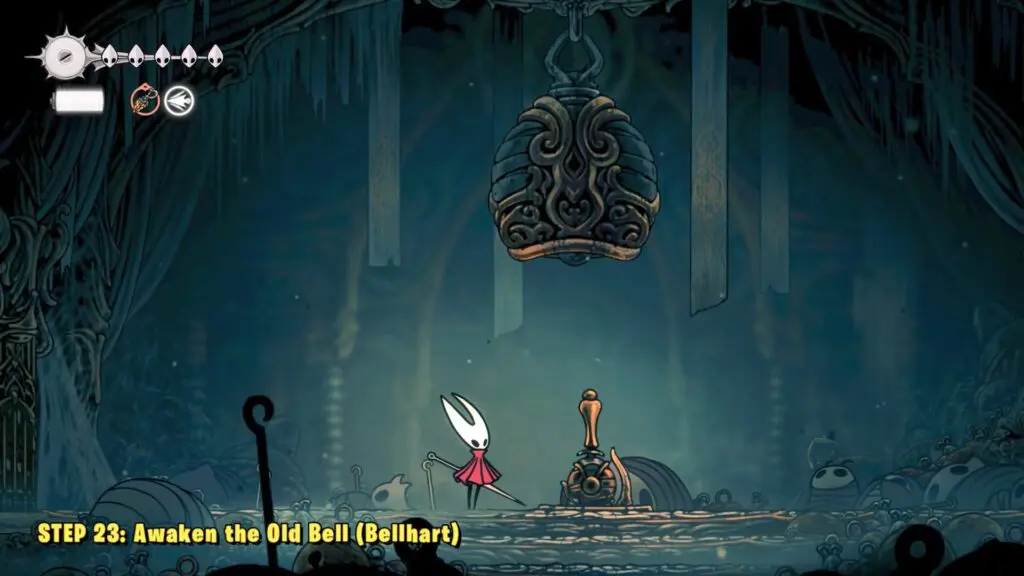
STEP 23: Awaken the Old Bell (Bellhart)
After the Boss fight, start climbing up the ledge to reach the top to get Awaken the Old Bell.
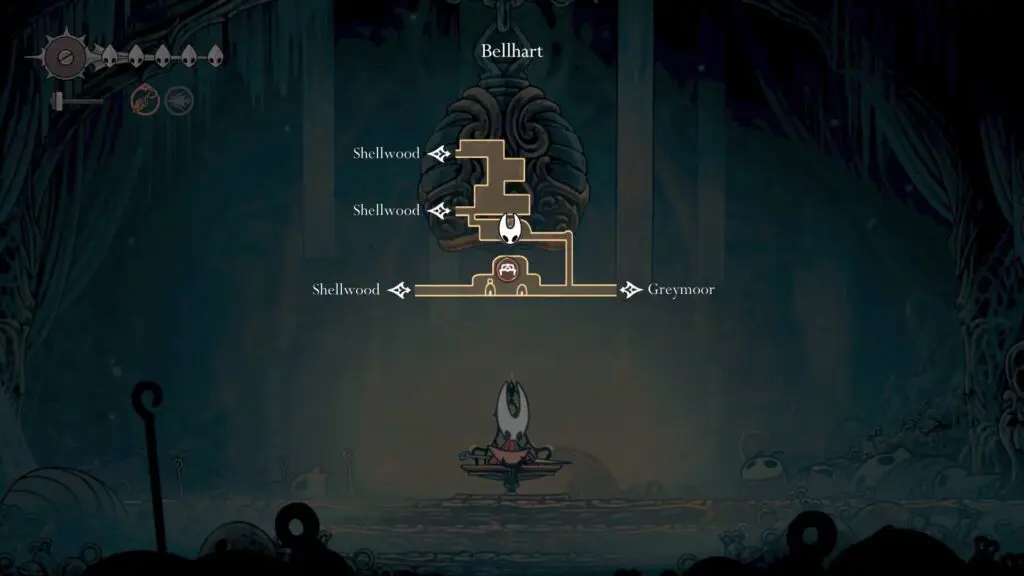
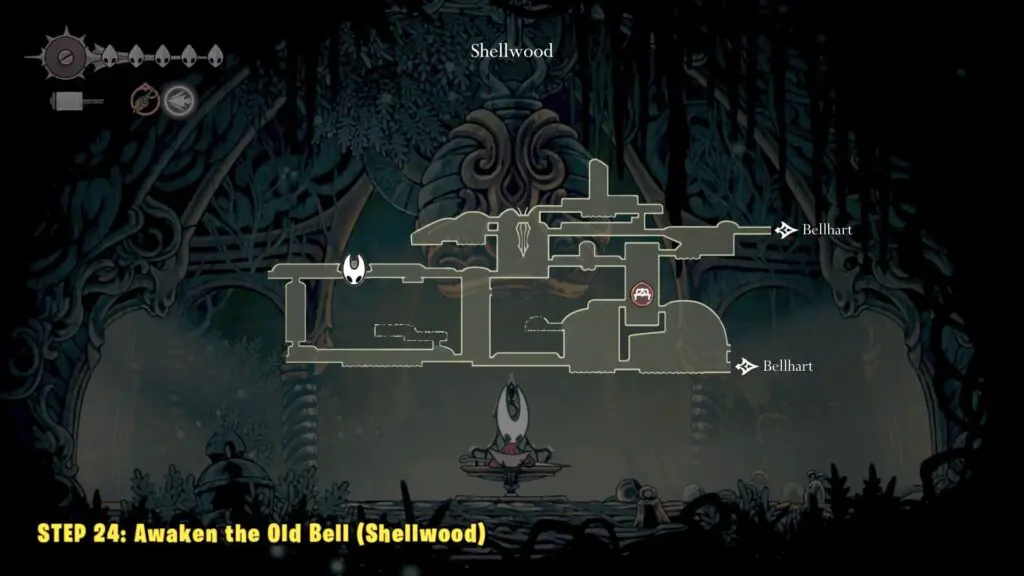
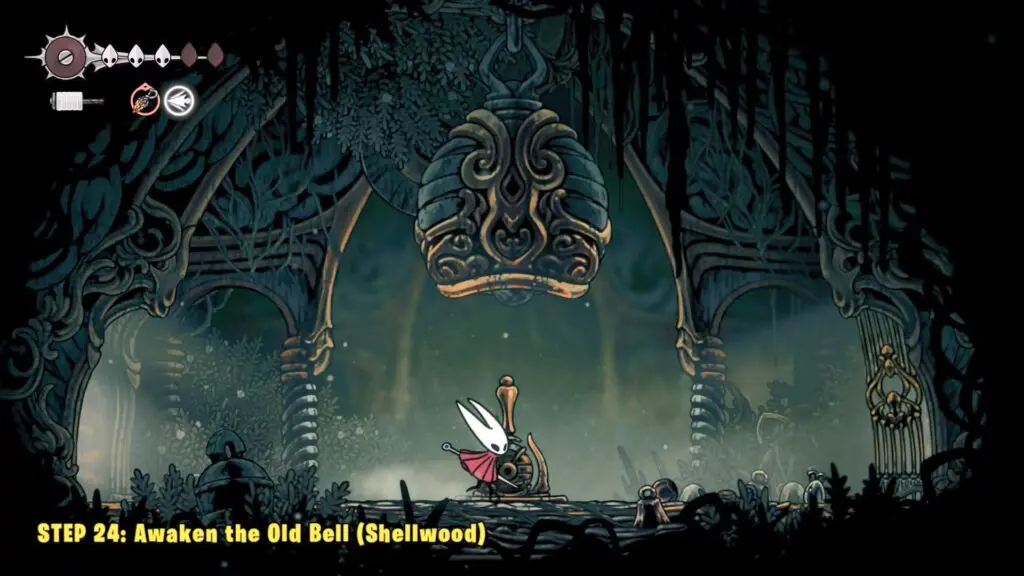
STEP 24: Awaken the Old Bell (Shellwood)
Old Bell in Shellwood is located in the western part of Shellwood.
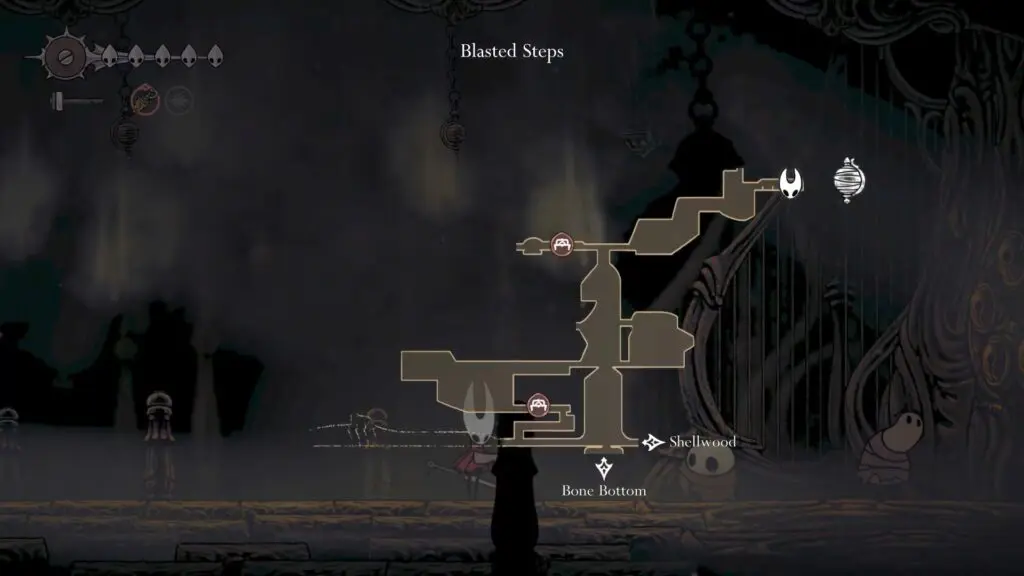
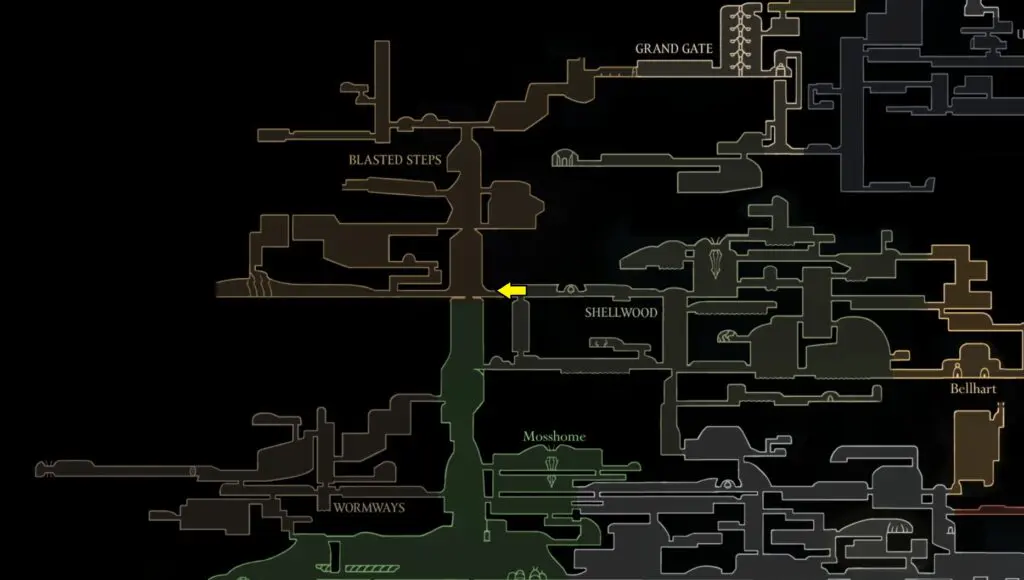
STEP 25: Reach Blasted Steps
proceed left from the Shellwood to reach Blasted Steps.
STEP 26: Buy Blasted Steps Map
After reaching the Blasted Steps, go left and then start climbing upward. Follow the winding path until you reach the top. From there, head right to find Shakra. Buy the area map from the merchant.
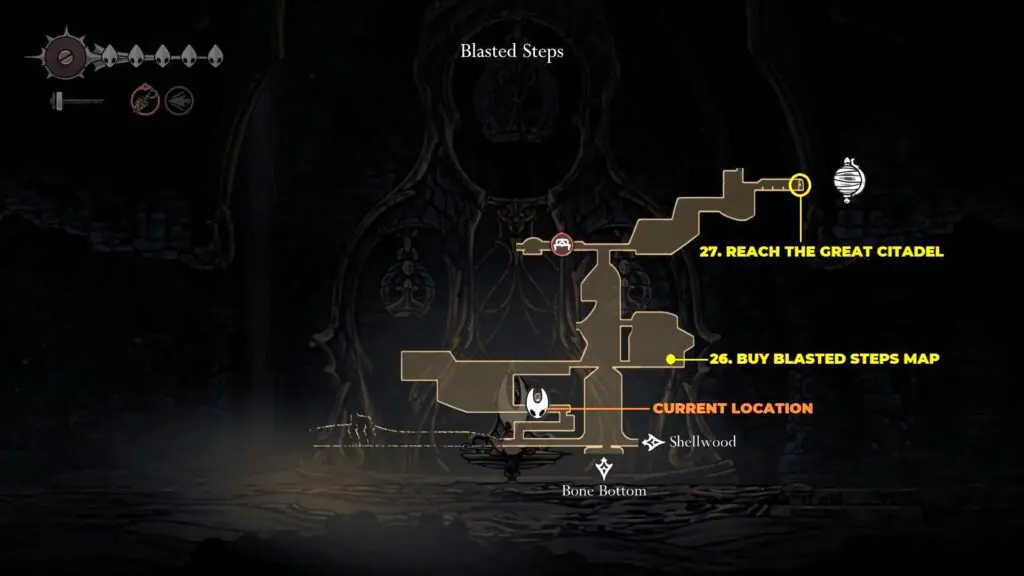

STEP 27: Reach the Great Citadel
From the Sakra’s location, you need to progress upward to reach the Great Citadel.