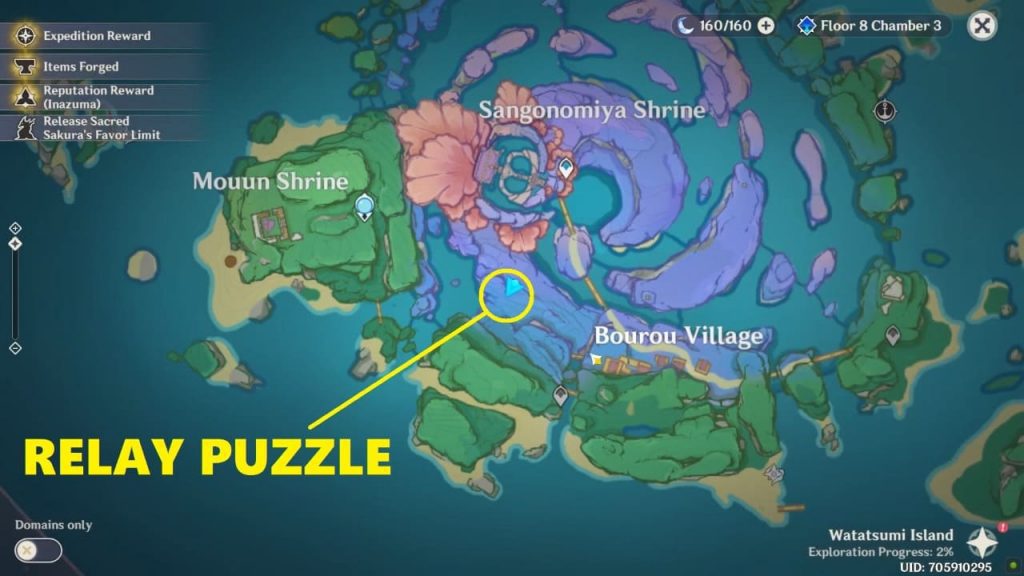
There are 7 relay stone puzzles in Watatsumi Island of Genshin Impact 2.1. Solving the relay stone puzzles will grant you access to Exquisite Chests (and sometimes luxurious chests). This walkthrough will show the location and solution of all the relay stone puzzles in Watatsumi Island.
A relay stone puzzle has 3 components:
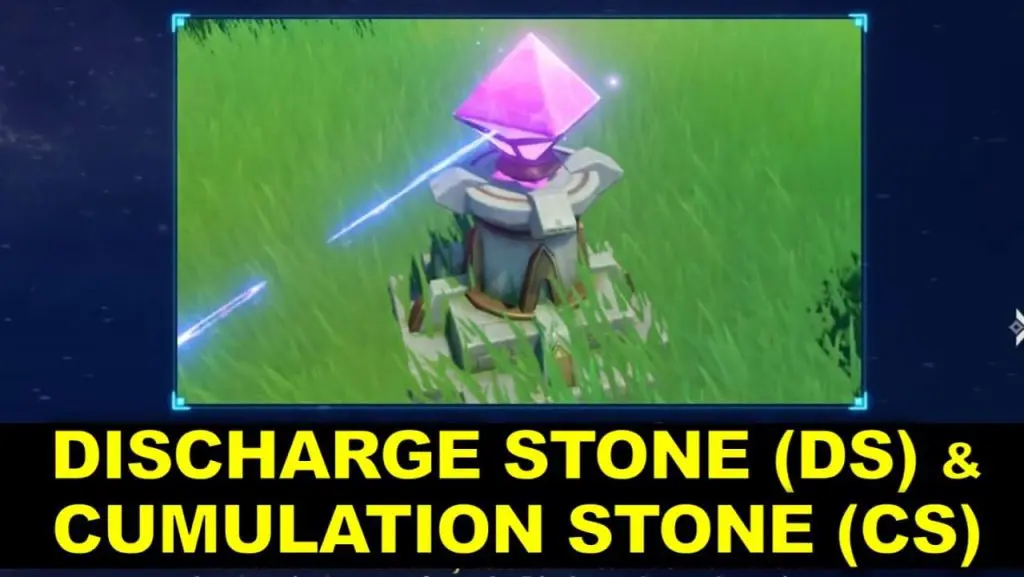
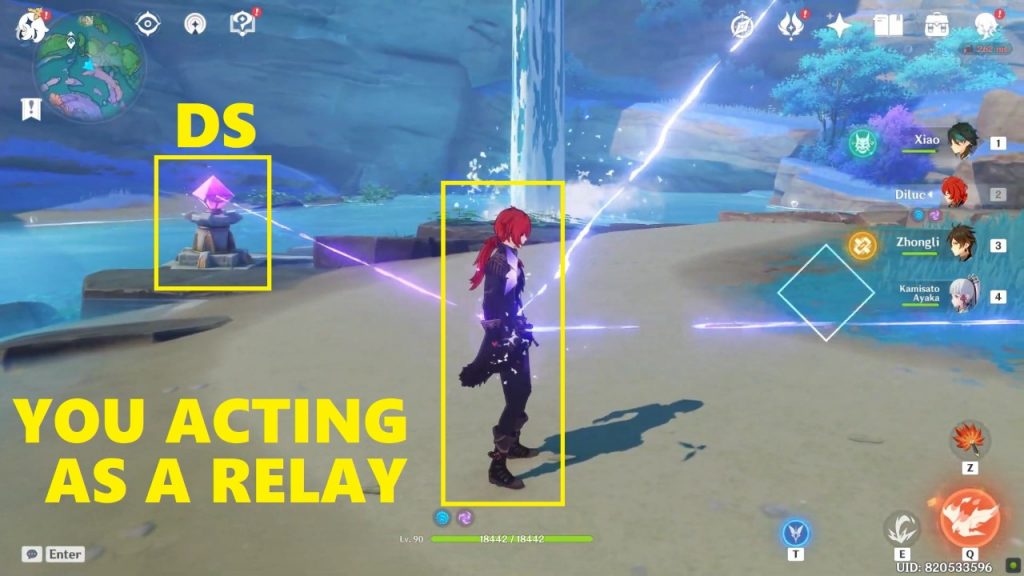
DISCHARGE STONE (DS): Shoots a harmless electric current.
CUMULATION STONE (CS): Absorbs the electrical energy from Discharge Stone.
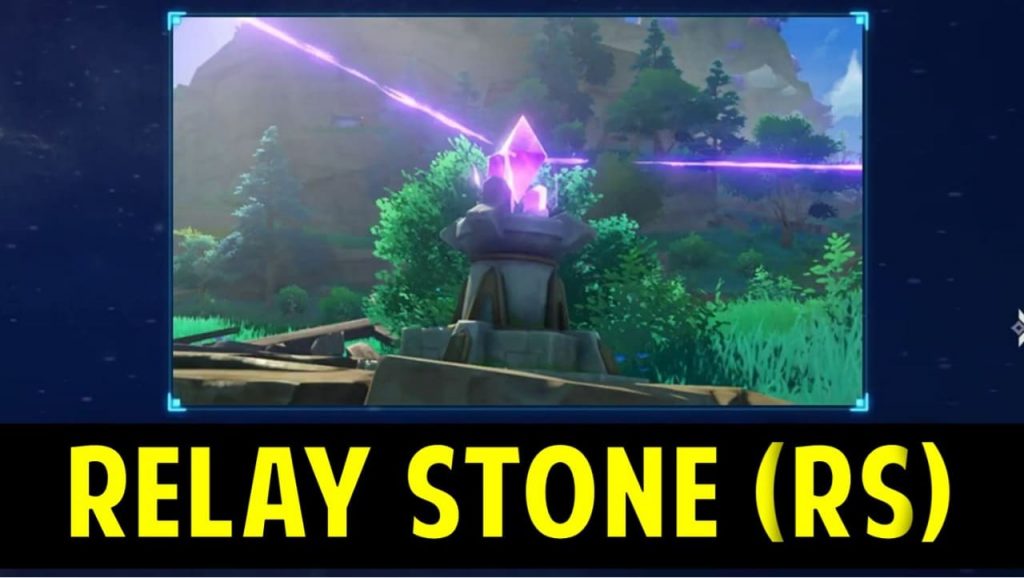
RELAY STONES (RS): Conducts the current released by Discharge Stone.
To solve the puzzle you must complete the circuit: the current from Discharge Stone must reach the Cumulation Stone. You’ll have to use the relay stones to complete the circuit. There will be multiple relay stones in the area which can be picked up and positioned anywhere. To solve the puzzle, you must position the relay stones in such a way that the current released from Discharge Stone reaches the Cumulation Stone. After the circuit is complete, an exquisite chest will appear and its loot will be yours. [NOTE: Electro-Seelie can also act as a relay stone. Your character, if affected by Electro, can also act as a relay stone.]
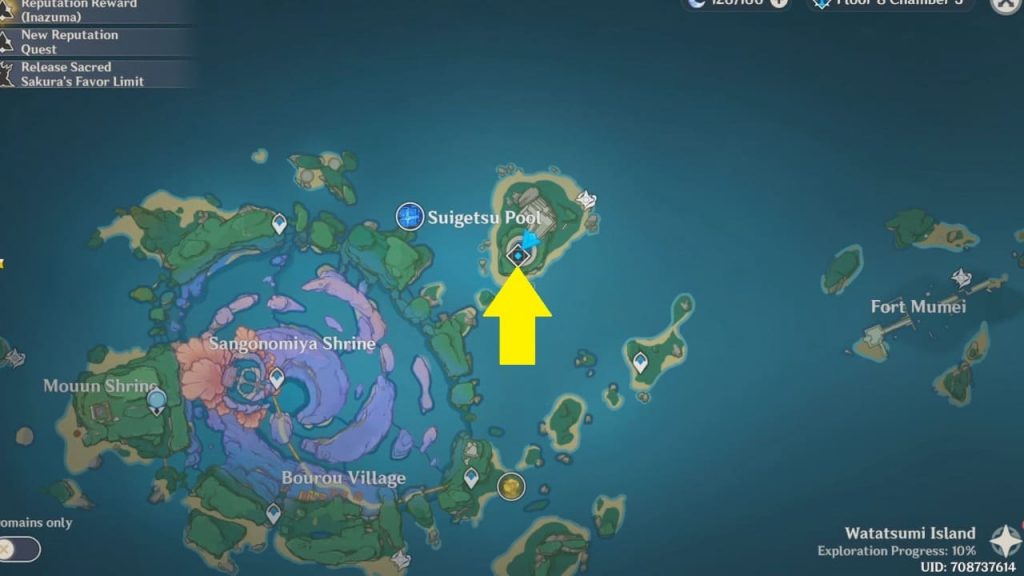
Relay Stone Puzzle 1: Suigetsu Pool
NOTE: You need to drain the water from this area first. Click here to see how to drain the water and unlock the ‘Palace in a Pool’ Domain.
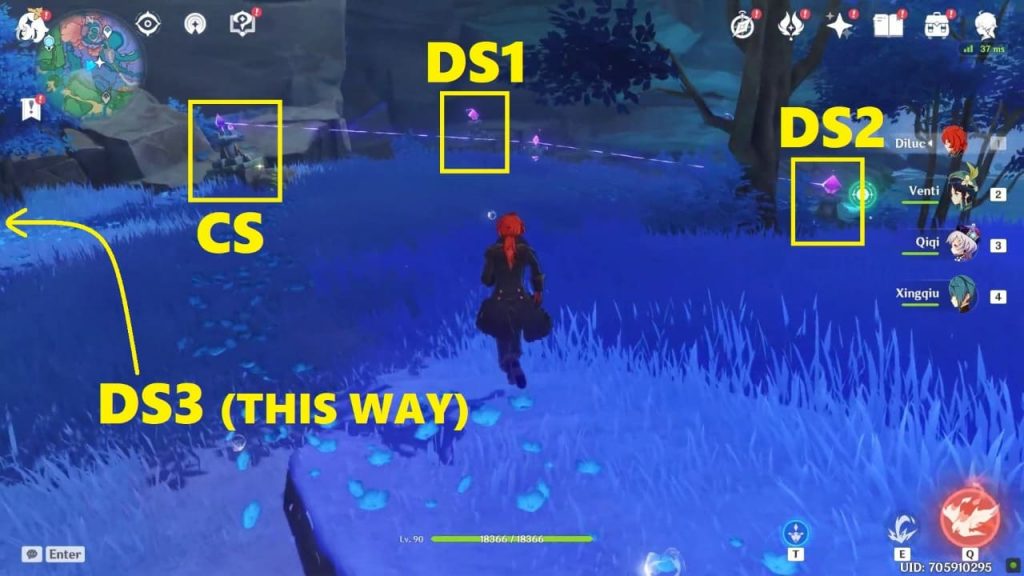
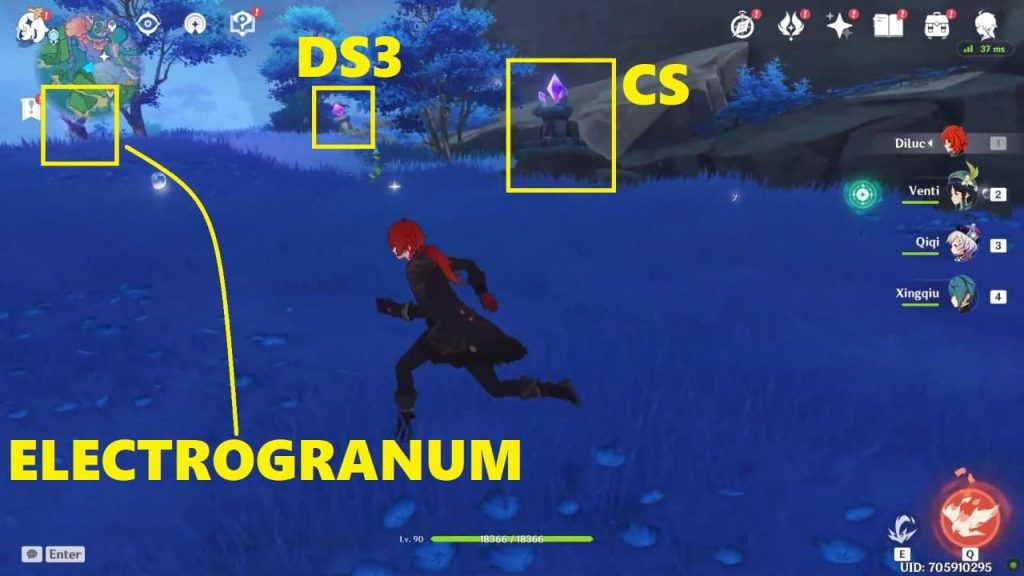
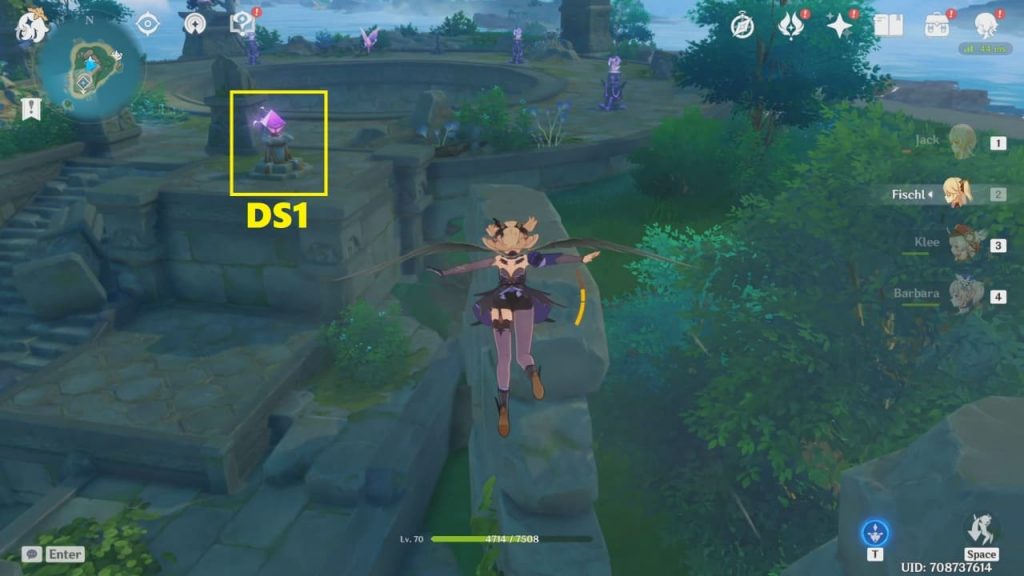
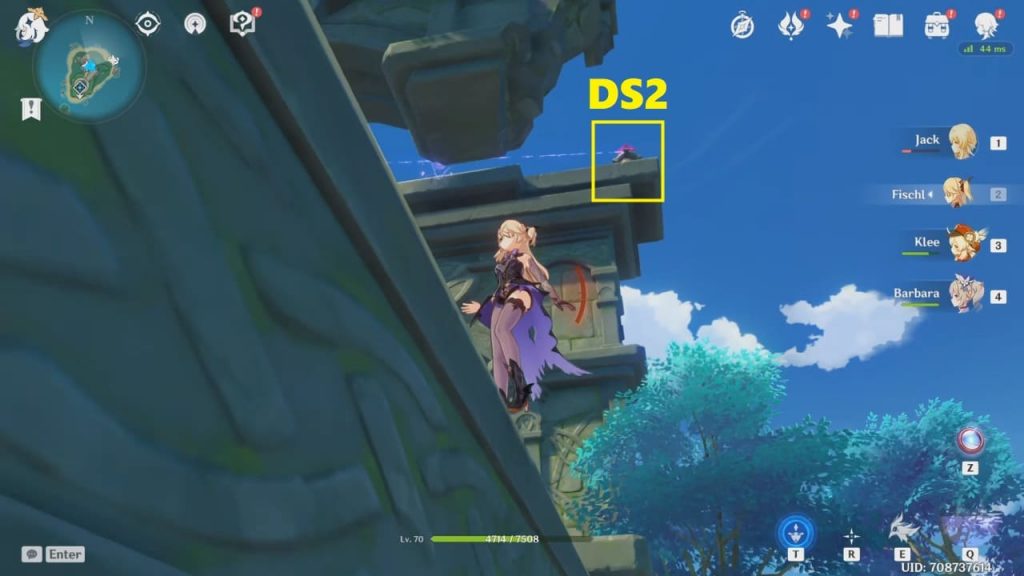
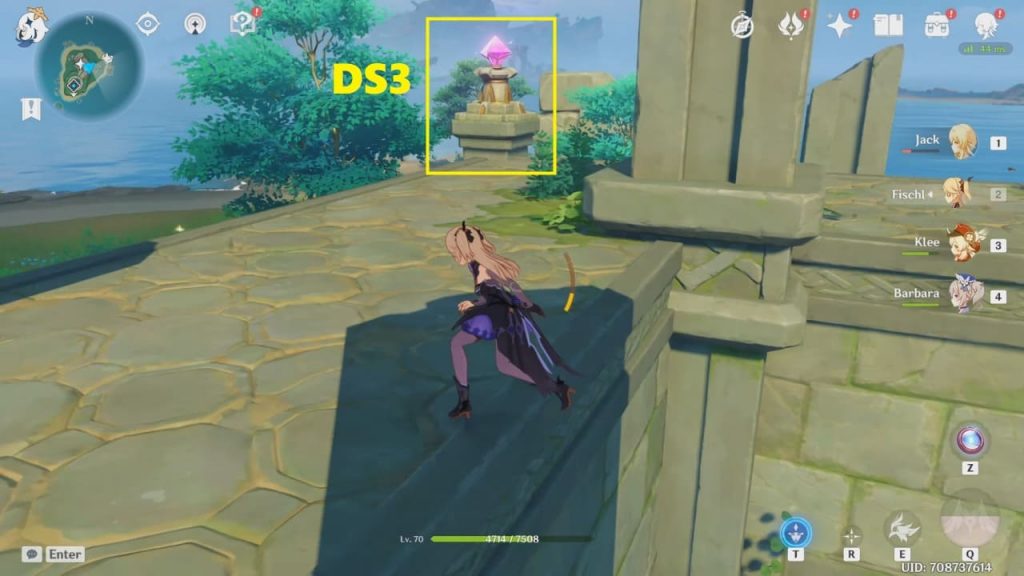
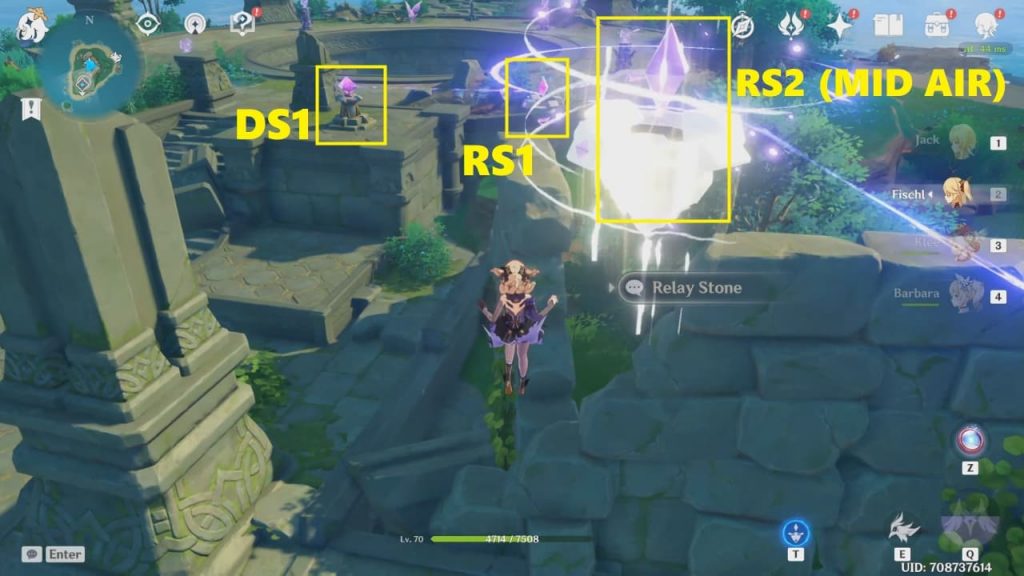
There are 3 Discharge stones (DS), 1 Cumulation Stone (CS), 3 Relay Stones (RS), and 1 Electro-Seelie in this puzzle. To complete the circuit you must connect the CS to all three DS. Discharge Stone 1 (DS1) is just outside the circular area (where all the pylons and Lightning Strike Probes are present). The ruins adjacent to the circular area have DS2, DS3, and CS. Discharge Stone 2 (DS2) is above the big stone gate. Discharge Stone 3 (DS3) is at the corner of the ruins. The Cumulation Stone (CS) is also at the roof of the ruins and will be easily visible. See the images below to check the location of the 3 discharge stones (DS).
1. Connect Discharge Stone 2 to Cumulation Stone (using Electro-Seelie)
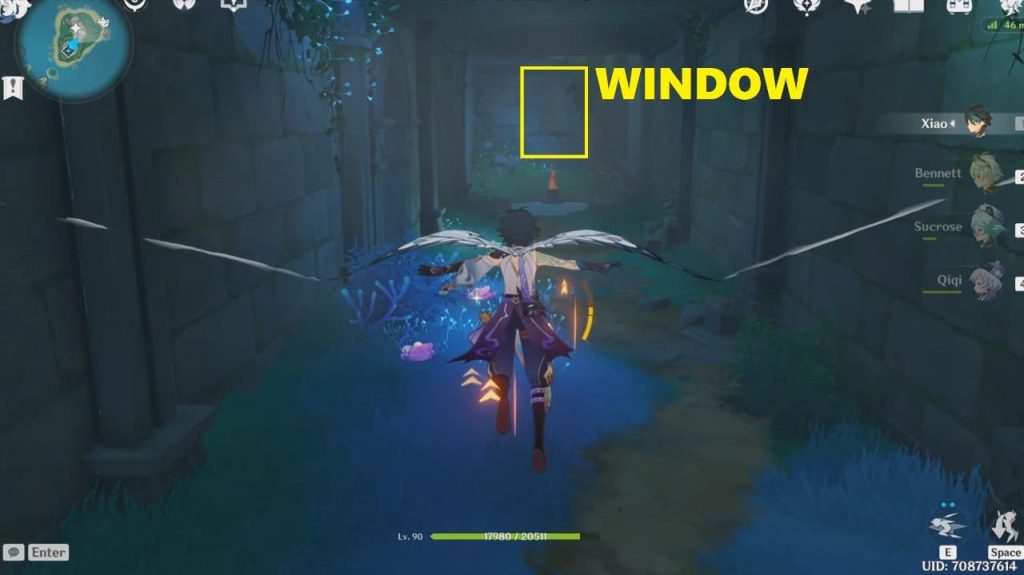
STEP 1: Find the Electro-Seelie
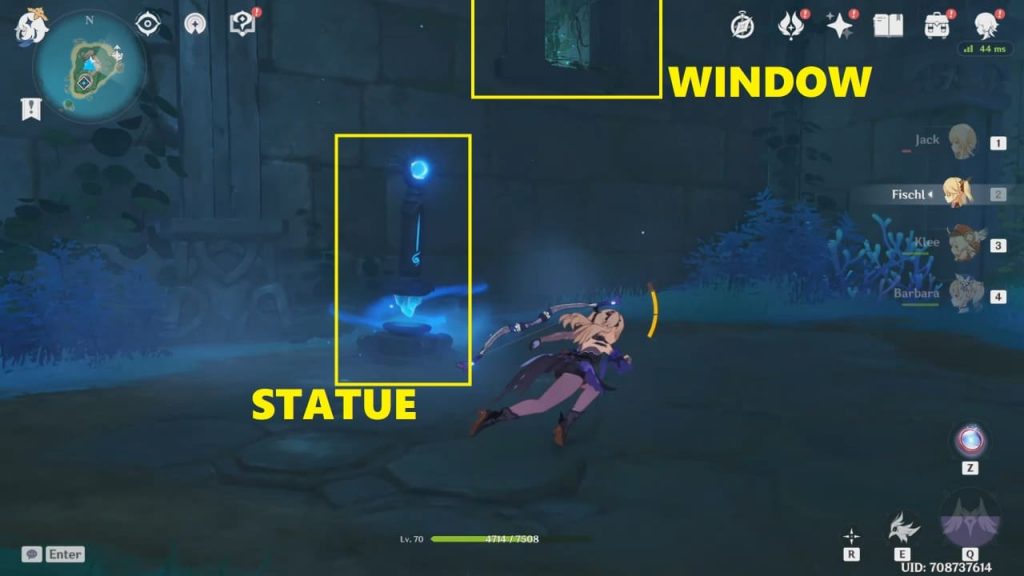
Jump down into the circular area where the Domain gate is present. Run down the corridor (opposite the domain gate) and jump across the window at the very end of this corridor. The Electro-Seelie will be on the other side of this window. It will move away when you get near it.
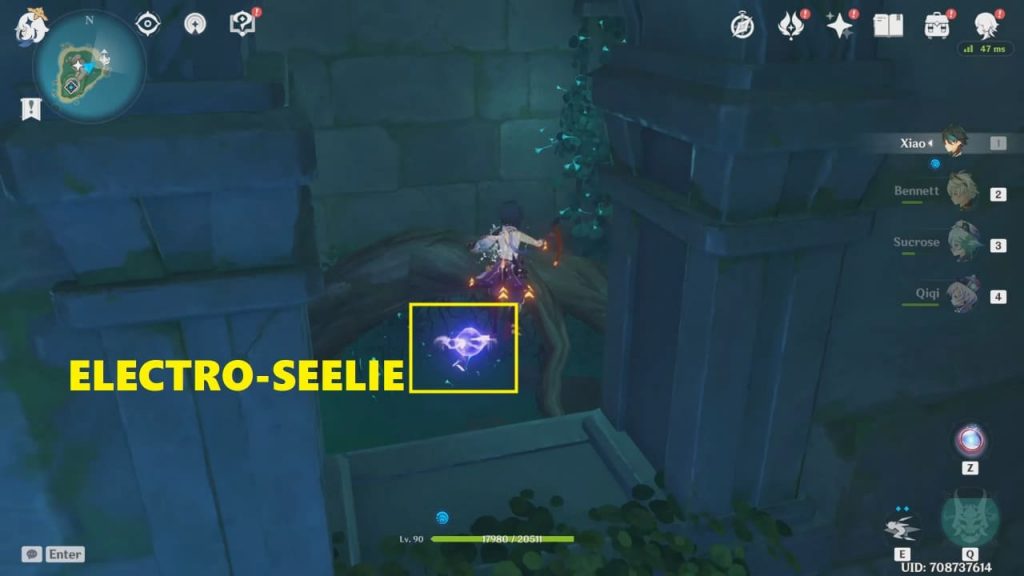
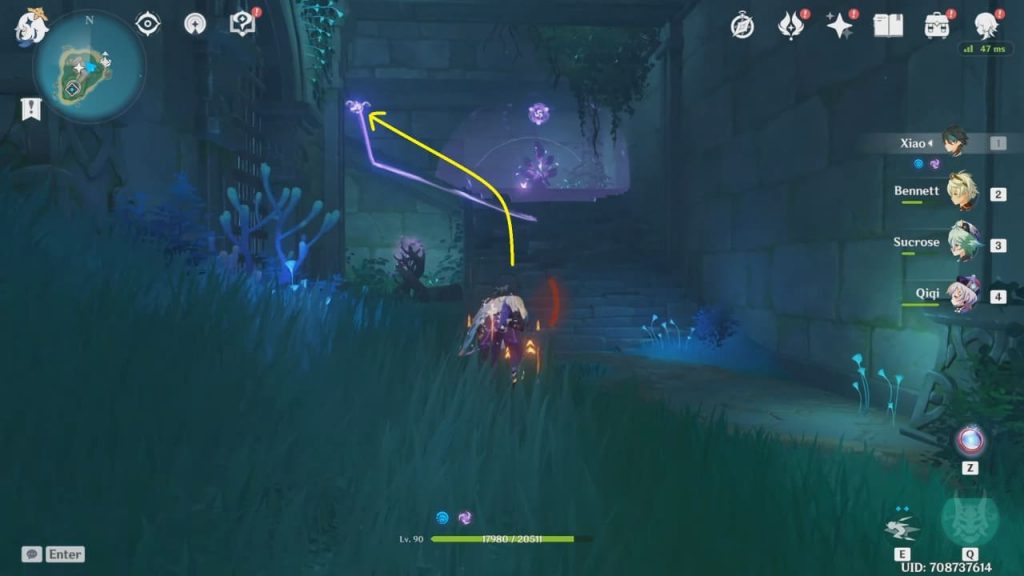
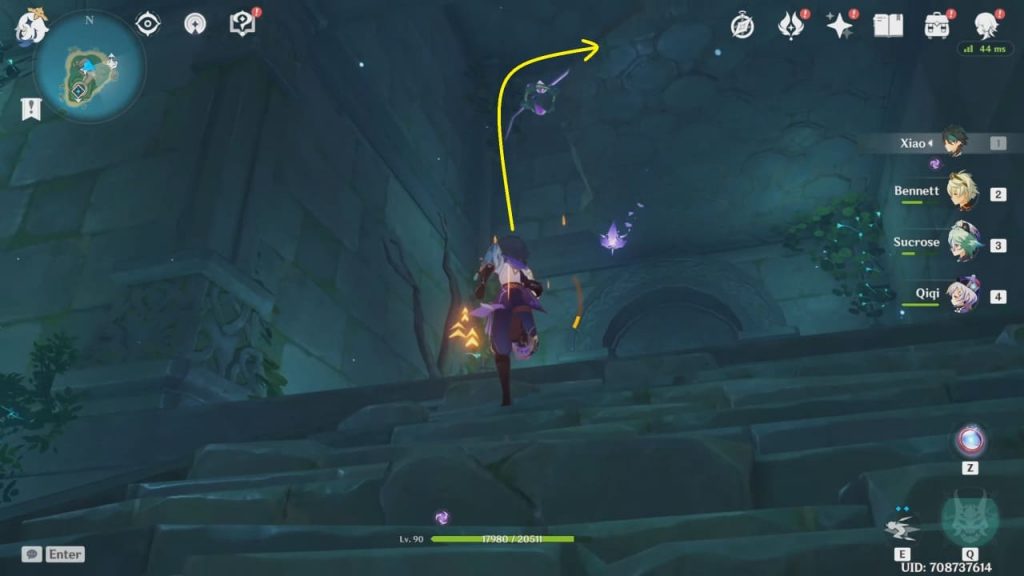
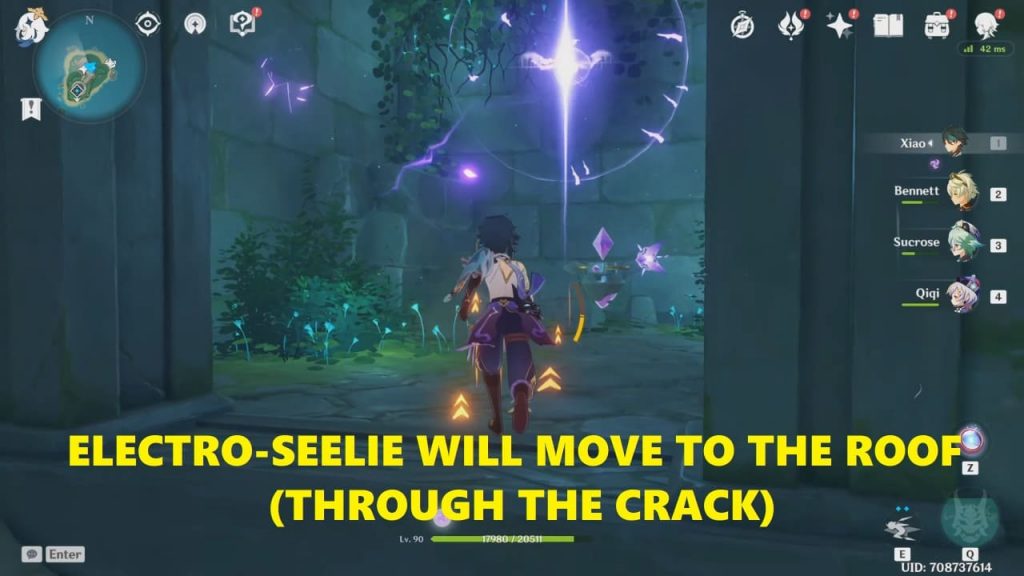
STEP 2: Chase the Electro-Seelie
Keep chasing the Electro-Seelie until it reaches the roof of the ruins. The Electro-Seelie will first go upstairs and then it will move to the room above (through the broken roof). From there it will reach the roof of the ruins (through a crack in the roof). When you chase it after it reaches the roof, it will move above and will connect DS2 to CS.

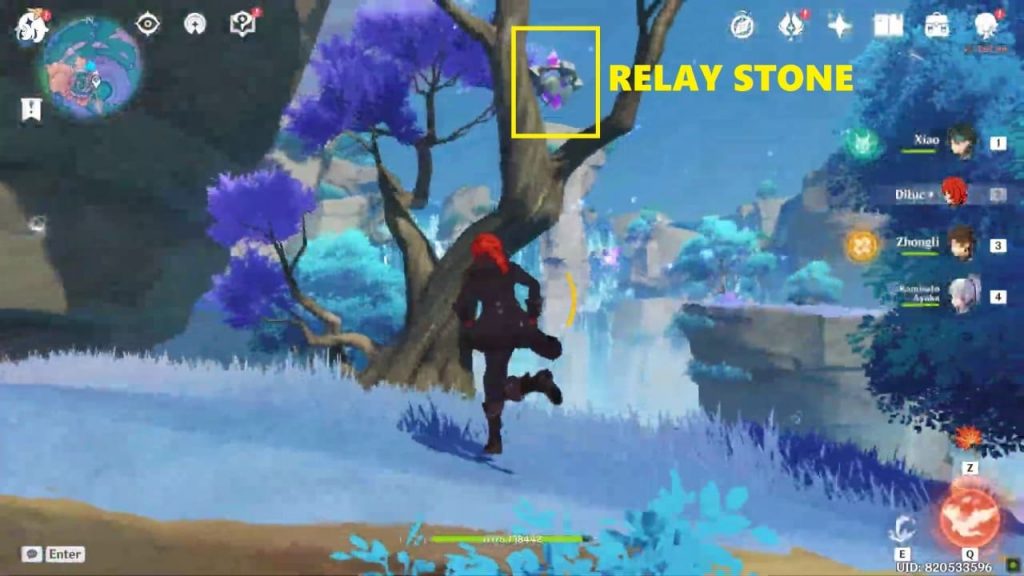
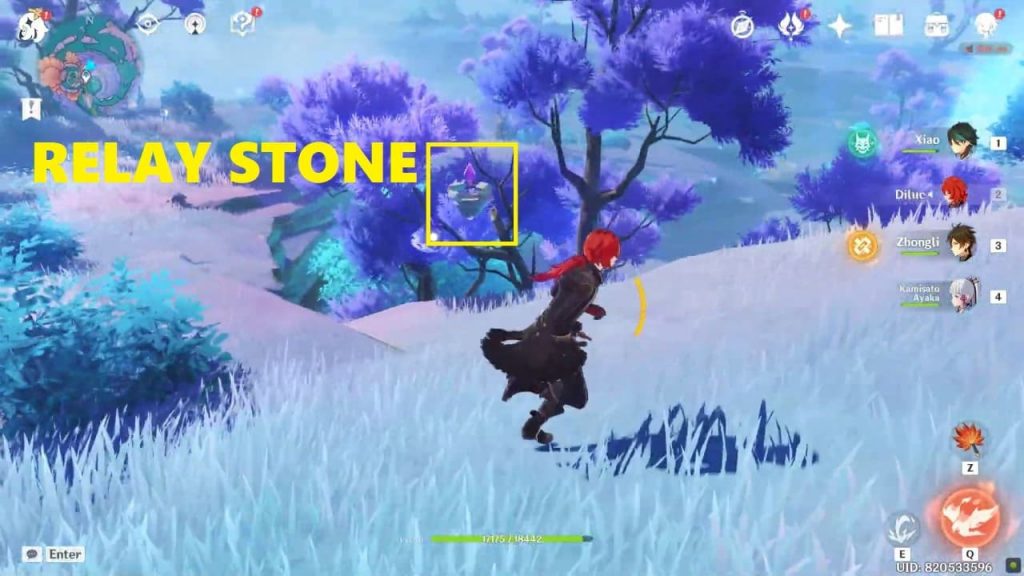
2. Collect the 3 Relay Stones
2 Relay Stones are pretty easy to find. They’re in the rooms just below the cumulation stone. You’ll be in these rooms while chasing the Electro-Seelie and can pick up these relay stones then. The third relay stone is hard to get. It’s in a locked room in the basement and you need to solve the lightning probe puzzle to open the doors.
STEP 1 (Reach the 3rd Relay Stone): Jump down into the circular area where the Domain gate is present. Go down the corridor (opposite the domain gate) and turn left in the middle of the corridor to reach the area with the lightning probe. The relay stone is in the room behind the iron gate. (Note: This lightning probe is locked now).
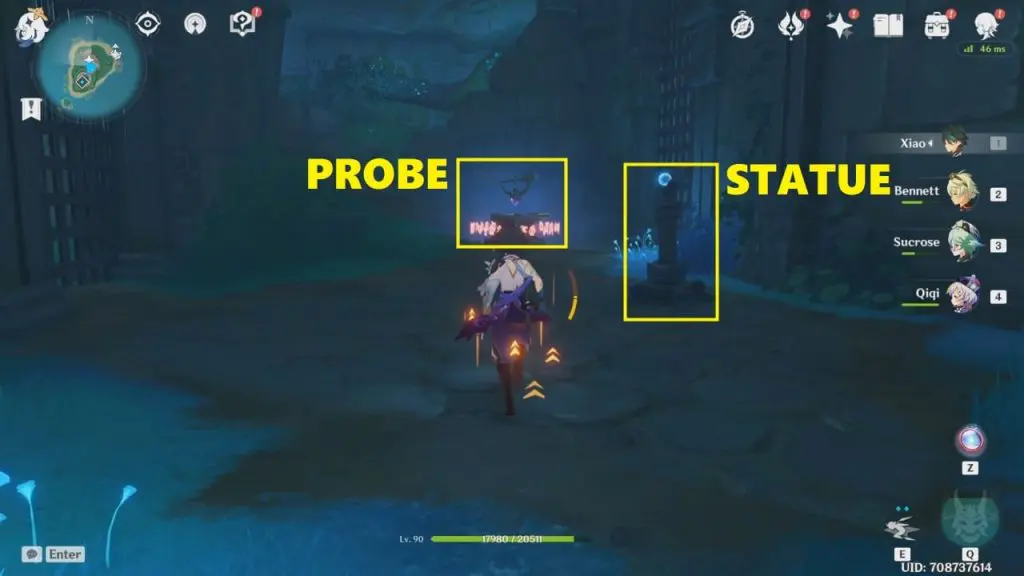
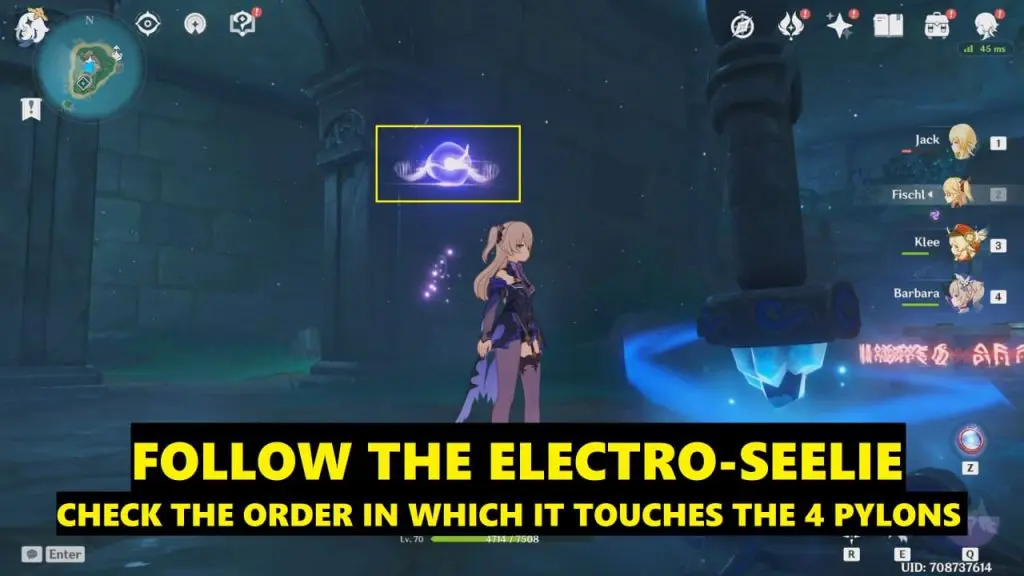
STEP 2 (Unlock the lightning probe): Interact with the statue which is to the right of the locked iron gate. An Electro-Seelie will appear. Follow the Electro-Seelie and note the order in which it touches the 4 Pylons in this area. The first 2 pylons are in the room in front of the statue. The door to this room can be opened by interacting with the switch on its right. Hit the 4 Pylons with electrical attacks in the same order in which the Electro-Seelie touched these Pylons. This will unlock the lightning probe.

STEP 3 (Redirect the Lightning Probes): The wall behind the statue has a window. Jump through the window and get to the other side. You’ll find another lightning probe here (you need to adjust the direction of both these lightning probes to open the locked iron gate). Move ahead and open the iron door (the switch is on its left) to reach the electrogranum plant which is on the left side of the stairs. Summon an electrogranum and then correct the direction of both the lightning probes. This will open the iron gates and then you can pick up the third relay stone. Now, you have all three relay stones.
How Lightning Strike Probe Works?
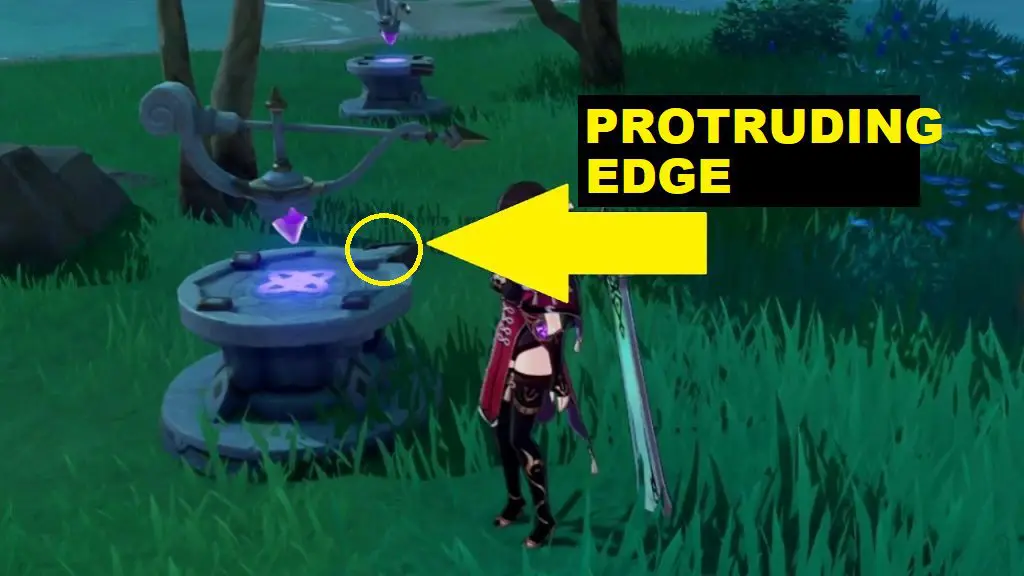
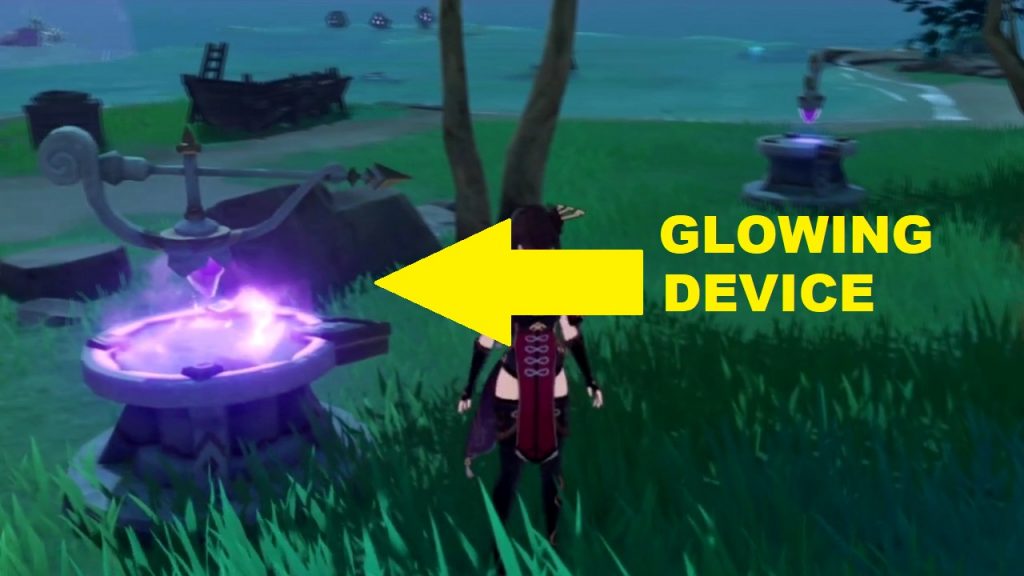
The Lightning Strike Probe has a compass attached to the top that points towards players or enemies charged with electro element. On the base of the Lightning Strike Probe, there is a protruding edge representing the direction in which the compass needs to be pointed (See the picture below). Use electro element to make the compass point in the correct direction and this will make the device glow, as shown in the second picture below.
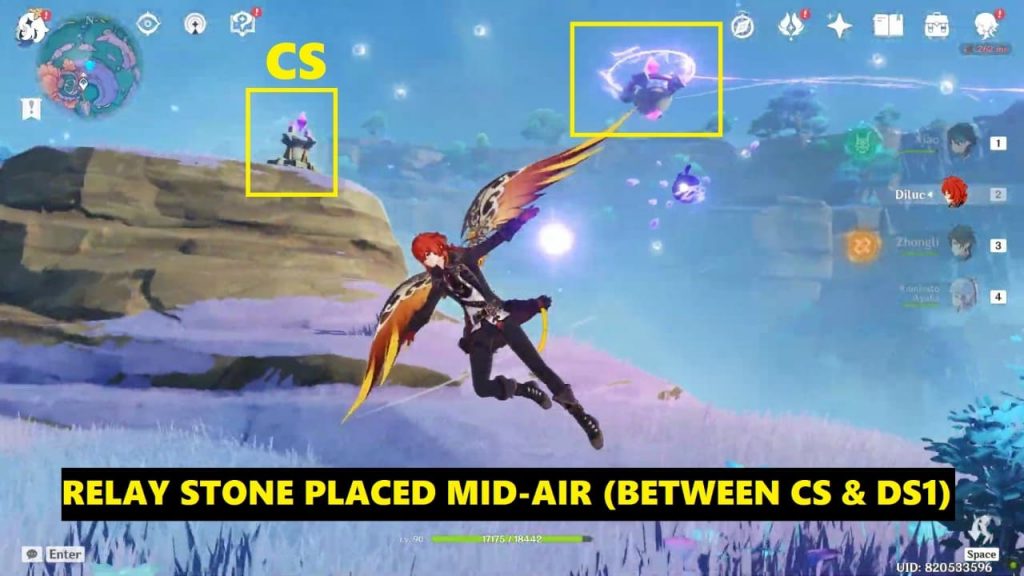
3. Connect Discharge Stone 1 to Cumulation Stone
Connect DS1 to the CS by placing 2 relay stones in between them. One of the two relay stones must be placed mid-air.
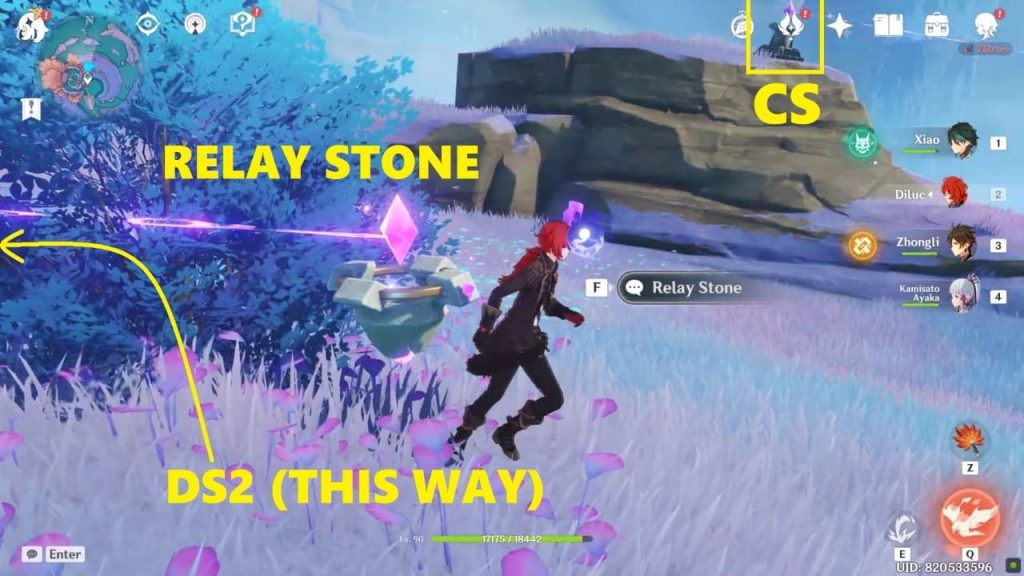
4. Connect Discharge Stone 3 to Cumulation Stone
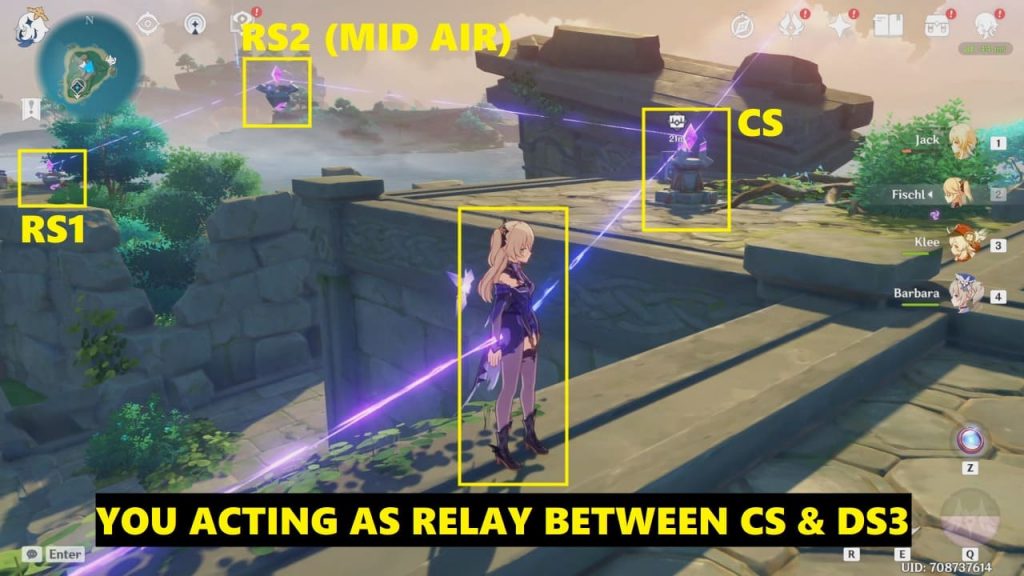
2 relay stones are needed to connect DS3 and CS but you only have one. So, you need to charge yourself with electro and act as a relay yourself. An electrogranum plant is on the left side of DS3. Jump down and summon an electrogranum (now you can act as a relay). Place the remaining relay stone and yourself (charged with electro) in between the DS3 and CS to connect them both. An exquisite chest will appear near the cumulation stone. Collect the loot!
Relay Stone Puzzle 2: Northeast of Sangonomiya Shrine
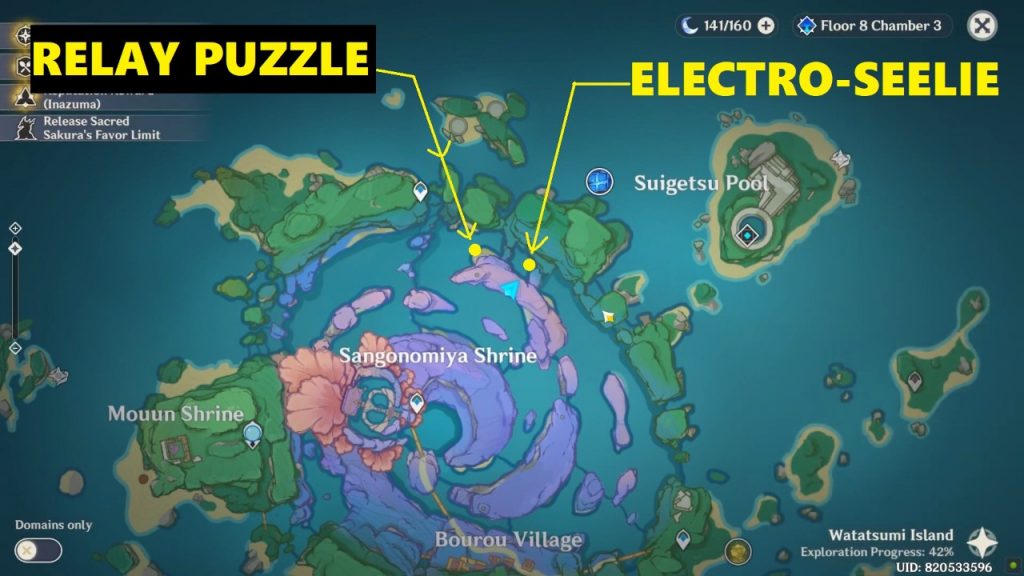
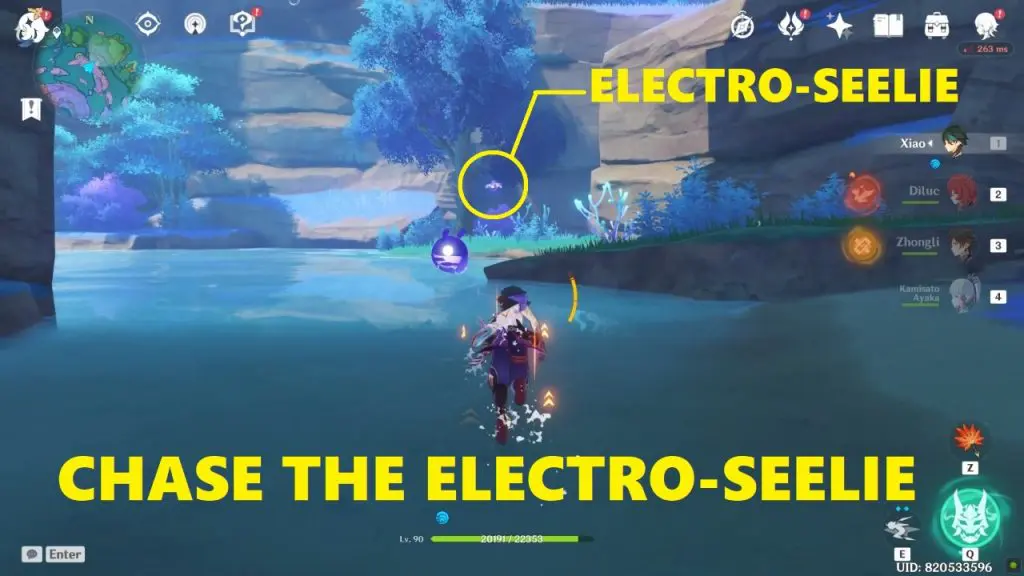
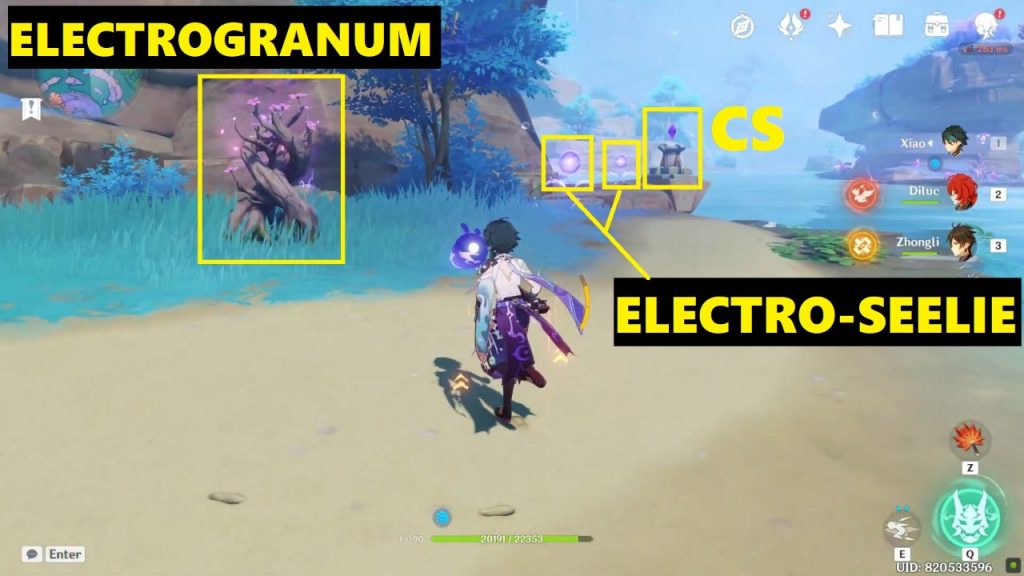
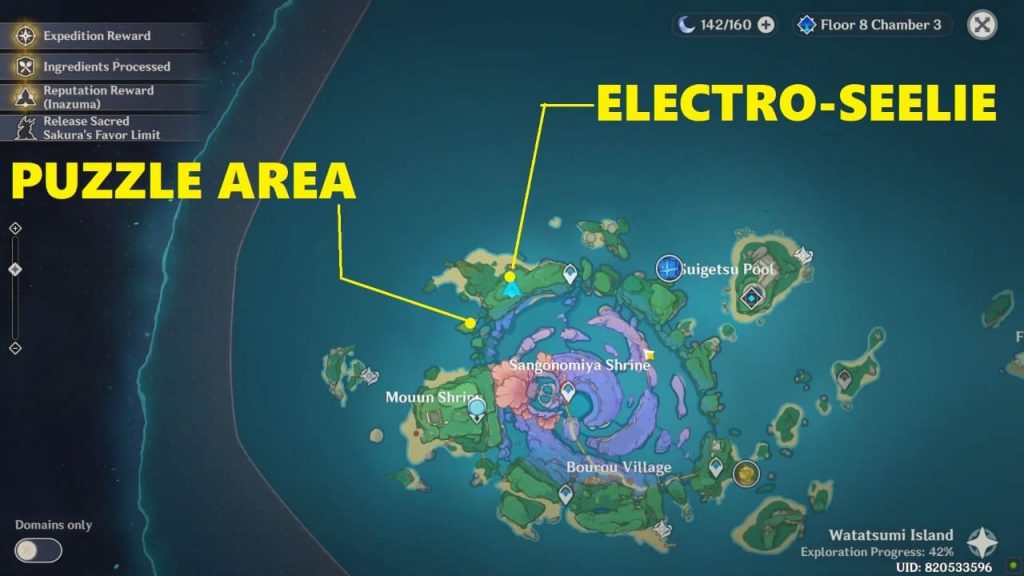
Start from the location as shown in the map below. You’ll find an electro-seelie underneath a tree. Chase the electro-seelie and it will automatically get to the relay puzzle area which is on a small beach in front of the waterfall. Follow the electro-seelie to the relay puzzle area. There will be a Discharge Stone (DS) and a Cumulation Stone (CS). You need to connect the DS to the CS (Note: There aren’t any relay stones here). Luckily, there are 2 electro-seelie here (one of which you chased here). Both the electro-seelie are in the correct position. All you need to do is summon an electrogranum and position yourself between the DS and electro-seelie to complete the circuit. Charged with electro, you’ll be acting as a relay here. A common chest will spawn as you finish the puzzle.
Relay Stone Puzzle 3: Northwest of Sangonomiya Shrine
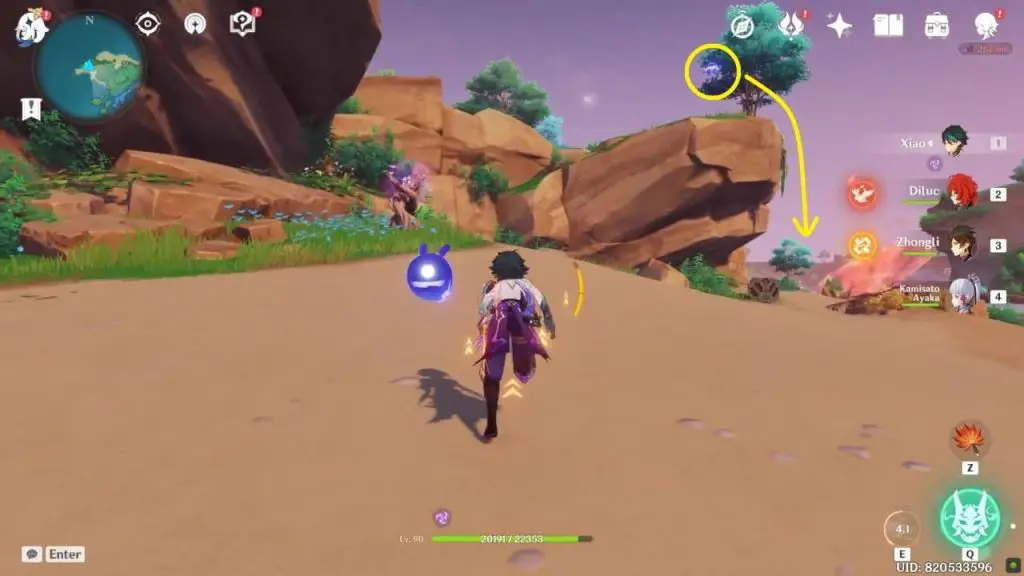
1. Chase the Electro-Seelie
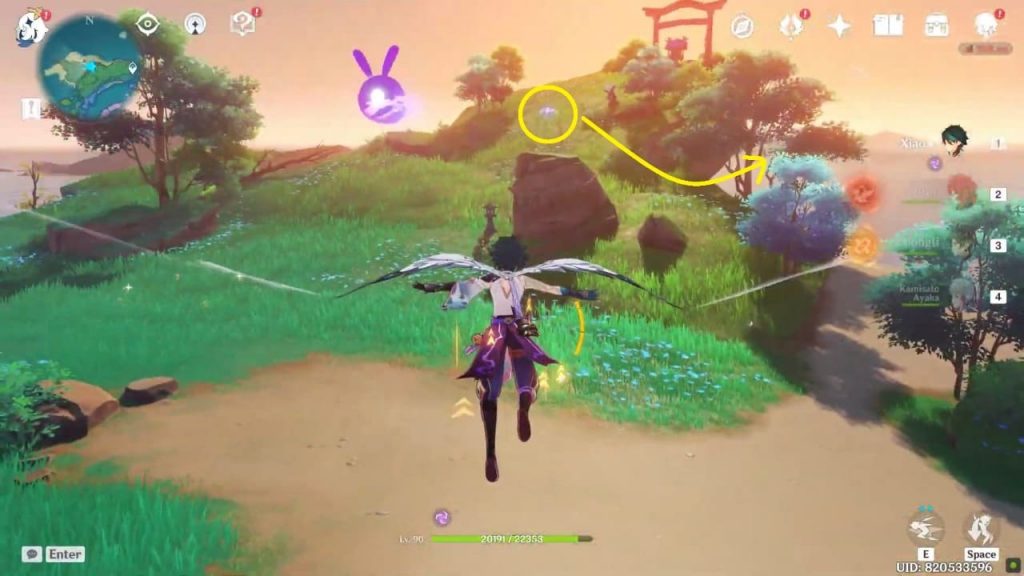
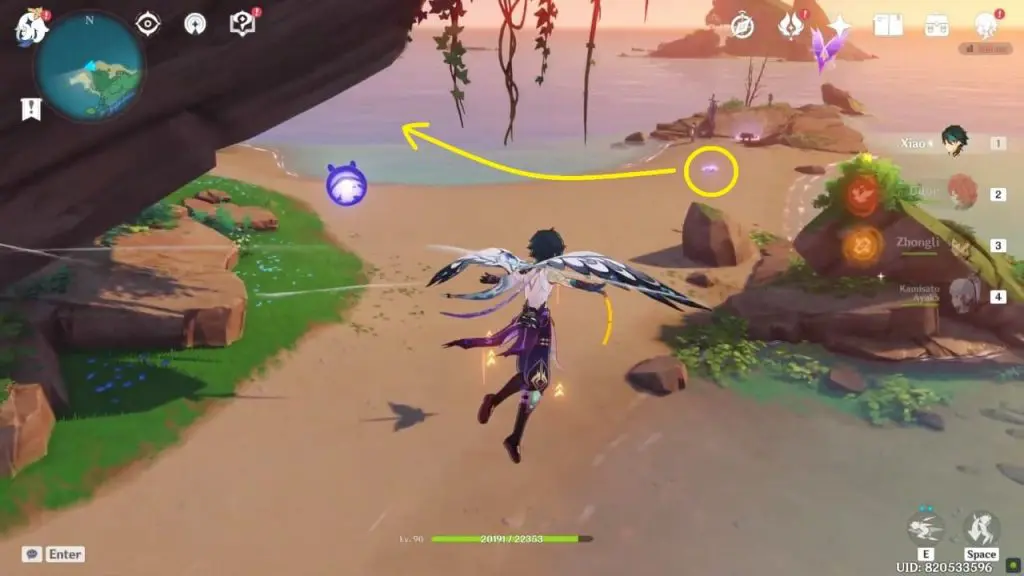
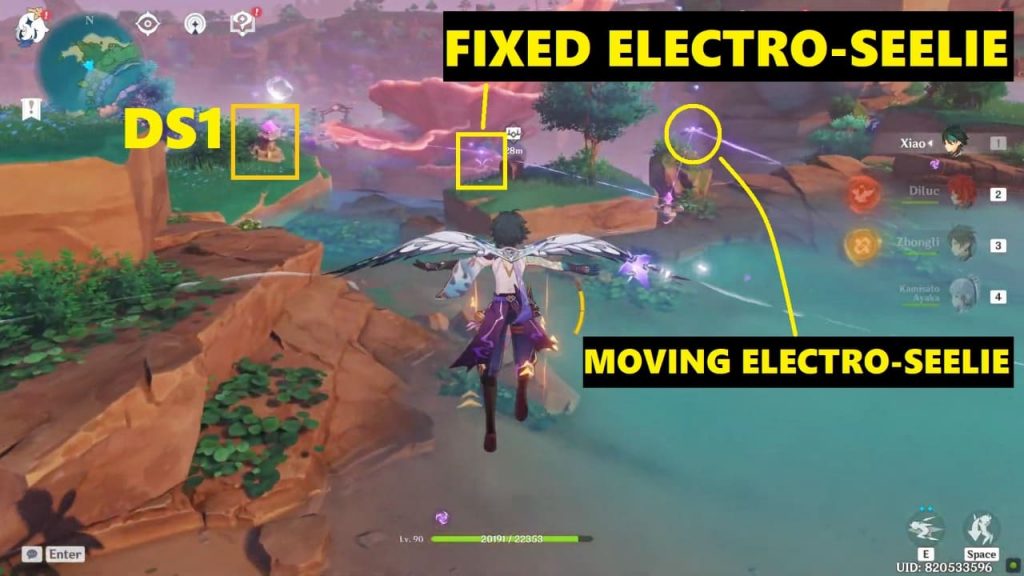
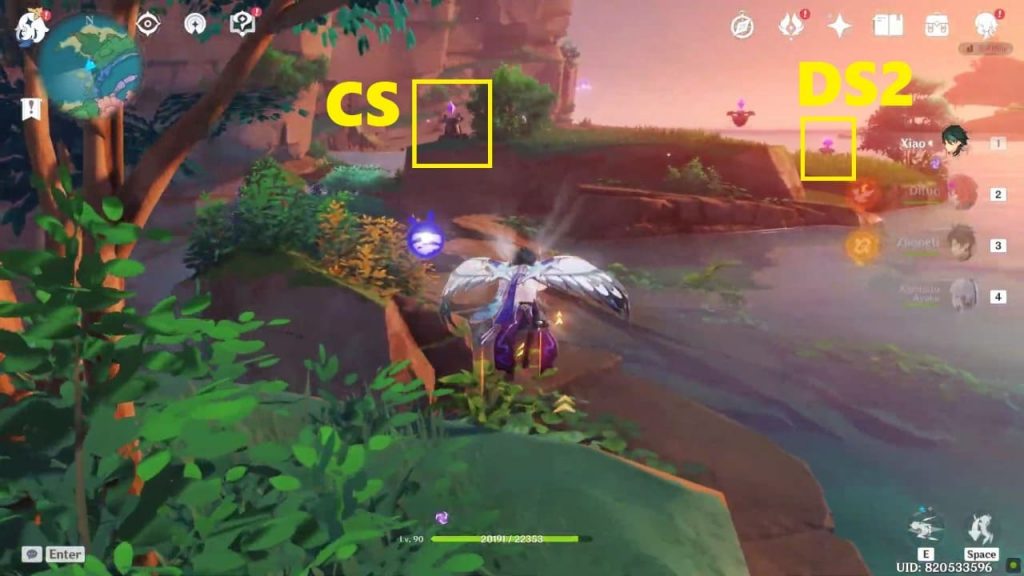
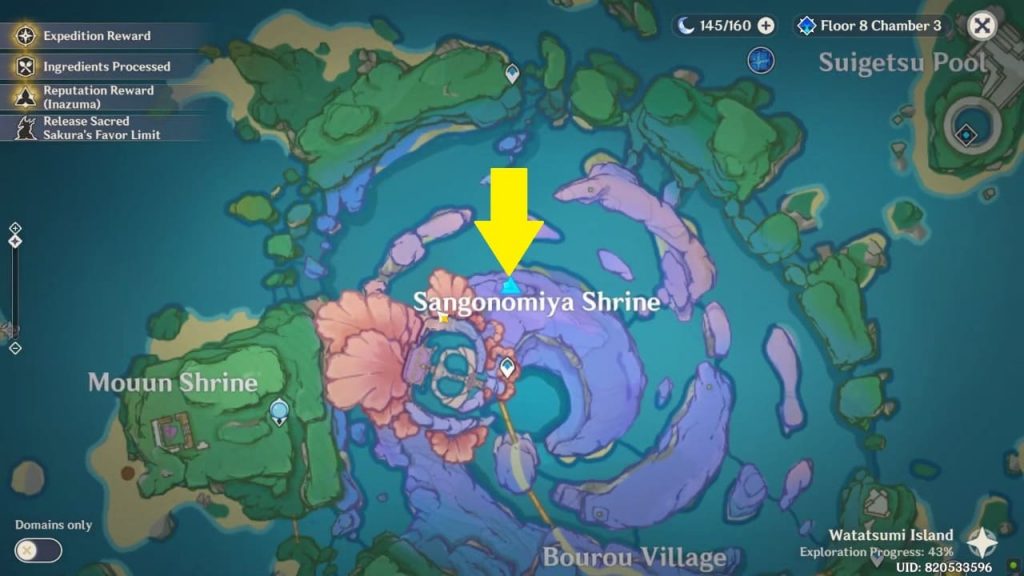
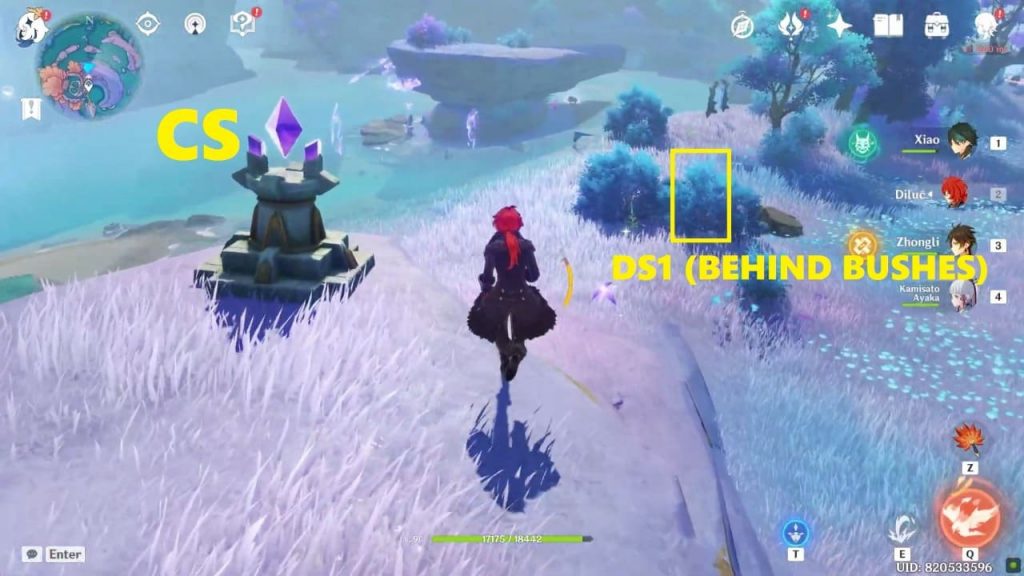
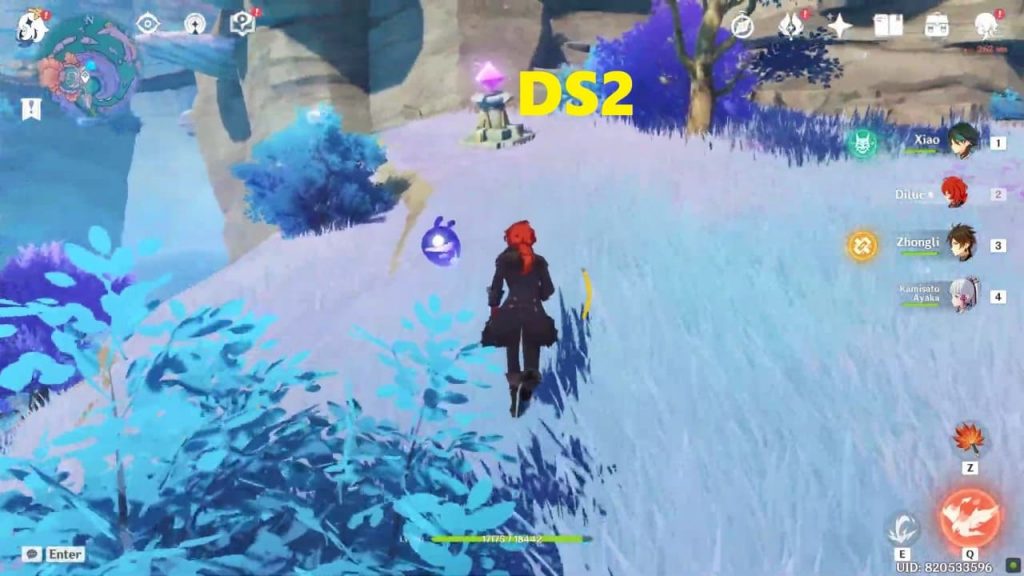
Start from the location as shown in the map below. You’ll see an electro-seelie at the edge of the cliff. Chase this electro-seelie until it reaches the relay puzzle area. The images below will show you the spots the electro-seelie will move to while you’re chasing it. Once it reaches the relay puzzle area it will permanently position itself near a discharge stone after which a common chest will appear. For future reference, I’ll call this electro-seelie the fixed electro-seelie.

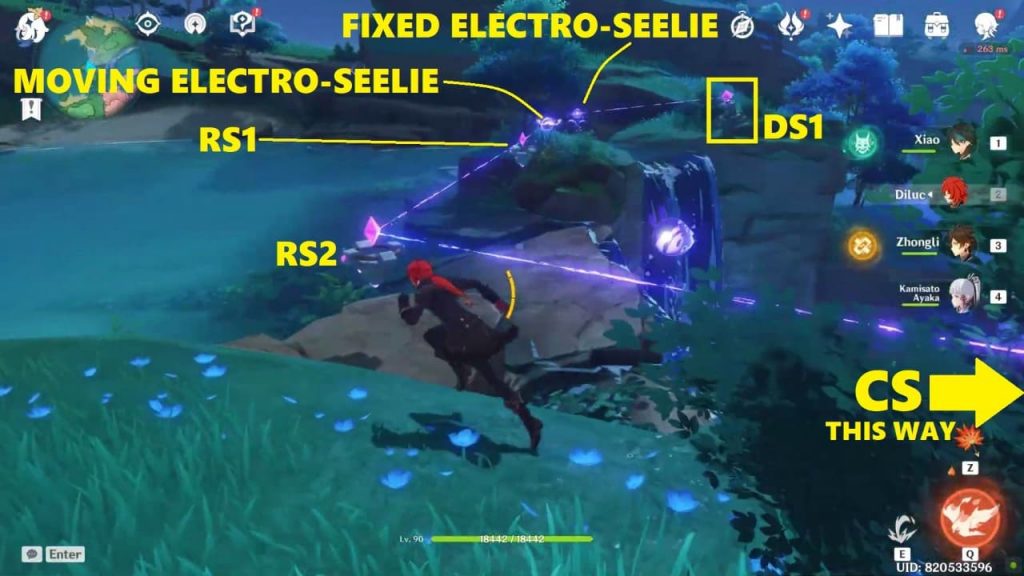
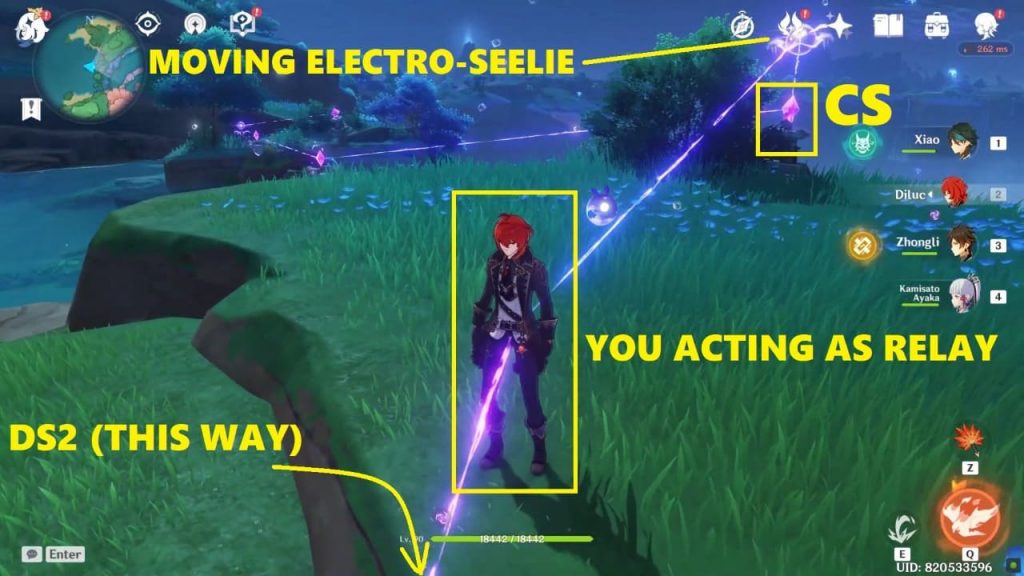
The puzzle area contains 2 discharge stones (DS1 and DS2), a cumulation stone (CS), and 2 relay stones (RS). The puzzle area also contains a fixed electro-seelie (which you chased here) and a moving electro-seelie. To solve the puzzle you need to connect both the discharge stones to the cumulation stone.
2. How to solve the puzzle?
STEP 1: Pick up the 2 relay stones and place both of them between the fixed electro-seelie and CS.
STEP 2: Go and stand between the CS and DS2.
The rest of the work will be done by the moving electro-seelie. This electro-seelie constantly moves between DS1 and CS, acting as a relay and electrifying the objects and characters in its vicinity. When it’s near the fixed electro-seelie, it’ll complete the connection between DS1 and CS. Then the electro-seelie will move and get near the CS. When it’s near the CS, it’ll electrify you (making you a relay) and the connection between DS2 and CS will complete. An exquisite chest will then appear near the CS.
Relay Stone Puzzle 4: Sangonomiya Shrine
Check the images below to see the location and solution of this relay stone puzzle. This puzzle contains 2 discharge stones (DS), 1 cumulation stone (CS), and 2 relay stones (RS). The relay stones are hidden in the trees. One relay stone is on the tree behind the electrogranum plant. Climb the tree and take the relay stone. The second relay stone is on the tree which is at the cliff close to DS2.
STEP 1 (Connect DS1 to CS): Place a relay stone mid-air between DS1 and CS.
STEP 2 (Connect DS2 to CS): For this, you need to act as a relay as well. To act as a relay you need to electro-charge yourself (summon electrogranum or touch the purple-colored electro crystal). Place relay stone and yourself (charged) between DS2 and CS to complete the circuit. An exquisite chest will spawn near the CS.
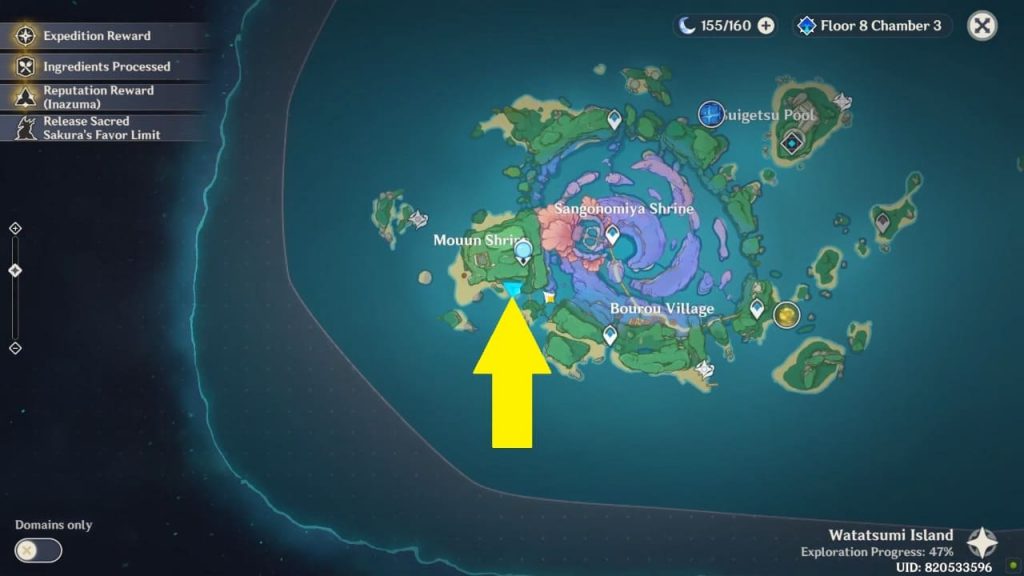
Relay Stone Puzzle 5: Mouun Shrine
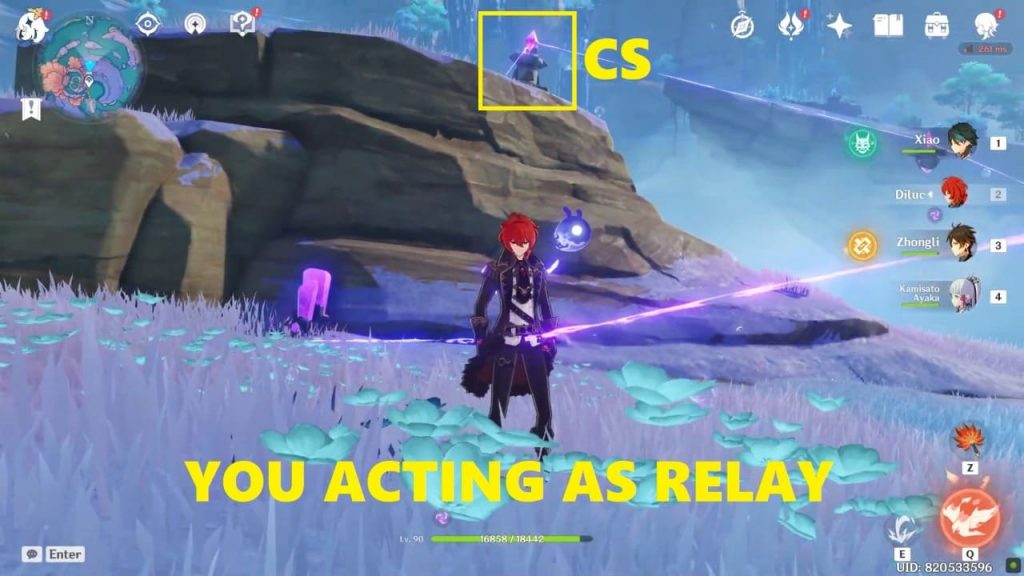
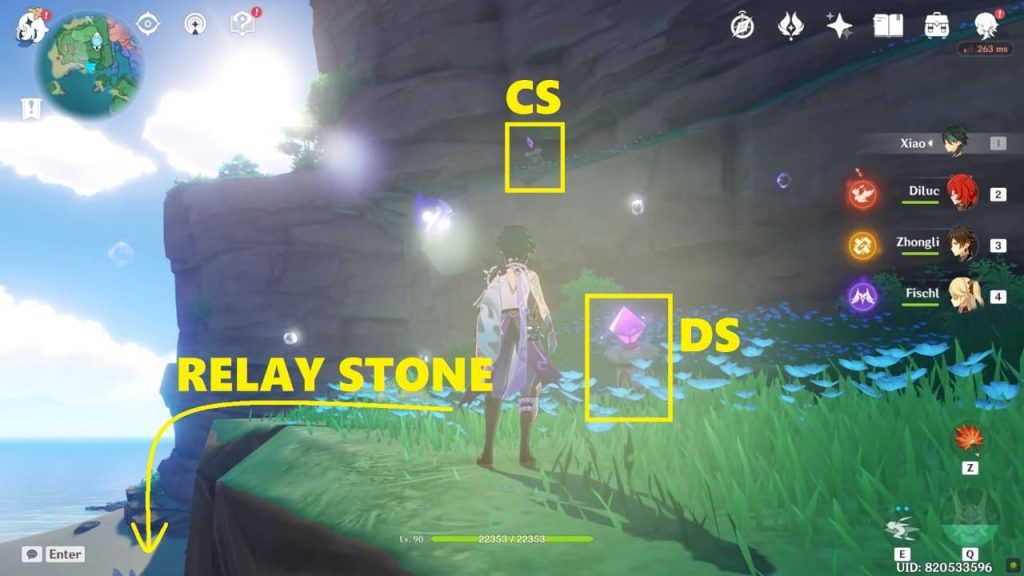
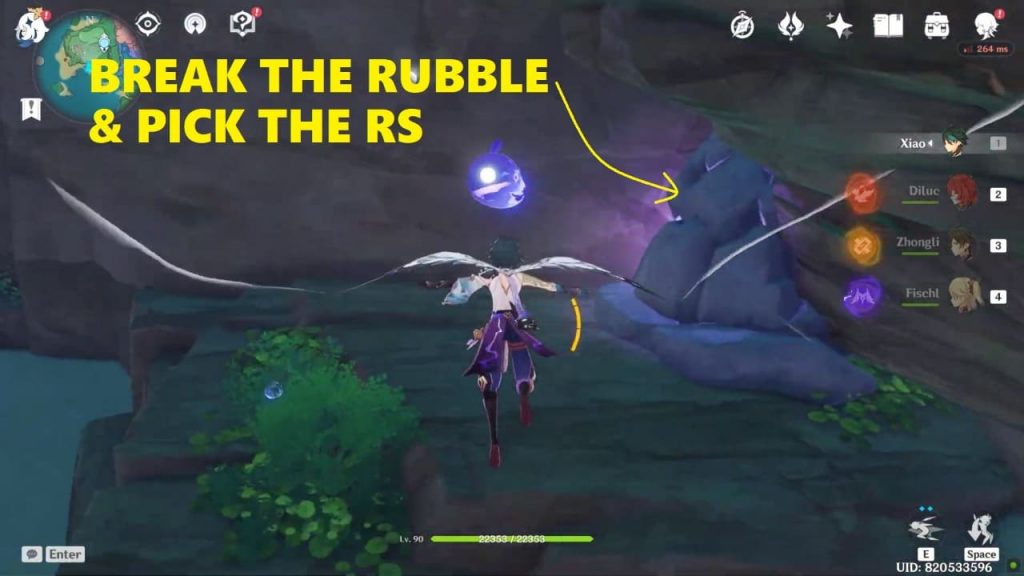
Check the images below to see the location and solution of this relay stone puzzle. This relay puzzle is located near the beach on the south side of Mouun Shrine. There is only one discharge stone (DS) and one cumulation stone (CS). You just have to place a relay stone between the DS and CS to complete the circuit. The relay stone is under the rubble of rocks (near the dinosaur skeleton). Smash the rubble of rocks to reveal the relay stone. Pick the relay stone and place it between the CS and DS to complete the puzzle. An exquisite chest will then appear.
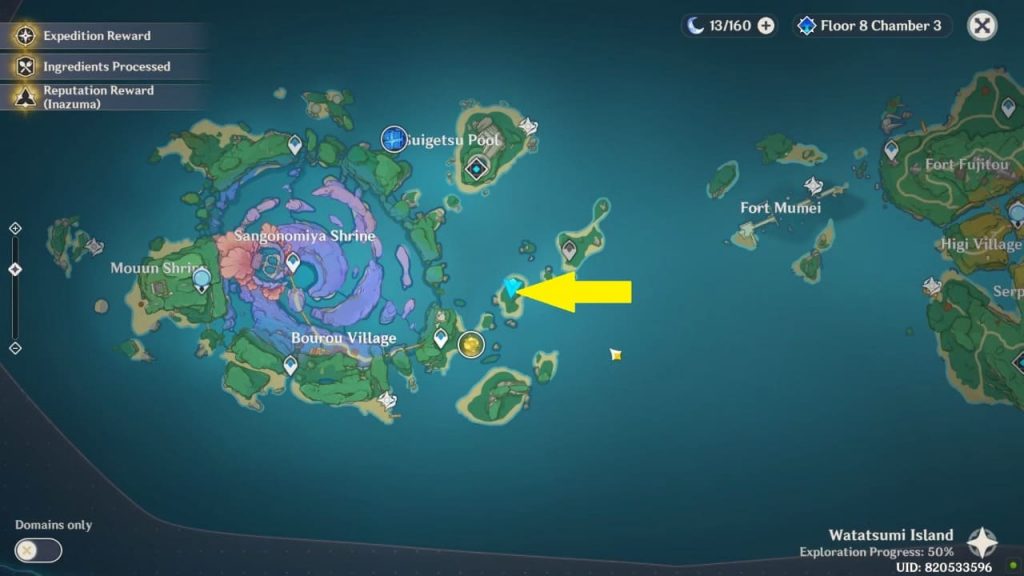
Relay Stone Puzzle 6: On an Eastern Island
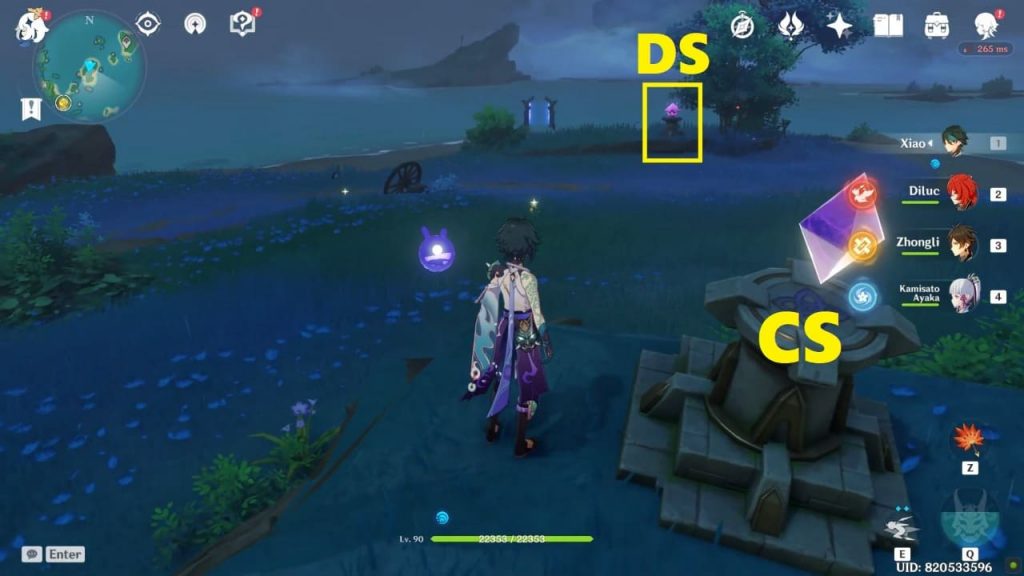
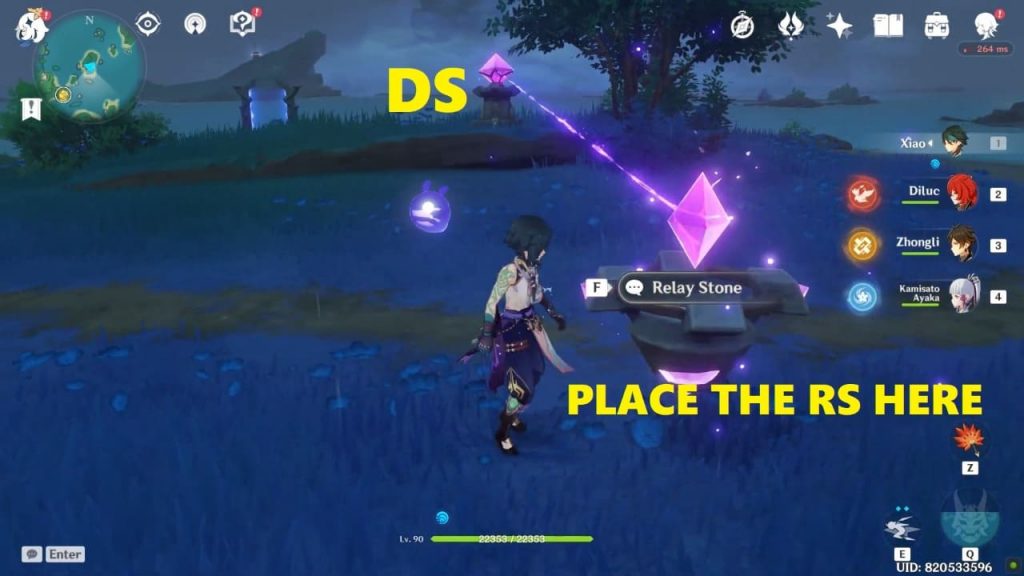
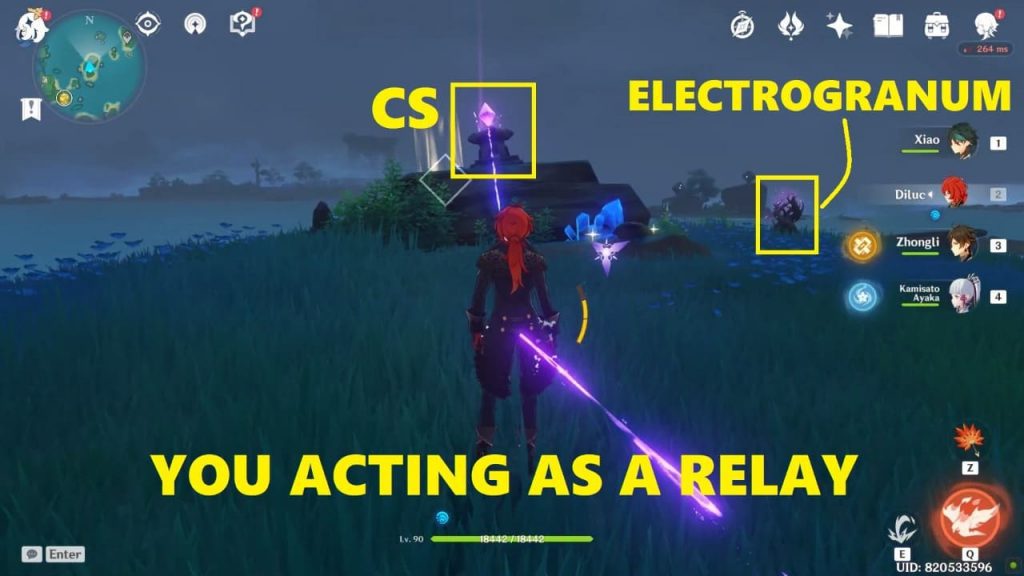
This puzzle contains 1 discharge stone (DS), 1 cumulation stone (CS), and 1 relay stone (RS). To solve the puzzle, you have to connect the DS to the CS. For this, you need to act as a relay as well. To act as a relay you need to electro-charge yourself (summon electrogranum). Place relay stone and yourself (charged) between DS and CS to complete the circuit. A common chest will spawn near the CS.

Relay Stone Puzzle 7: Bourou Village
This puzzle relay contains 1 cumulation stone (CS), 3 discharge stones (DS1, DS2, and DS3), and 2 relay stones (RS). You need to connect the Cumulation Stone to the three Discharge Stones.
STEP 1 (Connect CS to DS1): Place a relay stone between CS and DS1.
STEP 2 (Connect CS to DS2): Place a relay stone between CS and DS2.
STEP 3 (Connect CS to DS3): For this, you need to act as a relay. First, electro-charge yourself by summoning an electrogranum then stand between DS3 and CS to complete the circuit. A common chest will spawn near the CS.