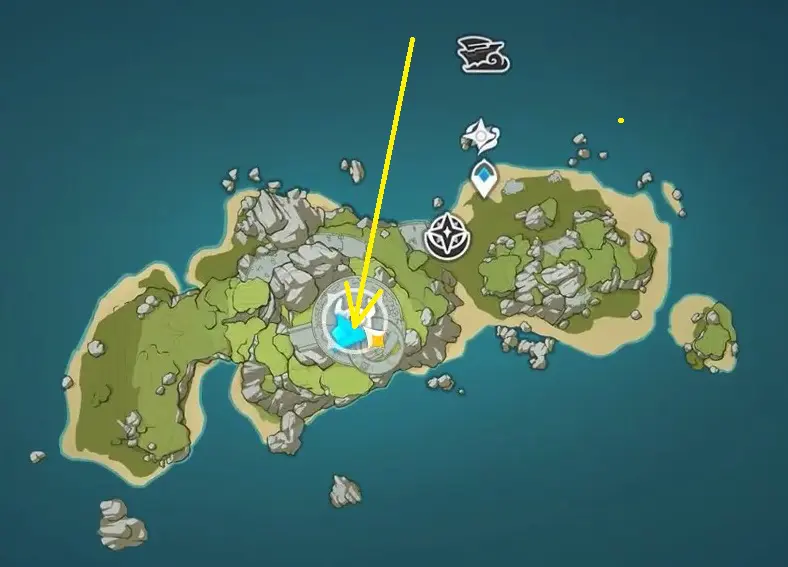
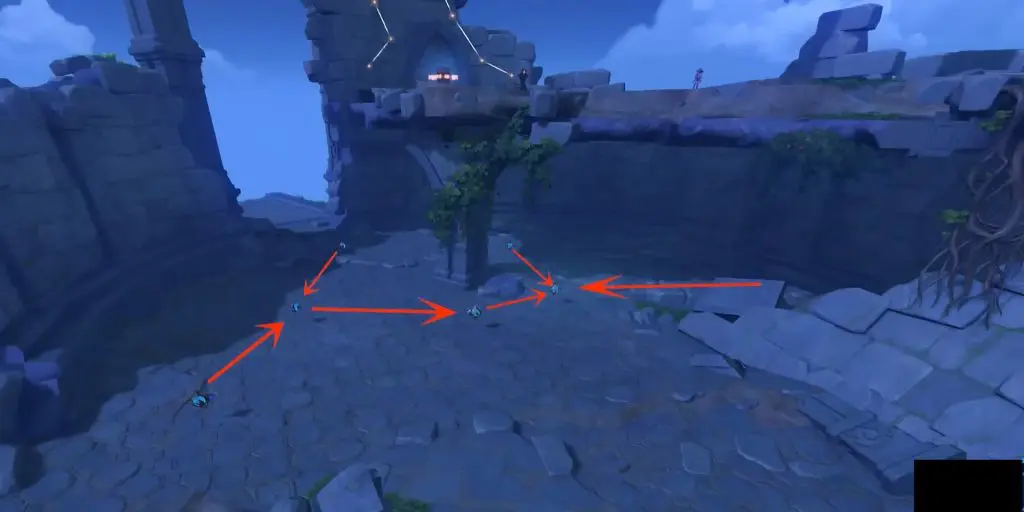
This guide shows how to solve all the Astral Puzzles in Genshin Impact 2.8 Summertime Odyssey event, which started on 15th July 2022 and will end on 24th August 2022.
When you reach the puzzle area, you will see several Star Guides. When a Star Guide is attacked, it shoots rays of starlight towards a specific direction and links up with other star guides. When you get close to a Star Guide, you can change the direction in which it is facing to help it link up to different star guides. To solve the puzzle, you need to link the Star Guides in a specific pattern. The pattern that you need to form can be seen in the surrounding.
Mona Domain Astral Puzzles behind Door 1
Door 1 can be recognized by the pattern drawn on it as shown in the picture below. If you don’t know how to open this door, then please check our full guide for The Ancient Azure Stars story quest.
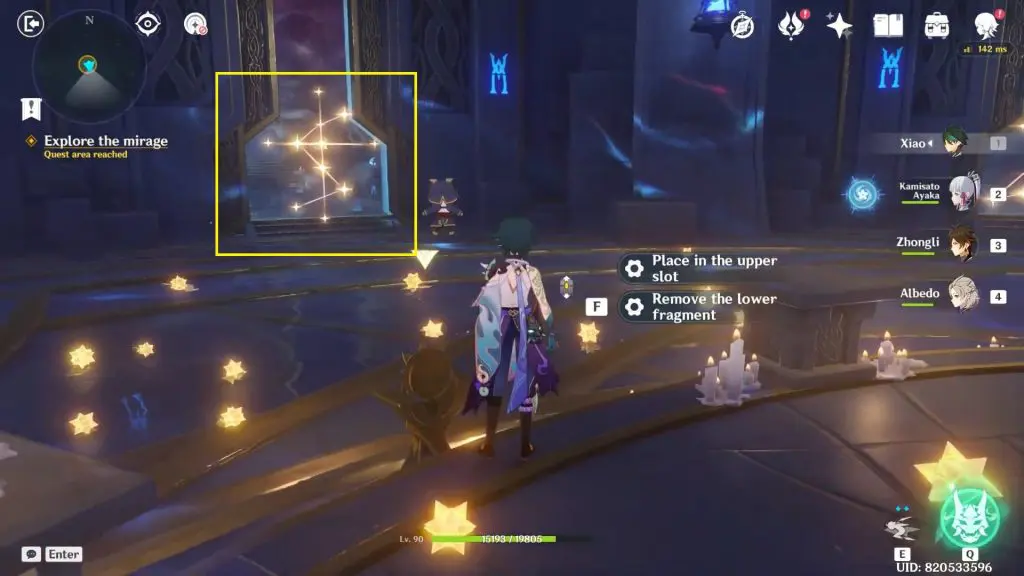
Puzzle 1 (Story Related)
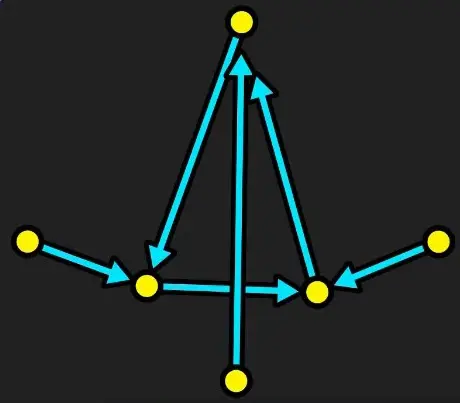
To solve the puzzle, you need to link the Star Guides in a specific pattern. The pattern that you need to form can be seen by looking up in the sky. The picture below shows the pattern for the first Astral Puzzle that you will encounter in the game. I have numbered the stars in the picture below to help you better understand the solution for this specific puzzle.
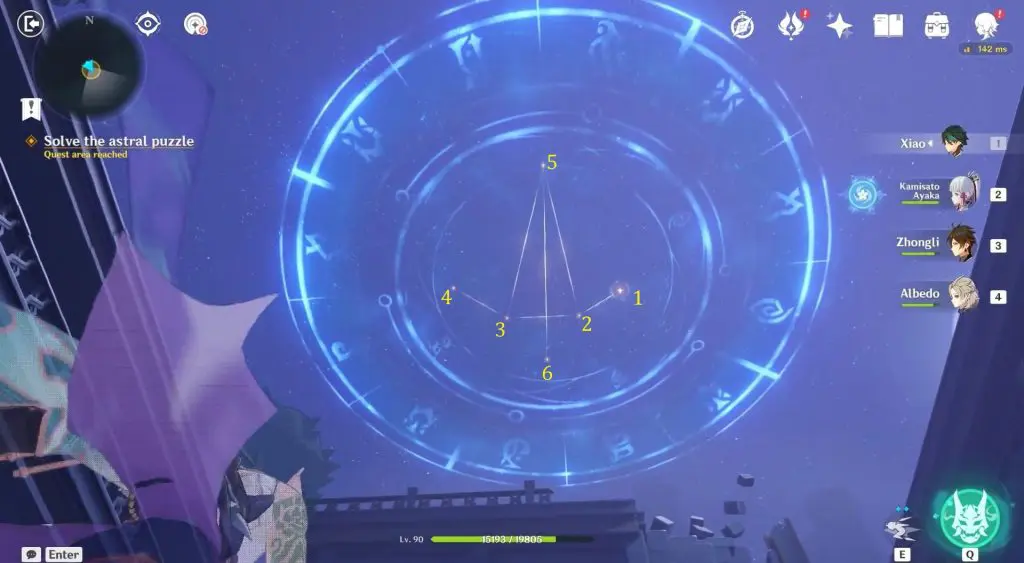
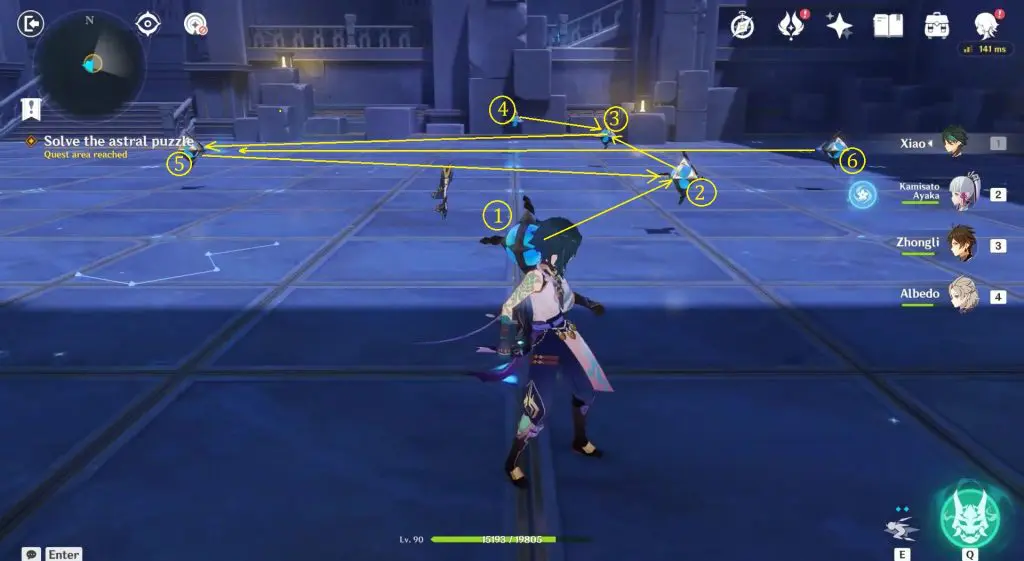
Link the star guides as shown in the picture below to solve the puzzle. I have numbered the Star guides to help you better understand the solution.
Link Star Guide #1 to Star Guide #2
Link Star Guide #2 to Star Guide #3
Link Star Guide #3 to Star Guide #5
Link Star Guide #4 to Star Guide #3
Link Star Guide #5 to Star Guide #2
Link Star Guide #6 to Star Guide #5
Puzzle 2 (Set of 3 Puzzles)
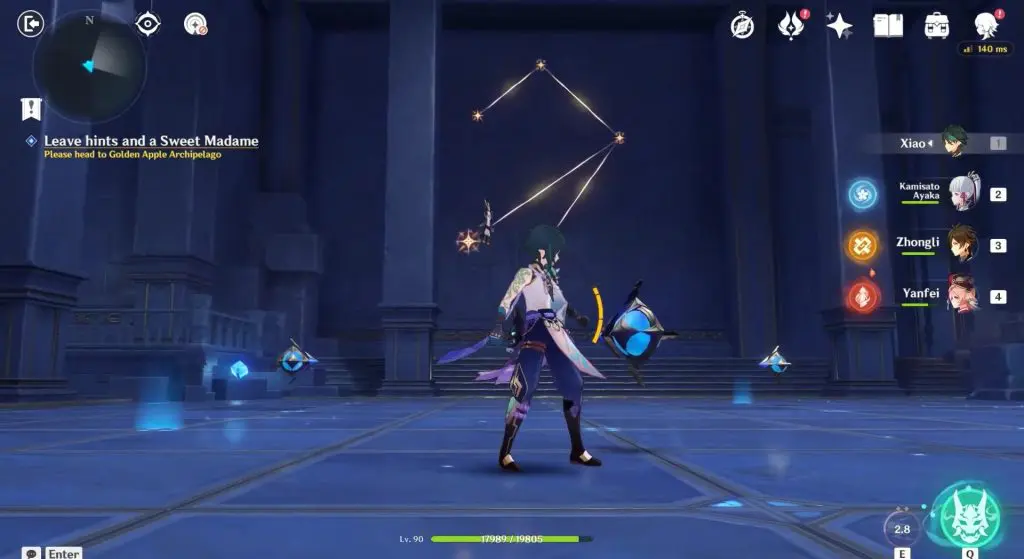
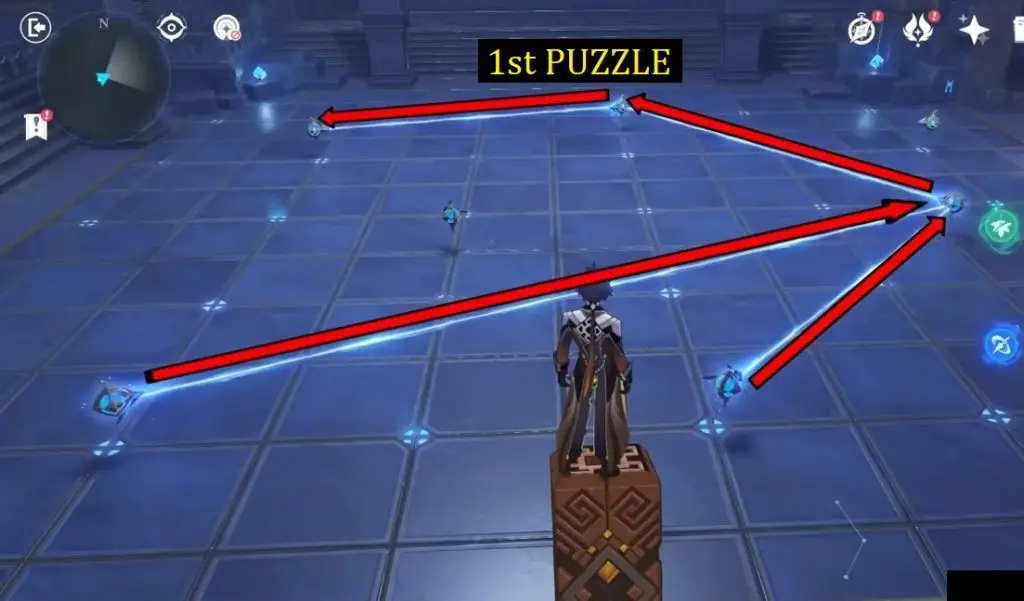
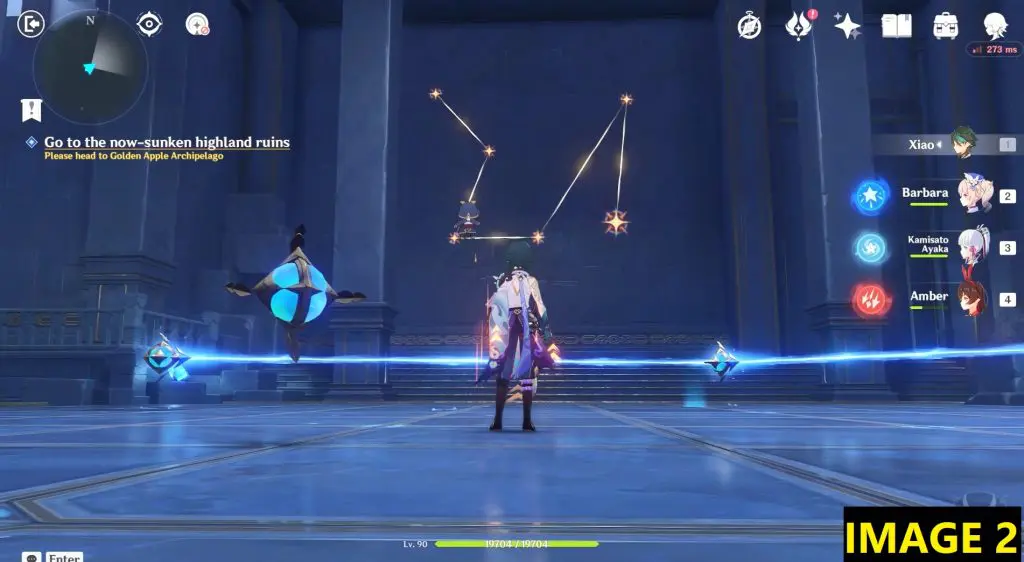
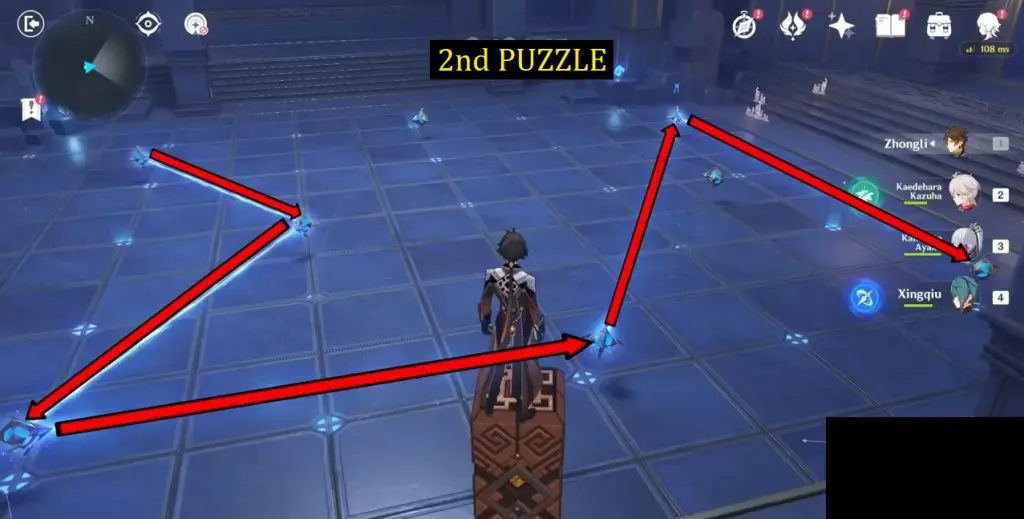
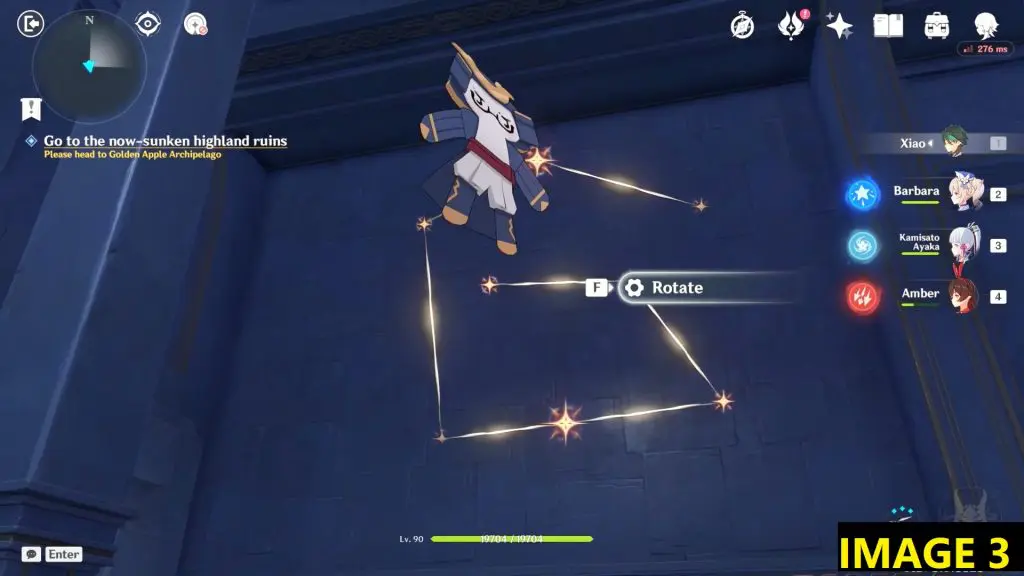
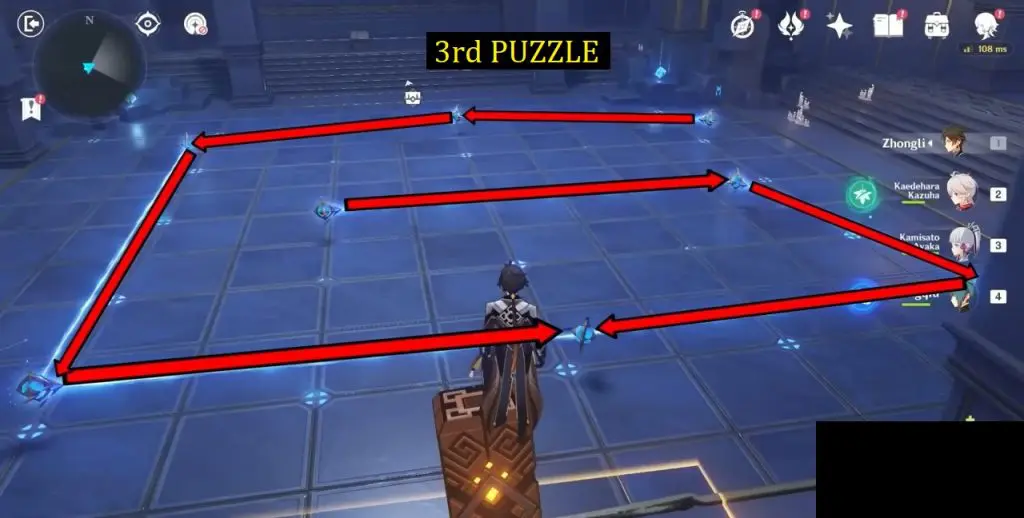
Proceed ahead until you reach an area with translucent bridges. Cross the translucent bridges to reach the next area. In the new area, you will have to solve another Astral puzzle. Input the three correct patterns that appear on the wall in order for the wall constellation to change to an arrow pattern.
1st Puzzle
2nd Puzzle
3rd Puzzle
Puzzle 3
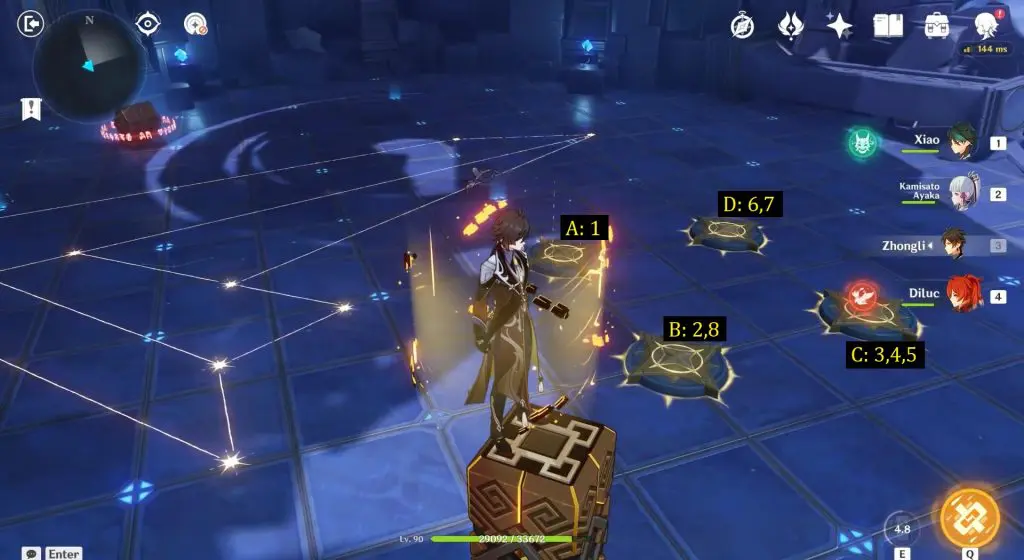
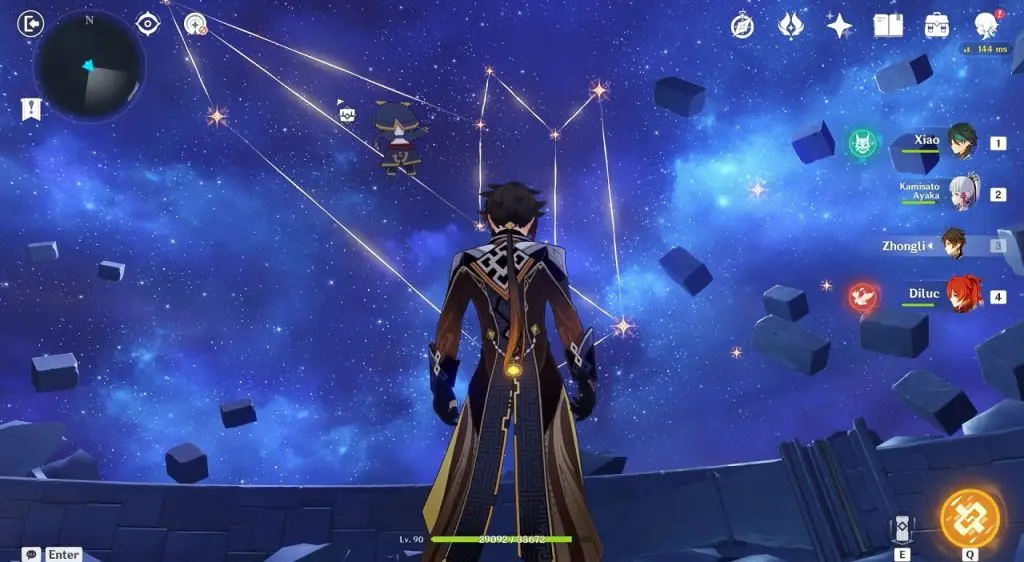
After solving the previous puzzle, the stars on the wall will form an arrow. Touch the wall the arrow is pointing to, to open it. Proceed ahead and take the astral path up to a room with four circular switches on the floor. In the same room, you will see four circular switches on the floor. You will see a pattern drawn on the floor near the switches. To solve the puzzle, you need to step on the switches to form the same pattern in the sky. This can be done in 8 steps as shown in the picture below. I have named the switches A, B, C, and D for ease of explanation. On solving the puzzle, the precious chest in this room will unlock.
Step 1: Step on Switch A
Step 2: Step on Switch B
Step 3: Step on Switch C
Step 4: Step on Switch C
Step 5: Step on Switch C
Step 6: Step on Switch D
Step 7: Step on Switch D
Step 8: Step on Switch B
Mona Domain: Astral Puzzles behind Door 2
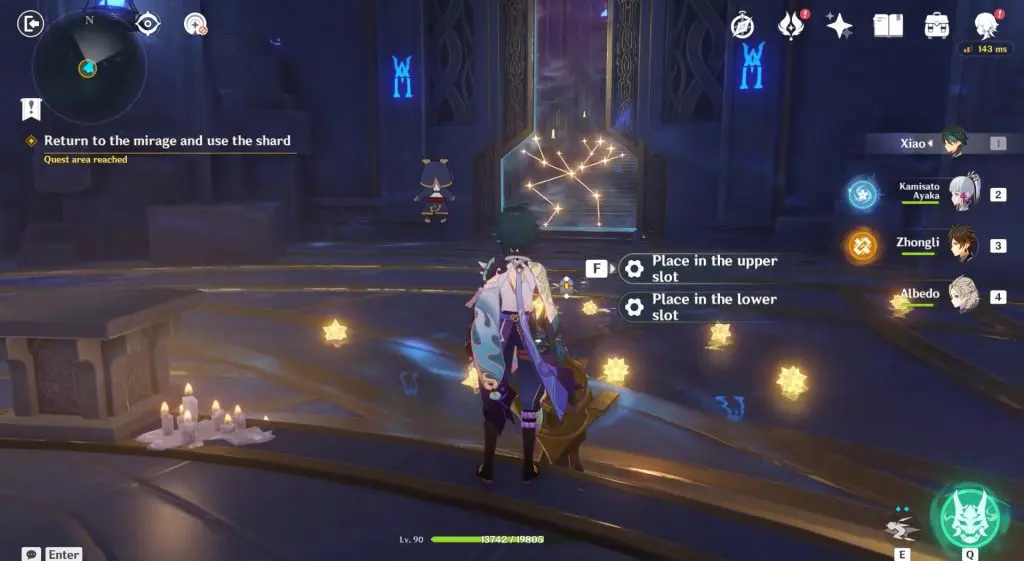
Door 2 can be recognized by the pattern drawn on it as shown in the picture below. If you don’t know how to open this door, then please check our full guide for The Ancient Azure Stars story quest.
Puzzle 1 (Story Related)
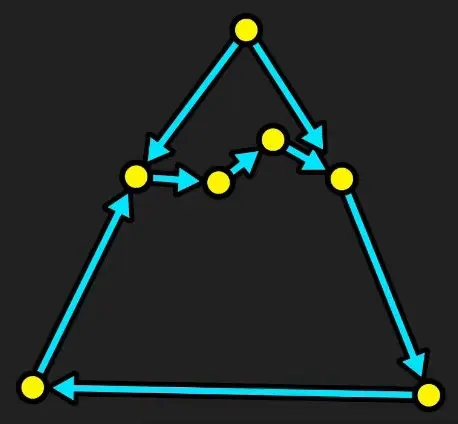
The pattern that you need to form can be seen by looking up in the sky. The solution for the Puzzle is shown in the pictures below.
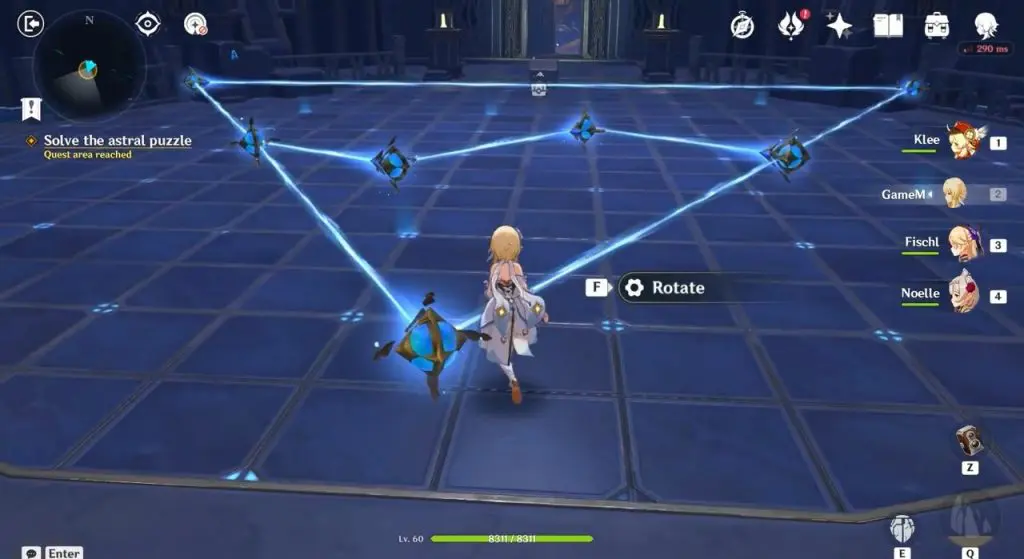
Puzzle 2
The solution to the Puzzle is shown in the picture below.
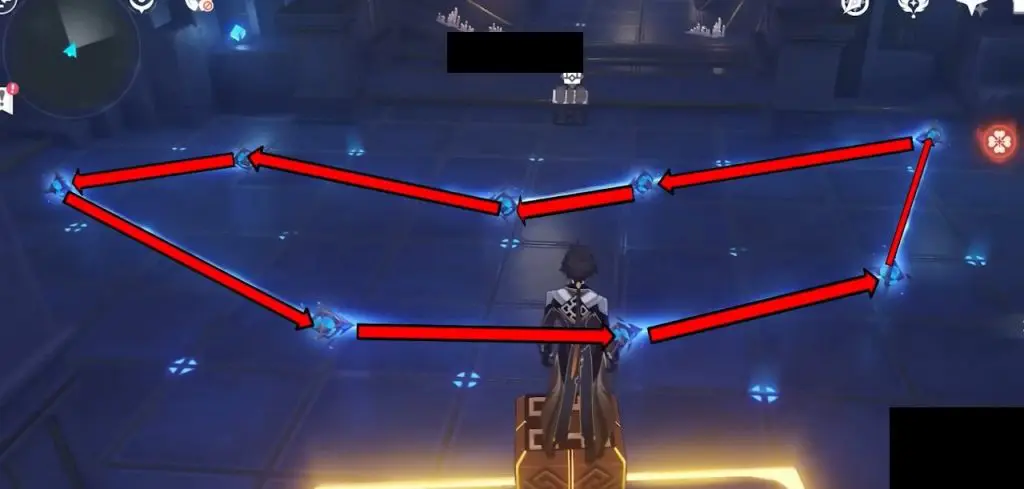
Puzzle 3
The solution to the Puzzle is shown in the picture below.
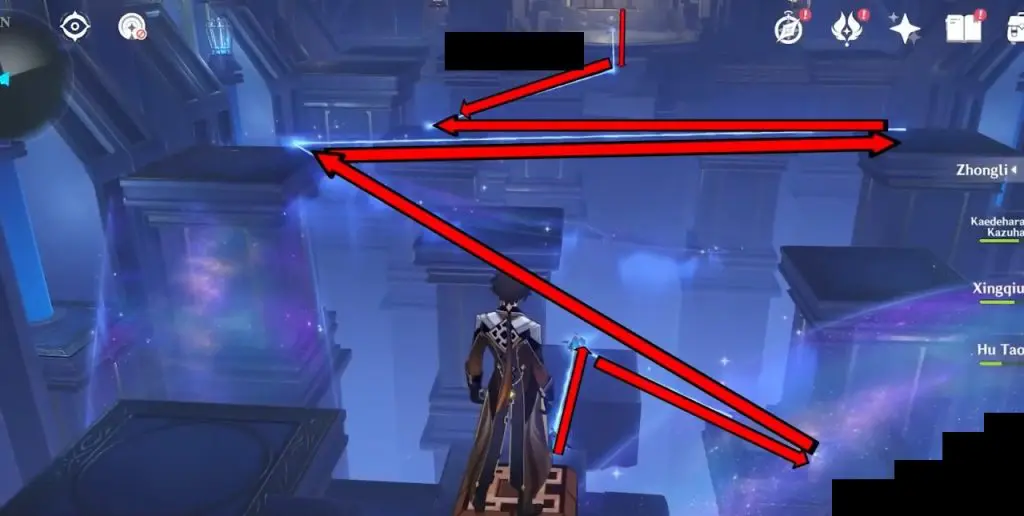
Mona Domain: Astral Puzzles behind Door 3
Door 3 can be recognized by the pattern drawn on it as shown in the picture below. If you don’t know how to open this door, then please check our full guide for The Ancient Azure Stars story quest.
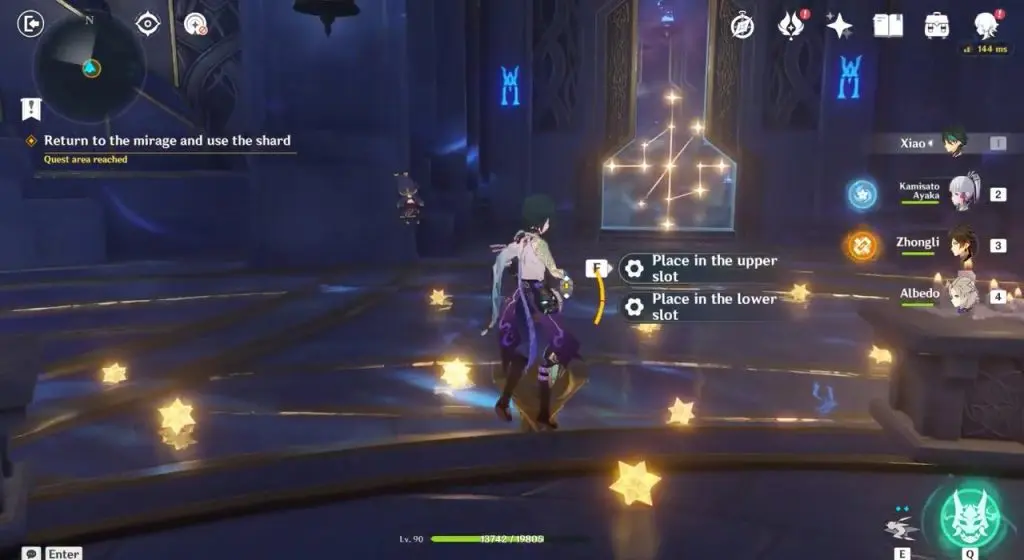
Puzzle 1 (Story Related)
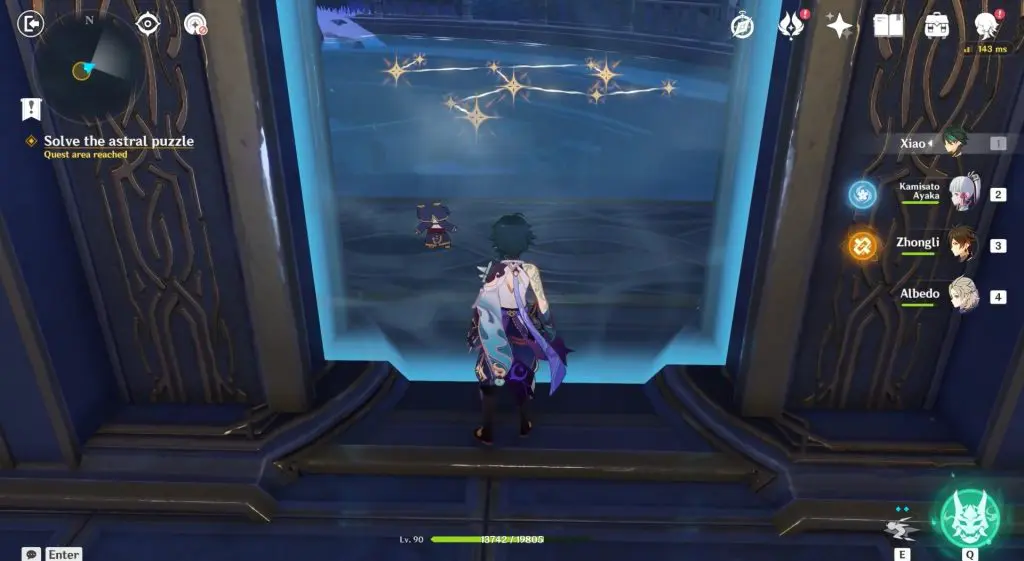
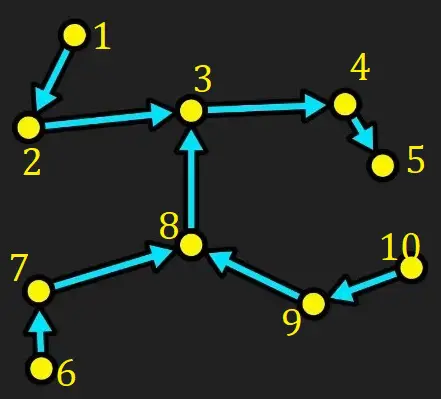
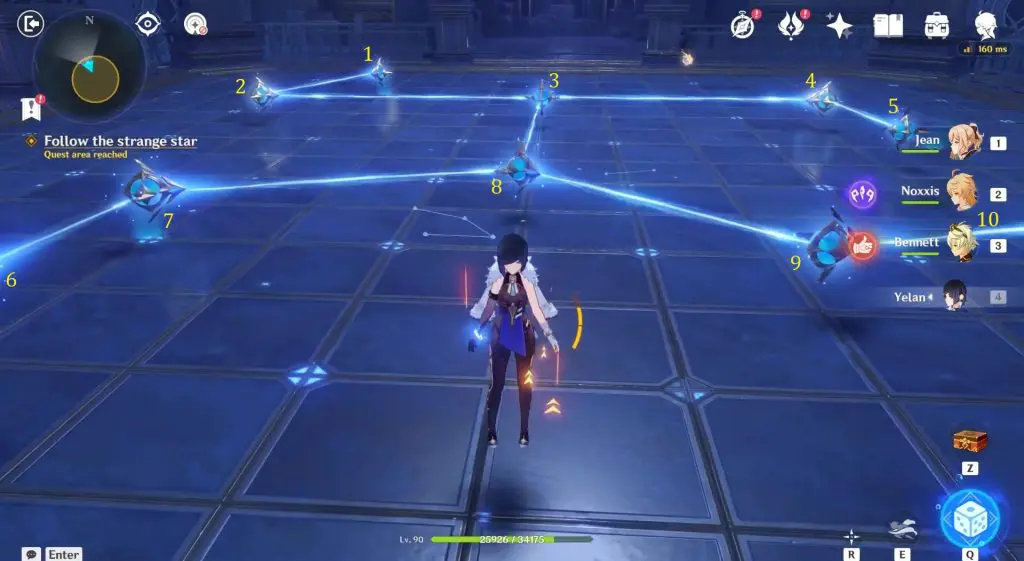
The pattern for this puzzle can be seen from the sealed door as shown in the first picture below. The solution for this Puzzle is shown in the second and third pictures below.
Puzzle 2
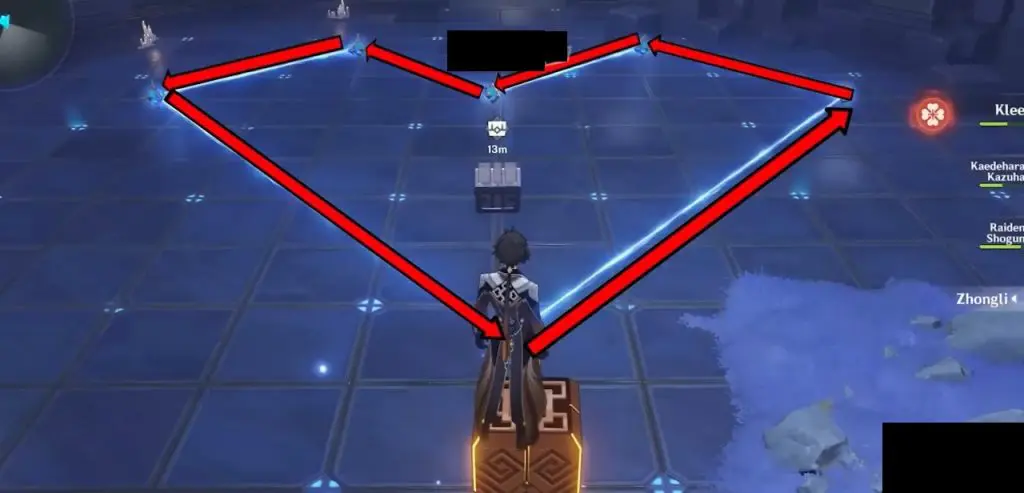
The solution to the Puzzle is shown in the picture below.
Mona Domain: Astral Puzzles behind Door 4
Door 4 can be recognized by the pattern drawn on it as shown in the picture below. If you don’t know how to open this door, then please check our full guide for The Ancient Azure Stars story quest.
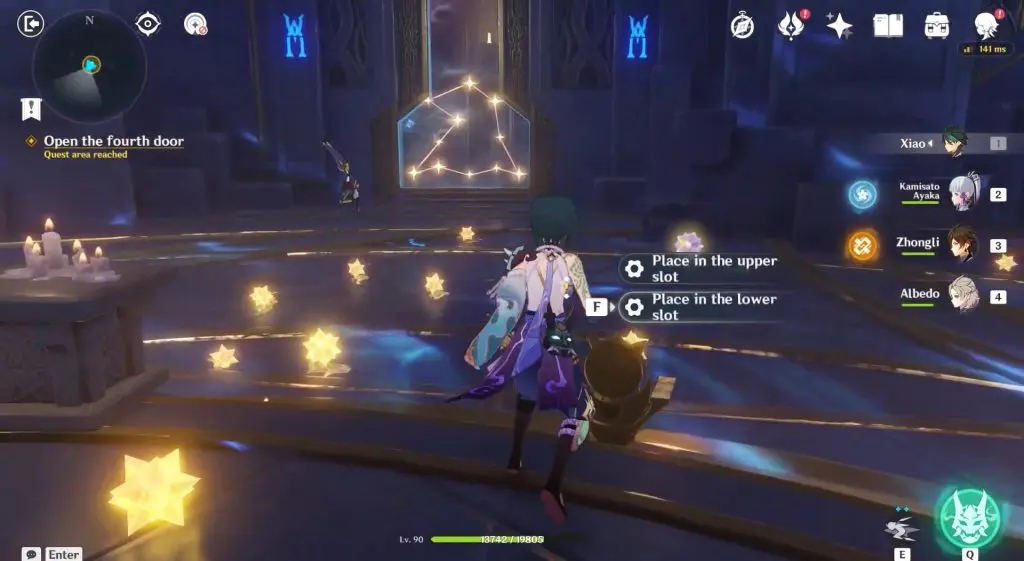
Puzzle 1 (Story Related)
The solution to this Puzzle is shown in the pictures below.
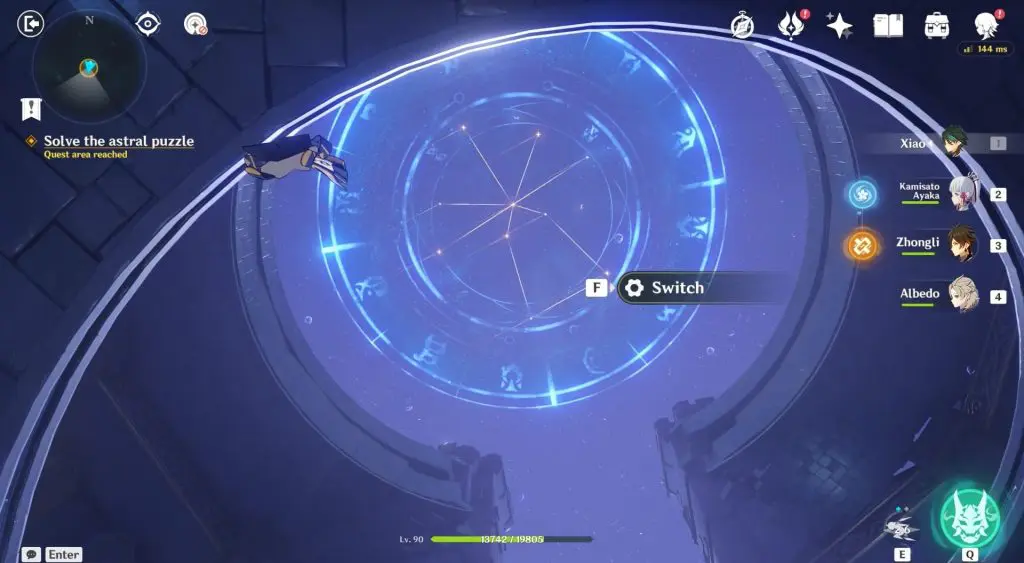
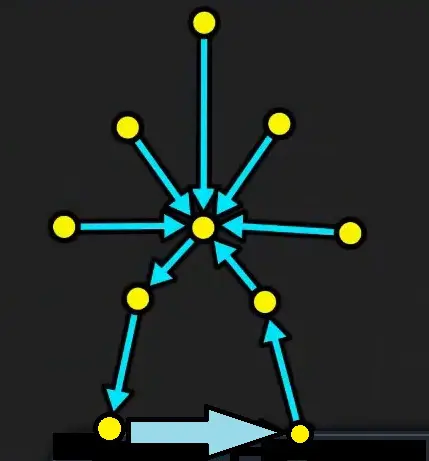
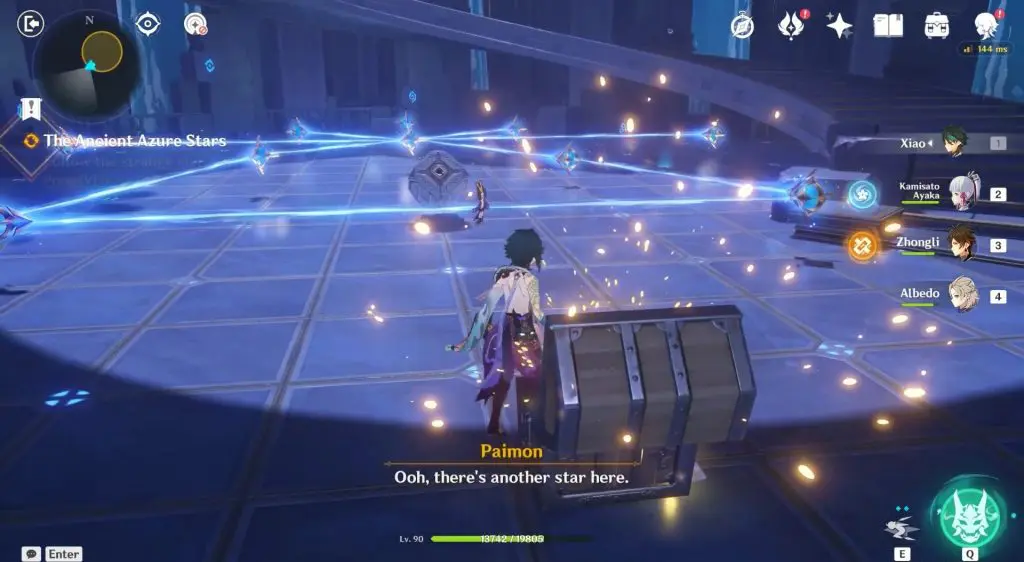
Puzzle 2
After solving the previous puzzle, climb up the stairs. In the next room, you will find a strange star. When you follow it, it will go up and get stuck in the ceiling. Then you will need to solve the astral puzzle as shown in the picture below. On solving the puzzle, astral stairs will emerge and you will be able to reach the strange star stuck on the ceiling.
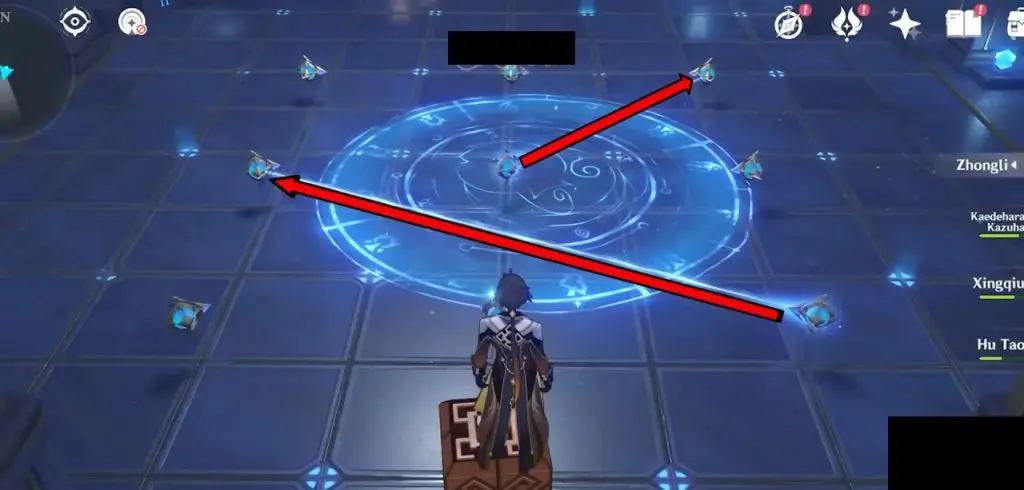
Mona Domain: Luxurious Chest Puzzle
This chest will be available only after you have completed The Ancient Azure Stars story quest. After completing the quest, jump inside the pool and enter the portal. Touch the strange ornament to reach a mirage.
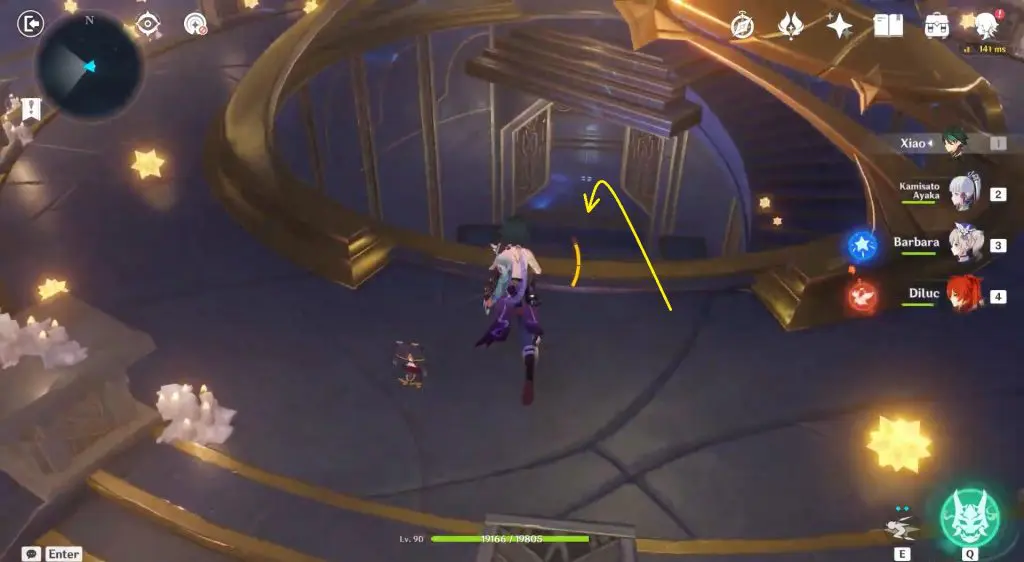
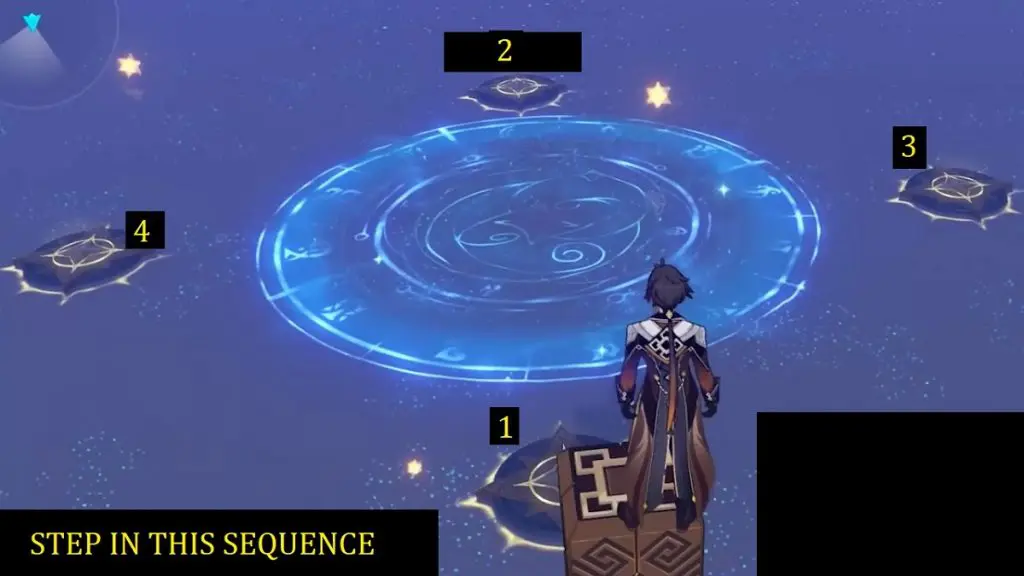
You will see four switches here and some patterns in the sky. Your objective here is to make the patterns in the sky disappear. To do so, step on the switches in the sequence shown below. After that enter the portal and you will find the Luxurious chest in front of the pool in the Mona Domain.
Minacious Isle: All Astral Star Puzzles
There is a total of 7 Astral Star Puzzles in both the maps of Minacious Isle.
Puzzle #1
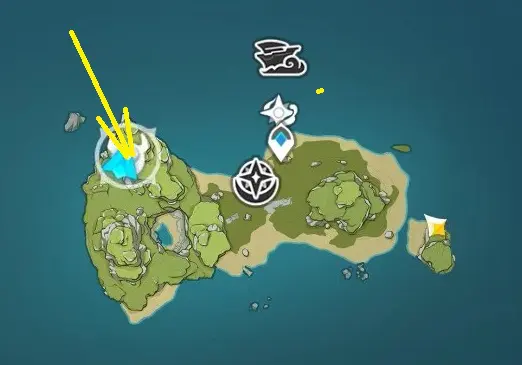
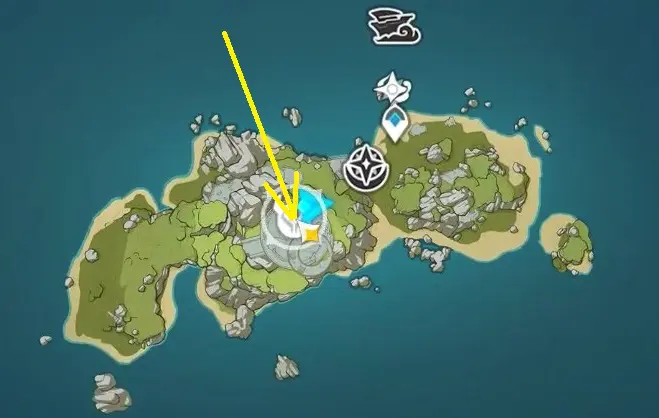
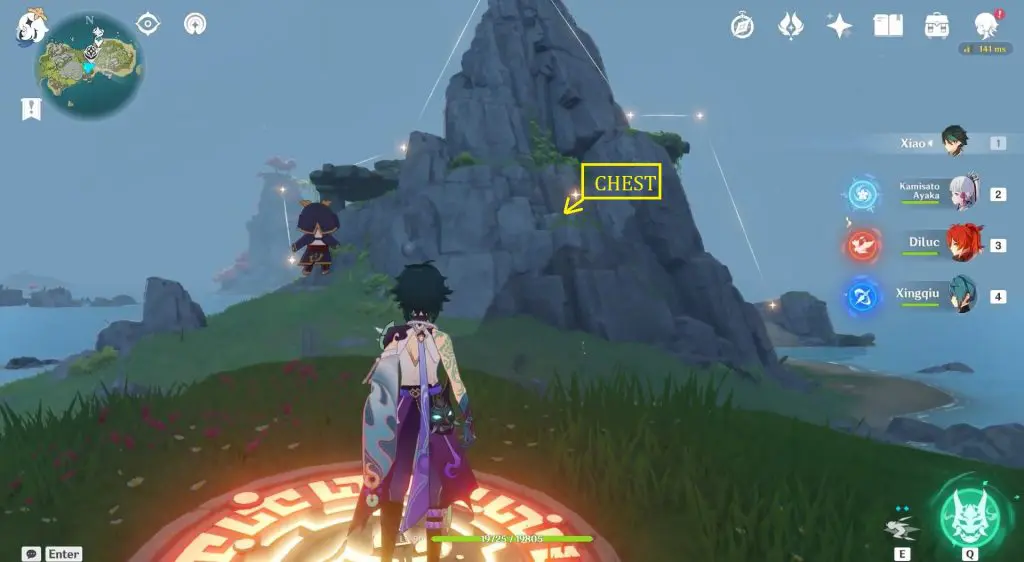
The location of the puzzle is shown in the picture below. To solve the puzzle, you need to link the Star Guides in a specific pattern. The pattern that you need to form can be seen in the sky. To solve the puzzle, link the star guides as shown in the third picture below.
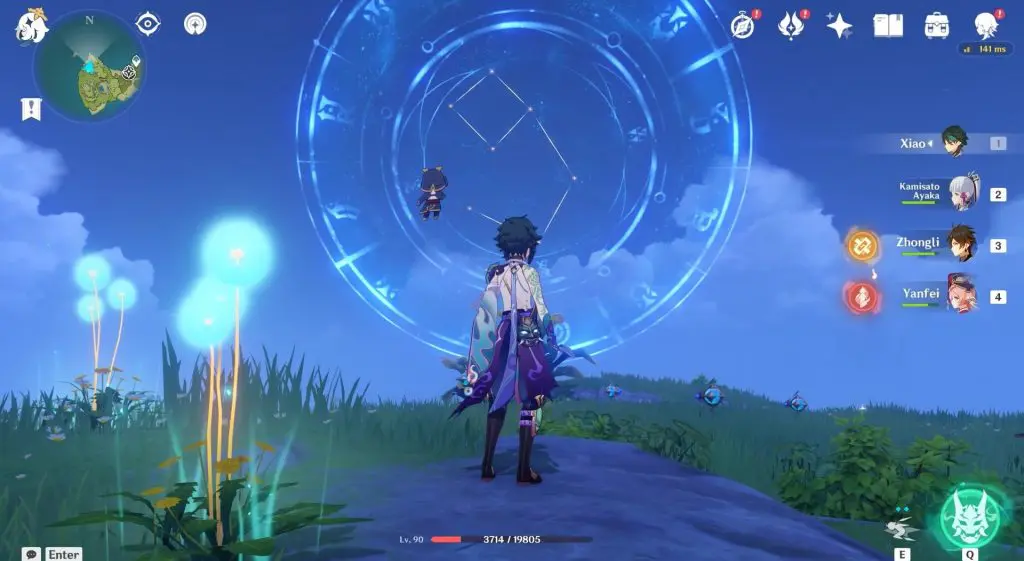
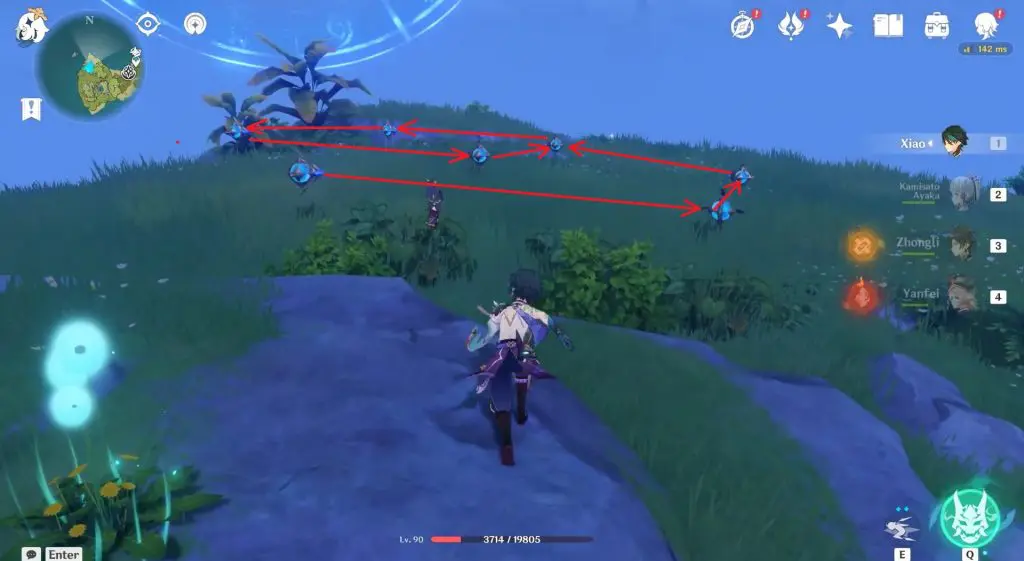
Puzzle #2
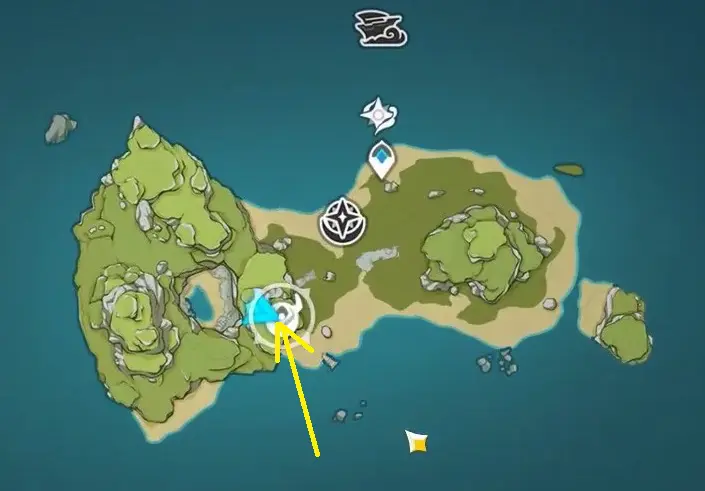
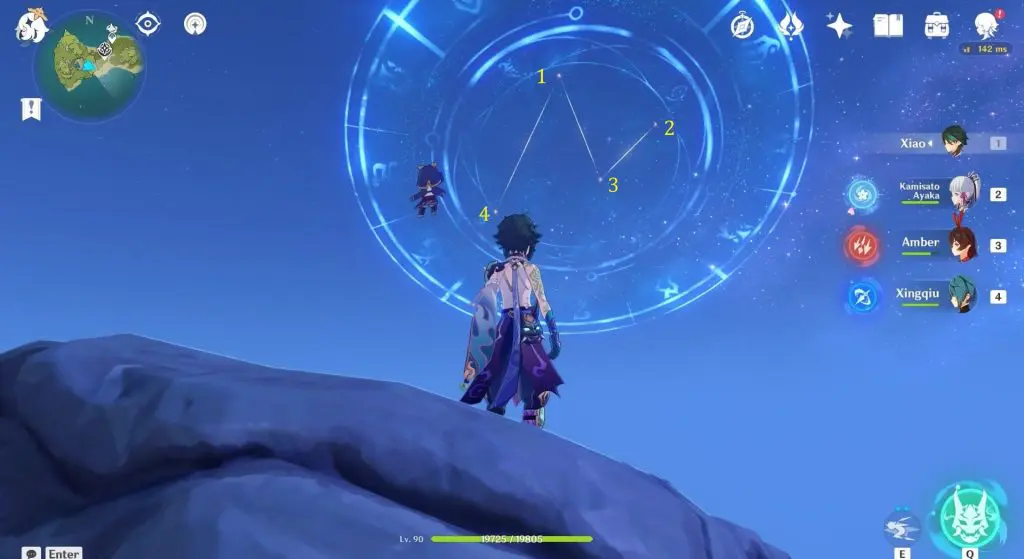
The location of the puzzle is shown in the picture below. To solve the puzzle, link the star guides as shown in the second picture below.
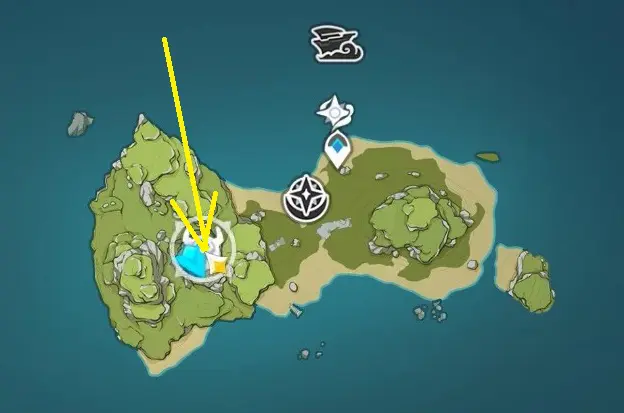
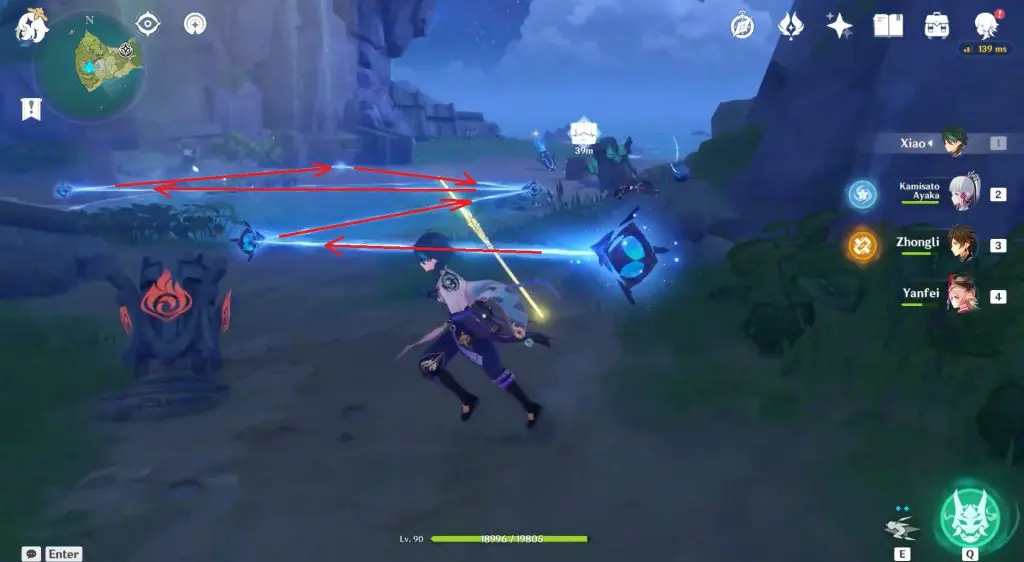
Puzzle #3
Go to the location shown in the picture below and chase the Starlight on the wall as shown in the second picture below. The Starlight will lead you to a plate. Stand on the plate and capture the Starlight. This will make a constellation appear in the sky and a common chest will also spawn at the location shown in the third picture below. You will have to dig this common chest.

Puzzle #4
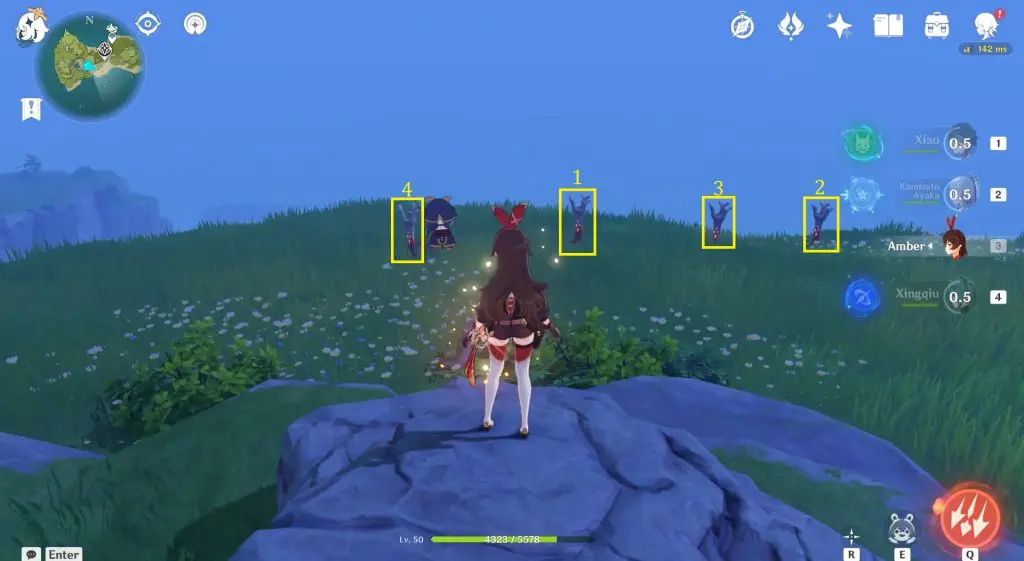
Go to the location shown in the picture below. Here you will find 4 torches. You need to light the torches in the sequence of the elevation of stars in the constellation as shown in the second and third pictures below. On lighting the torches in the correct sequence, you will get a common chest.
Puzzle #5
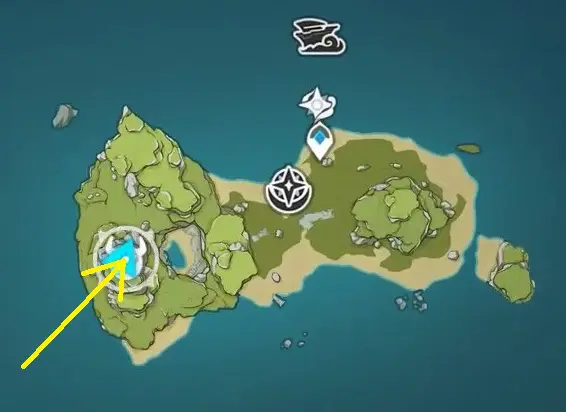
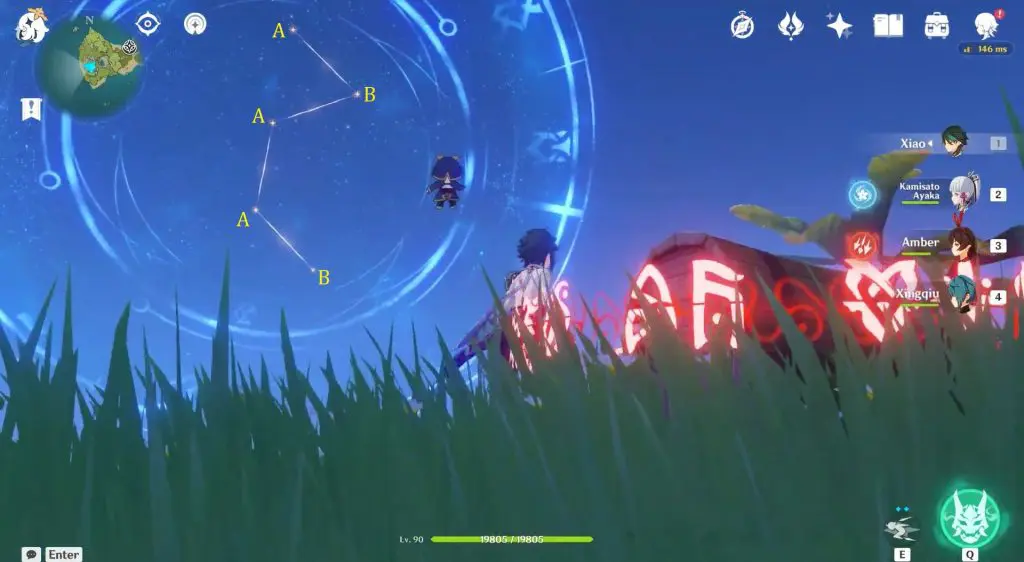
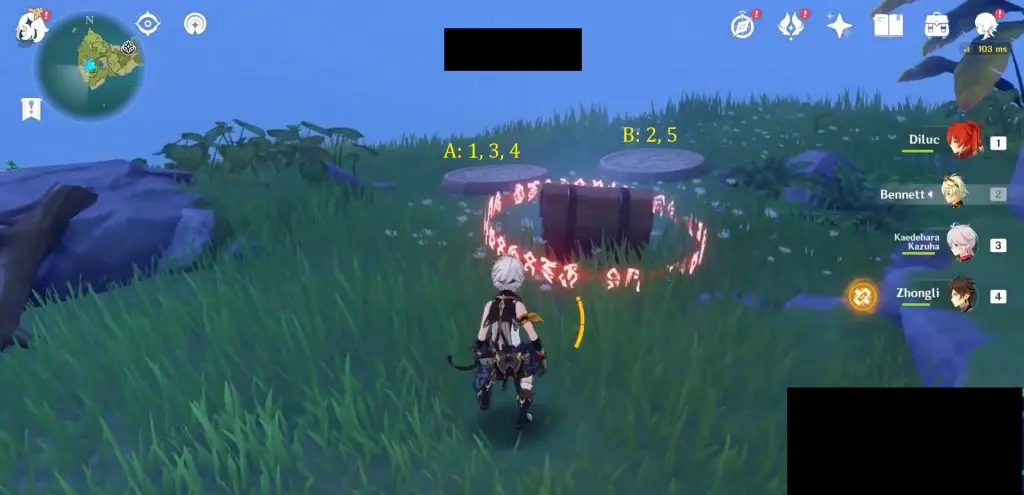
Go to the location shown in the picture below. Here you will find 2 pressure plates. You need to stand on the plates in the same sequence as shown by the pattern of stars in the constellation (See the second and third pictures below). On solving the puzzle, the common chest there will be unsealed.
Step 1: Stand on Switch A
Step 2: Stand on Switch B
Step 3: Stand on Switch A
Step 4: Stand on Switch A
Step 5: Stand on Switch B
Puzzle #6
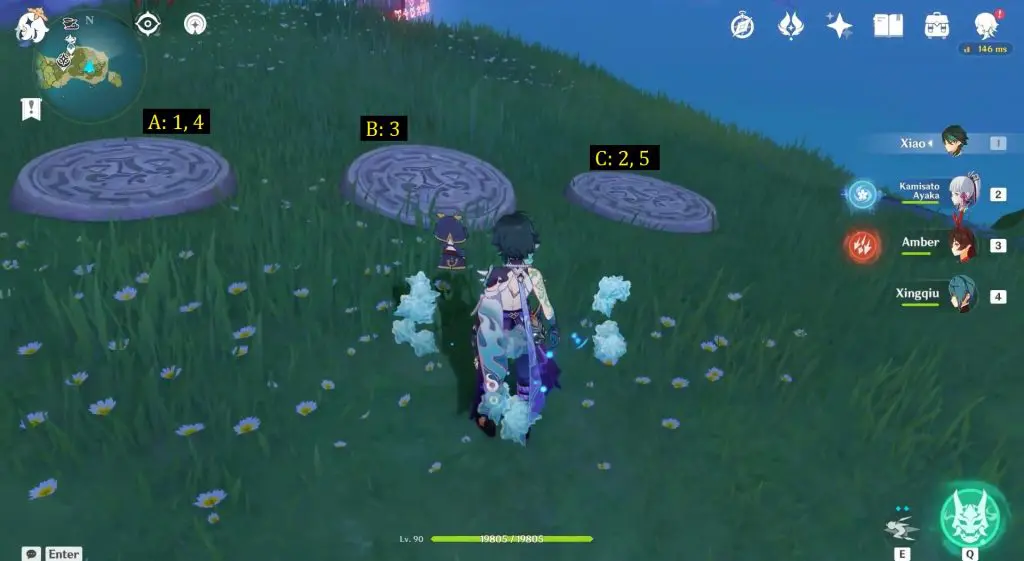
Go to the location shown in the picture below. Here you will find 3 pressure plates. You need to stand on the plates in the same sequence as shown by the pattern of stars in the constellation (See the second and third pictures below). On solving the puzzle, the common chest there will be unsealed.
Step 1: Stand on Switch A
Step 2: Stand on Switch C
Step 3: Stand on Switch B
Step 4: Stand on Switch A
Step 5: Stand on Switch C
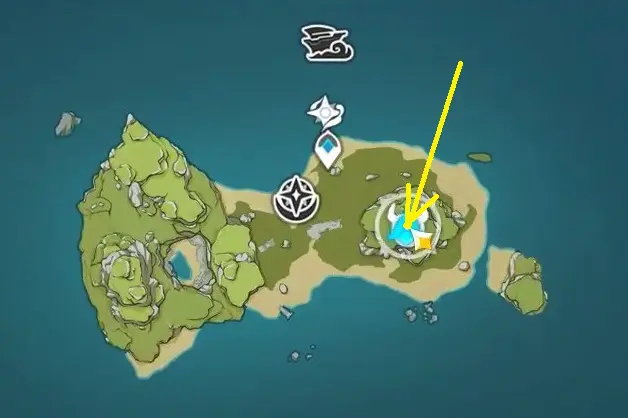
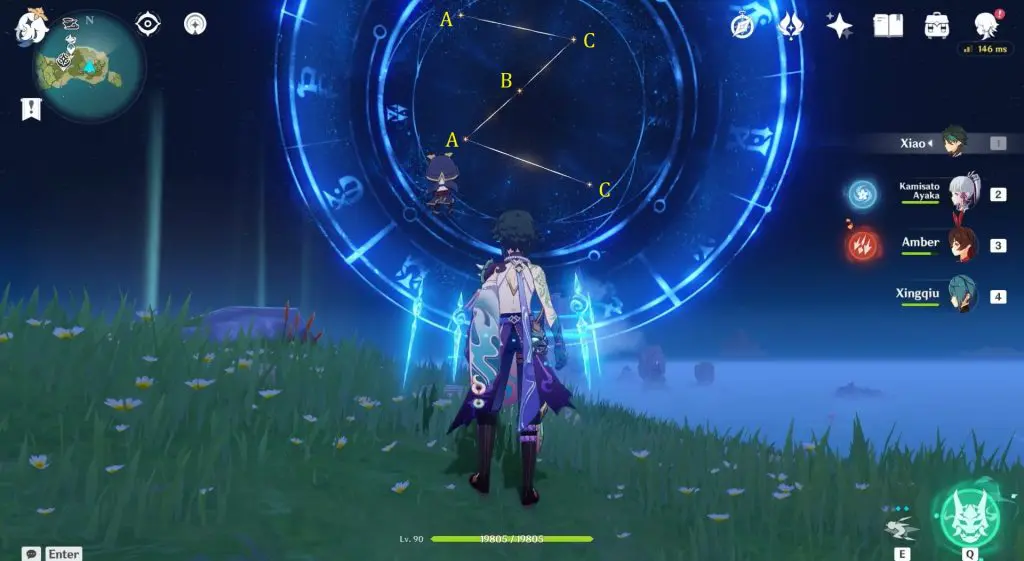
Puzzle #7
The location of the puzzle is shown in the picture below. To solve the puzzle, link the star guides as shown in the second picture below. On solving the puzzle, a Precious chest will spawn. Open the chest and a Starlight will come out from it. Chase the starlight to its destination and then capture it. This starlight will lead you to a constellation puzzle that will give you three Luxurious Chests.
