There are a total of 45 Luxurious Chests in the Inazuma region until Genshin Impact 2.4 update. This article shows the locations of all the 45 luxurious chests in Inazuma and how to get them. The article will be updated to show the locations of other luxurious chests when they are released.
Shortcuts:
Yashiori Island (5 Luxurious Chests)
Kannazuka (7 Luxurious Chests)
Narukami Island (9 Luxurious Chests)
Seirai Island (7 Luxurious Chests)
Watatsumi Island (4 Luxurious Chests)
Tsurumi Island (6 Luxurious Chests)
Enkanomiya (7 Luxurious Chests)
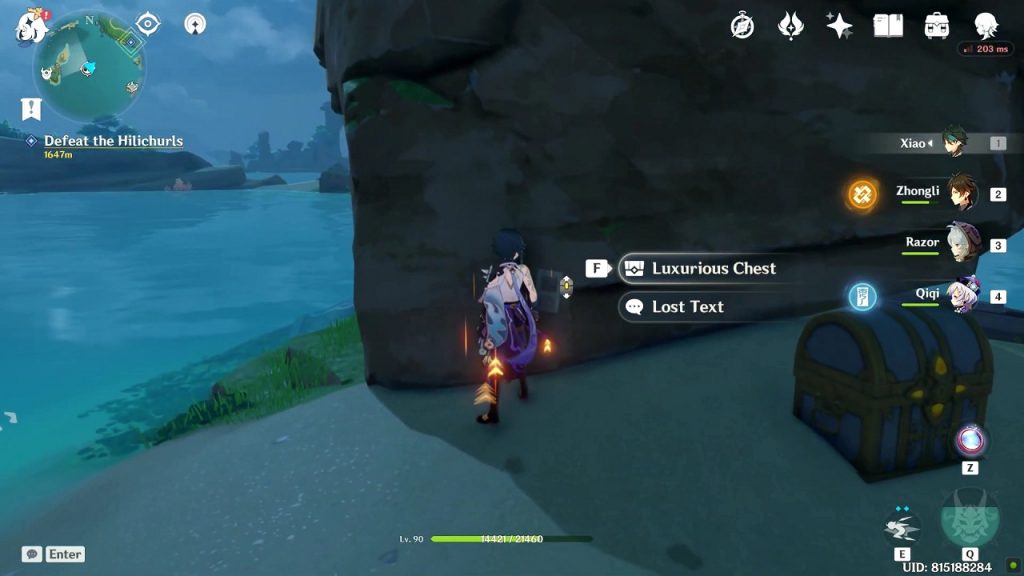
Luxurious Chest 1/45: Lost Texts (Yashiori Island)
The first chest is hidden. In order to reveal it, you will have to find four lost texts and use them to get the secret hidden luxurious chest. The location of Lost Texts and the luxurious chest is shown below.
Lost Text 1
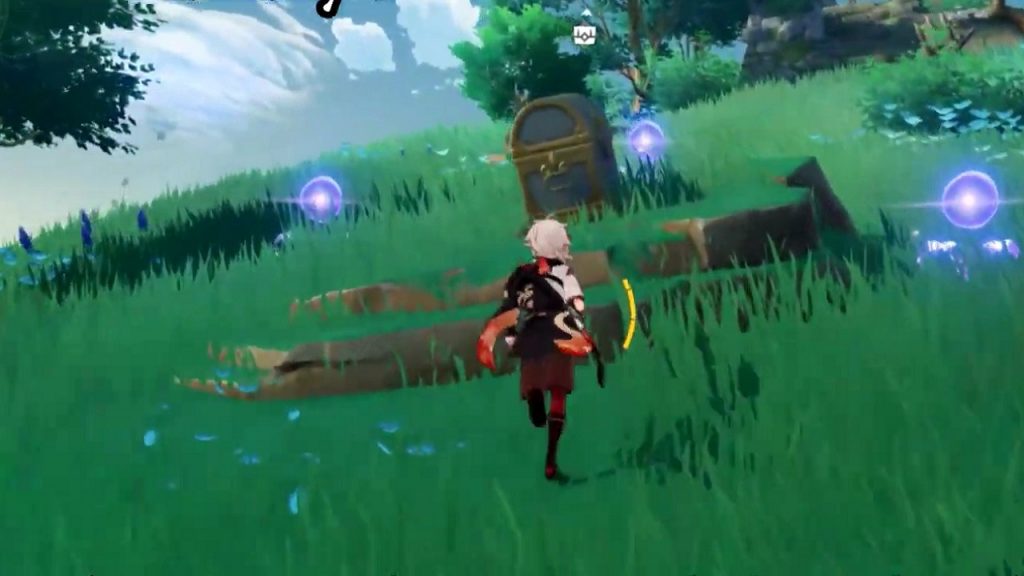
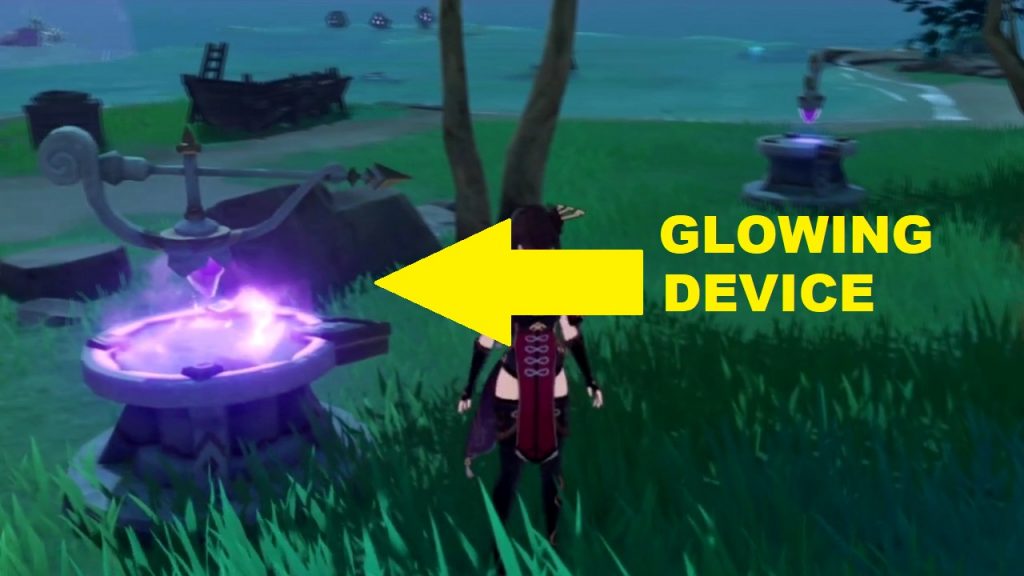
The first lost text is on a small island north of Fort Fujitou. The lost text is inside a small tent behind a barrier. To remove the barrier you will need to solve a block puzzle. This puzzle is very simple, simply hit the blocks until the glowing end turns towards the north as shown in the picture below. get inside the camp and read the text kept at top of a crate.
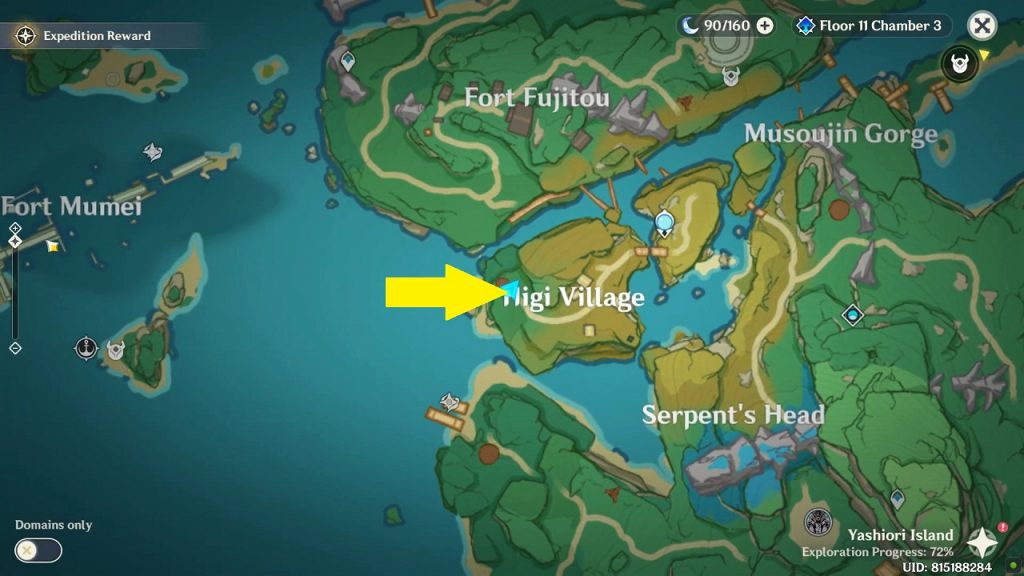
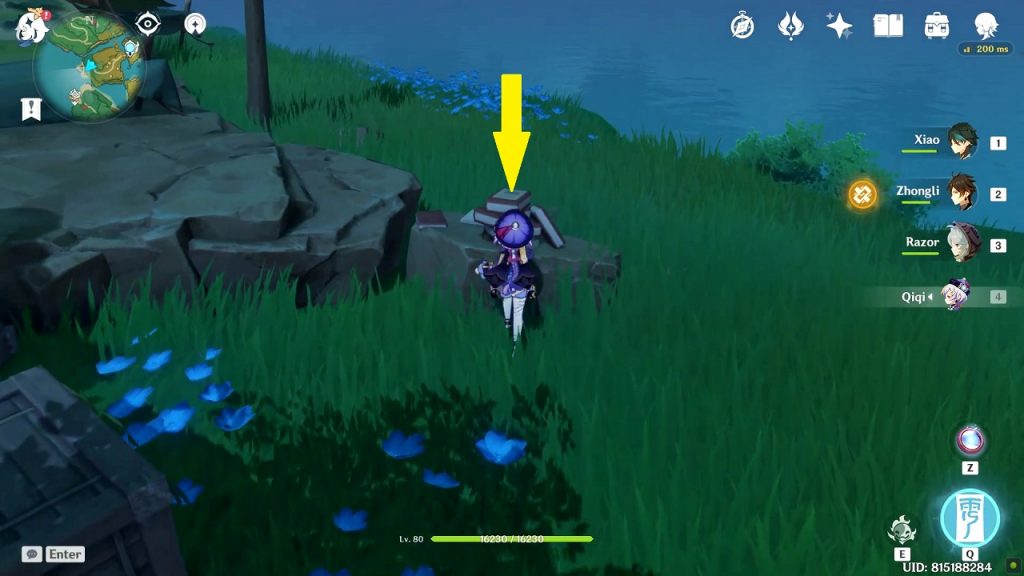
Lost Text 2
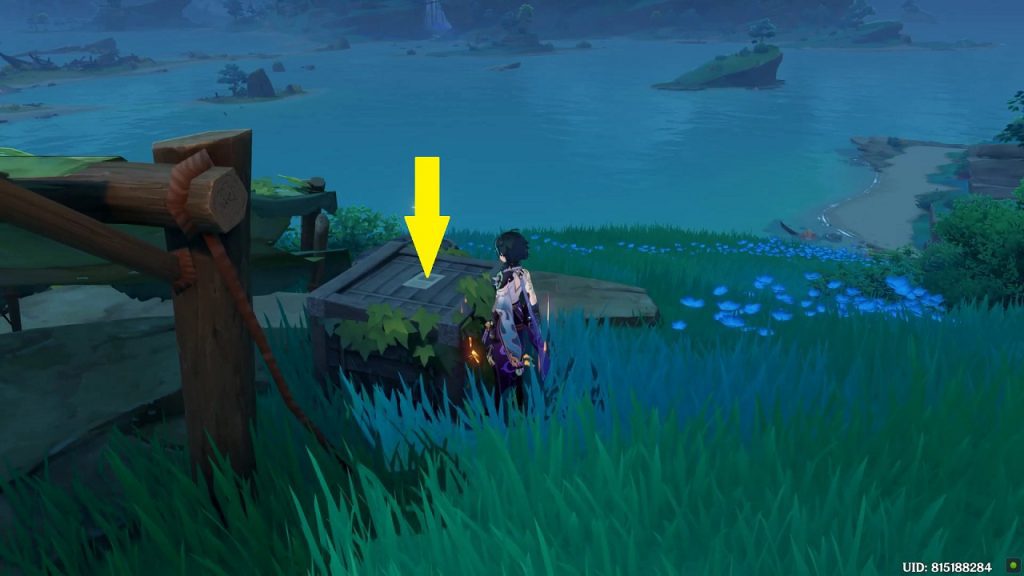
The second lost text on the western side of Higi Village at the location as shown in the picture below. The note is kept at top of a pile of books.
Lost Text 3
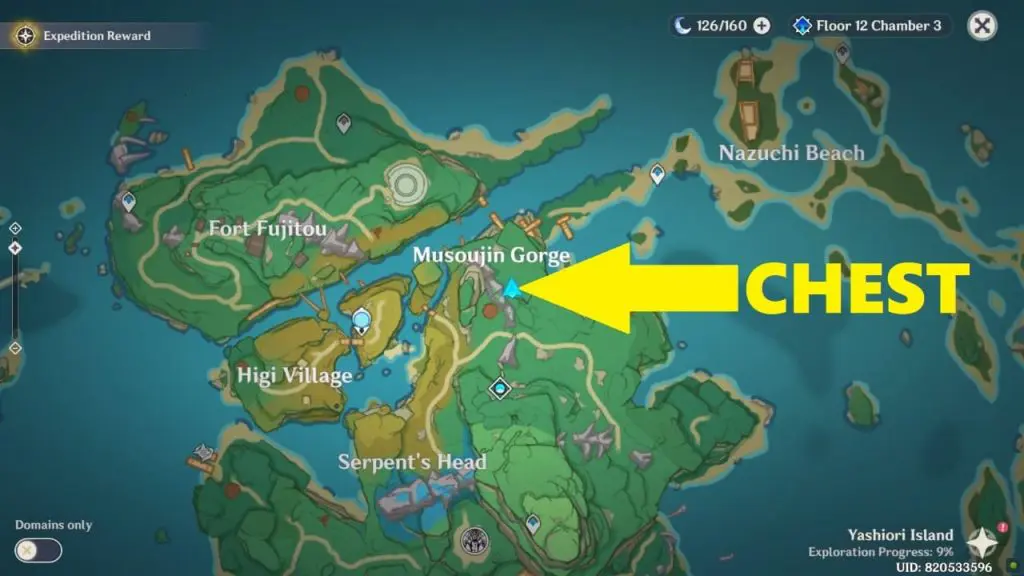
The third lost text is at the southeast portion of Musoujin Gorge at the location as shown in the picture below. The note is kept at the top of a crate.
Lost Text 4
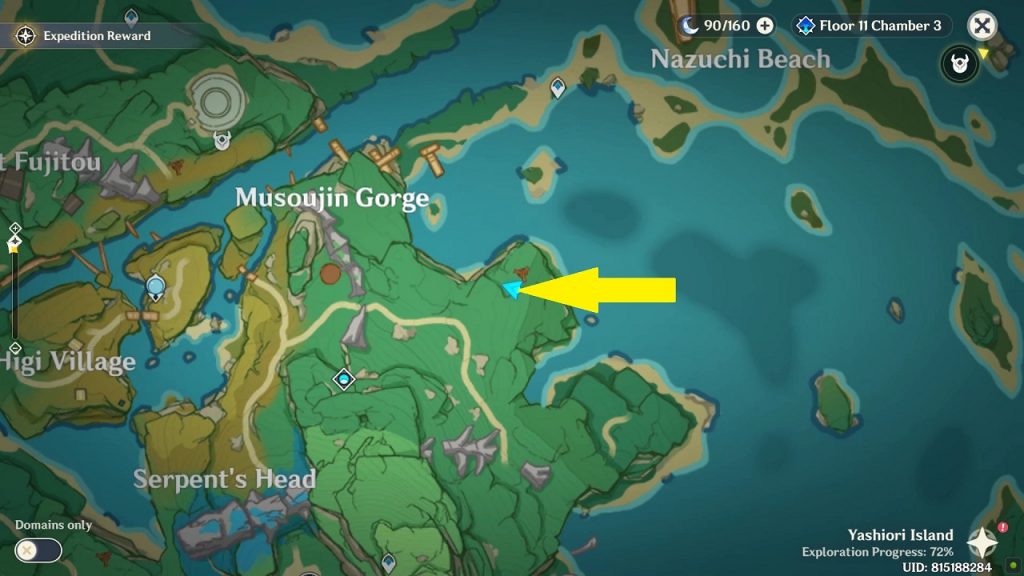
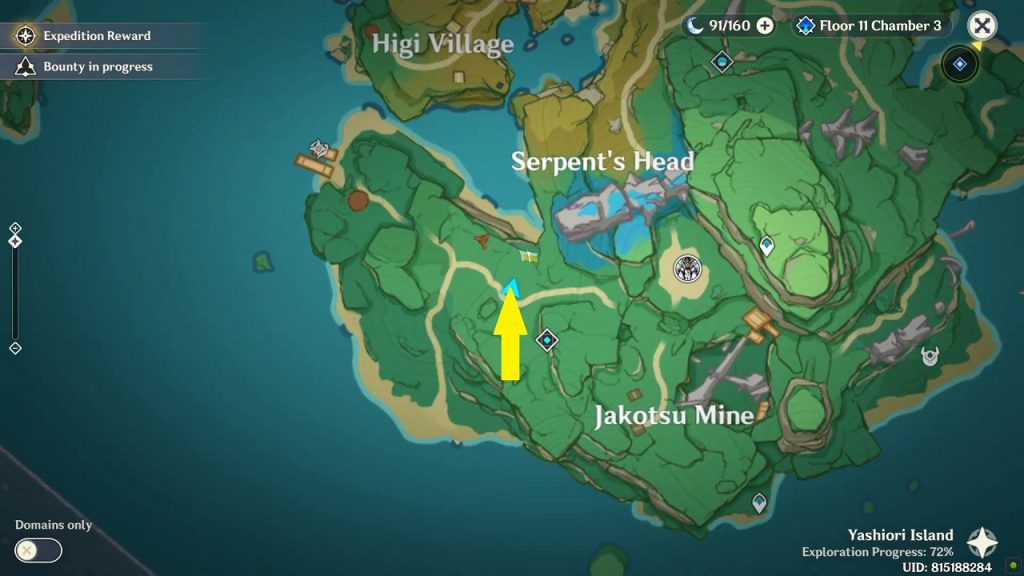
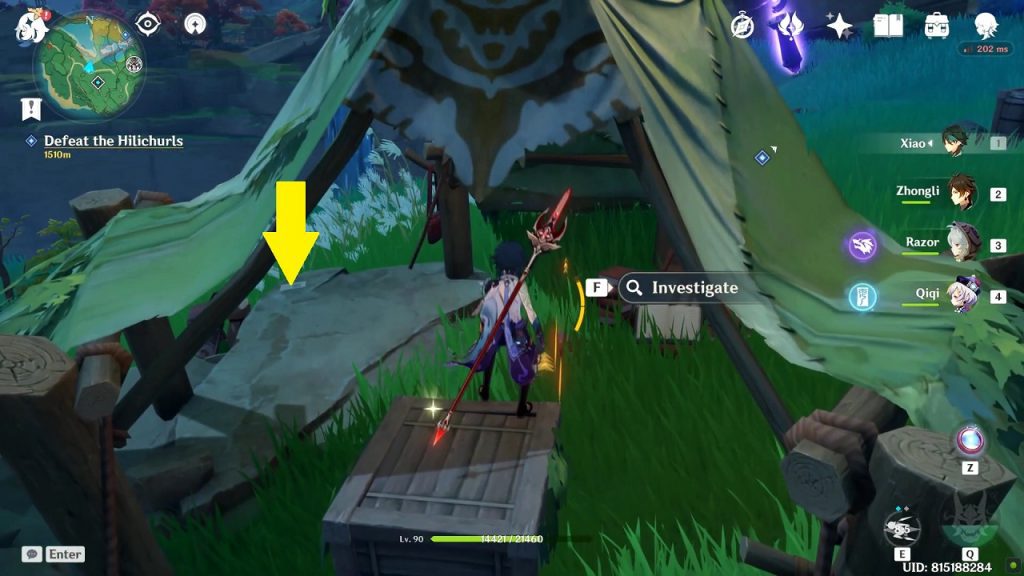
The fourth lost text is at the northeast side of Jakotsu Mine at the location as shown in the picture below. The note is placed on the ground inside a small tent.
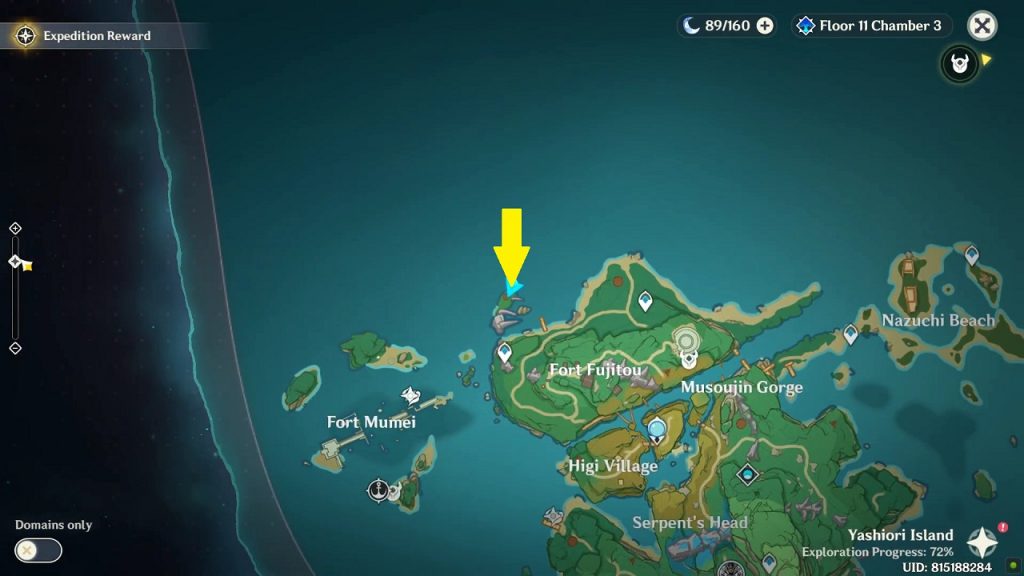
Hidden Luxurious Chest Location
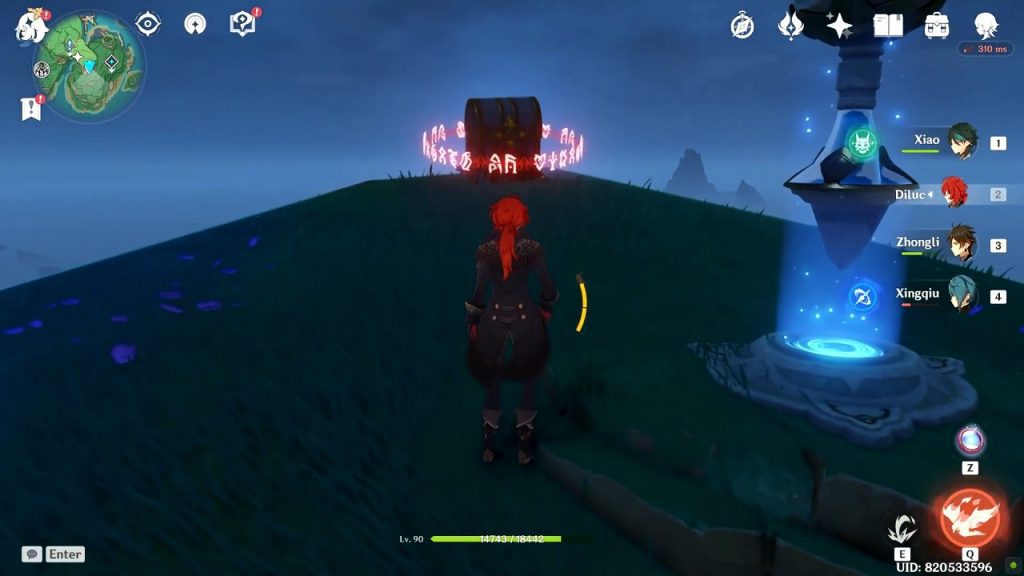
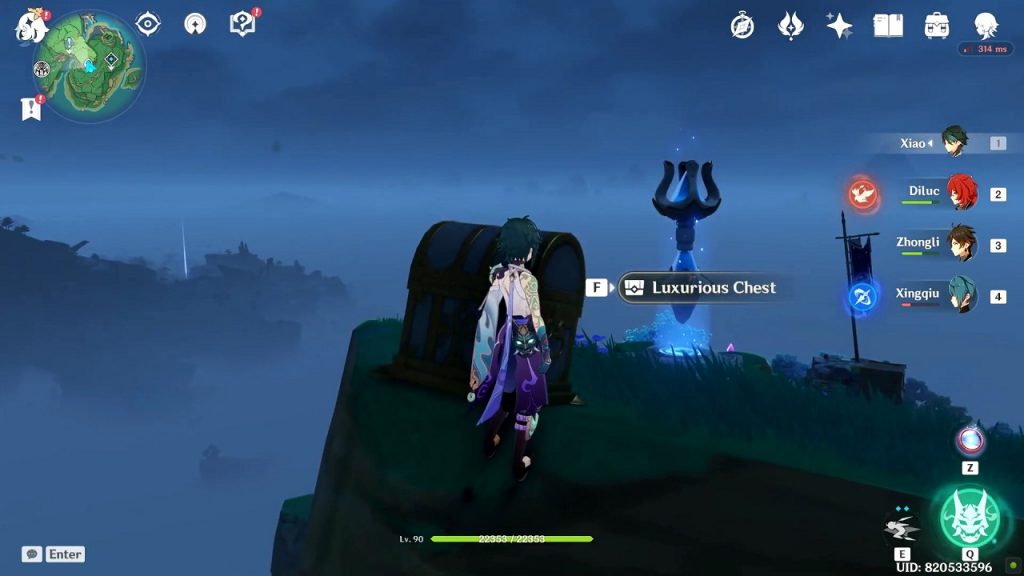
Once you have collected all the four lost texts, go to a small island south of Fort Mumei. The island is not visible on the map. Go to location as shown with a yellow arrow on the map below. You will find the final lost text stuck on a big rock with a luxurious chest near it as shown in the picture below.

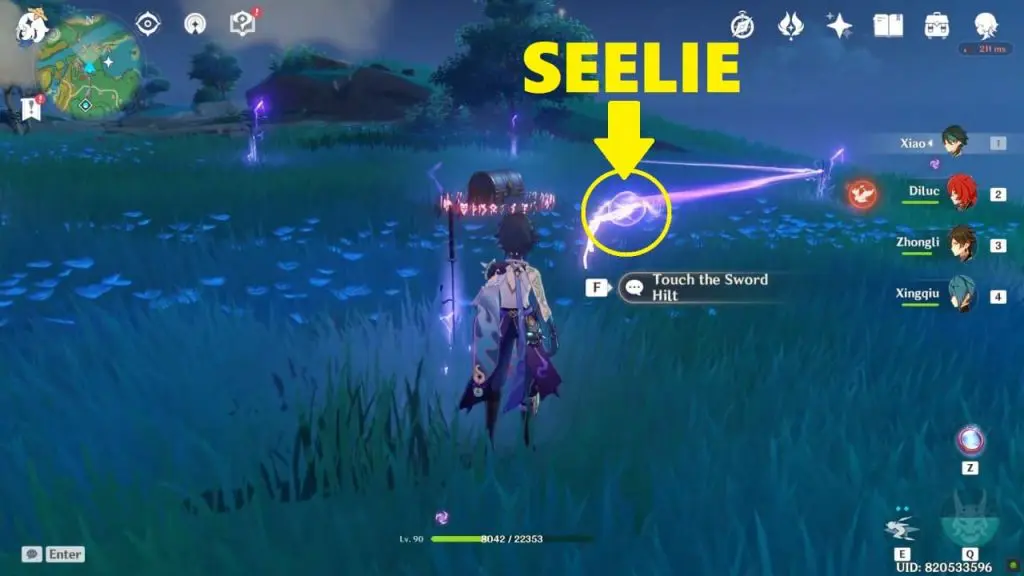
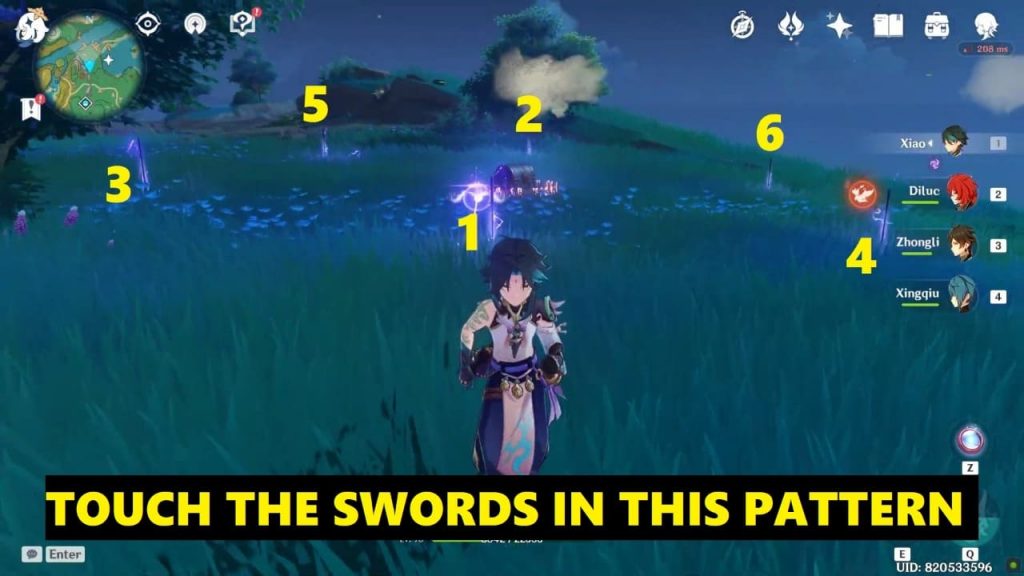
Luxurious Chest 2/45: Touch The Sword Hilt Puzzle (Yashiori Island)
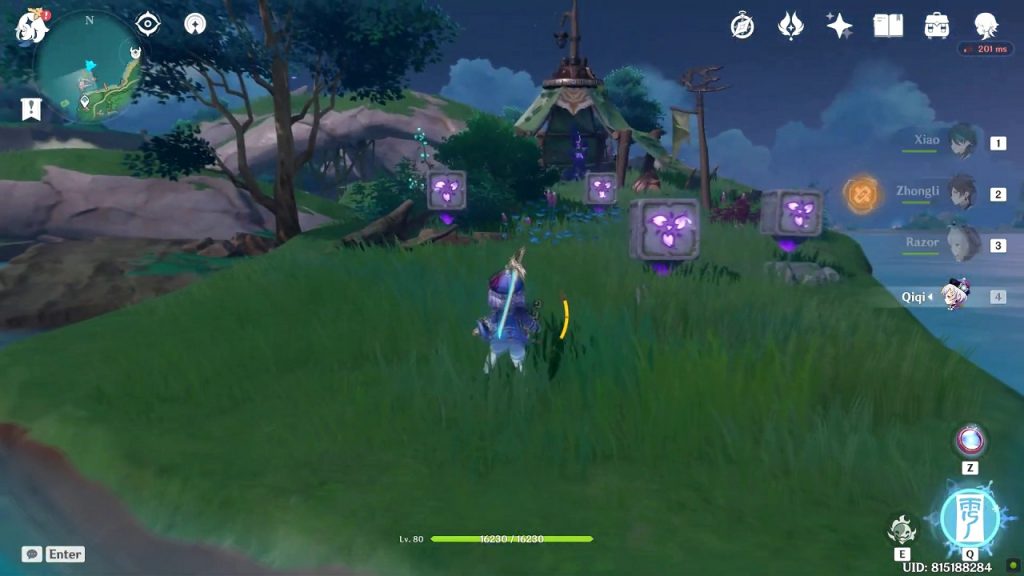
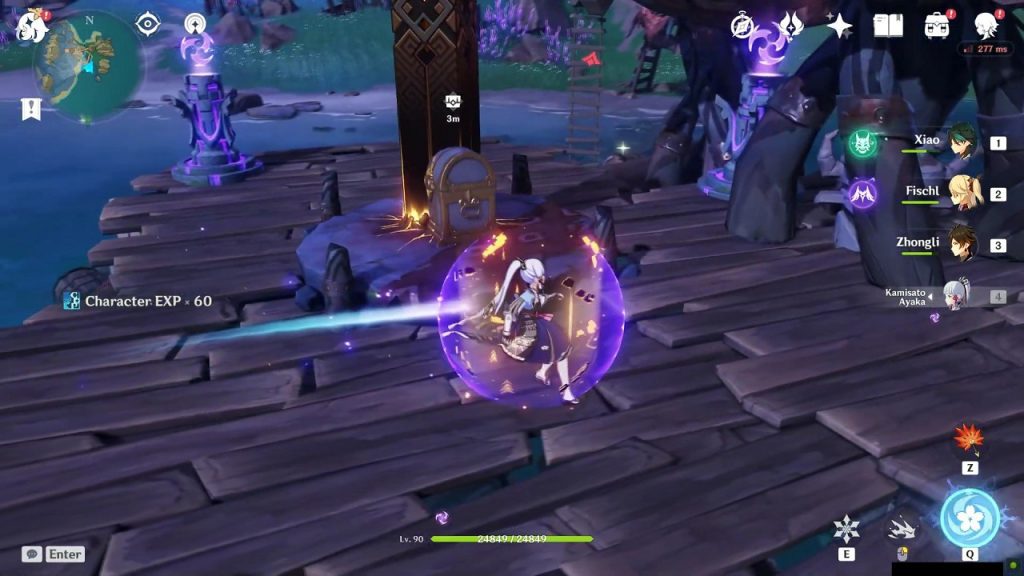
There is a luxurious chest in the Musoujin Gorge area of Yashiori Island which is surrounded by 6 electrified swords. When you approach an electrified sword you get the prompt TOUCH THE SWORD HILT. Touching the sword causes an explosion which will give you massive damage and you might even die.
How to solve TOUCH THE SWORD HILT Puzzle
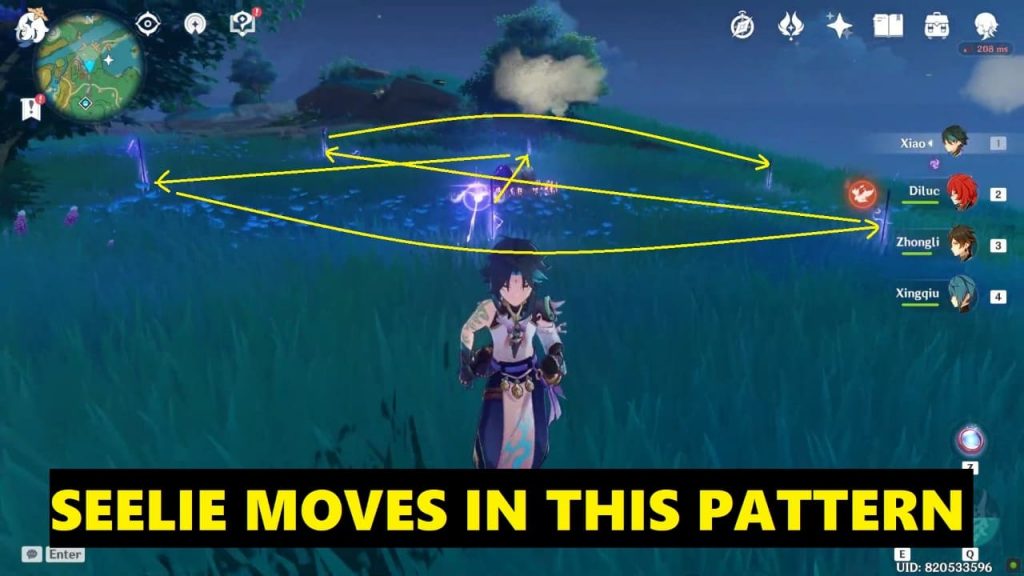
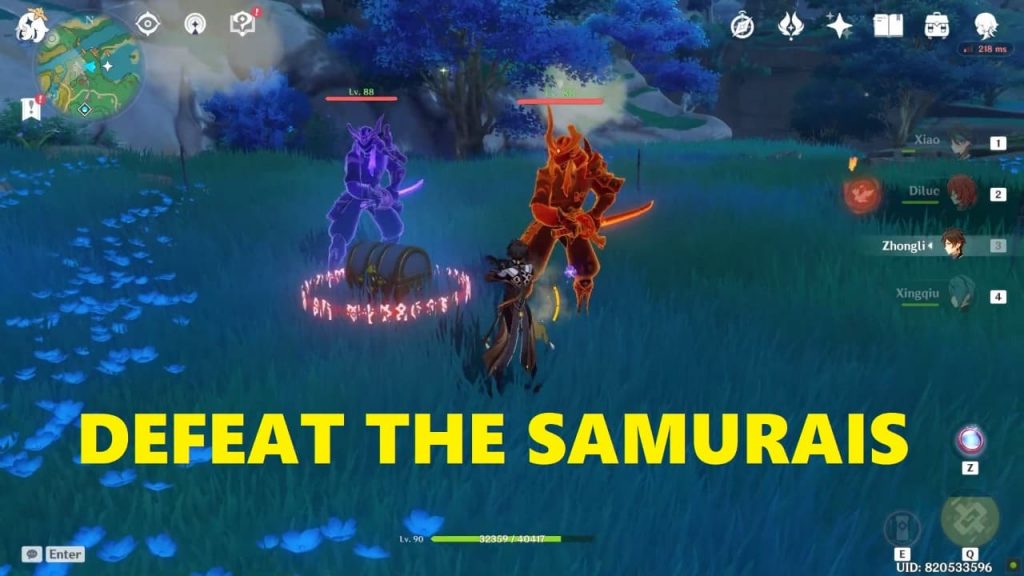
To de-electrify all the swords you have to touch the swords (interact with the swords) in the right order as shown by the Seelie. As you approach the swords you will see a Seelie flying from one sword to another in a particular order. Stand still and observe the Seelie for a while and carefully notice the pattern in which it’s touching the swords. You’ve to touch the swords in the same pattern. The images below show the correct order in which you’ve to touch the swords. Touching the swords in the correct pattern will de-electrify the swords and two samurais will appear. Defeat the samurais and grab the content of the luxurious chest.
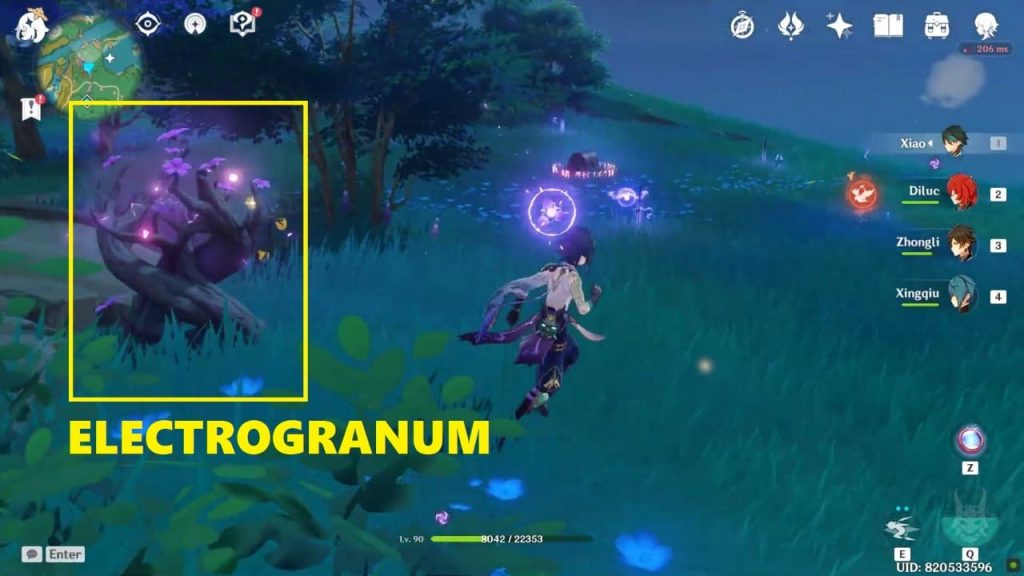
NOTE: You must be carrying an electrogranum while touching the swords (only then the swords will be de-electrified). Summon an electrogranum from the electrogranum plant nearby and then touch the swords (in correct order). If you run out of electrogranum after touching a few swords, just summon another electrogranum and then touch the remaining swords (in correct order).
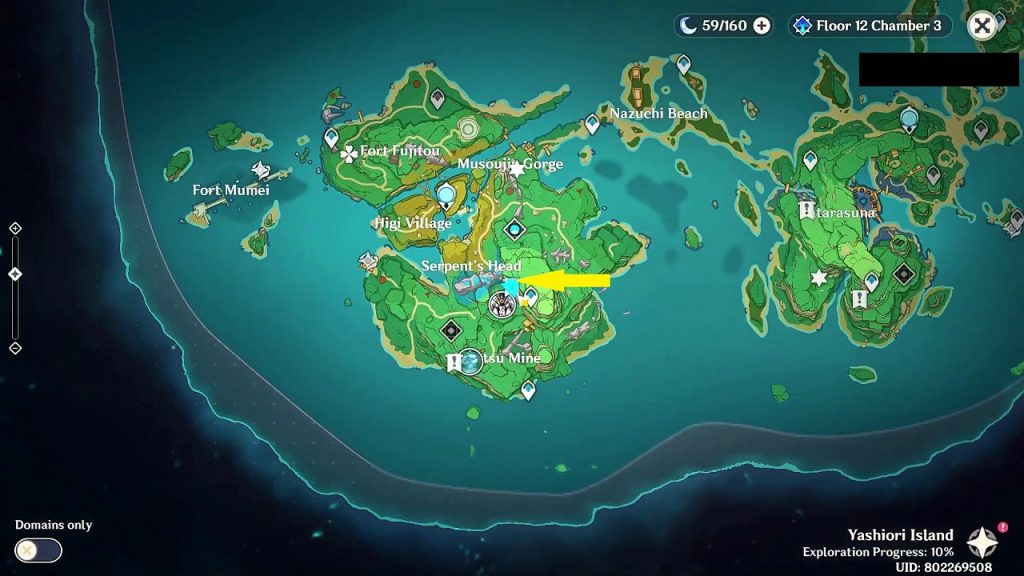
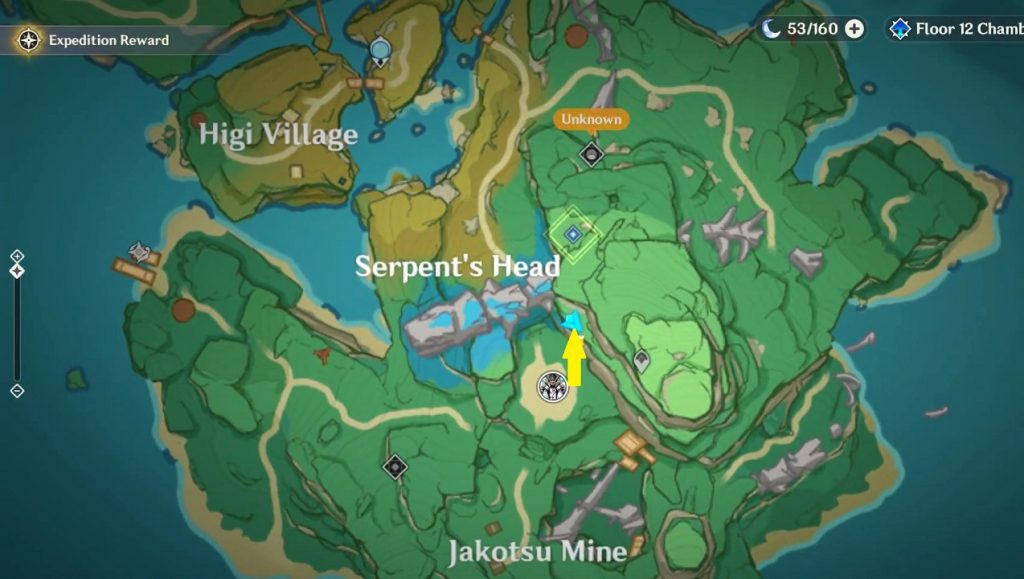
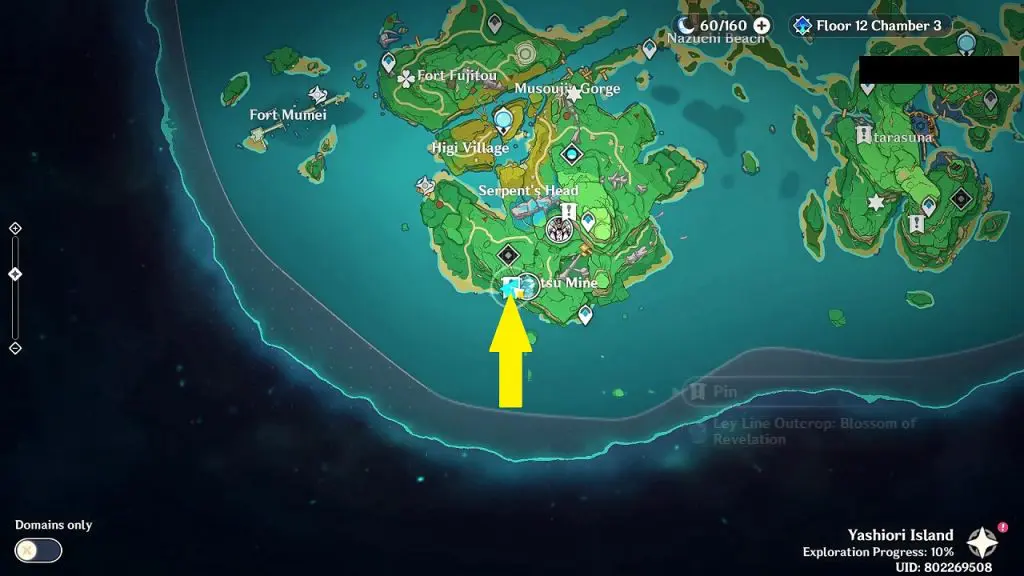
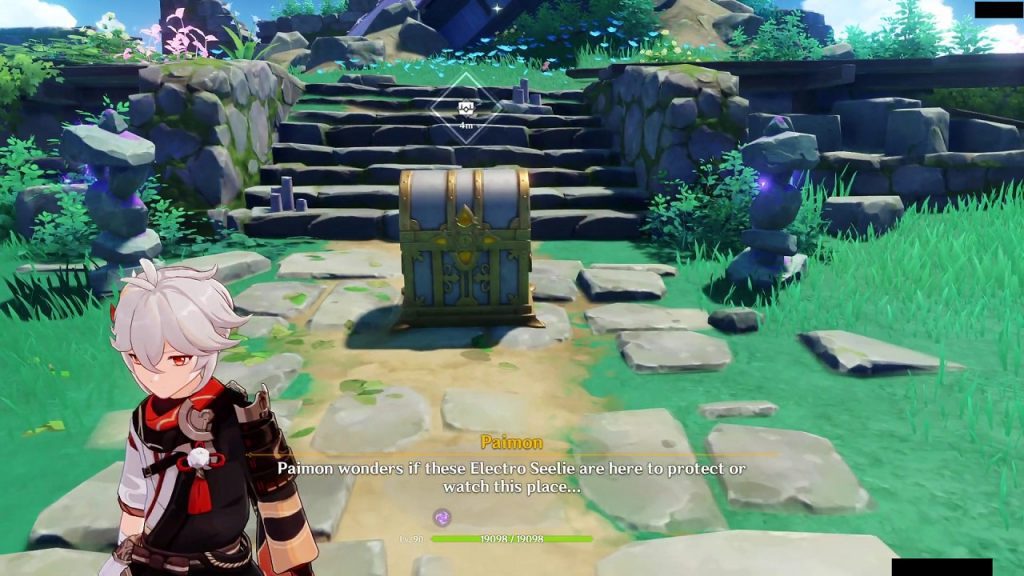
Luxurious Chest 3/45: Shrine of Depths (Yashiori Island)
You will get a luxurious chest inside the Shrine of Depths in Serpent’s Head at the location as shown in the picture below. Check the link to know how to get the key for the shrine.
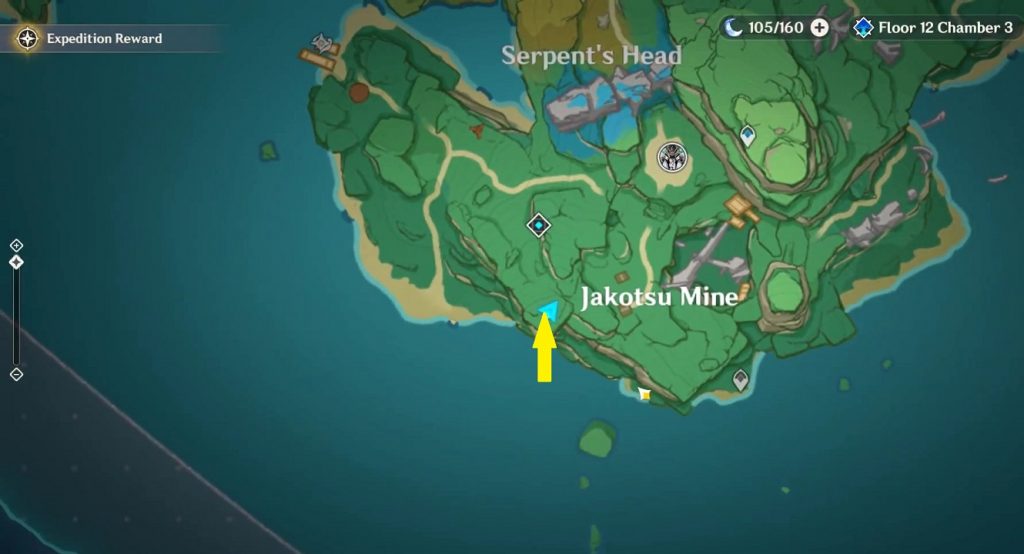
Luxurious Chest 4/45: Shrine of Depths (Yashiori Island)
You will get a luxurious chest inside the Shrine of Depths west of Jakotsu Mine at the location as shown in the picture below. Check the link to know how to get the key for the shrine.
Luxurious Chest 5/45: A Doctor’s Odyssey Achievement (Yashiori Island)
You will get the location of this luxurious chest by unlocking ‘A Doctor’s Odyssey’ Hidden Achievement. To unlock ‘A Doctor’s Odyssey’ you will first need to complete ‘Treatment on the Island’ World Quest. Once finished, put Naku weeds inside the bamboo basket outside Yasumoto’s house. Doing this will make an exquisite chest appear in front of the house the next day (Real Life Day). Repeat this process for three days. On the final day, you won’t find any chest outside Yasumoto’s house and the Naku weeds will still be there in the basket. Interact with the basket and the dialogue will hint you to use elemental sight to track the owner. Use the elemental sight and it will lead you to three Pharmacist’s Notebooks. Collecting the three Pharmacist’s Notebooks unlocks ‘A Doctor’s Odyssey’ achievement. The notebooks will give you the location of a luxurious chest. Check the link below for a complete walkthrough to unlock the achievement and getting the luxurious chest.
‘A Doctors Odyssey’ Complete Walkthrough
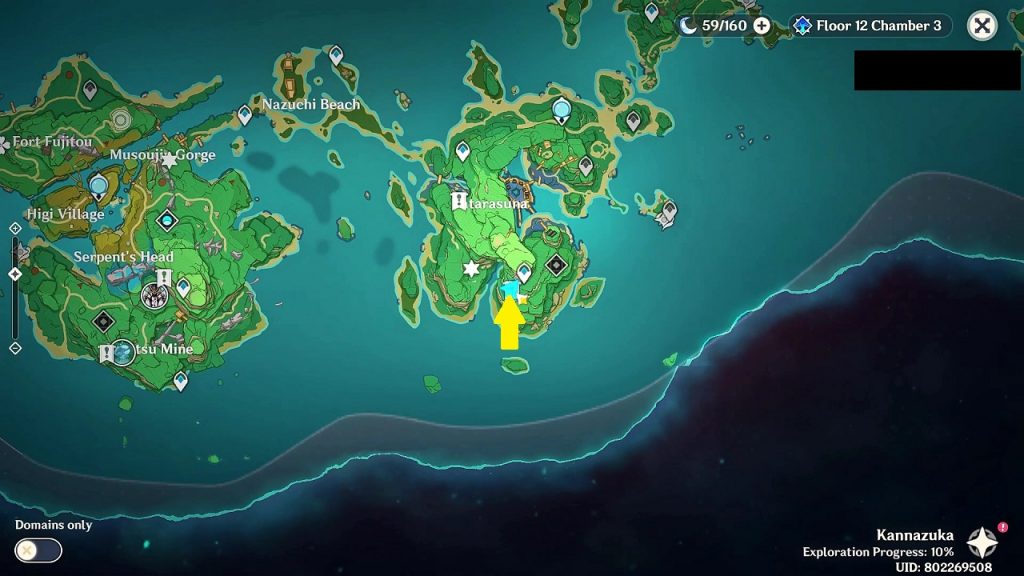
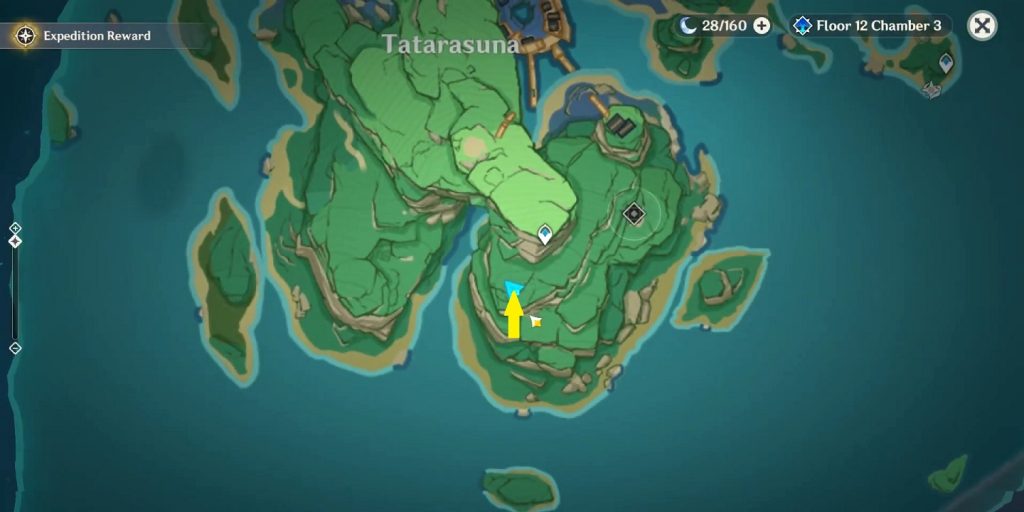
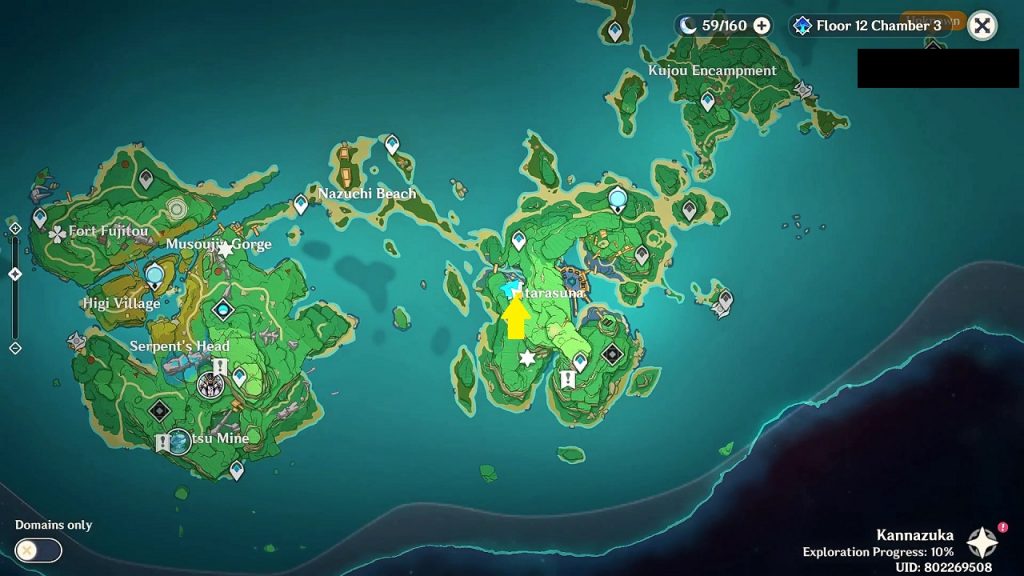
Luxurious Chest 6/45: Tatarasuna Mountain Edge (kannazuka)
At the southern end of Tatarasuna, near Tatarasuna Fast Travel Point you will find a locked Luxurious chest. The luxurious chest is near Tatarasuna’s fast travel point near the edge of the mountain at the location as shown in the picture below. The luxurious chest unlocks when you move far from it but locks as you approach near it. There is a small trick that will help you unlock the chest and get the reward.
To unlock the chest, you need to approach it from behind. You have to place yourself appropriately behind the chest for the option to open the luxurious chest to appear. If you are finding it difficult to place yourself in the correct position, simply jump down and climb the cliff from behind. This way you will be able to stand right behind the luxurious chest as shown in the picture below.
Luxurious Chest 7/45: Break Pots Puzzle (kannazuka)
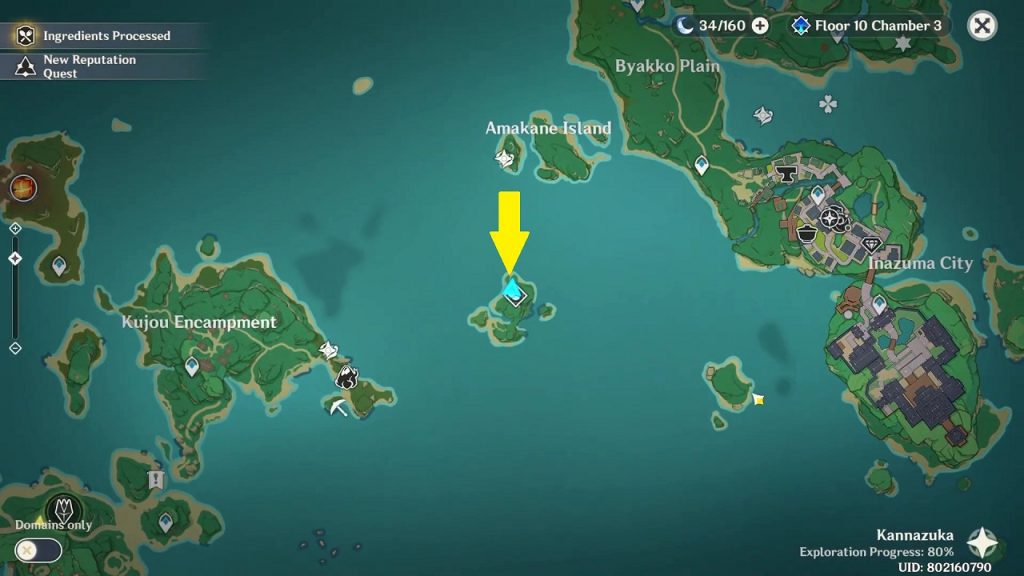
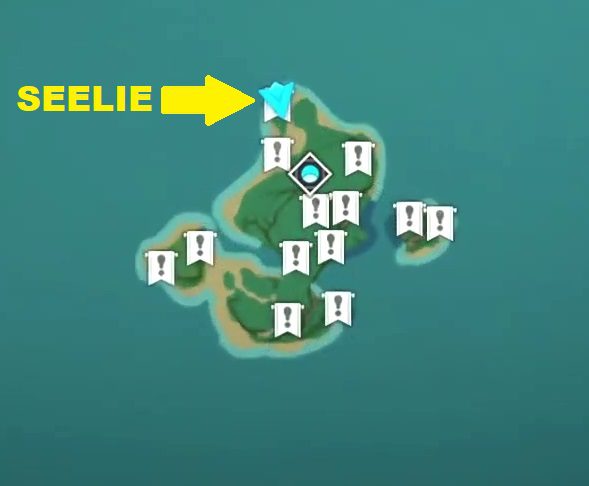
The luxurious chest is on an island east of Kujou Encampment and south of Amakane Island as shown in the picture below. You will need to break all the pots on the island for the luxurious chest to appear. The second picture below shows the location of all the pots on the island.
At the northmost point of the island, you will find a Seelie (Location Marked on Second Picture Below). This Seelie will stop at pots locations. Follow it around to find the pots. Make sure to check the surrounding area where the Seelie stops, because it does not stop at the top of all the pots. See the second picture below for all the pots locations.
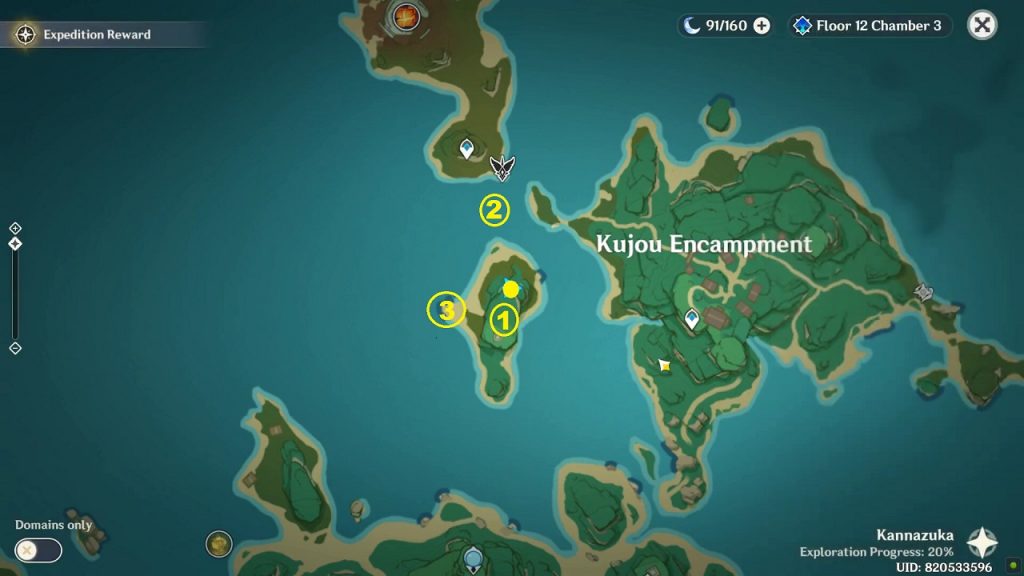
Luxurious Chest 8/45: Find Three Seelies (kannazuka)
The luxurious chest is on an island west of Kujou Encampment at a location marked with a yellow dot on the map below. You will find three Electro Seelies around the island at locations marked with 1,2, and 3 on the map below. Chase the Seelies and bring them to the Luxurious chest to unlock it.
Seelie 1: Just south of the chest.
Seelie 2: On the water at the north side of the island
Seelie 3: On the beach at the western end of the island
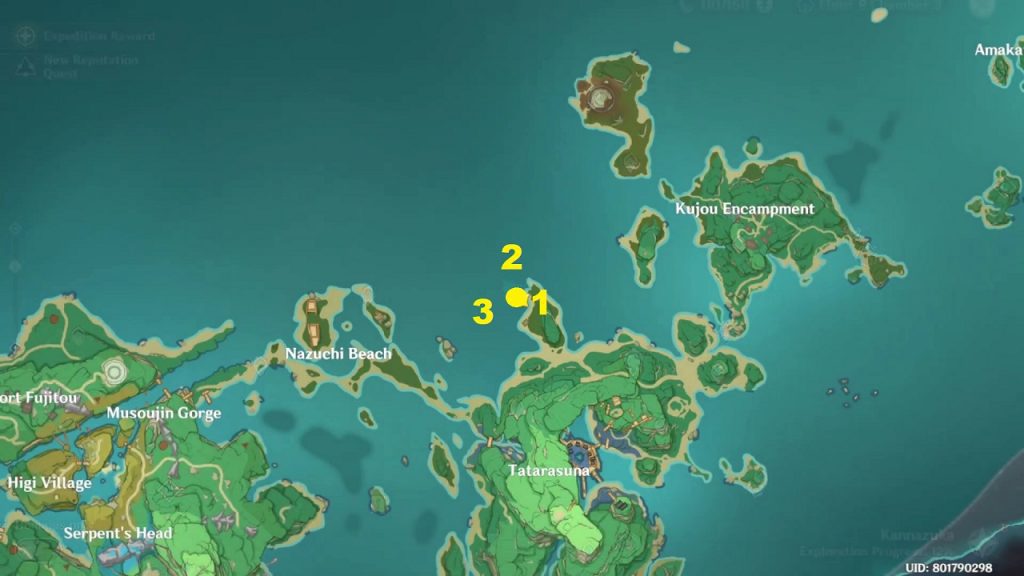
Luxurious Chest 9/45: Tatarasuna Northen Edge (kannazuka)
You will find a barrier on the water at the northern end of Tatarasuna at the location marked by a dot on the map in the picture below. Inside the barrier, you will get a Luxurious chest. To get inside the barrier you will first need to find three Electro Seelies by solving three puzzles at locations marked by 1,2, & 3 on the map in the picture below.
Seelie 1: Lightning Strike Probe Puzzle
Lightning Strike probe is a device with a compass attached to the top that points towards players charged with electro element. The base of the Lightning Strike Probe is marked with the direction in which the compass needs to be pointed (See the picture below). Use electro element to make the compass point in the correct direction and this will make the device glow, as shown in the second picture below. Once the device starts glowing, it will keep glowing only for a small period of time. To complete the Lightning Strike Probe puzzle you will need to make all three devices glow simultaneously.
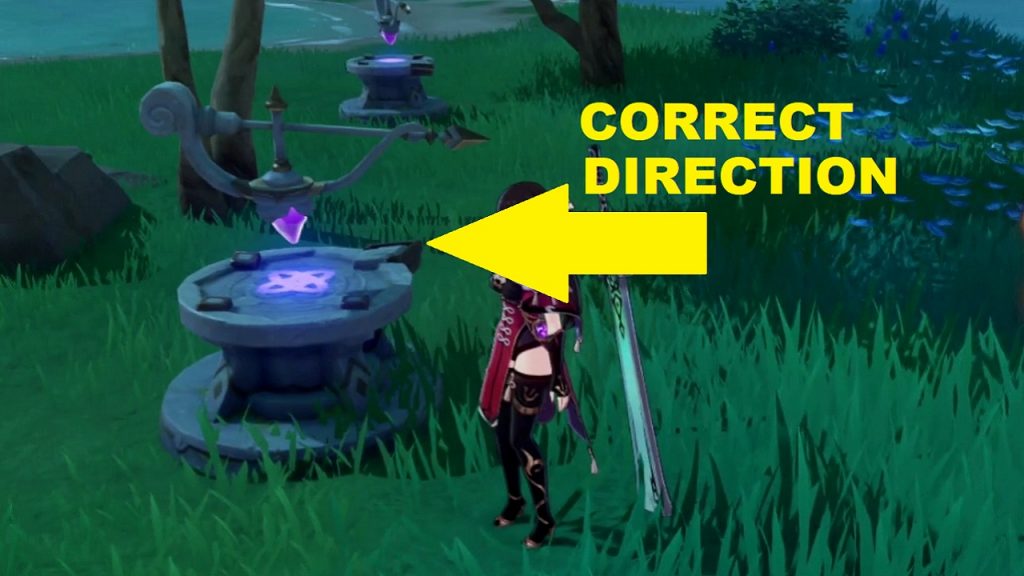
In order to solve the puzzle, you will need to get an electro charge and use it to rotate the compass on top of the Lightning Strike probe in the correct direction. You can get imbued by electro by going near Electro Crystal ore as shown in the picture below.
After you are charged with electro, go near a Lightning Strike Probe and stand in the direction where the device base is pointing until the compass points in the same direction and the device starts to glow. Do the same for the other two devices. You have to do this quickly because the device will remain glowing only for a small period of time. To complete the puzzle you will need to make all three devices glow simultaneously.
Once all the three Lightning Strike Probes are glowing simultaneously, an exquisite chest and an electro Seelie will appear at the center. Chase the Electro Seelie until it reaches the electrograna plant near the barrier.
Seelie 2: Block Puzzle
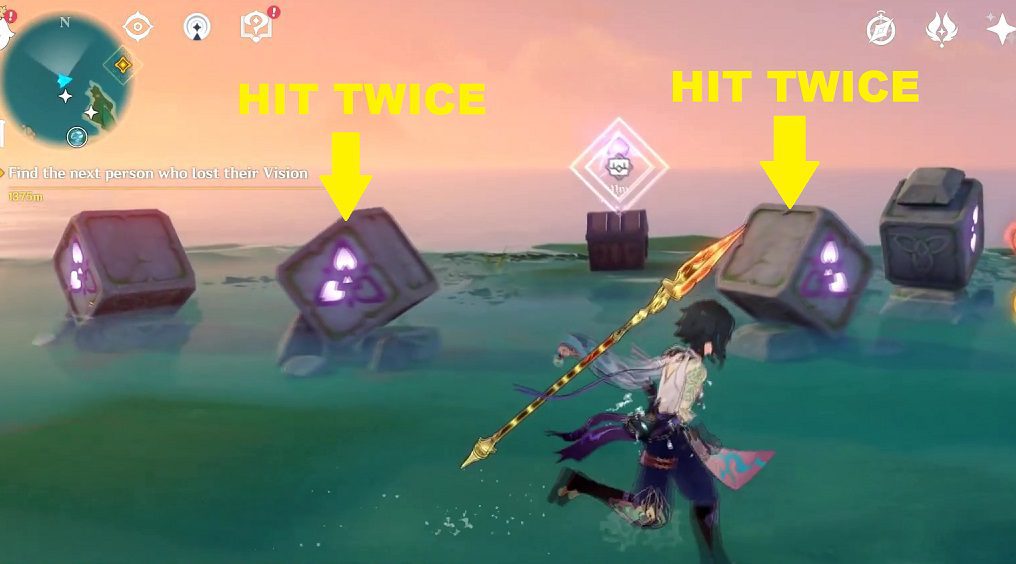
On the north side of the barrier, you will find four blocks. To solve the puzzle you will need to make the same number of feathers glow on all four blocks. Hit the middle two blocks two times each and it will make two feathers glow on all four blocks. An exquisite chest and an Electro Seelie will appear on the completion of the puzzle. Chase the Electro Seelie until it reaches the Electrograna plant.
Seelie 3: Complete Challenge
On the south side of the barrier, you will find a sword as shown in the picture below. Interact with the sword to start a challenge. Defeat the enemies within the time limit to complete the challenge. An exquisite chest and an Electro Seelie will appear on the completion of the challenge. Chase the Electro Seelie until it reaches the Electrograna plant.
Luxurious Chest Puzzle
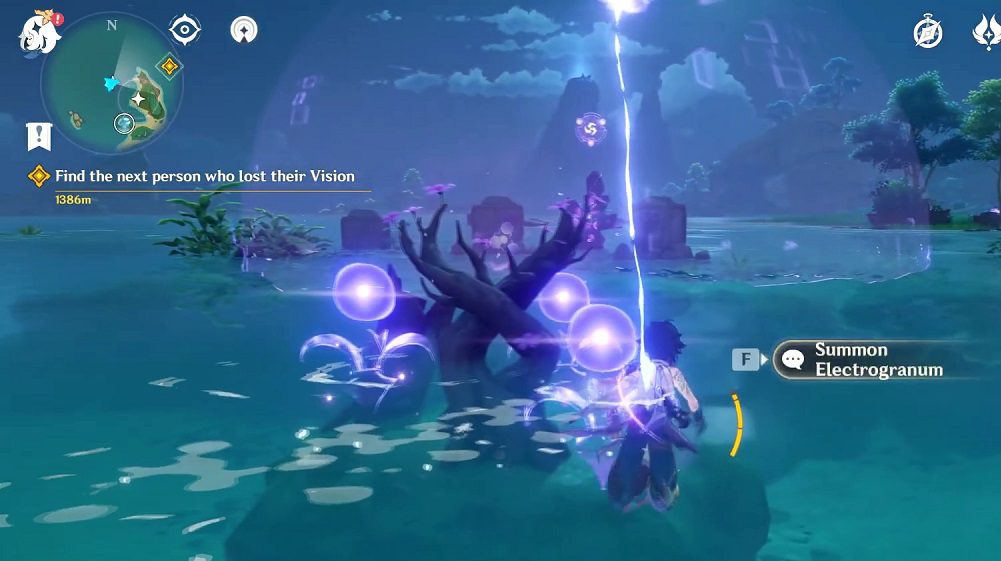
After you have chased all the three Electro Seelies to the electrograna plant, the option to summon electrogranum will appear. Summon electrogranum and use it to enter the barrier. After entering the barrier, interact with the pillar and switch off the barrier.
In front of the pillar, you will find three blocks. Hit the blocks until the glowing part turns towards the pillar. This will make the Luxurious chest appear. Open the chest to get Traveling Doctor’s Pocket Watch, Silver Sword, Lucky Dog’s Hourglass, Exile’s Goblet, 4 Electro SIgils, and 1800 Moras.
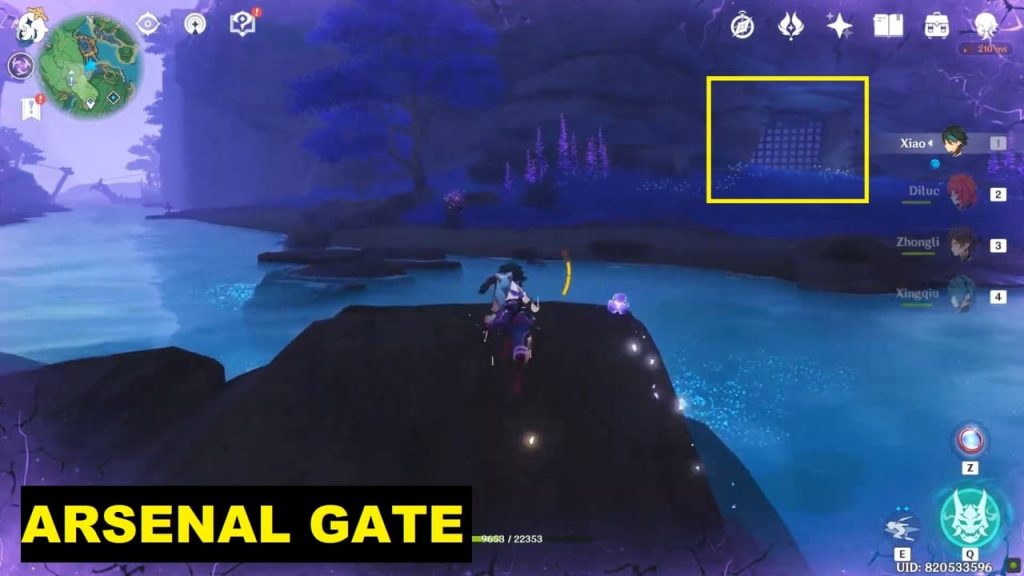
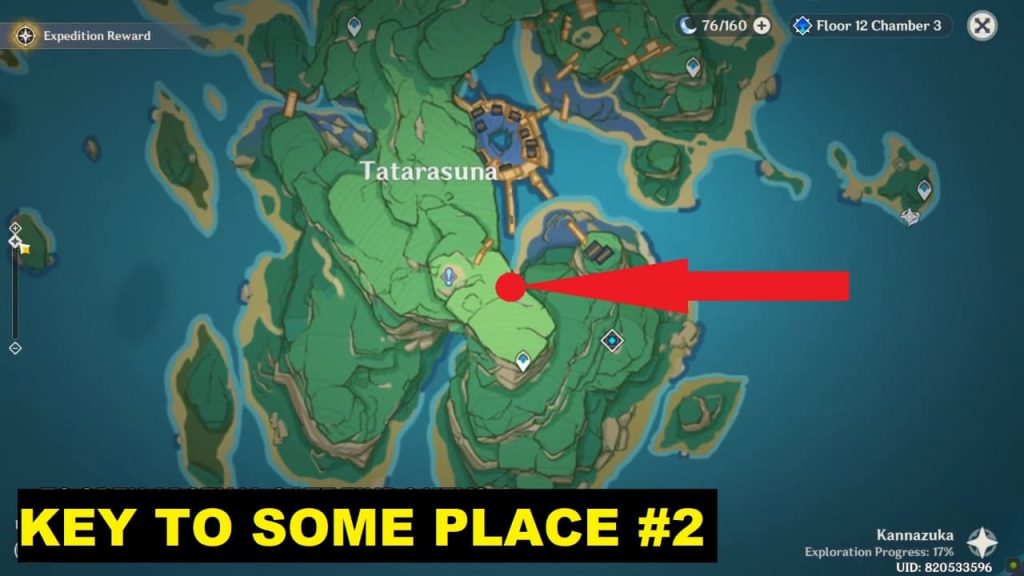
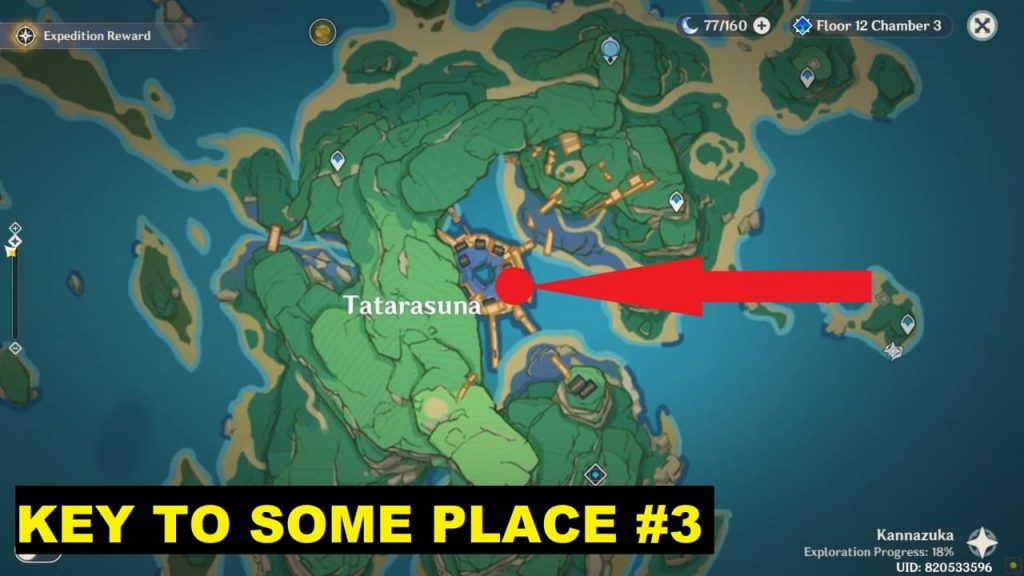
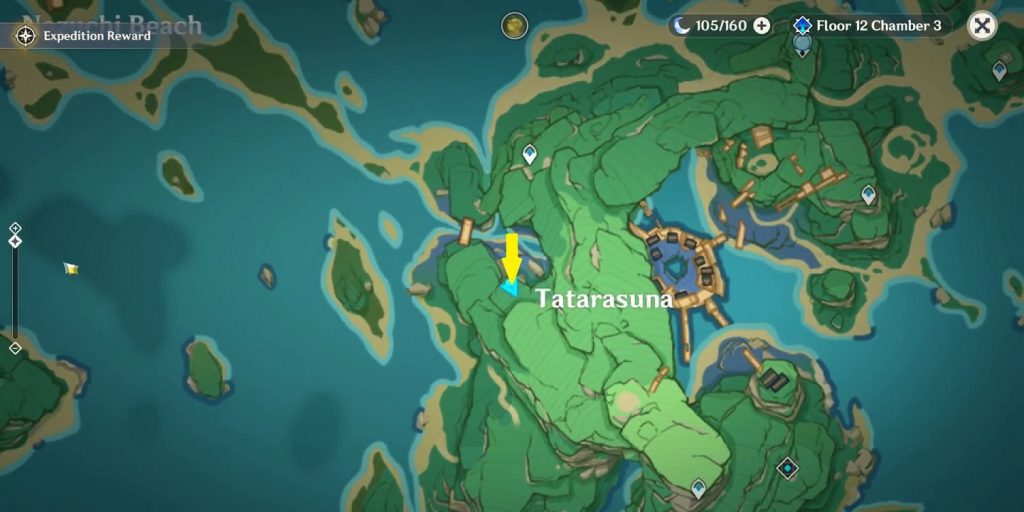
Luxurious Chest 10/45: Arsenal in Tatarasuna (kannazuka)
You will find the Luxurious chest in the Arsenal, which is in the central part of Tatarasuna near the river (Check the image below for location). The Arsenal is locked and 3 Keys to Some Place are required to unlock the Arsenal. The location of the keys is described below.

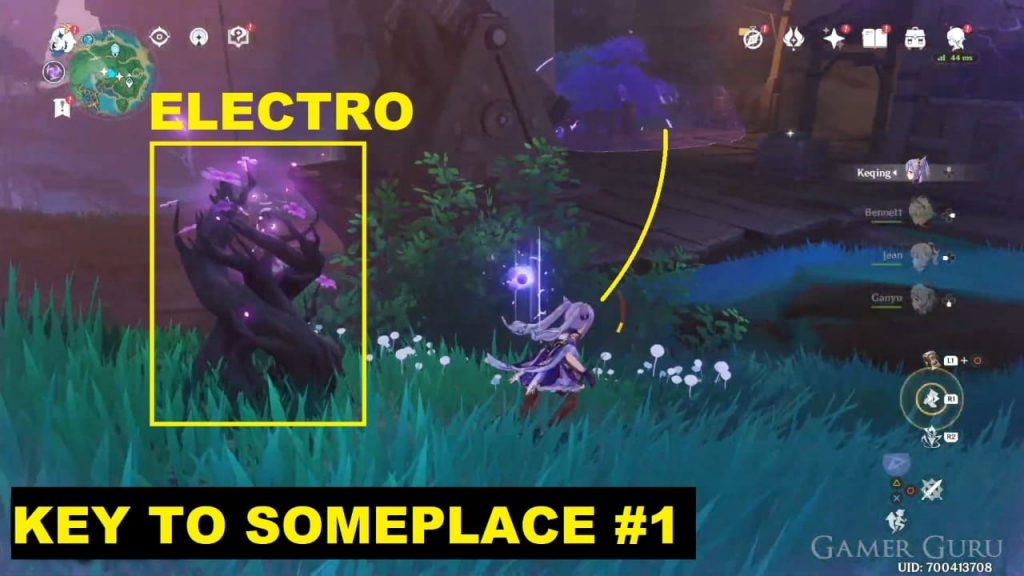
Key to Some Place #1
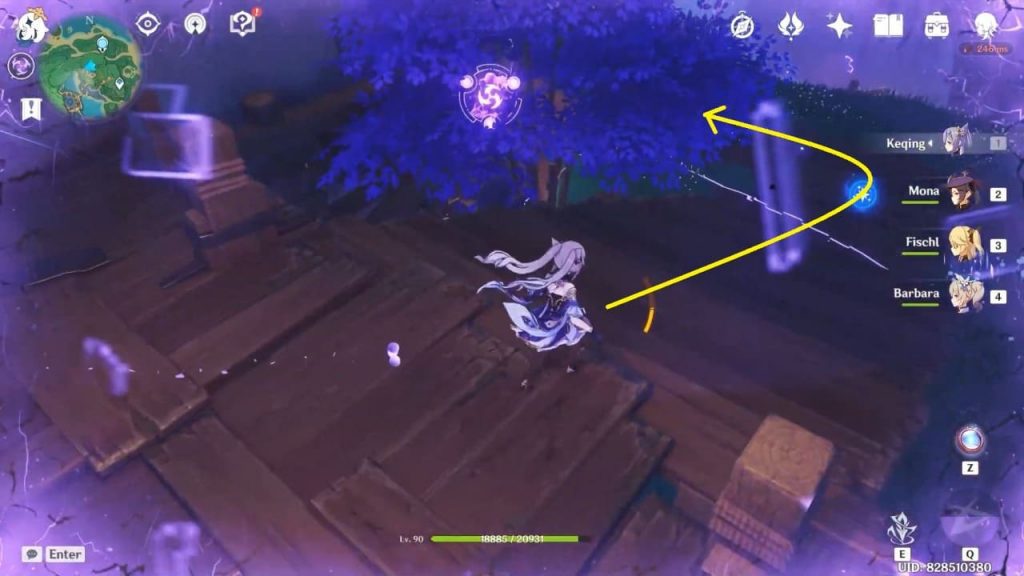
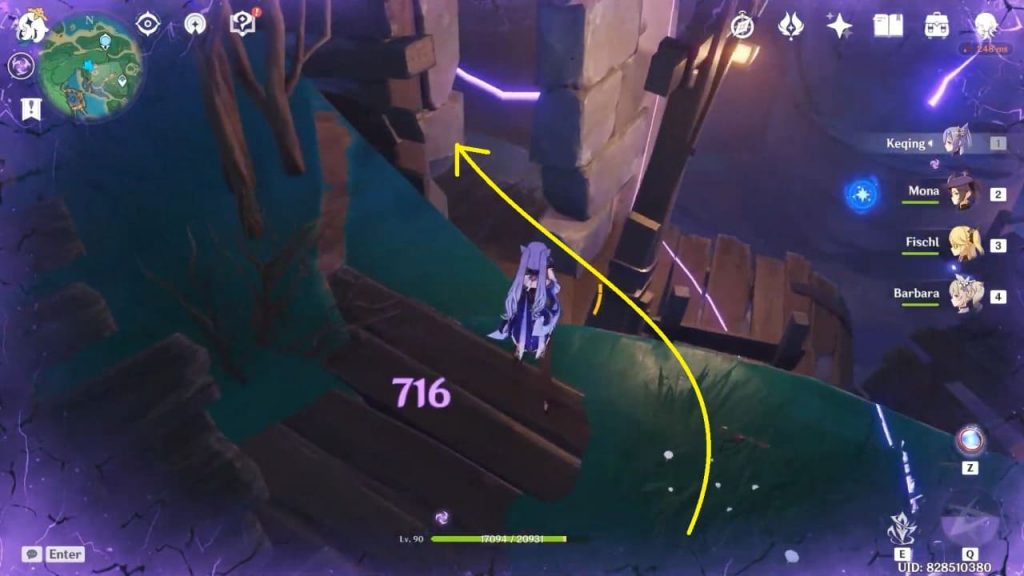
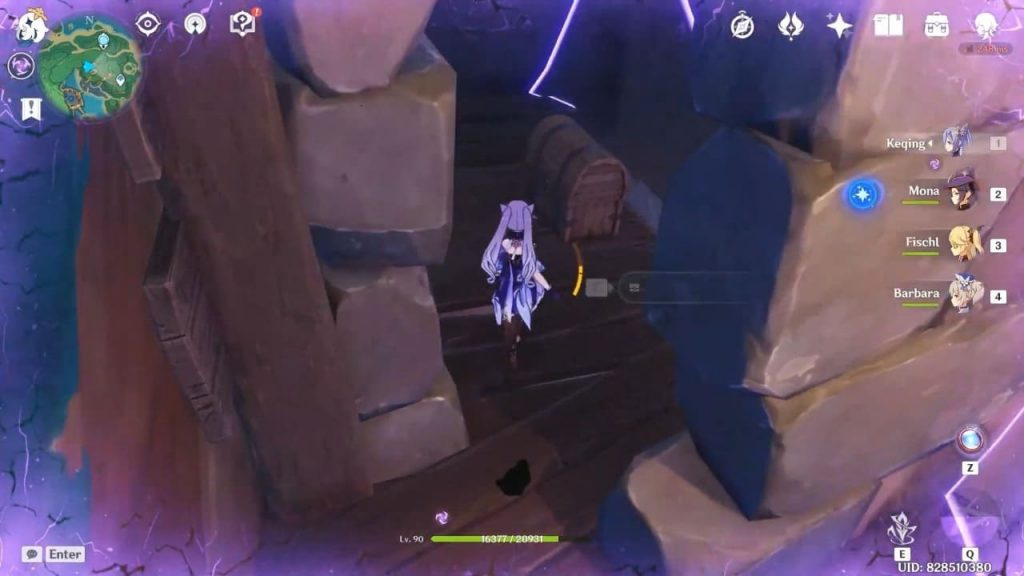
Key to Some Place #1 is in the northeast part of Tatarasuna (check the image below for the exact location). The common chest containing the key is in the broken building inside the purple-colored dome (shield). You’ll need electro to cross the shield (enter the dome). There is an electrogranum plant nearby and is pretty hard to miss. Cross the shield –> go downstairs –> take a sharp left and jump down onto the wooden platform –> enter the narrow space to get to the common chest.

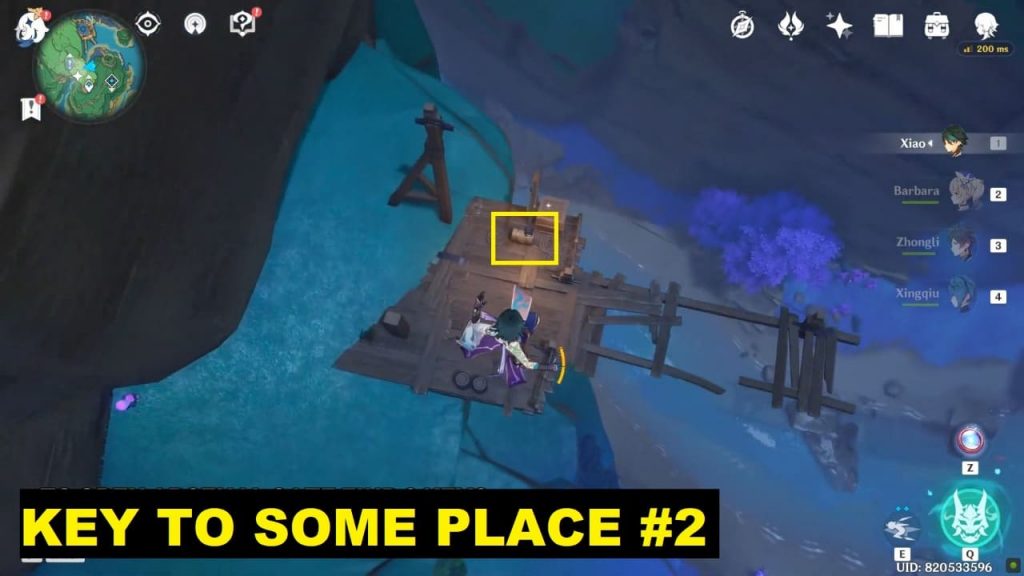
Key to Some Place #2
Key to Some Place #2 is in the southeast part of Tatarasuna (check the image below for the exact location). Move north from the teleportation waypoint and jump down from the ledge. Glide down to reach the broken wooden platform with the common chest (containing Key to Some Place #2). This wooden platform is located somewhere above the Arsenal gate.
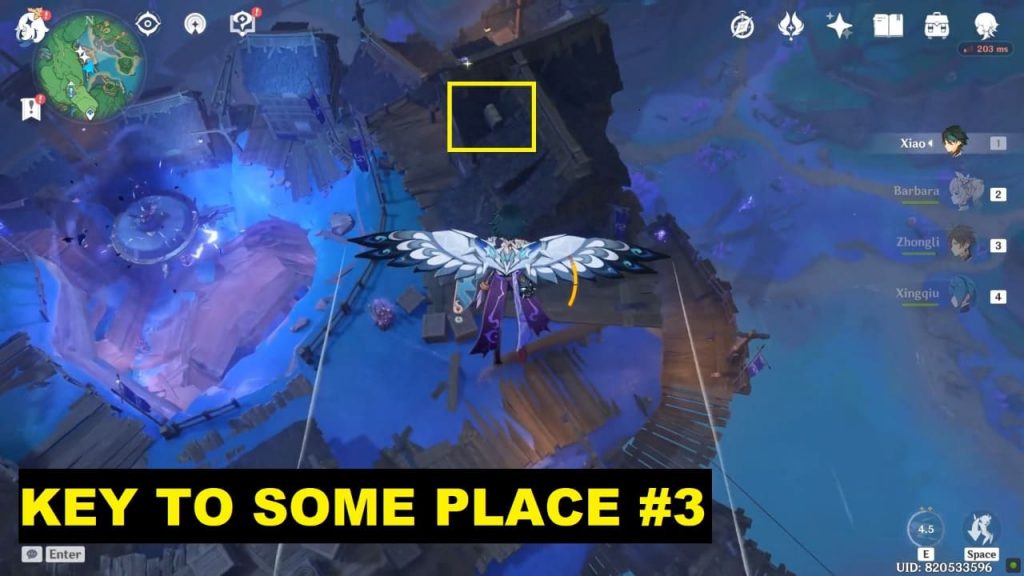
Key to Some Place #3
Key to Some Place #3 is in the central part of Tatarasuna near the Mikage Furnace (check the image below for the exact location). The common chest containing the key is on the roof of a hut in the Mikage Furnace area. It’s better if you approach the Mikage Furnace from the cliff on its western side. You can jump off the cliff and can easily glide to the common chest.
Once you have the three ‘Keys to Some Place’, open the arsenal gate and get the ‘Katsugakiri Nagamasa‘ blueprint from the Luxurious chest inside it.
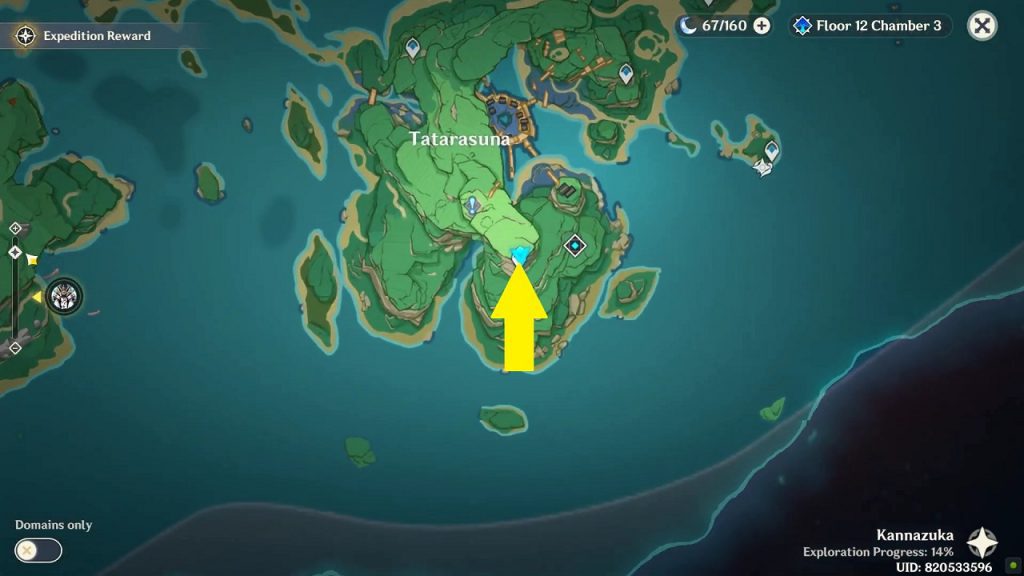
Luxurious Chest 11/45: Shrine of Depths (kannazuka)
You will find a luxurious chest inside a Shrine of Depths in Tatarasuna at the southwest of the fast travel point at the location as shown in the picture below. Check the link to know how to get the key for the shrine.
Luxurious Chest 12/45: Shrine of Depths (kannazuka)
You will find a luxurious chest inside a Shrine of Depths in the western portion of Tatarasuna at the location as shown in the picture below. Check the link to know how to get the key for the shrine.
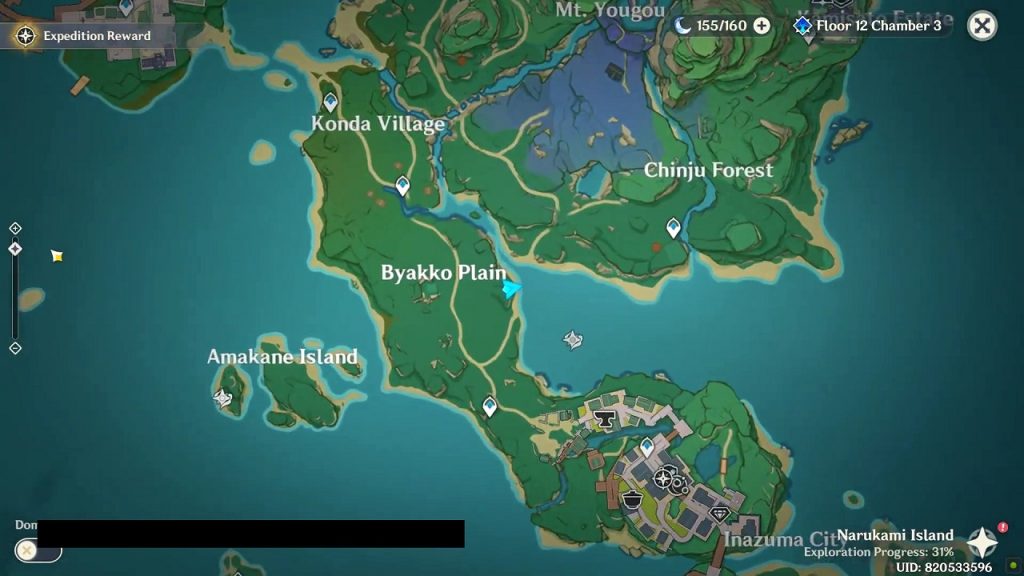
Luxurious Chest 13/45: Byakko Plain Beach (Narukami Island)
There is a locked luxurious chest on a beach east of Byakko plain at the location as shown in the picture below. Defeat the enemies around the chest to unlock it and get the rewards.

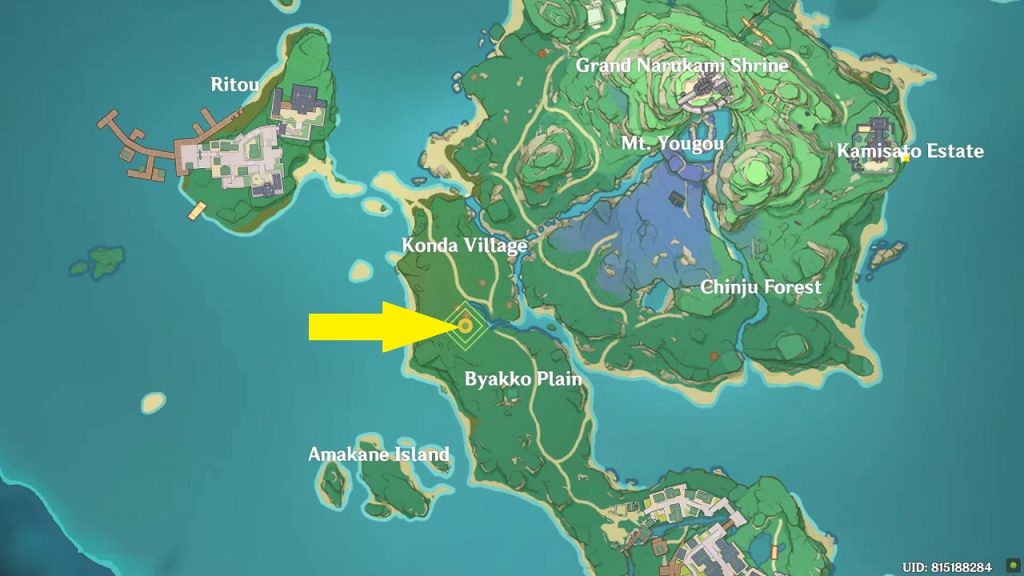
Luxurious Chest 14/45: Konda Village Well (Narukami Island)
The second luxurious chest is inside the well of Konda, where you have to go during ‘A strange story in Konda’ world quest for sacred sakura cleansing ritual. To see how to reach the cleansing point check the complete walkthrough in the link below.
A strange story in Konda complete walkthrough
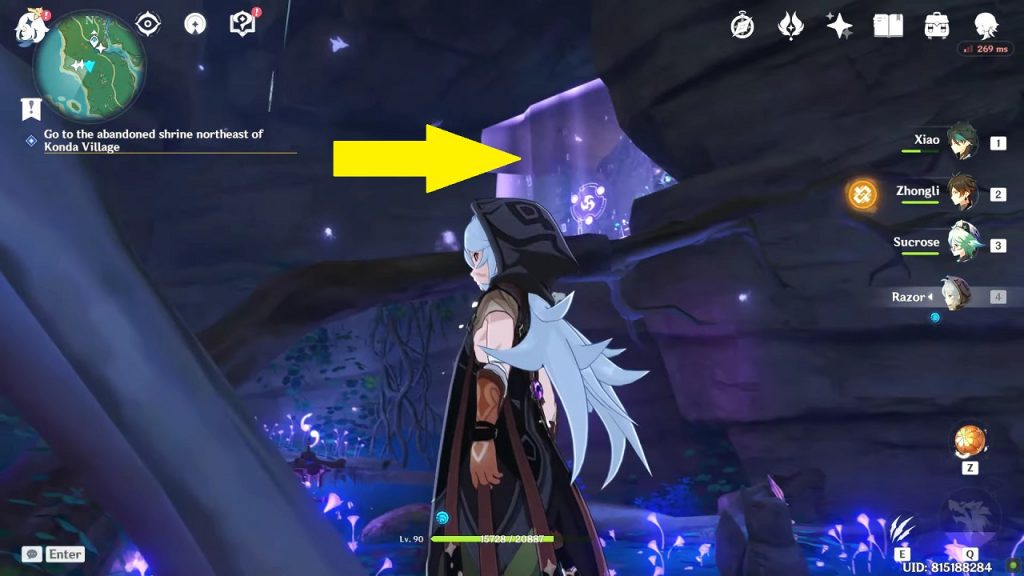
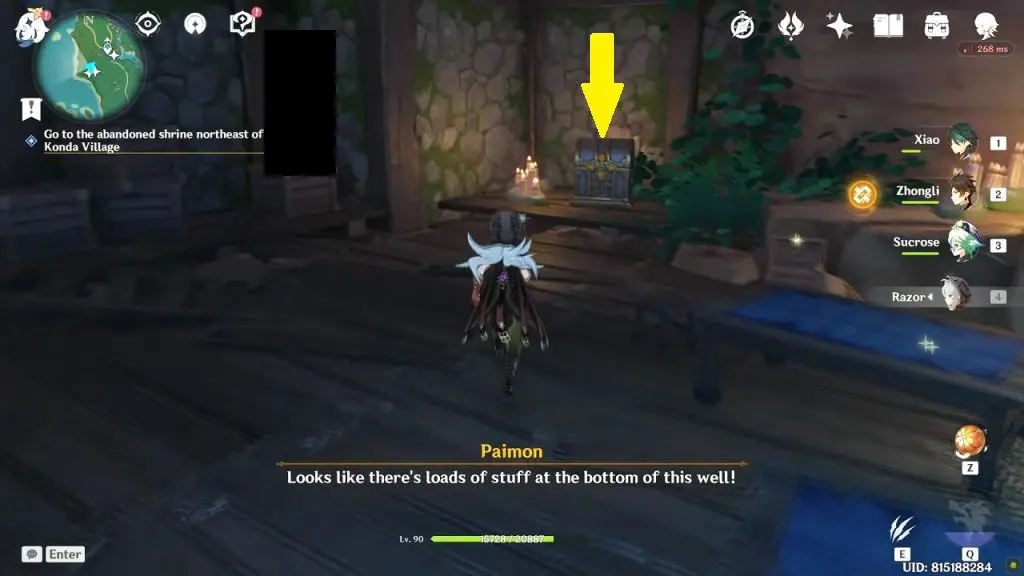
When you reach the point where you destroy the barrier, you can see an electro barrier on the sidewall (See the second picture below). Summon electrogranum and use it to cross the barrier and then climb up the thick plant vines. Up there you will find an iron gate. Open the gate and go inside. Inside the room, you will find the luxurious chest at the corner as shown in the third picture below.
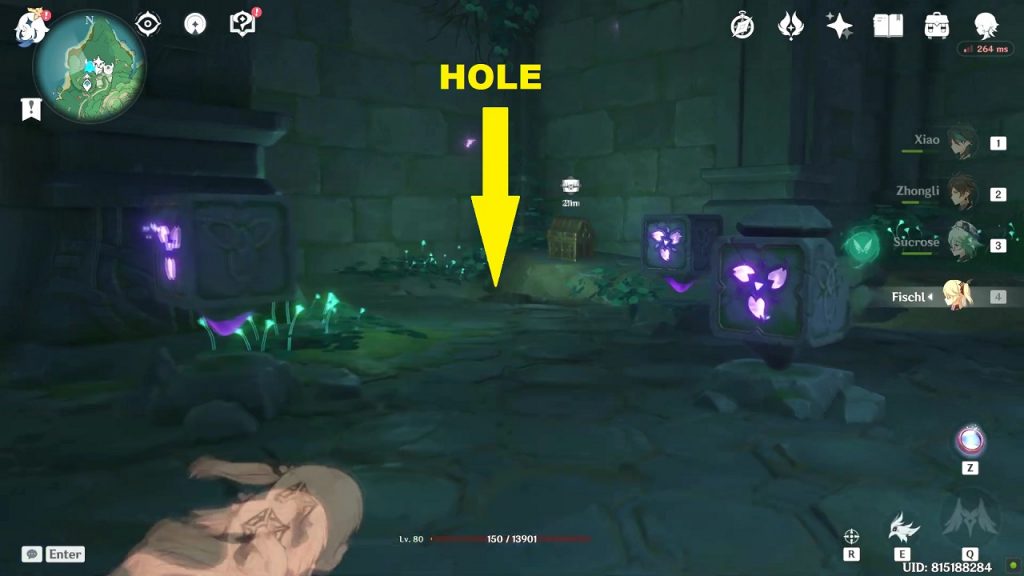
Luxurious Chest 15/45: Araumi Underground (Narukami Island)
the third Luxurious chest is under the broken tower in Araumi. You will reach underground while doing the Cleansing Defilement world quest. Check the link below to see how to reach Araumi underground.
How to reach Araumi Underground
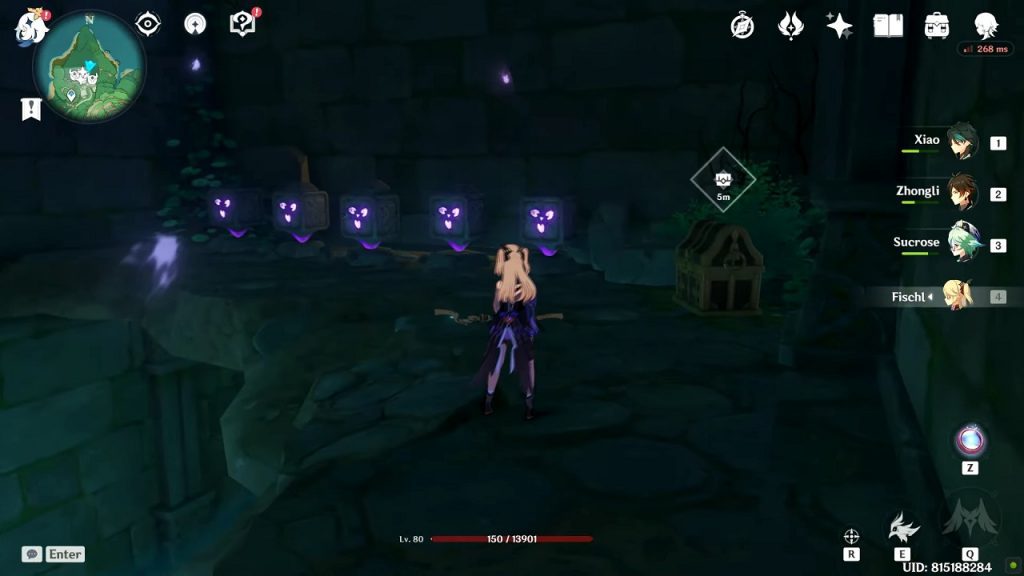
Near the location where you destroy the barrier, you will find a rotating block barrier. Make the glowing side of the block face the same direction to make a hole open up in the ground as shown in the second picture below. Jump down the hole and swim until you reach a stair. Climb the stair, where you will find another block puzzle. make the shining side of the blocks turn north for the water to drain out. Now go back and summon electrogranum from a room that became accessible after the water drained out. Summon electrogranum and use it to cross an electro barrier for getting to the luxurious chest. You can cross the barrier only after reaching Sakura level 17.
Luxurious Chest 16/45: Araumi Underground Domain (Narukami Island)
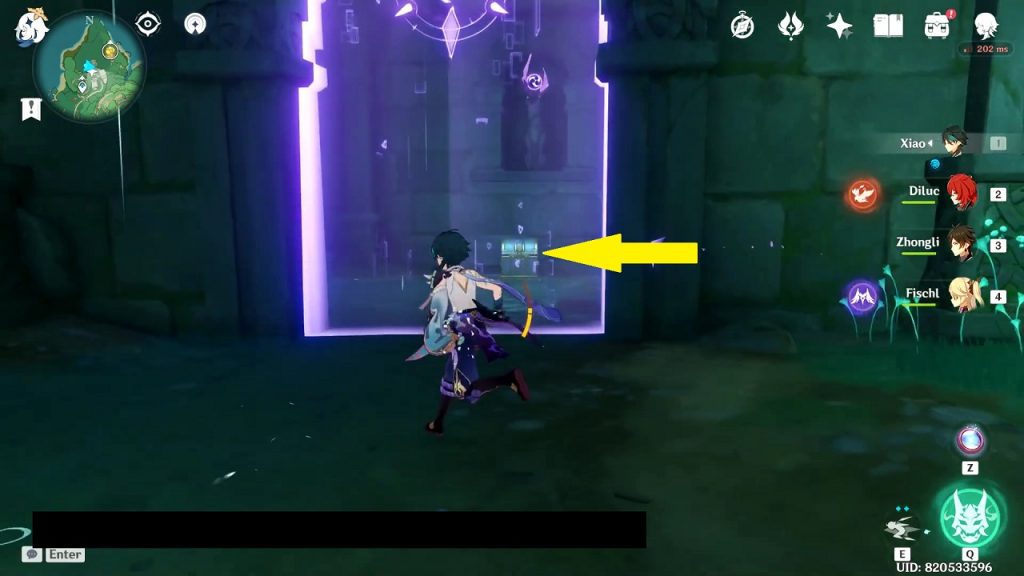
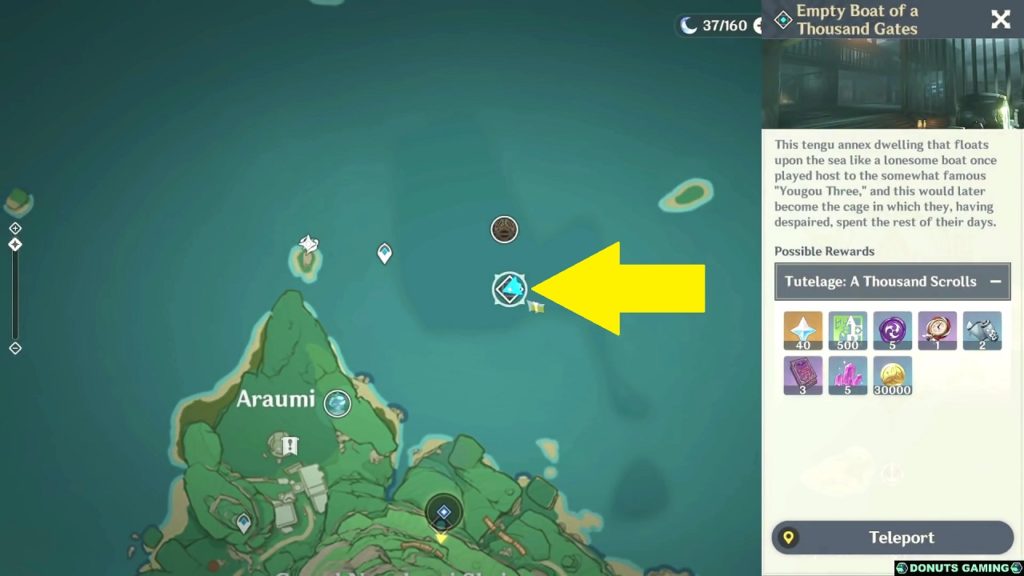
You will get a hidden luxury chest in Araumi underground upon unlocking ‘Empty Boat of a Thousand Gates’ Domain. The chest will appear in front of the Domain door after it is unlocked. Check the link below to see how to unlock the ‘Empty Boat of a Thousand Gates’ Domain.
How to unlock ‘Empty Boat of a Thousand Gates’ Domain
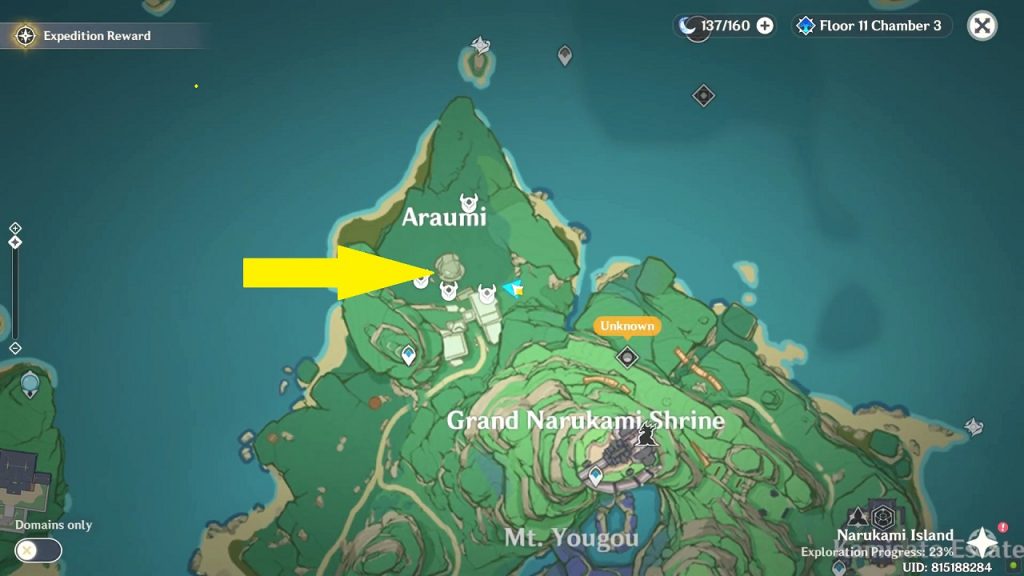
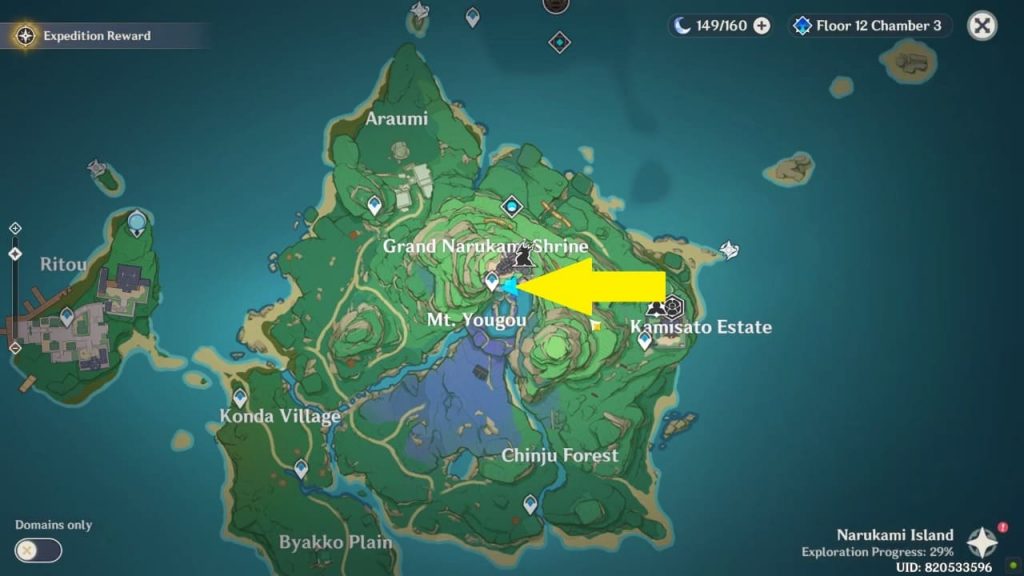
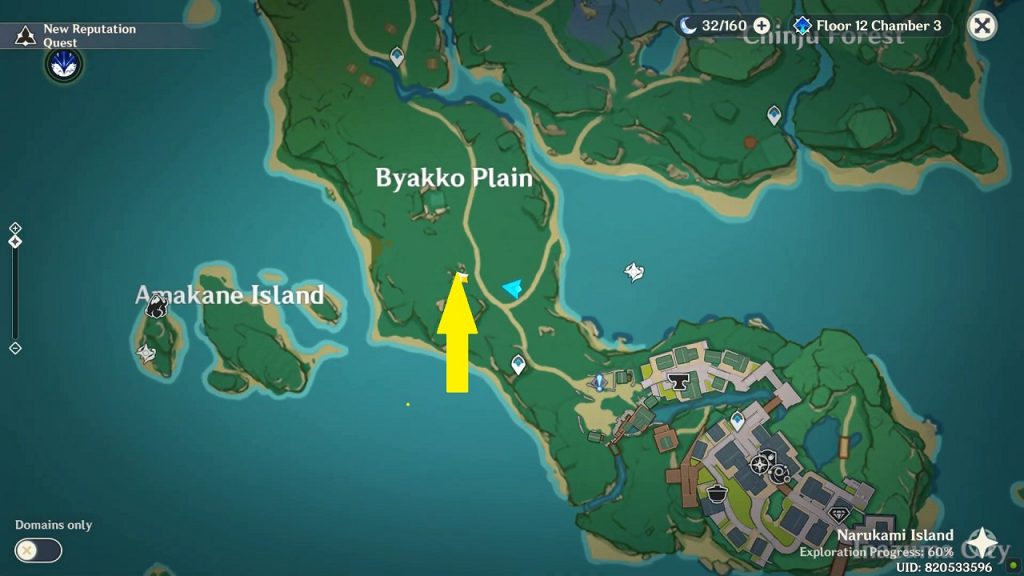
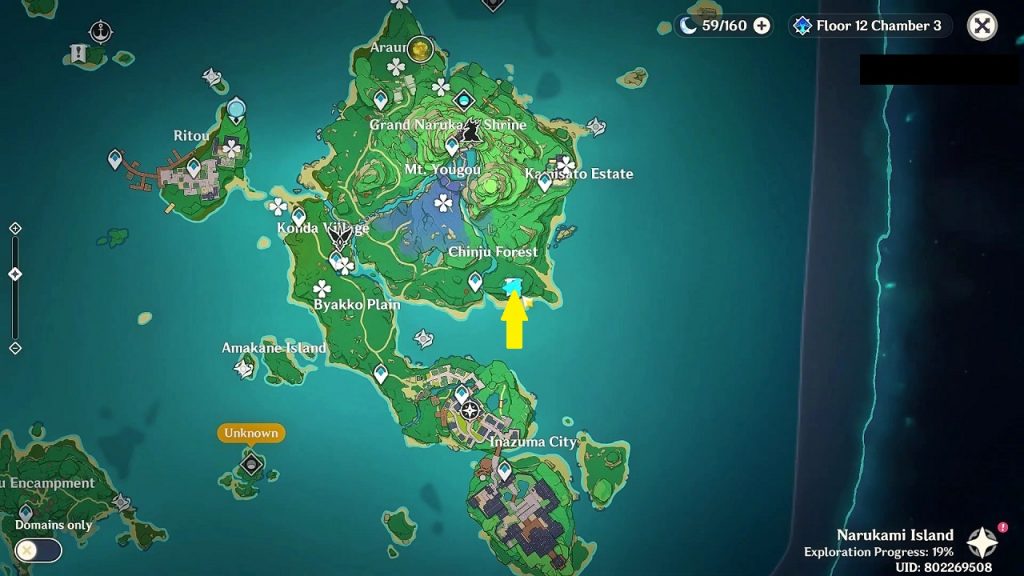
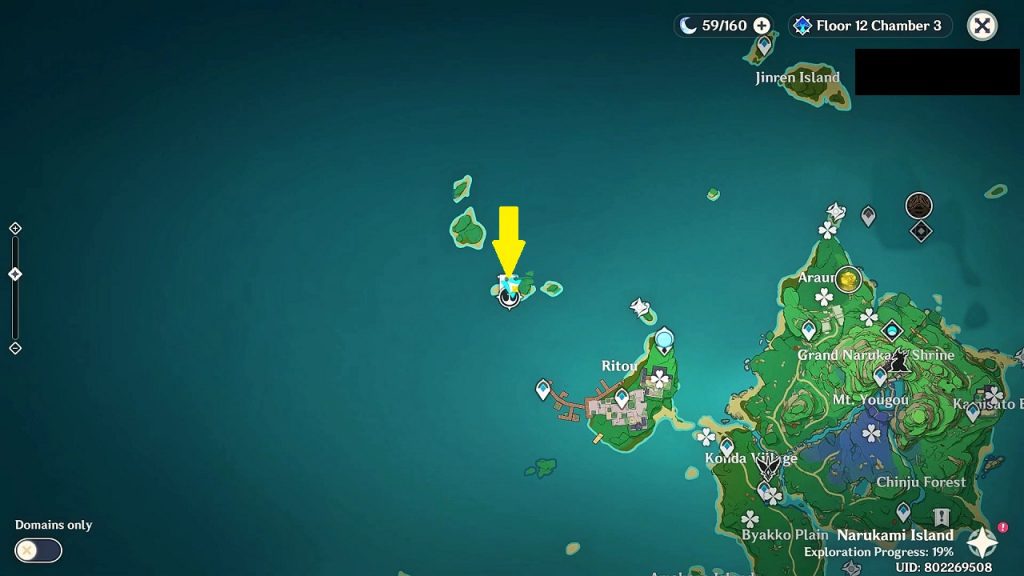
Luxurious Chest 17/45: Mt. Yougou (Narukami Island)
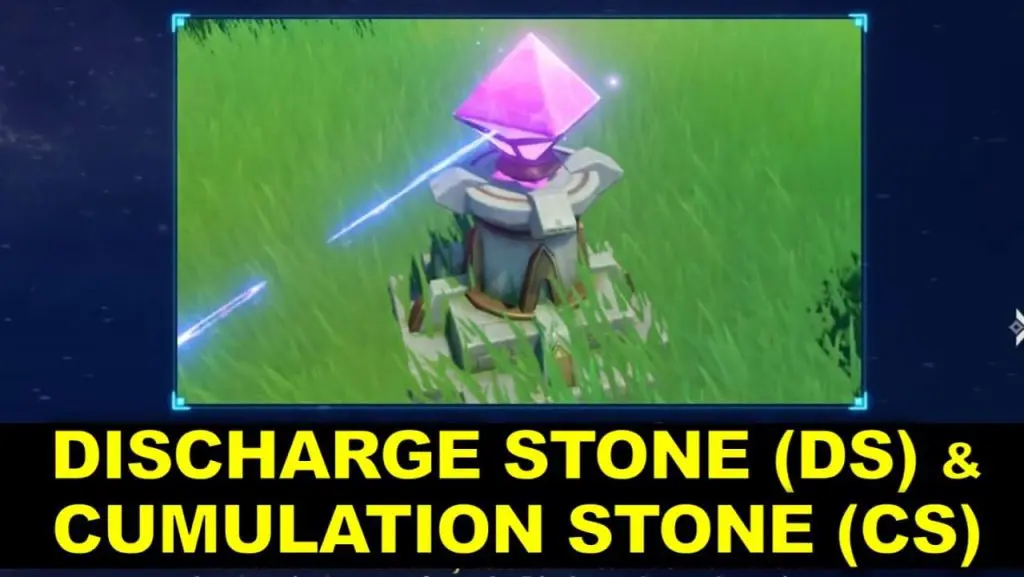
There is a relay stone puzzle in Mt. Yougou in Narukami Island of Genshin Impact 2.0 (Inazuma Region). Solving a relay stone puzzle will grant you access to a Luxurious Chest.
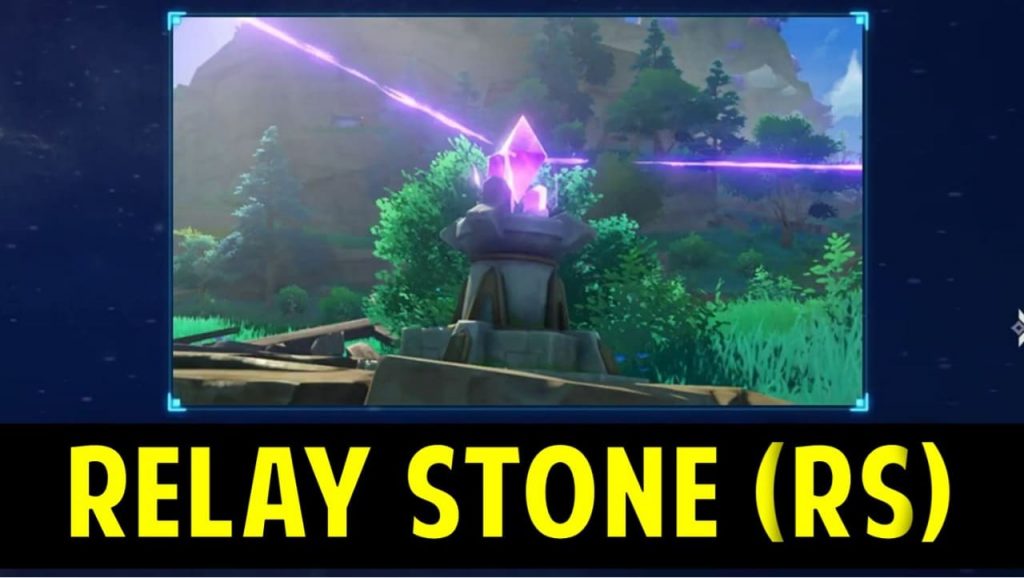
How to solve Relay Stone Puzzles?
A relay stone puzzle has 3 components:
DISCHARGE STONE (DS): Shoots a harmless electric current.
CUMULATION STONE (CS): Absorbs the electrical energy from Discharge Stone.
RELAY STONES (RS): Conducts the current released by Discharge Stone.
To solve the puzzle you must complete the circuit: the current from Discharge Stone must reach the Cumulation Stone. You’ll have to use the relay stones to complete the circuit. There will be multiple relay stones in the area which can be picked-up and positioned anywhere. To solve the puzzle, you must position the relay stones in such a way that the current released from Discharge Stone reaches the Cumulation Stone. After the circuit is complete, an exquisite chest will appear and its loot will be yours.
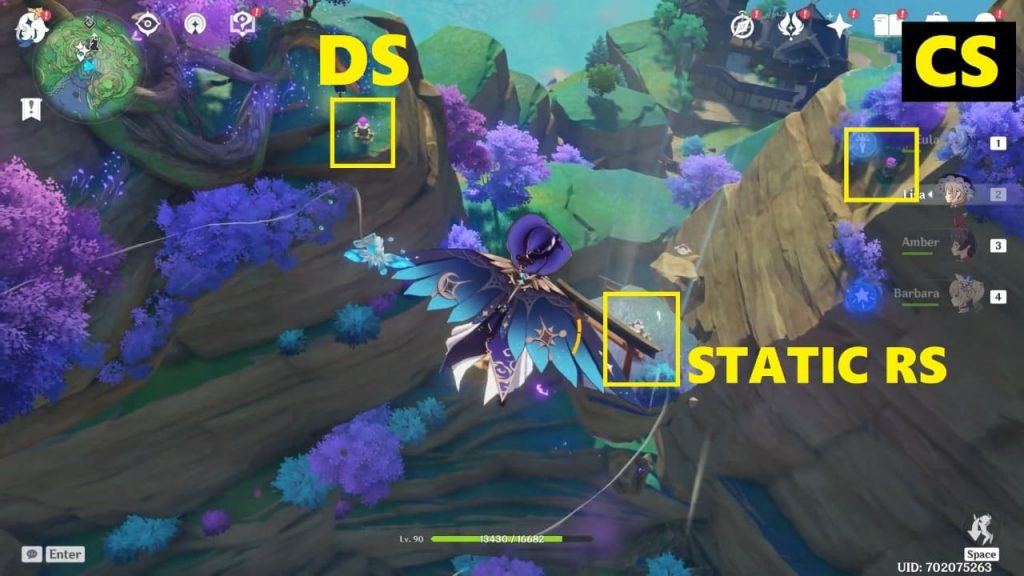
Mt. Yougou Relay Stone Puzzle
Check the images below to see the location and solution of this relay stone puzzle. There are 2 RELAY STONES here: one is static (can’t be moved) and the other one (near static RS) can be picked-up. There are 2-steps for completing this puzzle.
STEP 1: Connect the Discharge Stone with Static Relay Stone.
Pick-up the Relay Stone and place it mid-air between Discharge Stone and Static Relay Stone. This will connect the 2 stones. [NOTE: You’ll see a SEELIE mid-air between the two stones. This is a hint showing you where you should place the Relay Stone].
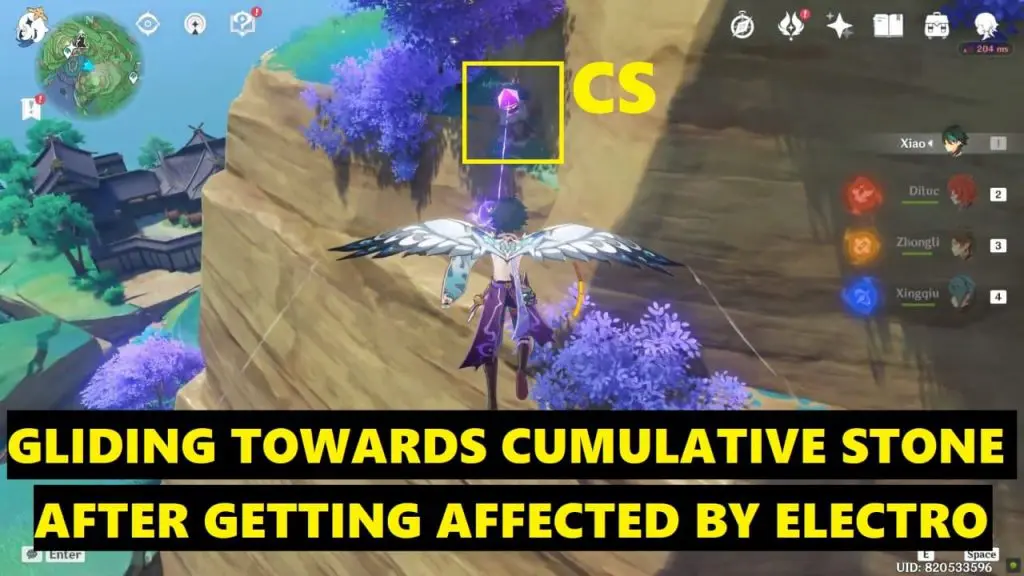
STEP 2: Connect the Static Relay Stone with Cumulation Stone.
For this step, you must yourself act as a Relay Stone [NOTE: You can act as a connector/conductor if you’re affected by Electro]. First, get hit by the shockwave static relay stone is producing so that you get affected by Electro. Now, glide towards the Cumulation Stone and stay mid-air (where the SEELIE is) to connect the two stones. Once the connection is established and the circuit is complete the exquisite chest will spawn near the static relay stone. Go and Loot it!


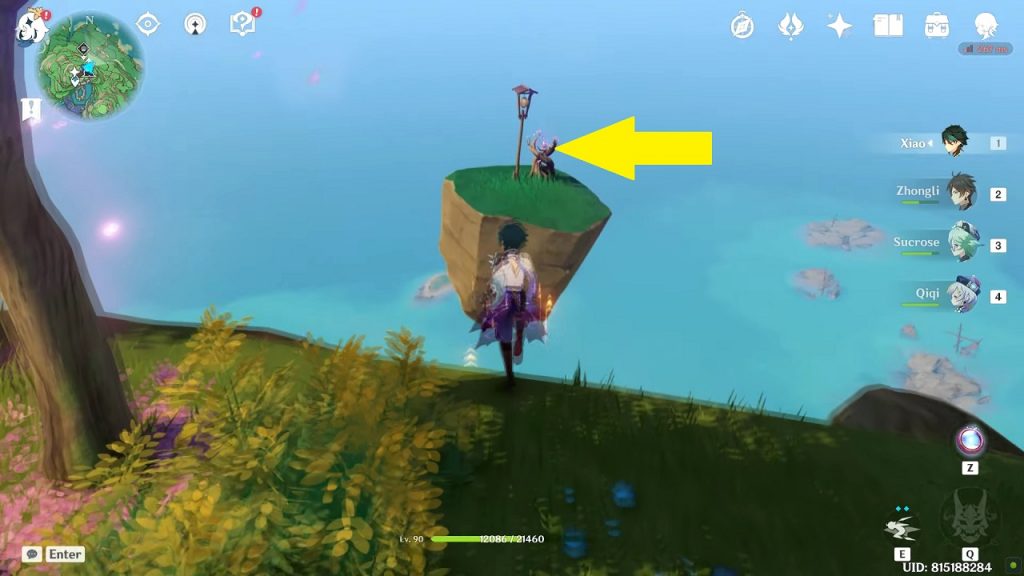
Luxurious Chest 18/45: Iwakura Out (Narukami Island)
Iwakura Out is a secret achievement in Genshin Impact 2.0 that you get by defeating all Iwakura swordsmen in the Inazuma region. You will also get a hidden luxurious chest on eliminating the entire Iwakura clan. Check the link below for all 6 Iwakura Swordsmen.
Location of 6 Iwakura Swordsmen
After you have defeated all the six Iwakura Swordsmen, go to the giant rock at the south of Byakko Plain. There you will find the last two remaining Iwakuma clan swordsmen. Eliminate them to get Iwakura Out Achievement. You will get two swords after the fight. Place the swords on the blade mounds in front of the rock and a hidden luxurious chest will appear. Open it and claim the rewards.

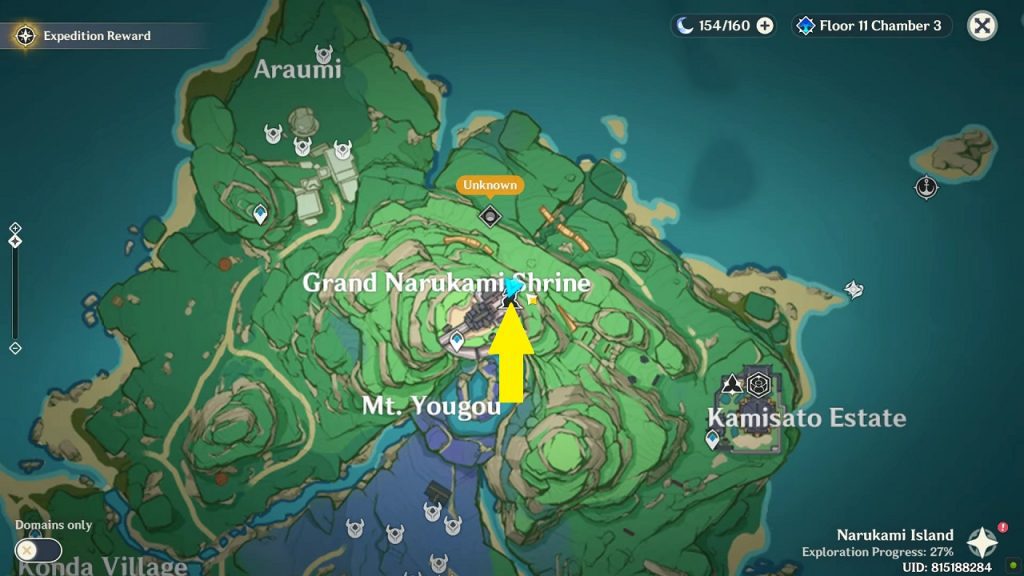
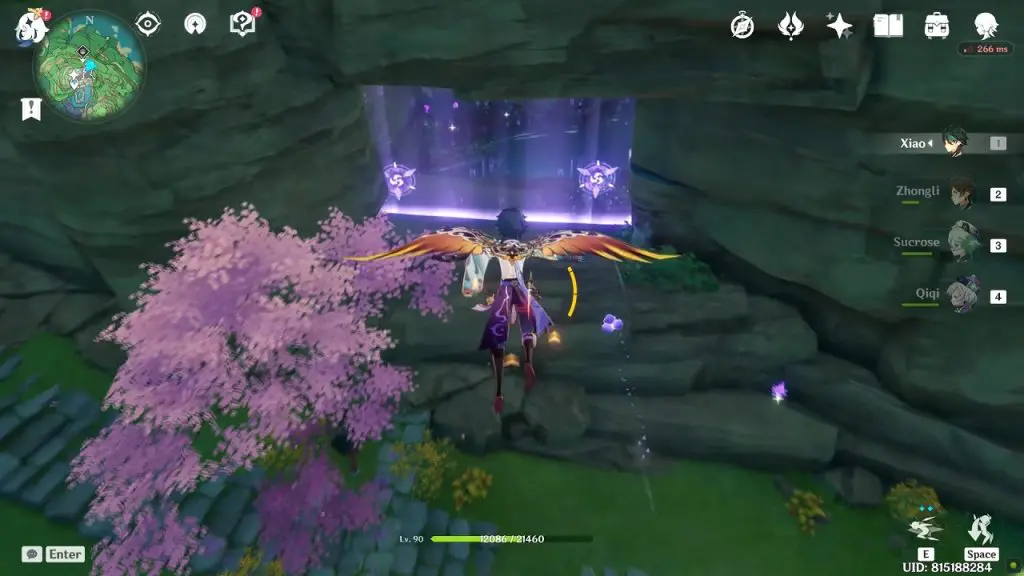
Luxurious Chest 19/45: Mt. Yougou Barrier (Narukami Island)
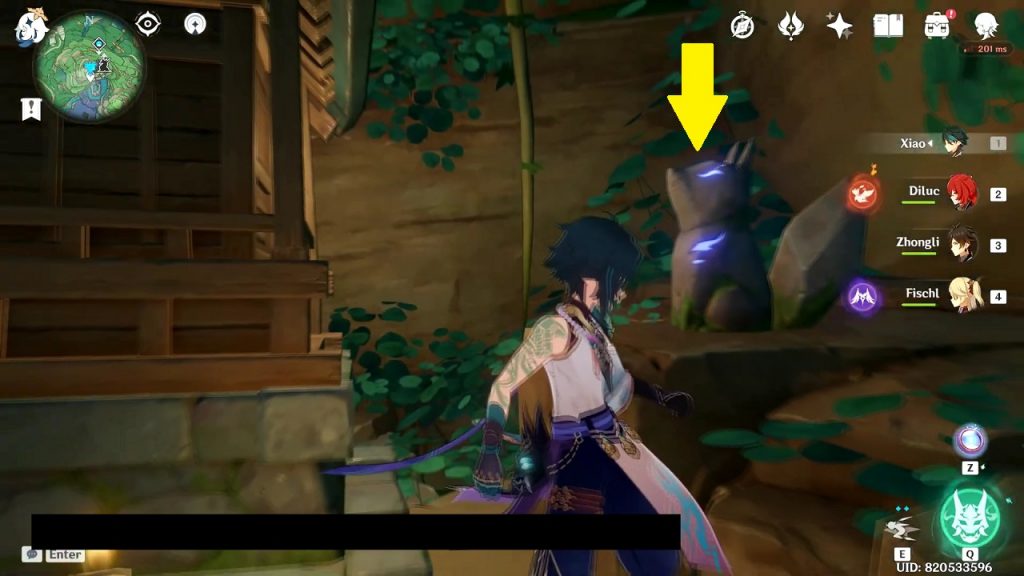
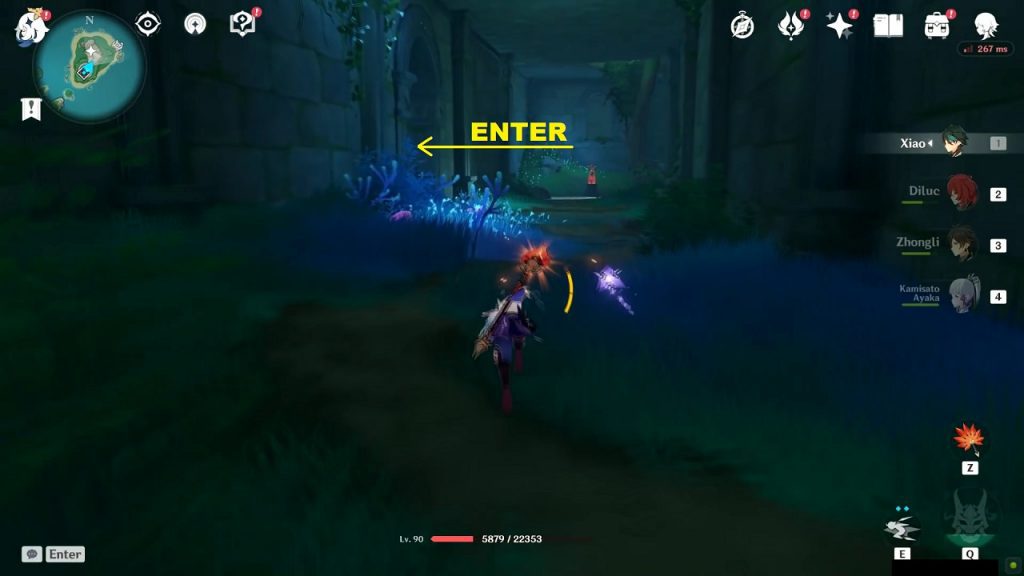
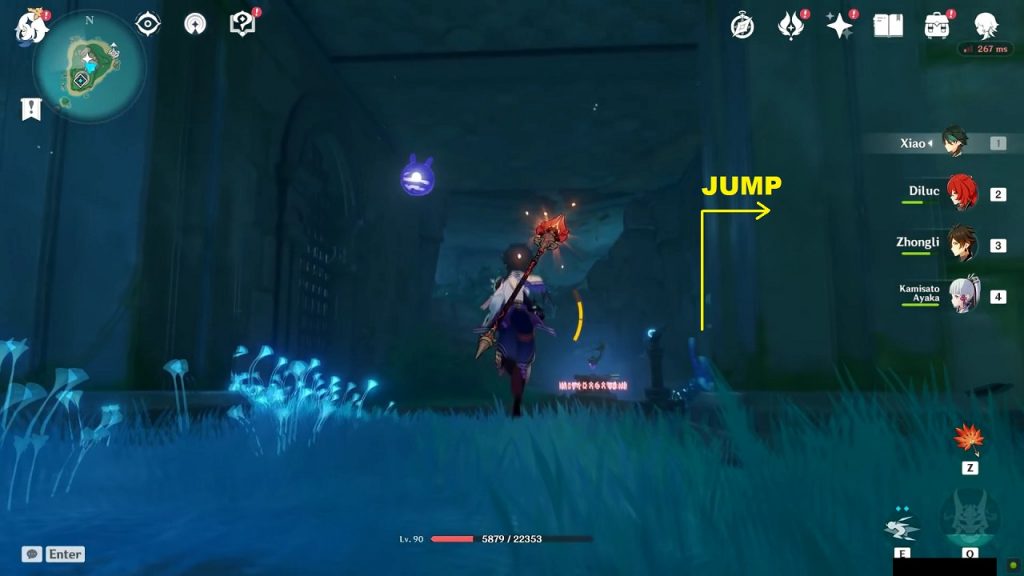
From the backside of the Grand Narukami Shrine jump to the floating land with the electrogranum plant. Summon electrogranum and jump down towards the thunder barrier. Level 17 Sakura is required to cross the barrier. You can get a luxurious chest after crossing the barrier. The chest is hidden. You need to go behind the shrine and observe the fox statue with a memento lens for the luxurious chest to appear.
Luxurious Chest 20/45: Shrine of Depths (Narukami Island)
There are two Shrine of Depths on Narukami island. One is at the southeast of Chinju Forest at location as shown in the picture below. You will get a luxurious chest inside the shrine. Click here to see how to get Shrine of Depths Keys.

Luxurious Chest 21/45: Shrine of Depths (Narukami Island)
You will find the second Shrine of Depths of Narukami Island on a small island on the north side, northeast of Ritou at the location as shown in the picture below. You will get a luxurious chest inside the shrine. Click here to see how to get Shrine of Depths Keys.
Luxurious Chest 22/45: Seiraimaru Ship (Seirai Island)
You will find this chest at the bottom-most level of the Seiraimaru Ship. Click here to see how to reach the bottom level of the ship. Here you will find glowing tiles on the floor. You will also see a locked door that requires an Intact Key to open. You will find a small hole on the floor with a common chest inside it as shown in the picture below. This common chest contains the Intact key. Use the key to open the door on the western end of the ship. Inside this newly opened room, you will find a sealed Luxurious chest with four rotating helms around it. Rotate the helms to make the arrows face each other. This will unlock the luxurious chest.
Luxurious Chest 23/45: Seiraimaru Ship Underground (Seirai Island)
You will find this chest at the underground portion you reach through the Seiraimaru Ship. Click here to see how to reach the seiraimaru ship underground. Here you will need to solve a relay stone puzzle and you will get the luxurious chest as a reward. First I will explain, how the relay stone puzzles work followed by the solution for this relay stone puzzle.
How Relay Stone Puzzles Work?
A relay stone puzzle has 3 components:
DISCHARGE STONE (DS): Shoots a harmless electric current.
CUMULATION STONE (CS): Absorbs the electrical energy from Discharge Stone.
RELAY STONES (RS): Conducts the current released by Discharge Stone.
To solve the puzzle you must complete the circuit: the current from Discharge Stone must reach the Cumulation Stone. You’ll have to use the relay stones to complete the circuit. There will be multiple relay stones in the area which can be picked up and positioned anywhere. To solve the puzzle, you must position the relay stones in such a way that the current released from Discharge Stone reaches the Cumulation Stone. After the circuit is complete, an exquisite chest will appear and its loot will be yours. [NOTE: Electro-Seelie can also act as a relay stone. Your character, if affected by Electro, can also act as a relay stone.]
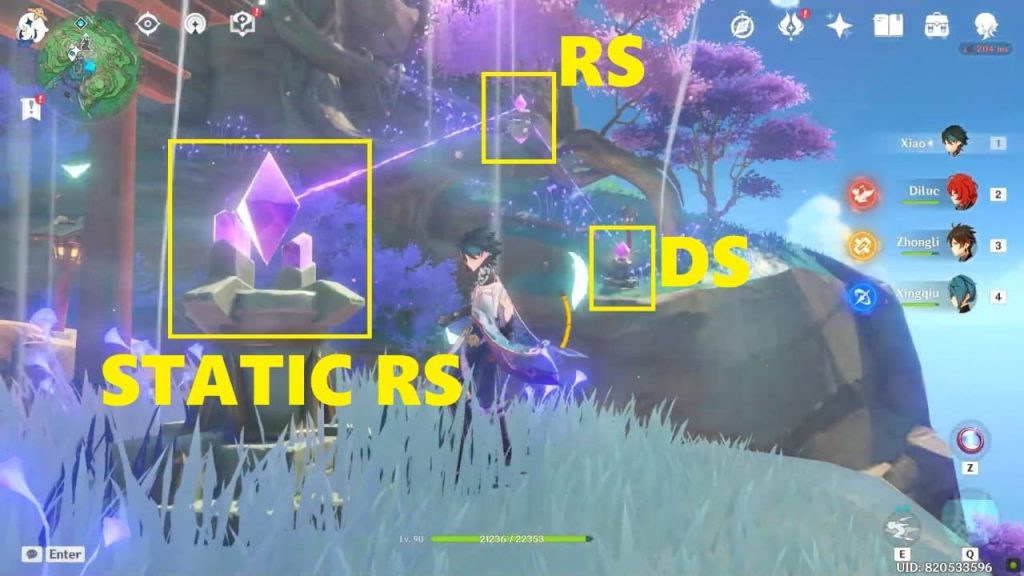
Seiraimaru Ship Relay Stone Puzzle
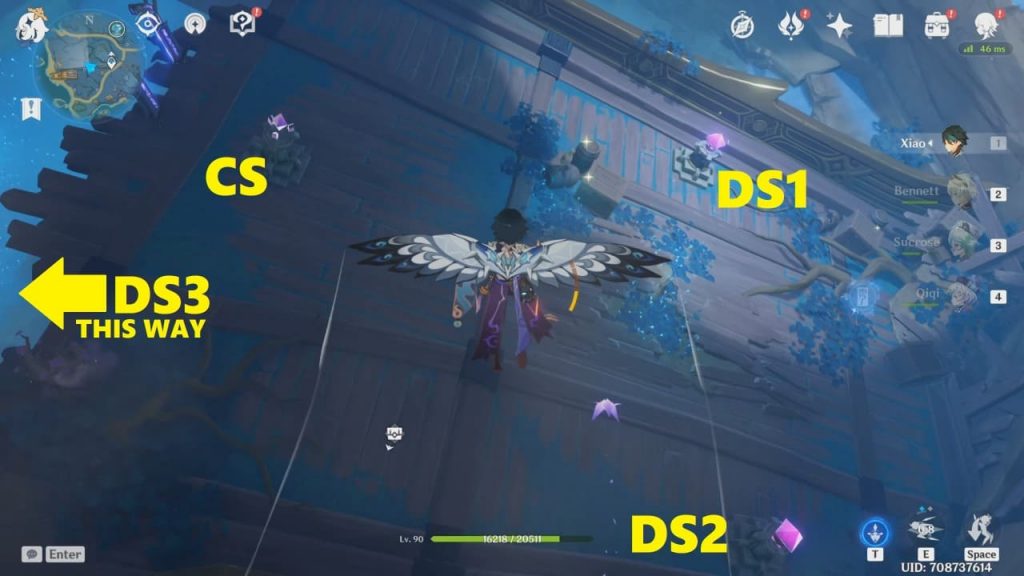
Go through the broken wall as explained in the previous section, to reach the underground area. You’ll find a wrecked ship at the bottom of this underground area. There are 3 Discharge stones (DS), 1 Cumulation Stone (CS), and 3 Relay Stones (RS) in this puzzle. To complete the puzzle you need to connect the CS to all three DS. The discharge stones and the cumulation stone are on the underground ship and are pretty easy to spot. The 3 relay stones are scattered around in the area surrounding the underground ship. Collect these relay stones first and then head to the ship to complete the puzzle.
Location of the 3 Relay Stones
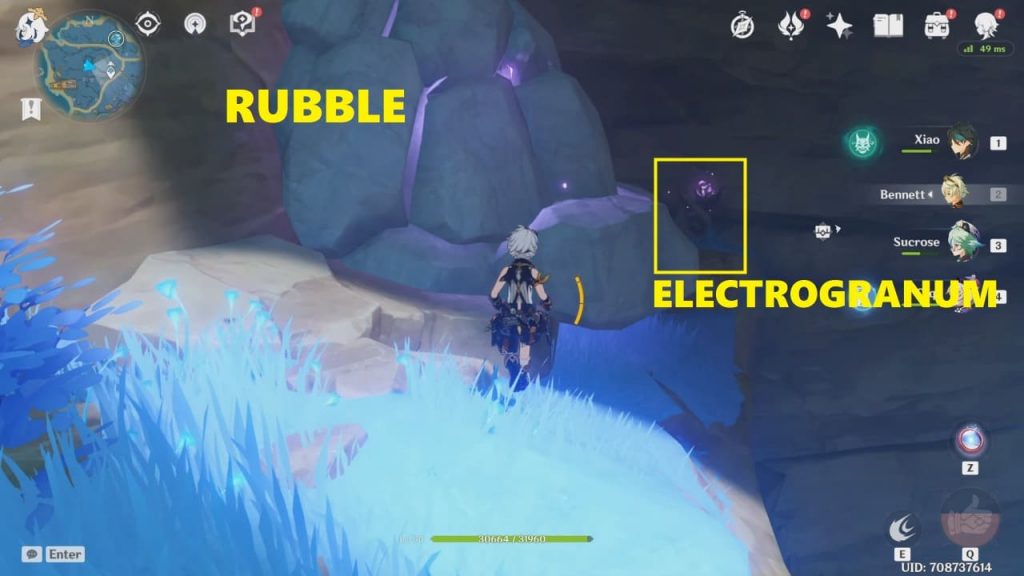
The three relay stones are present on the cliffs surrounding the wrecked ship. On one of the cliffs, you’ll see an electrogranum plant. A relay stone is hidden beneath the rubble of rocks next to the electrogranum plant. Smash the rubble to reveal the relay stone and pick it up. Then summon an electrogranum (you’ll need it to cross the energy shield).
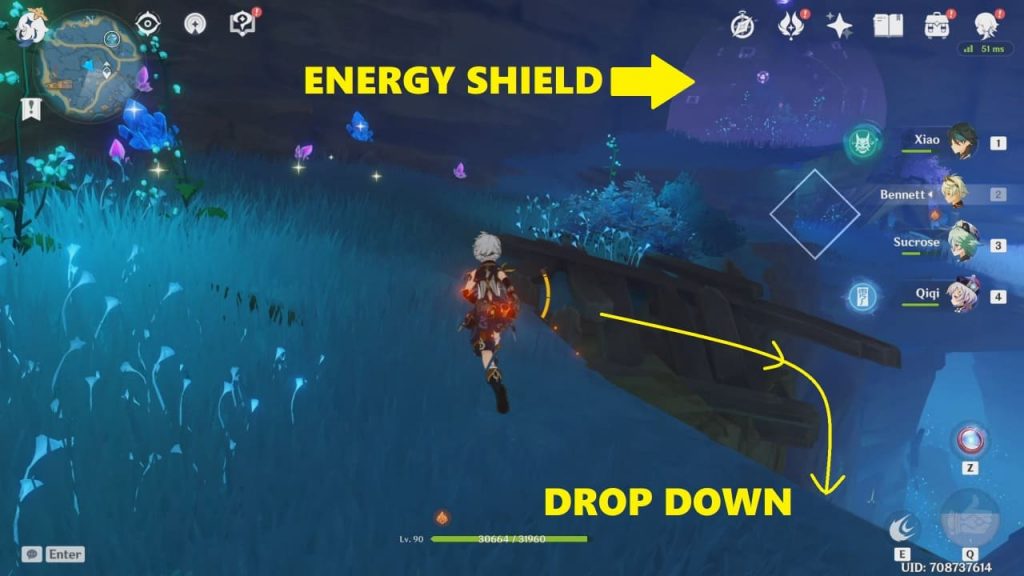
You can easily spot 2 energy shields in the nearby cliffs. There is a relay stone under both these energy shields. Enter these energy shields and collect both the relay stones. You need to be charged with electro to cross the energy shield. Summon electrogranum (from the electrogranum plant near relay stone 1) before entering the energy shields. After collecting all the three relay stones, head to the wrecked ship and complete the circuit puzzle.
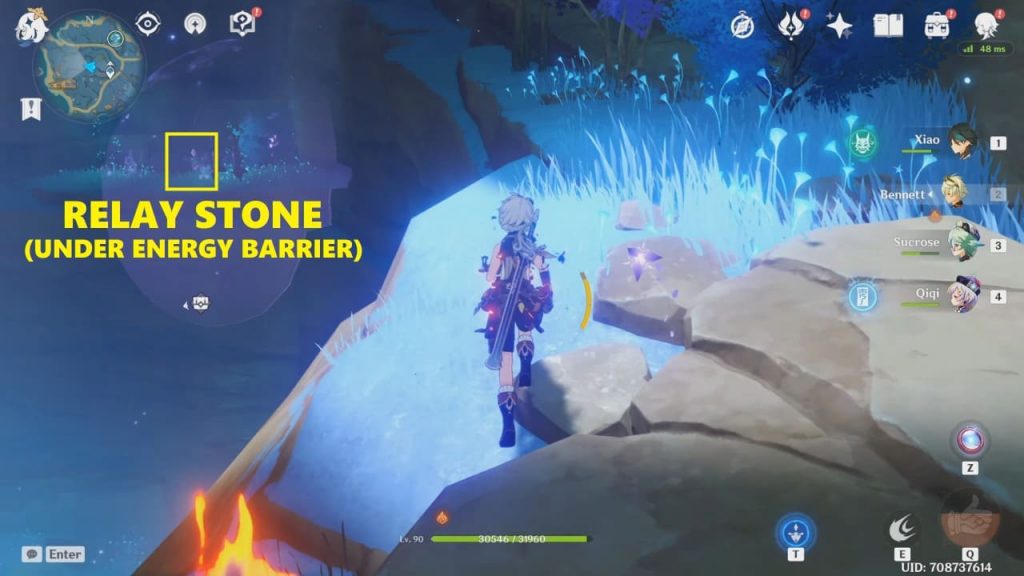
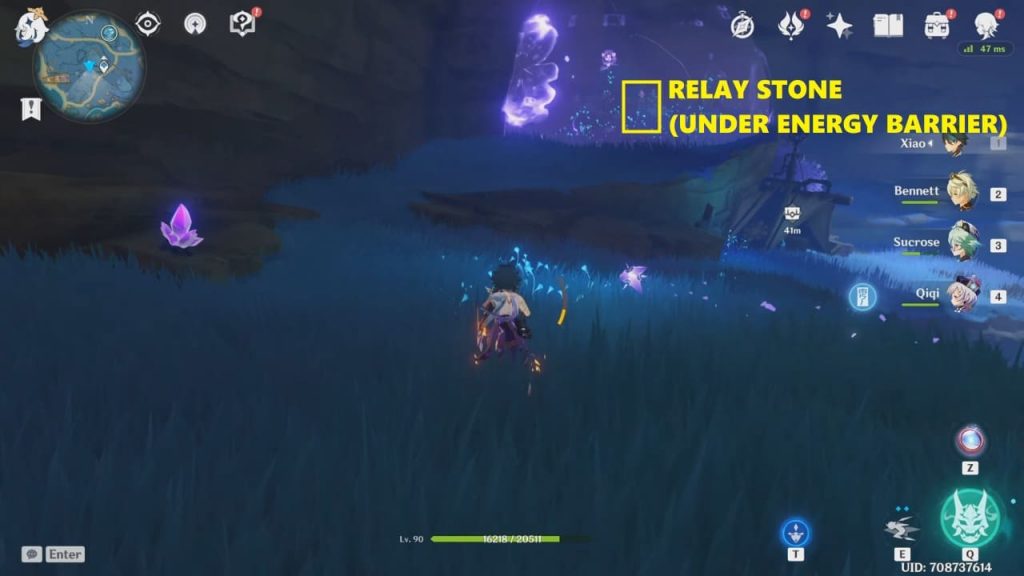
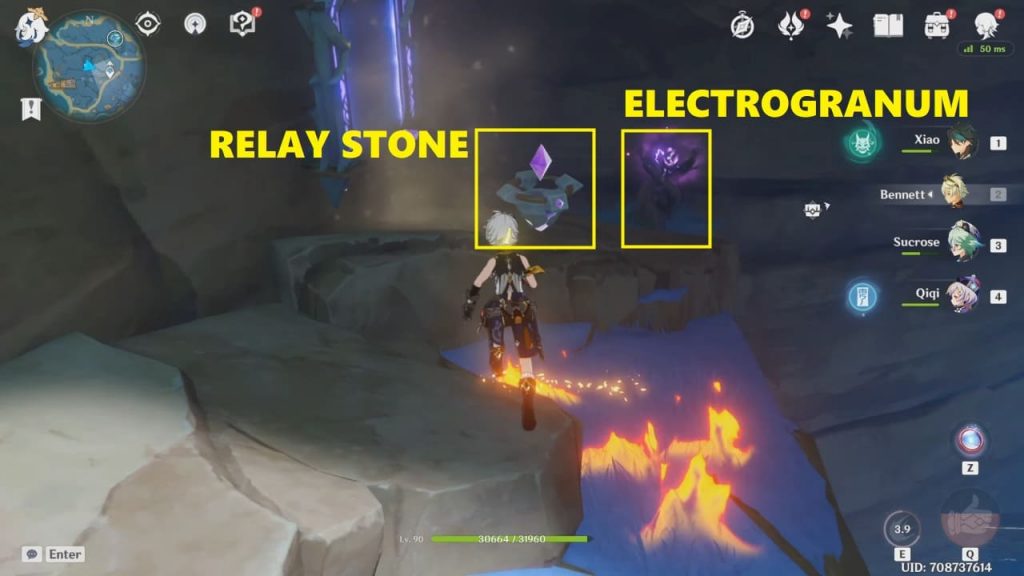
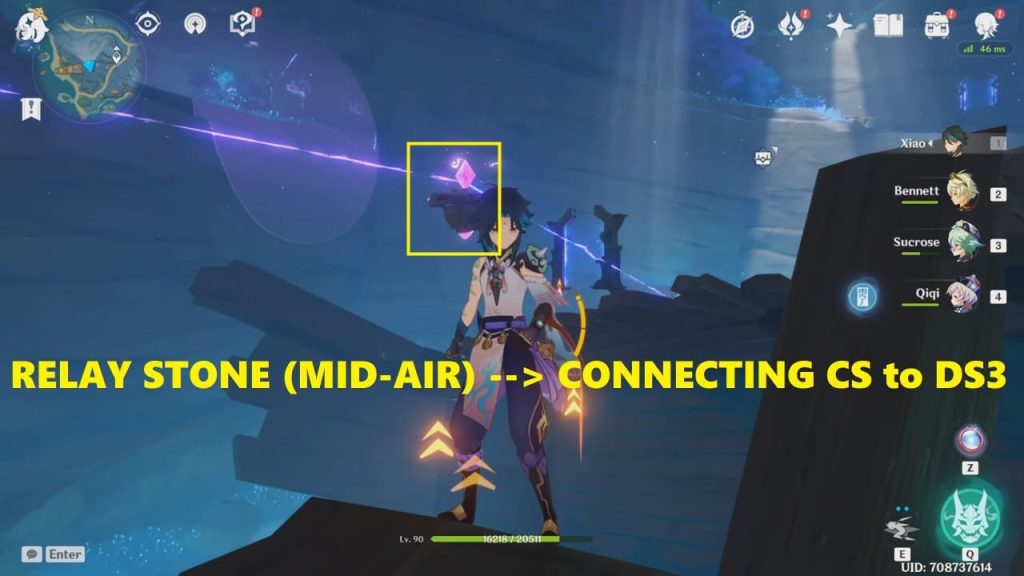
Place a relay stone between DS1 and CS to connect them. Similarly, place a relay stone between DS2 and CS. DS3 in on another half of the wrecked ship. Jump towards DS3 and place a relay stone mid-air to connect DS3 and CS. This will complete the circuit and a luxurious chest will spawn. The luxurious chest spawns in a small cave under the wrecked ship. Jump down and follow the chest marker to reach the cave and collect the luxurious chest loot.
Luxurious Chest 24,25/45: Amakumo Peak Underground (Seirai Island)
You will find two Luxurious chests in the Amakumo Peak Underwater area. Both the luxurious chests are behind a blue door at the end of the underwater area. To reach the underwater area you will also need to solve a pressure plate puzzle. Click here to see how to reach the end of the Amakumo Peak Underwater area. In the underwater area, you will eventually come to a blue door as shown in the second picture below.
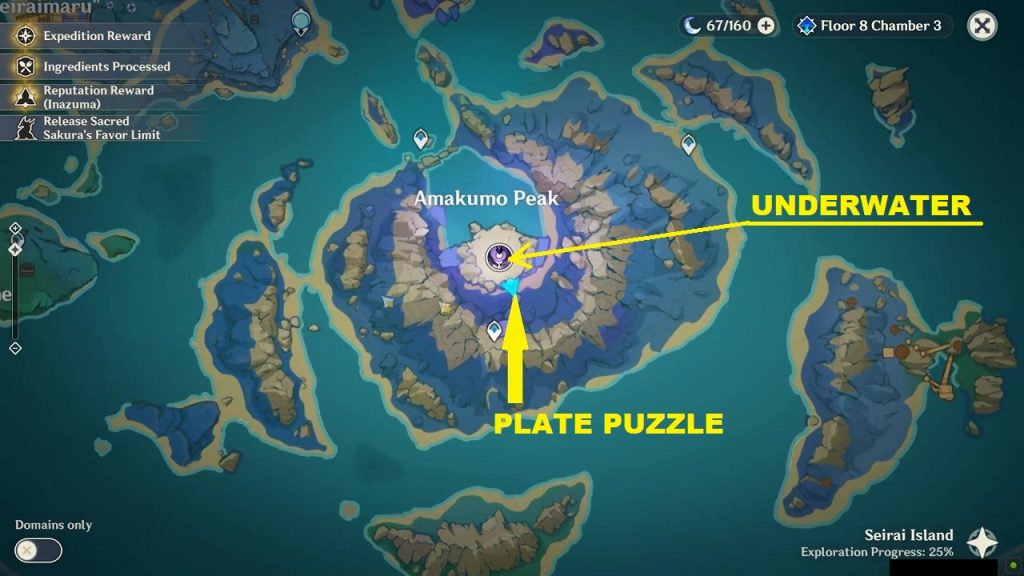
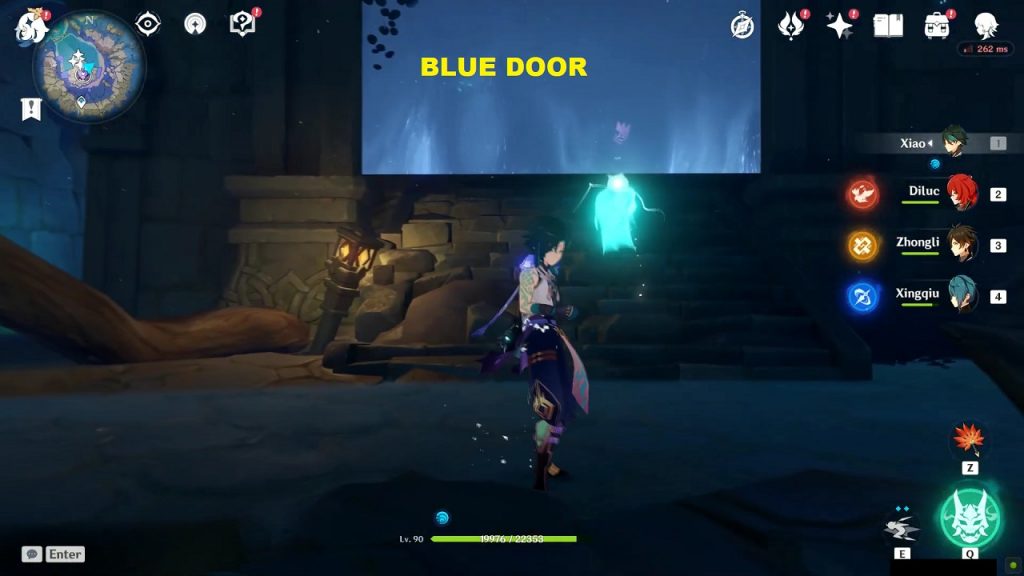
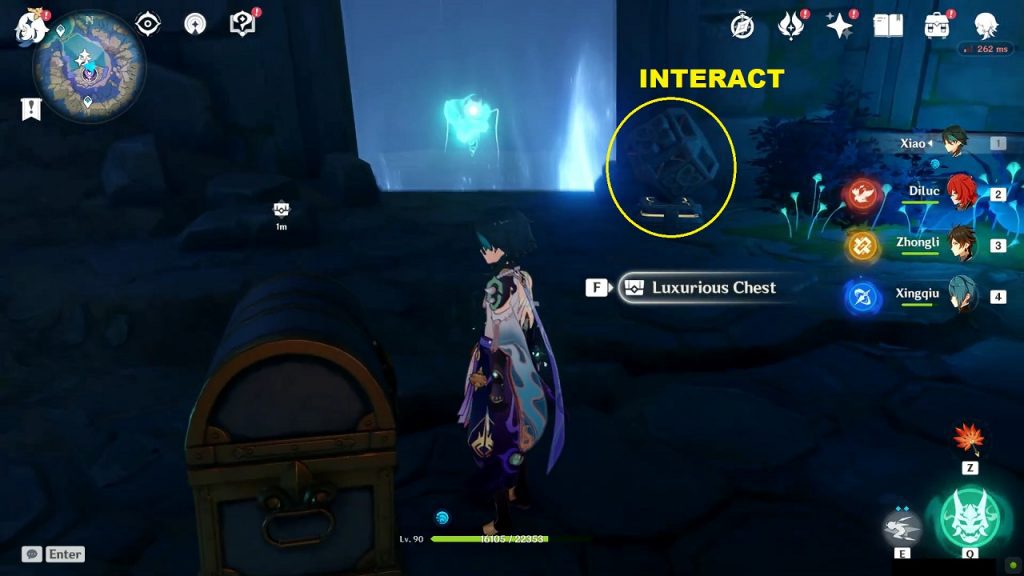
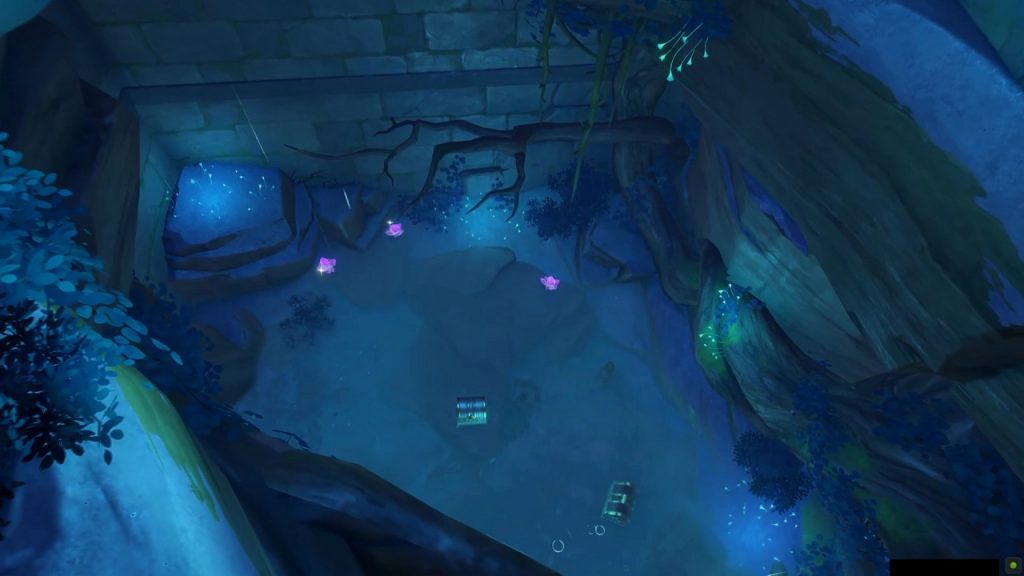
After you open the blue door, go inside the room. In this room, you will find a Luxurious chest. there will be another blue door in this room with a switch next to it as shown in the picture below. Interact with the switch to drain out the water completely. This will open the blue door as well. Draining the water will reveal a luxurious chest as the bottom. Go through the now-open blue door and jump down to reach the luxurious chest at the bottom.
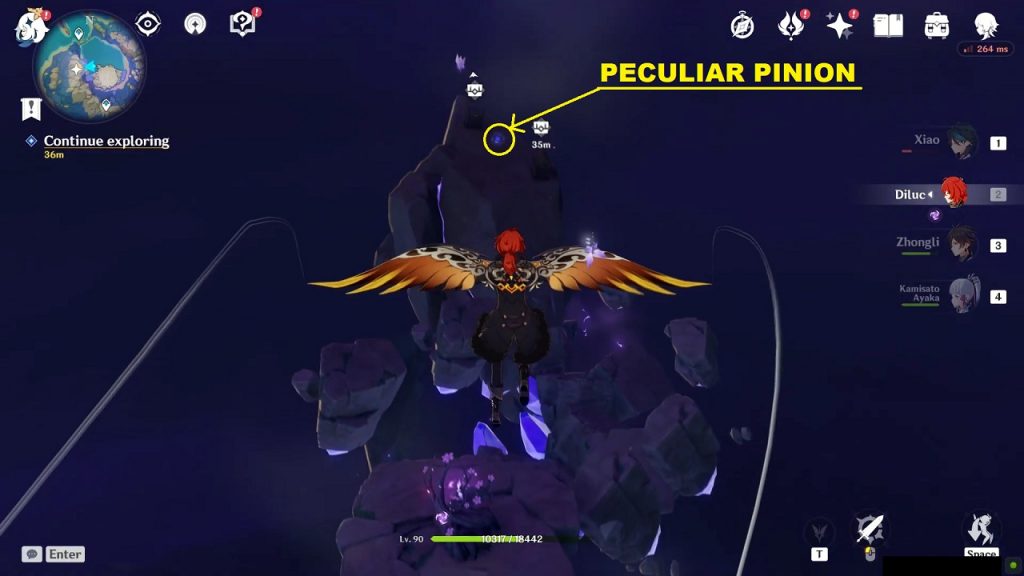
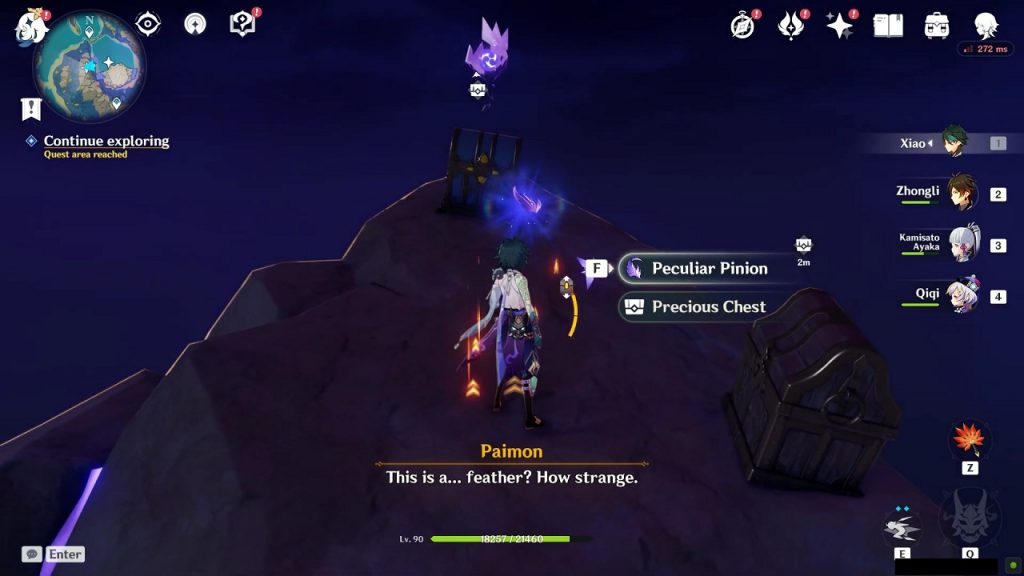
Luxurious Chest 26/45: Seirai Stormchasers (Seirai Island)
During the ‘Seirai Stormchasers Part 4’ world quest you will have to collect Peculiar Pinion. You will find the Luxurious Chest on the same platform where you find the Peculiar Pinion.

Luxurious Chest 27/45: Electro Totem Puzzle (Seirai Island)
There is a secret hidden luxurious chest that you can get on the small island in the southeast part of Seirai Island.
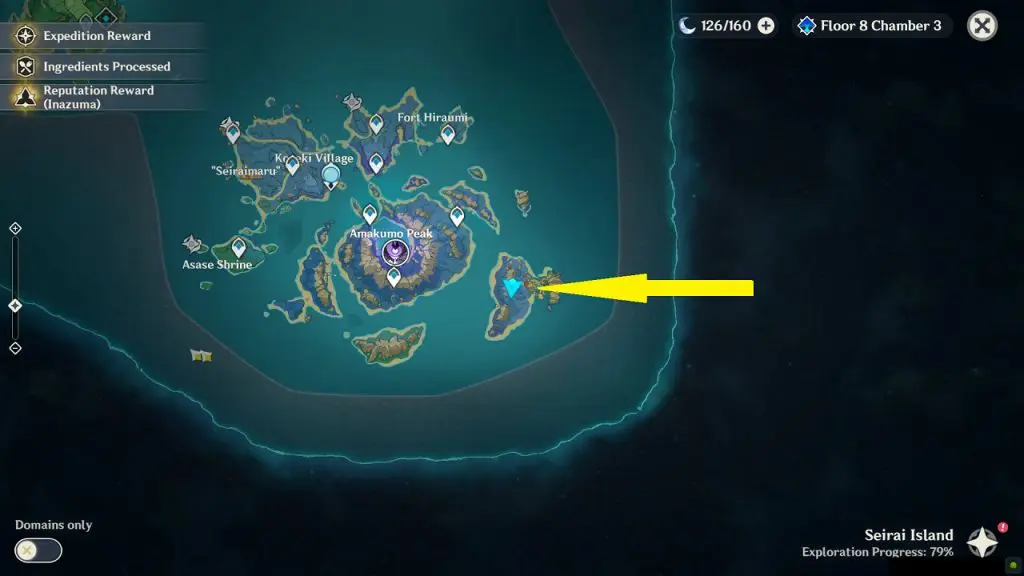
You will find three sealed electro totems at the eastern part of the small island in the southeast portion of Seirai Island. To unseal the electro totems you will need to clear three Hilicurls camps. The location of the three Hilicurls camps and electro totems is shown below.
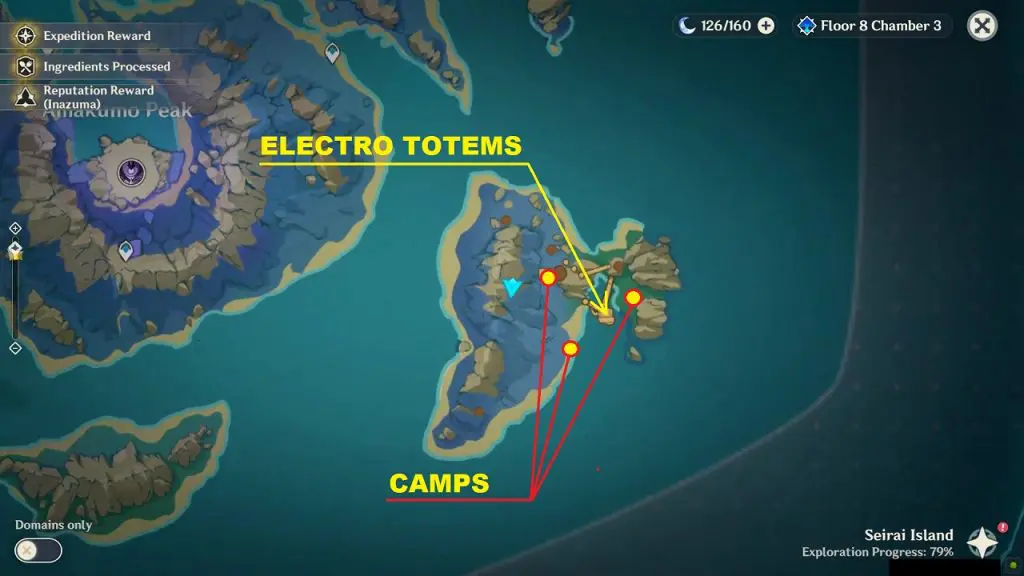

Once you have unsealed the electro totems by defeating clearing the Hilicurls camps, hit them with an electro attack to activate them. When the three electro totems are activated, a boss will appear. Defeat the boss and a luxurious chest will appear at the center of the platform with the electro totems.
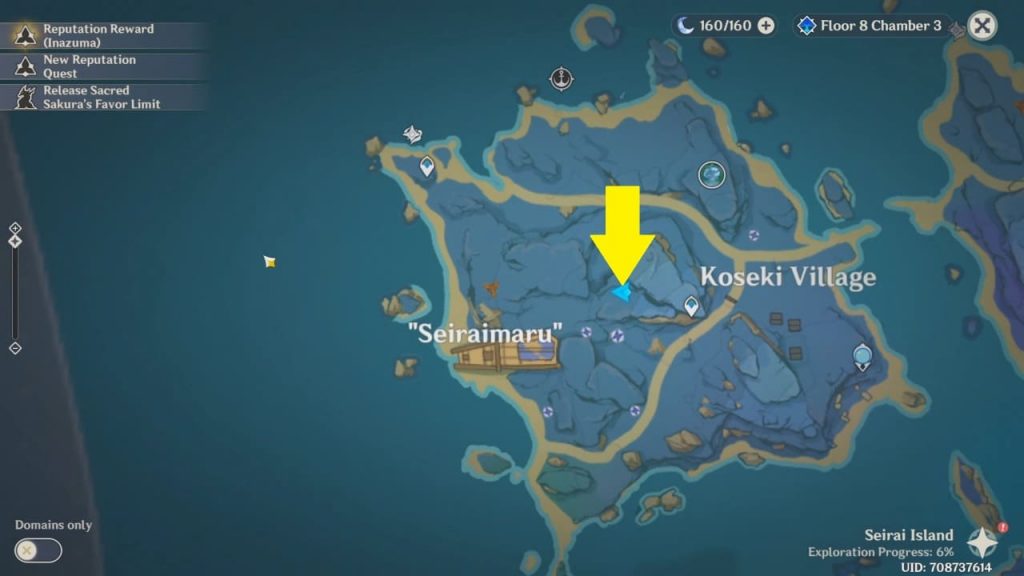
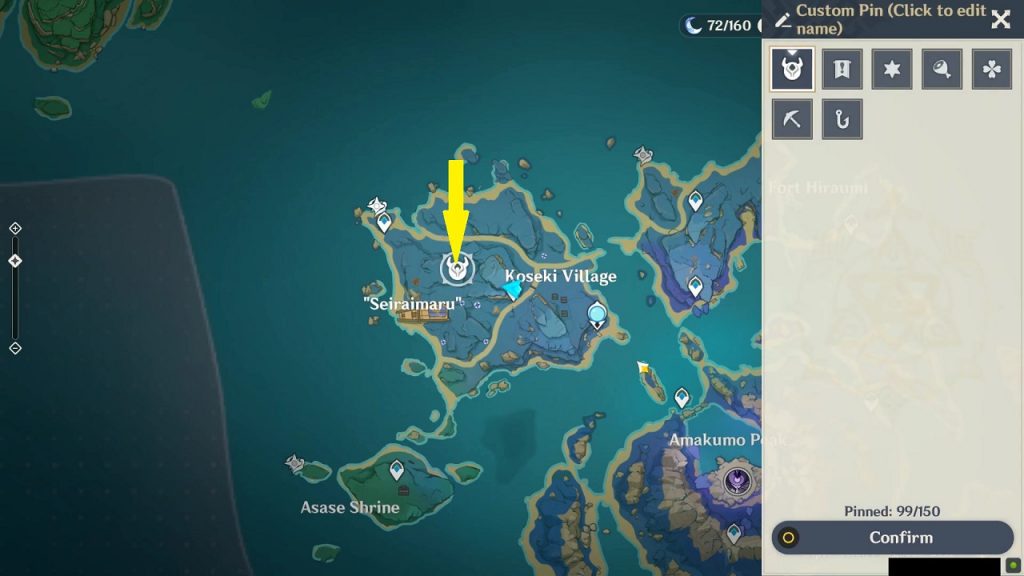
Luxurious Chest 28/45: Shrine of Depths (Seirai Island)
You will get a luxurious chest inside the Shrine of Depths at the location west of Koseki Village as shown in the picture below. Check the link to know how to get the key for the shrine.
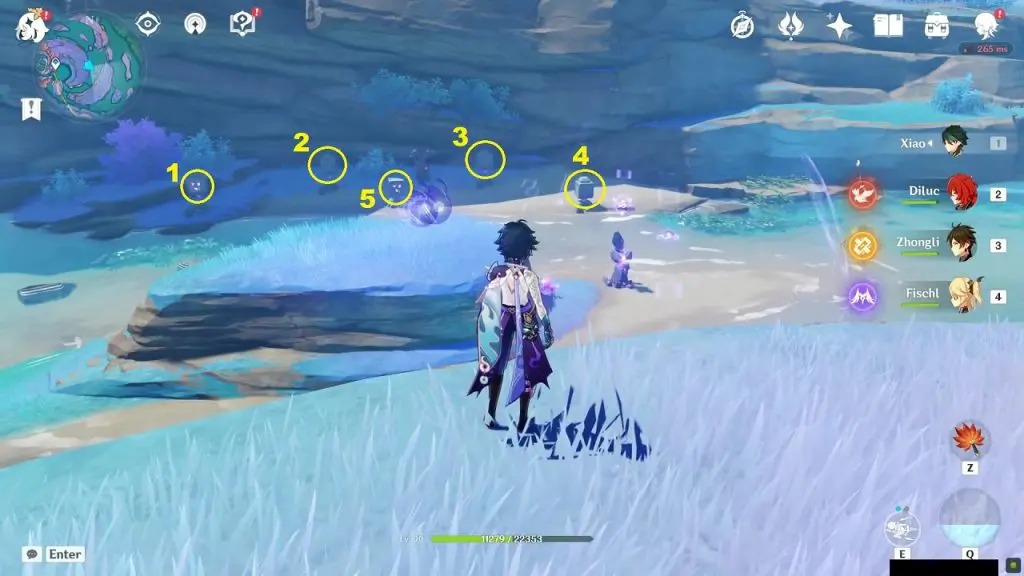
Luxurious Chest 29/45: Electro Seelie Puzzle (Watatsumi Island)
There is a hidden Luxurious chest in Sangonimiya Shrine which can be revealed by following an Electro Seelie. The Electro Seelie travels a long path and you will have to solve a few Rotating Stone Cube puzzles on the way. On reaching its destination, the Electro Seelie will reveal three hidden chests – One Luxurious and Two Precious.
Electro Seelie Starting Location
You will find the Electro Seelie on the west side of Bourou Village of Watatsumi Island at the location as shown in the picture below. At the edge of the mountain, you will find an Electro Seelie. Go near it and it will go down. Jump down the cliff and find the Electro Seelie under a tree. Keep following the Electro Seelie and after some time it will go inside a Thunder barrier and you will have to solve a Rotating Stone Cube Puzzle here.
First Thunder barrier (Three Rotating Cubes Puzzle)
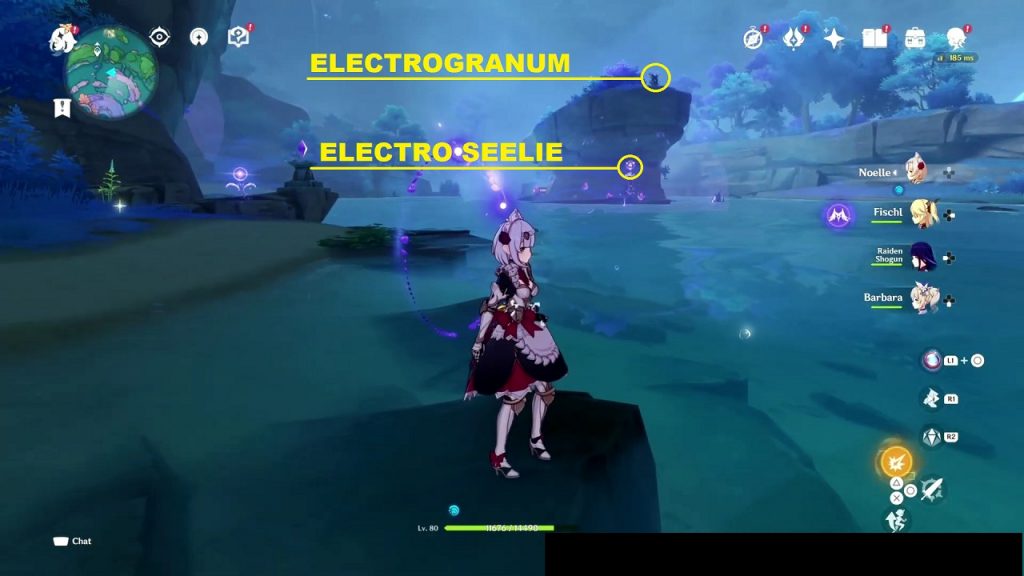
The Electro Seelie will lead you to a Thunder barrier. Near the barrier, you will find three rotating cubes. To go inside the thunder barrier you will need to solve the rotating cube puzzle. This puzzle is very simple. There are three cubes (See the second picture below). Hit each cube until it faces north. You can do it by hitting the middle cube two times and the other two, three times. On solving the puzzle, the Electrogranum plant near the middle cube will be activated. Summon Electrogranum and use it to go inside the Thunder Barrier and switch it off. Start following the Electro Seelie again.
Second Thunder Barrier
Follow the Electro Seelie and it will go inside a Thunder Barrier at the north portion of Sangonimiya Shrine. Near the barrier, you will find a statue. Pay respect to the statue and an enemy will appear. Defeat it and the barrier will disappear. Now start following the Electro Seelie again.

Third Thunder Barrier
Follow the Electro Seelie and it will go inside a Thunder Barrier at the northeast portion of Sangonimiya Shrine. Climb the mountain behind the barrier. At top of the mountain, you will find an Electrogranum Plant. Summon Electrogranum and use it to go inside the barrier and switch it off. Now start following the Electro Seelie again.
Fourth Thunder barrier (Five Cubes Puzzle)
Follow the Electro Seelie and it will go inside a Thunder Barrier at the east portion of Sangonimiya Shrine as shown in the picture below. Near the barrier, you will find five rotating cubes. To go inside the thunder barrier you will need to solve the rotating cube puzzle.
In this puzzle, there are five cubes. Hitting cube 1 rotates cubes 1 & 2. Hitting cube 4 rotates cubes 3 & 4. Hitting cube 3 rotates cubes 2, 3 & 4. Hitting cube 2 rotates cubes 1, 2 & 3. To solve the puzzle you need to make all the cubes face towards the front side. Solving the puzzle gives you an exquisite chest.
Reset the puzzle and then follow the following steps to solve the puzzle:
1) Hit cube 1 three times
2) Hit cube 2 one time
3) Hit cube 3 three times
4) Hit cube 4 two times
On solving the puzzle, the Electrogranum plant near the cubes will be activated. Summon Electrogranum and use it to go inside the Thunder Barrier and switch it off. Start following the Electro Seelie again.
Hidden Luxurious Chest
Start following the Electro Seelie from the previous thunder location. Keep your eye on the Electro Seelie as it will start moving very fast from this point. Keep following it and shortly it will reach its destination as shown in the picture below. This will reveal a luxurious chest and two precious chests.
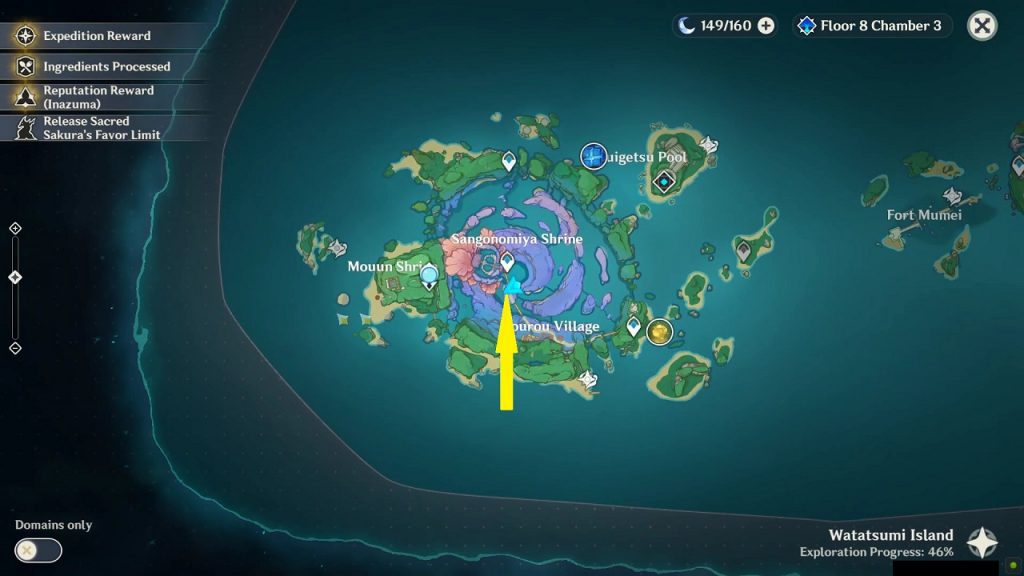
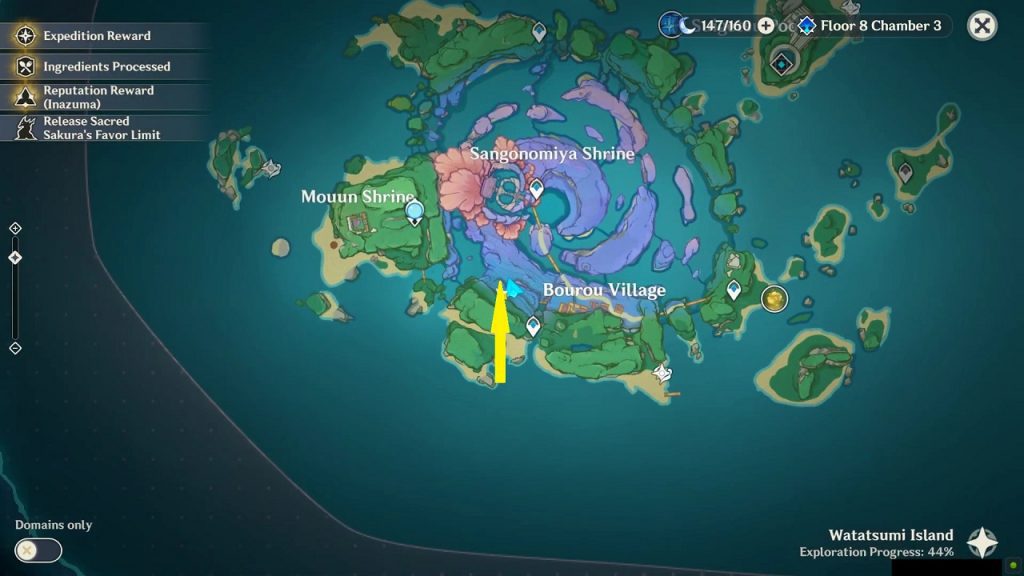
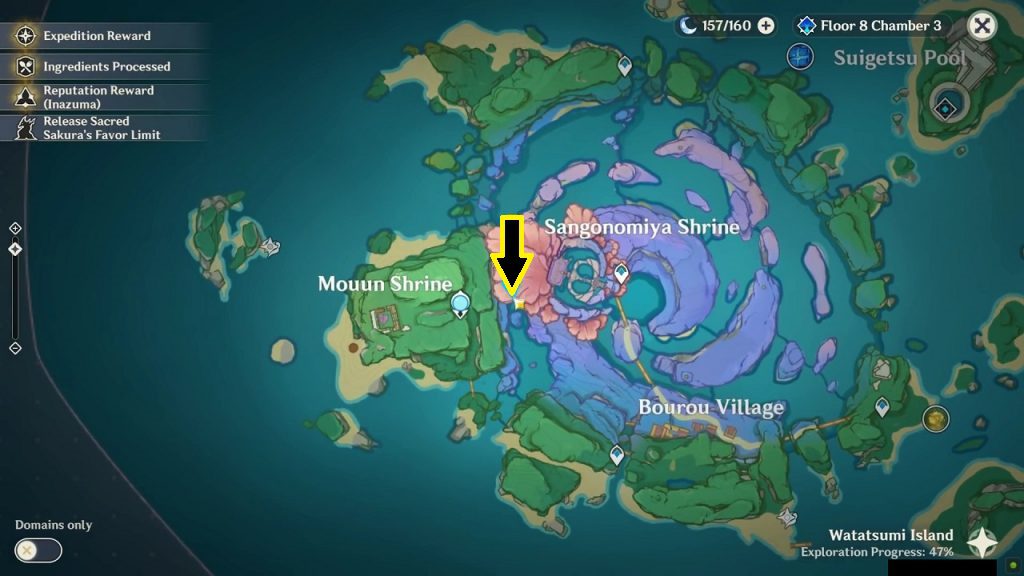
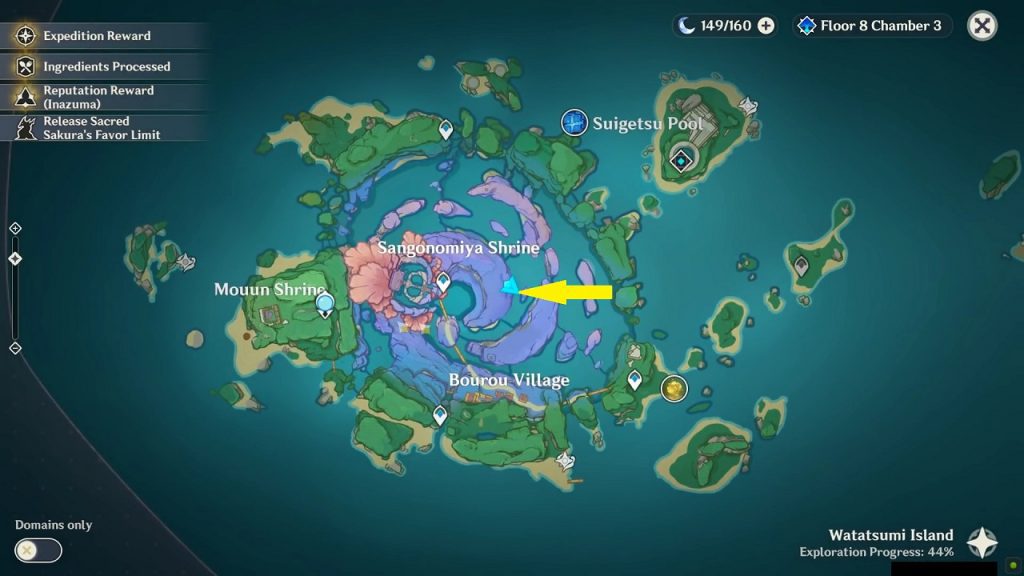
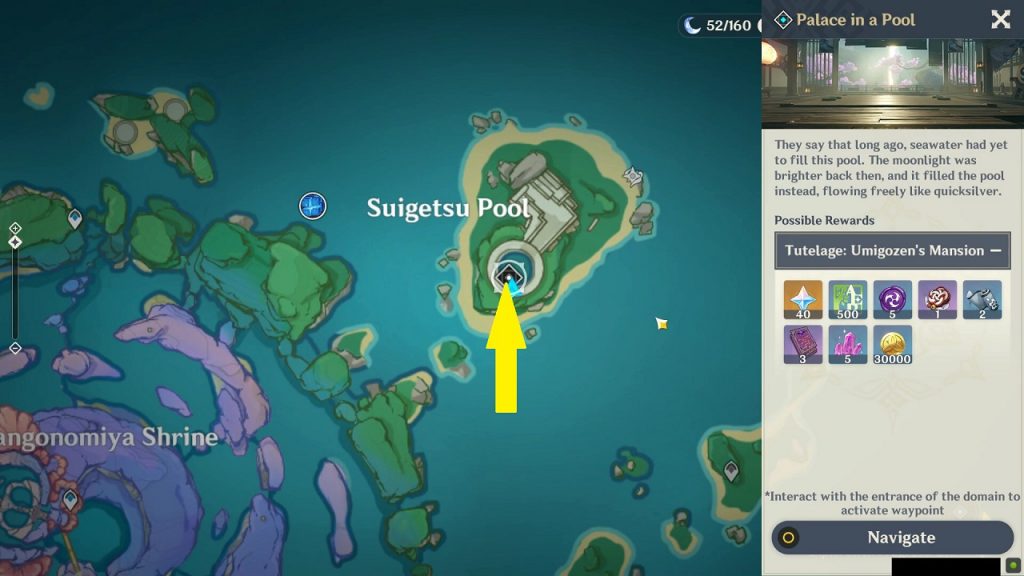
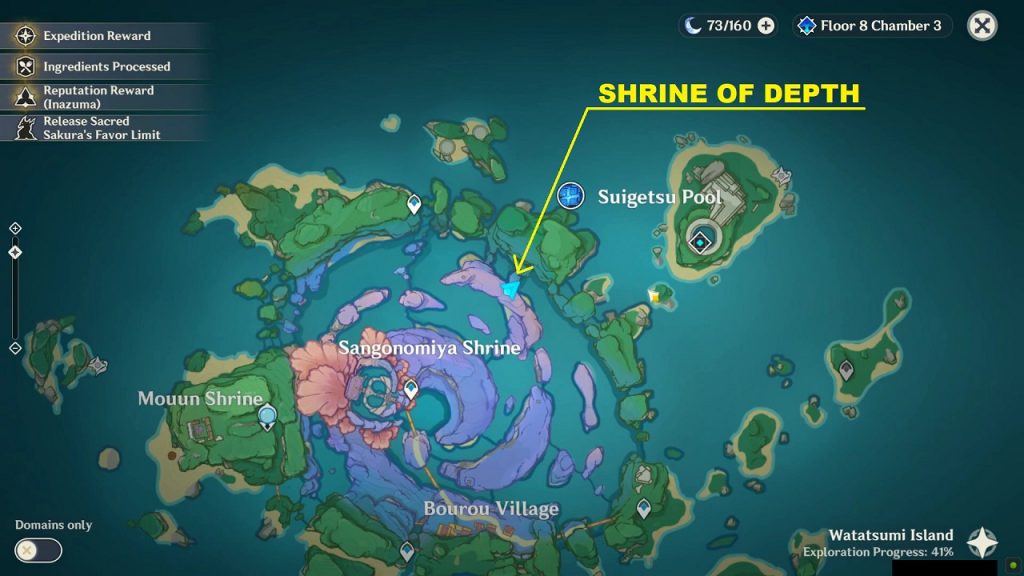
Luxurious Chest 30/45: Suigetsu Pool (Watatsumi Island)
There is one Luxurious Chest near the ‘Palace in a Pool‘ domain in Suigetsu Pool. Suigetsu Pool is on the northeast side of Watatsumi island as shown in the picture below. To get the luxurious chest you will first need to drain out water from the pool. Click here to see how to drain out water from the pool.
After the water is cleared, go back to the top of the pool and jump down into the circular area where the Domain gate is present. Go down the corridor (opposite the domain gate) and turn left in the middle of the corridor as shown below.
In this room jump through the windows on the right wall as shown below.
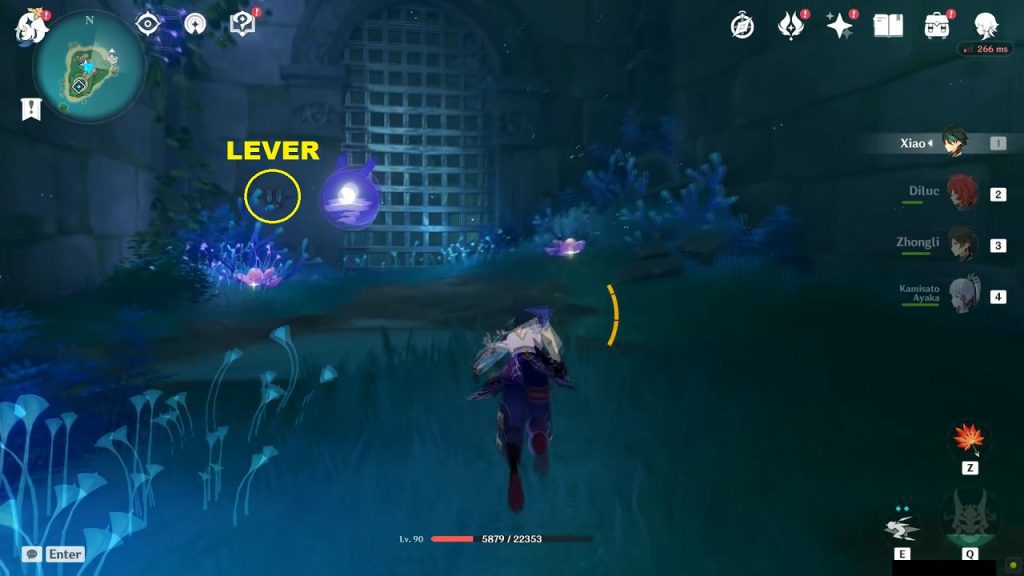
In the next room, you will find a closed gate at the end, interact with the lever on its left to open the gate. Go through the gate to the next room.
In this room, you will find an Electrogranum plant.

Summon Electrogranum from the plant and go back to the previous room. In this room, climb on the wall on the right side and use Electrogranum to pass through the thunder barrier.

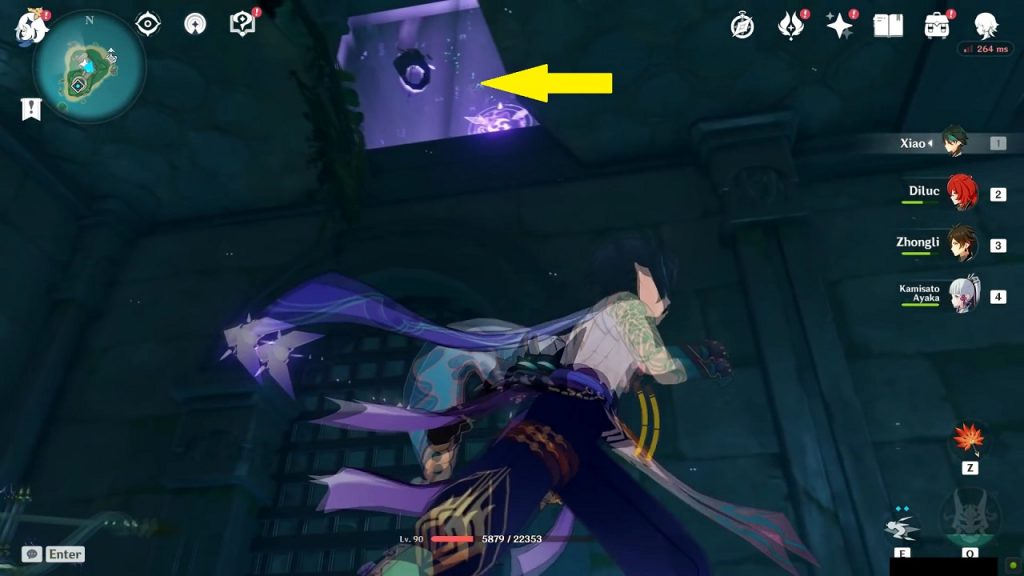
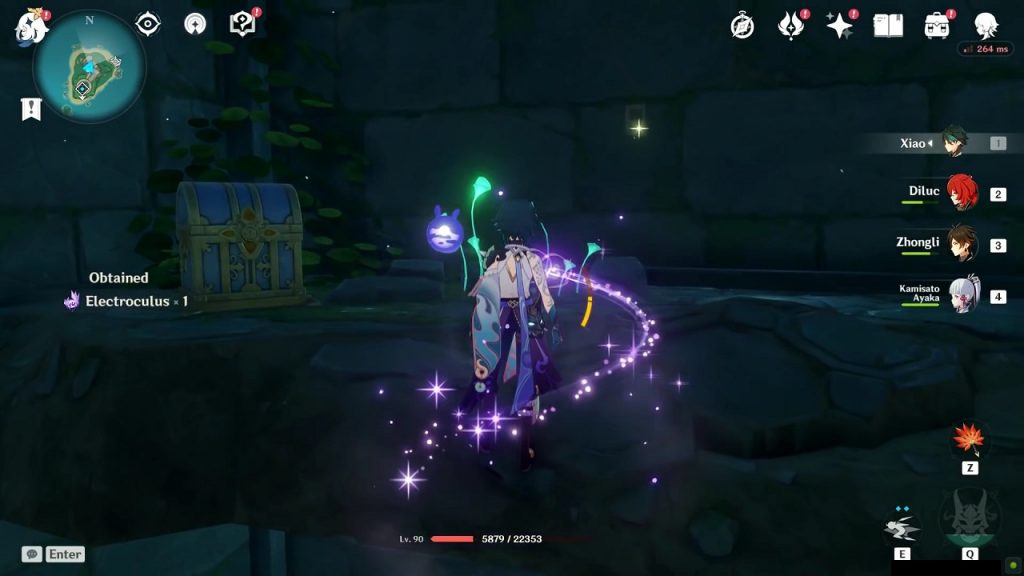
After crossing the thunder barrier, see up and you will see an Electroculus at the top, near the ceiling. Climb the wall upto the Electroculus level. Here you will see a Luxurious chest on a small platform. Jump to reach the platform and get the chest.
Luxurious Chest 31/45: Mouun Shrine (Watatsumi Island)
Mouun Shrine is at the western edge of Watatsumi island of Inazuma Region. On the north side of Mouun Shrine, you will find a Rotating Cube Puzzle and on the south side, you will find a Lightning Strike Probe Puzzle. Solving both the puzzles gets you a Luxurious chest.
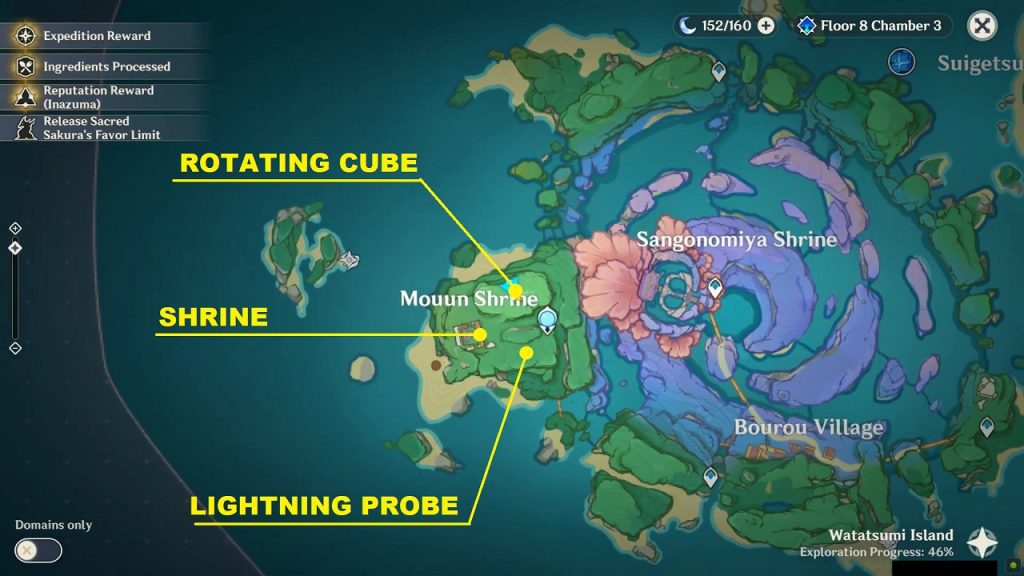
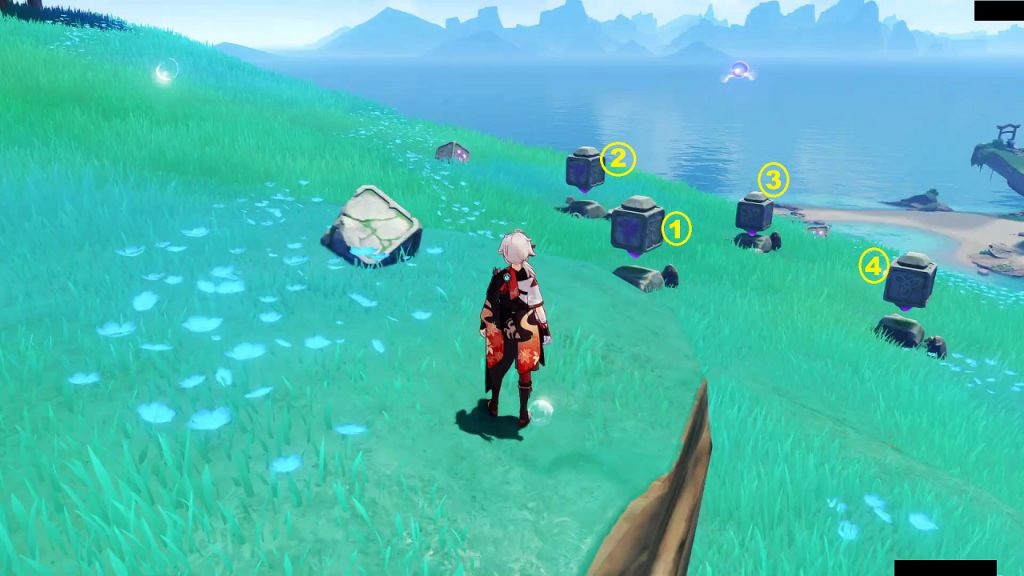
Mouun Shrine Rotating Cube Puzzle
There are four rotating cubes on the north side of Mouun Shrine. I have numbered the cubes as shown below for easy understanding. You have to make all the cubes face inwards (make cube 1 face 3 and cube 2 face 4) to solve the puzzle. You can do so by hitting cube 1 twice, cube 2 thrice, and cube 3 once. On solving the puzzle, the Electro Seelie at the center of the cubes will start moving. Chase the Electro Seelie to its home to complete this part.
Mouun Shrine Lightning Strike Probe Puzzle
There are three Lightning Strike Probes on the south side of Mouun Shrine. All three probes are sealed. North of the probes you will see a statue with an immovable Electro Seelie above it. Pay respect to the statue to unseal the Lightning Strike Probes.
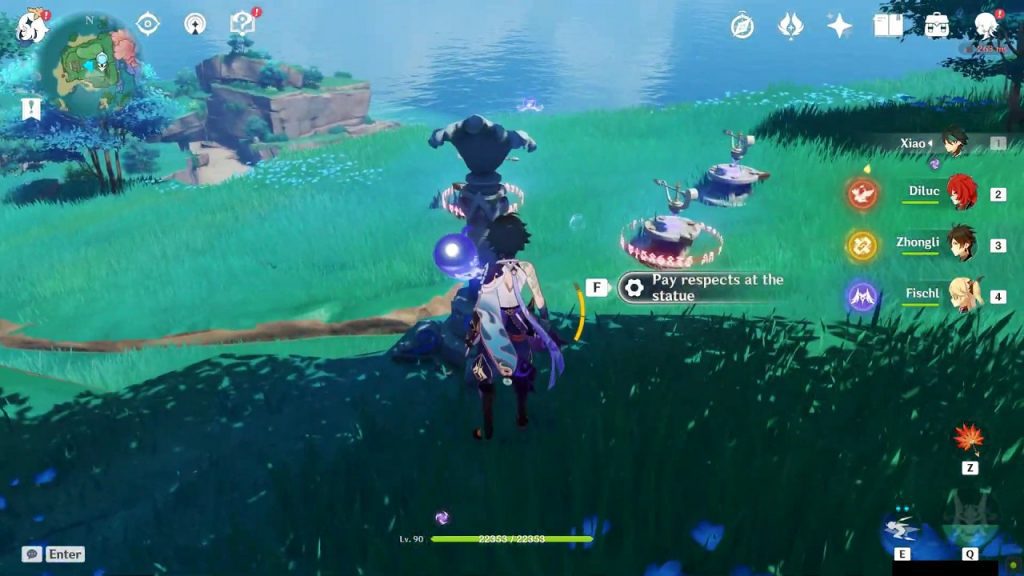
To solve the Lightning Strike Probe Puzzle you need to activate all three probes. A Lightning Strike probe can be activated by aligning the arrow at its top to the protruding edge of its base. The arrow points towards a charged object. There are two moving Electro Seelies near the probes. Electro Seelie will keep changing position from one probe to another. Get charged from the Electro Seelie and stand in front of one of the three probe’s protruding edge to activate it. Other two will be activated when Electro Seelies change position and get in front of them. When all the three probes are activated simultaneously, the puzzle will be solved and the Electro Seelie above the statue will start moving. Chase the Electro Seelie to its home to complete this part.
Mouun Shrine Luxurious Chest
After solving both the above-mentioned puzzles, when you have chased the two Electro Seelies to their home, a hidden Luxurious chest will appear.
Luxurious Chest 32/45: Shrine of Depths (Watatsumi Island)
You will get a luxurious chest inside the Shrine of Depths at the location northeast of Sangonomiya Shrine as shown in the picture below. Check the link to know how to get the key for the shrine.
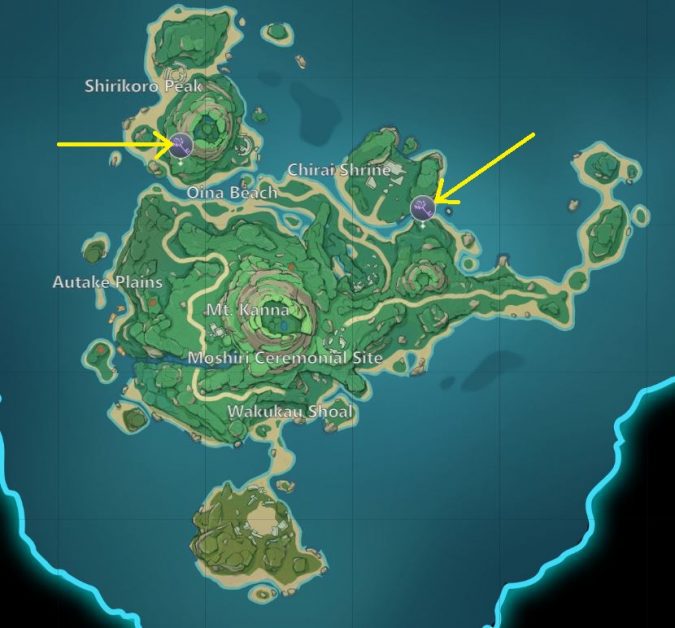
Luxurious Chest 33/45: Shirikoro Peak Underground (Tsurumi Island)
You will get a Luxurious Chest during the ‘A Particularly Particular Author‘ World Quest. You will find it after completing the second relay stone puzzle in the Shirikoro Peak Underground.
Luxurious Chest 34,35/45: Stone Slate Puzzle (Tsurumi Island)
You will get 2 Luxurious Chests by finding 7 Stone Slates and inserting them in their slot in Shirikoro Peak underground.
Luxurious Chest 36/45: Mural Puzzle (Tsurumi Island)
You can get a Luxurious Chest by solving the Mural Puzzle in Shirikoro Peak underground. Click here for the complete walkthrough.
Luxurious Chest 37,38/45: Shrine of Depths ( Tsurumi Island)
You will get luxurious chests from the two Shrine of Depths in Tsurumi island at the location shown in the picture below. Check the link to know how to get the key for the shrine.
Luxurious Chest 39-45/45: Enkanomiya
Click here to see all the Enkanomiya Luxurious chests locations.