There are a total of 5 luxurious chests in the Kannazuka area of the Inazuma Region, which was introduced in the Genshin Impact 2.0 update Introduced on 21st July 2021. This article shows the location of all the five luxurious chests and how to get them
Shortcuts:
#1 Tatarasuna Mountain Edge
#2 Solve Break the pots Puzzle
#3 Find three Seelies
#4 Tatarasuna North Edge: Behind a Barrier
#5 Tatarasuna Arsenal (Keys to Some Place)
#6 Shrine of Depths
#7 Shrine of Depths
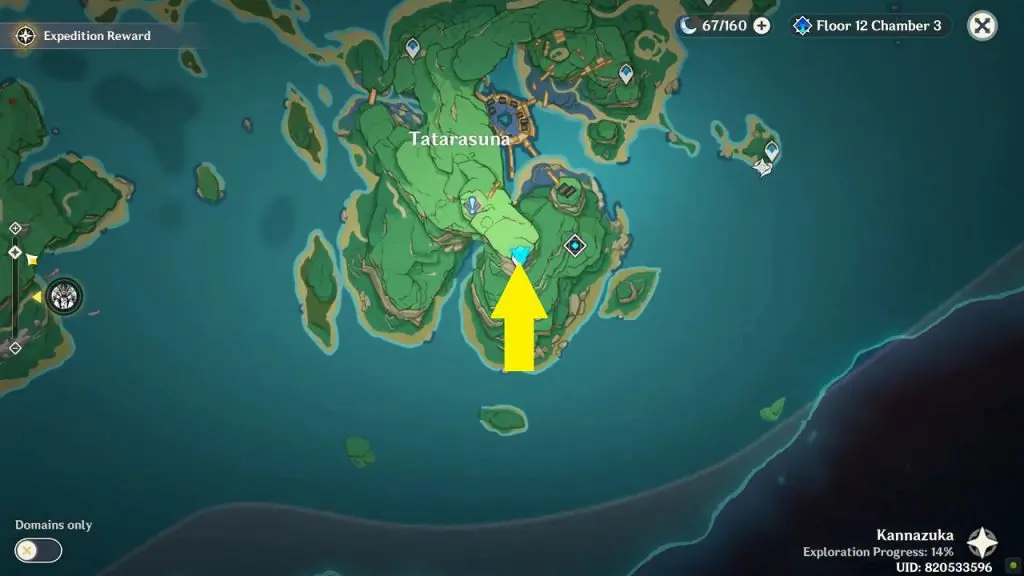
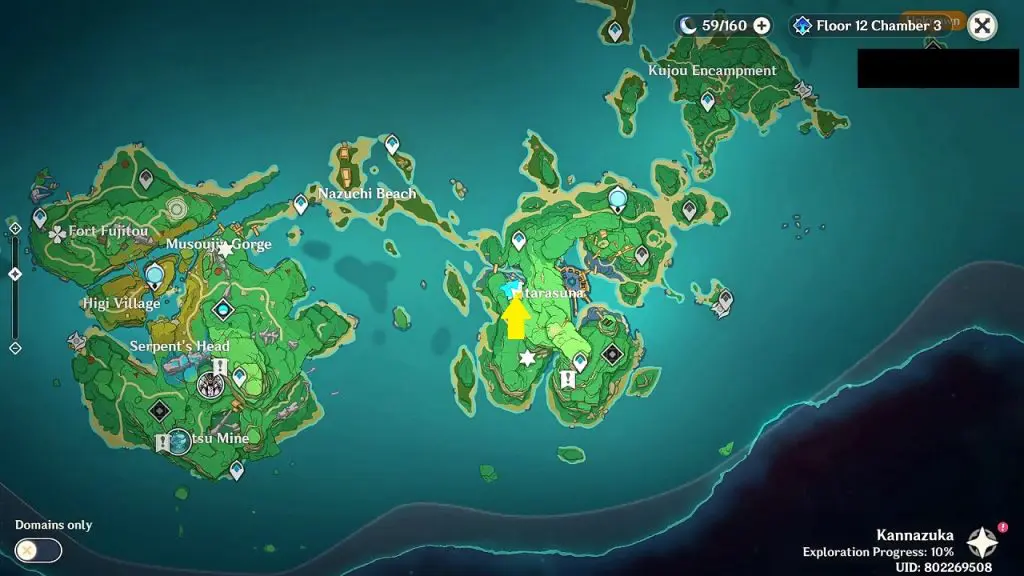
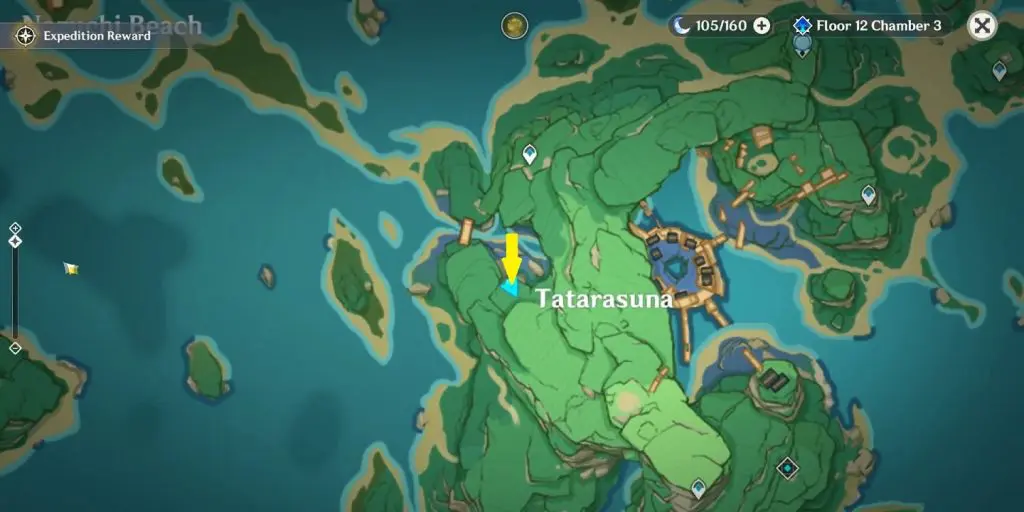
Luxurious Chest 1: Tatarasuna Mountain Edge
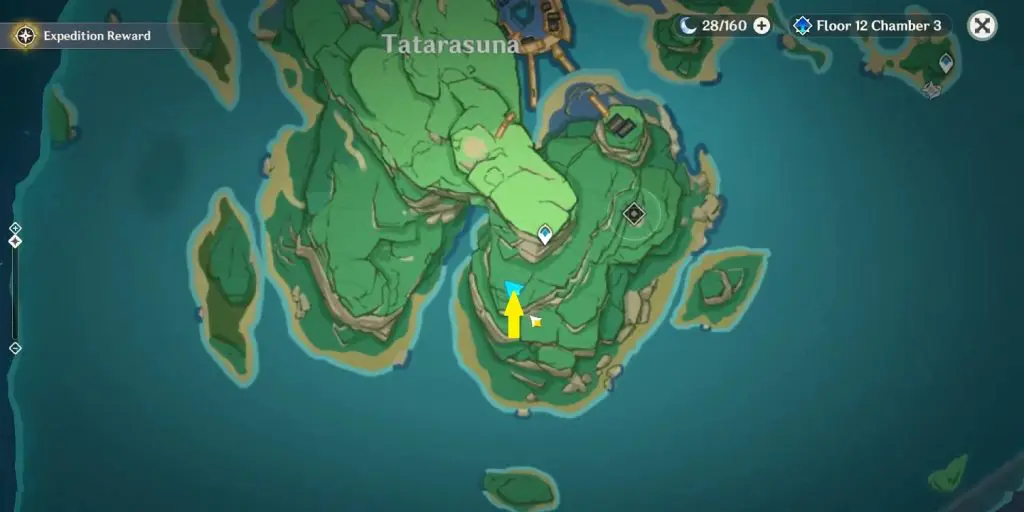
At the southern end of Tatarasuna, near Tatarasuna Fast Travel Point you will find a locked Luxurious chest. The luxurious chest is near Tatarasuna’s fast travel point near the edge of the mountain at the location as shown in the picture below. The luxurious chest unlocks when you move far from it but locks as you approach near it. There is a small trick that will help you unlock the chest and get the reward.
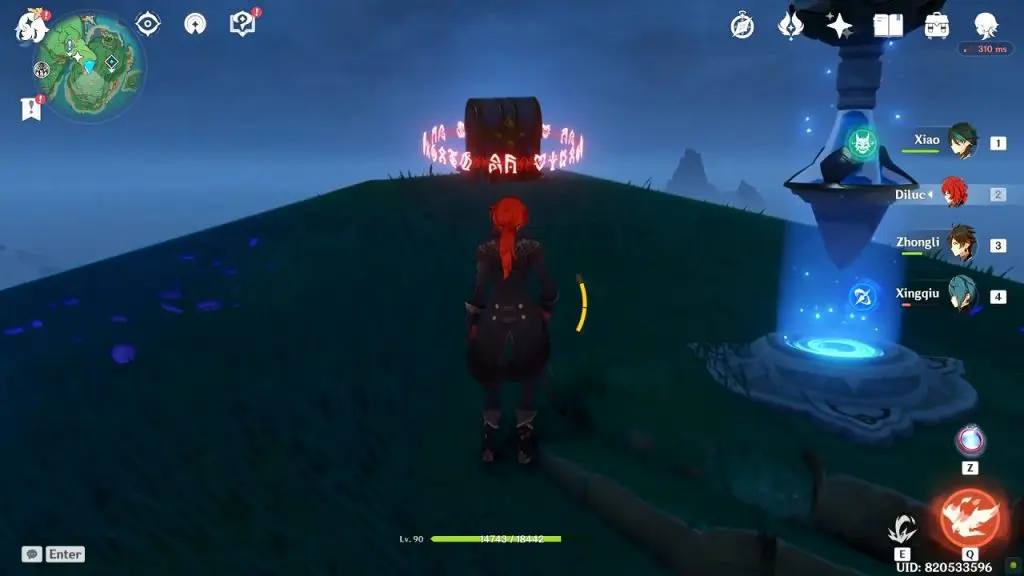
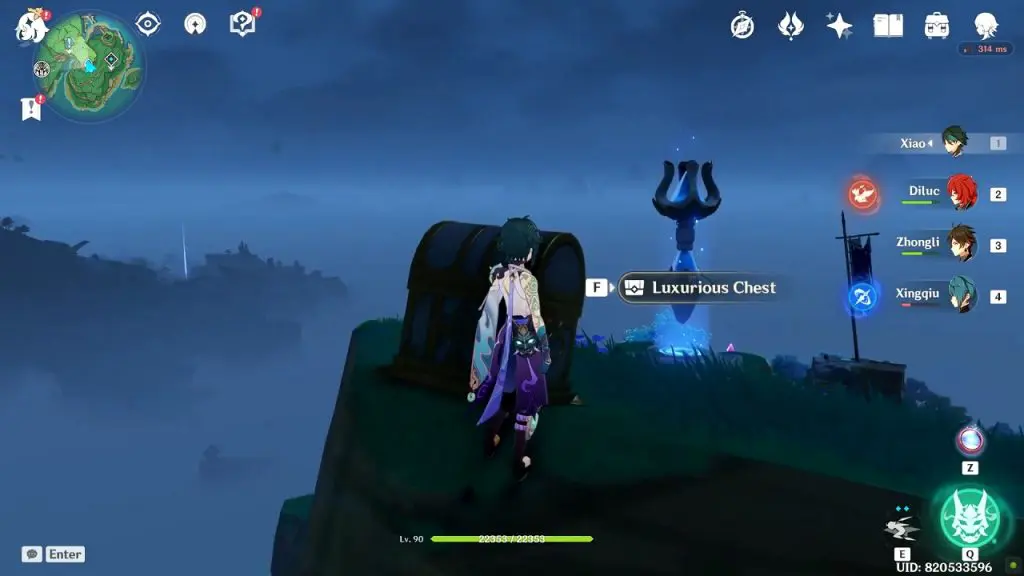
To unlock the chest, you need to approach it from behind. You have to place yourself appropriately behind the chest for the option to open the luxurious chest to appear. If you are finding it difficult to place yourself in the correct position, simply jump down and climb the cliff from behind. This way you will be able to stand right behind the luxurious chest as shown in the picture below.
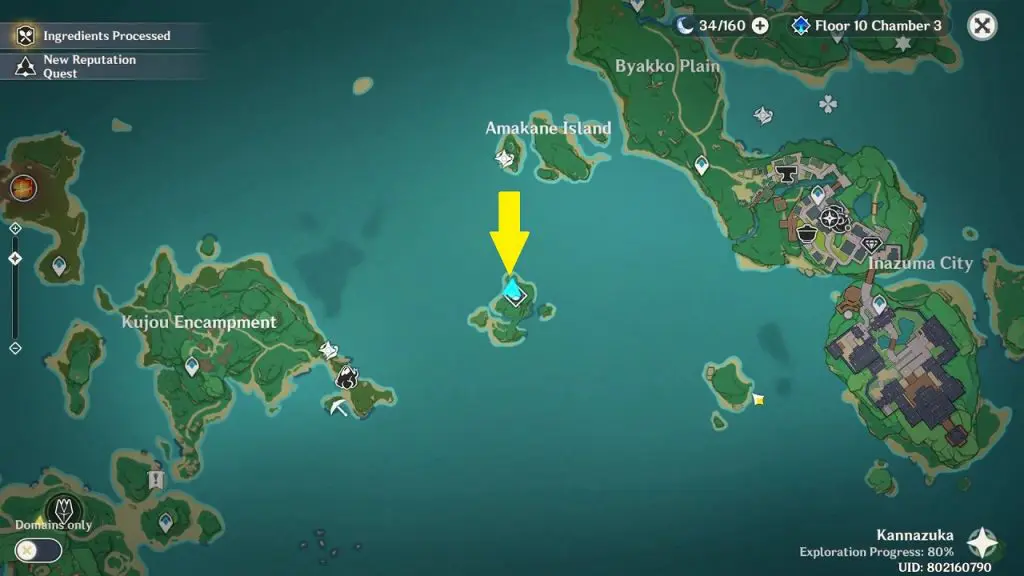
Luxurious Chest 2: Break Pots Puzzle
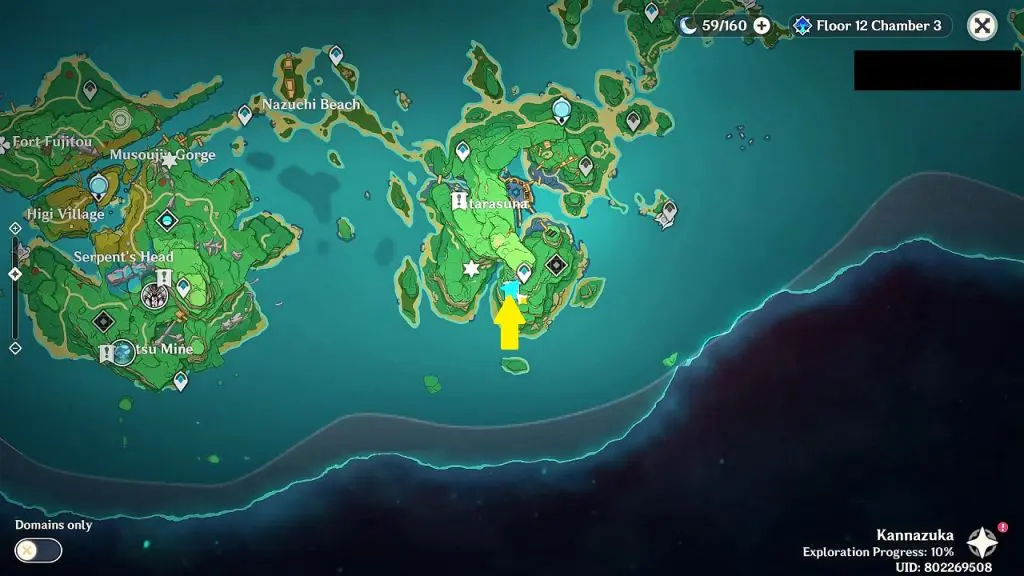
The luxurious chest is on an island east of Kujou Encampment and south of Amakane Island as shown in the picture below. You will need to break all the pots on the island for the luxurious chest to appear. The second picture below shows the location of all the pots on the island.
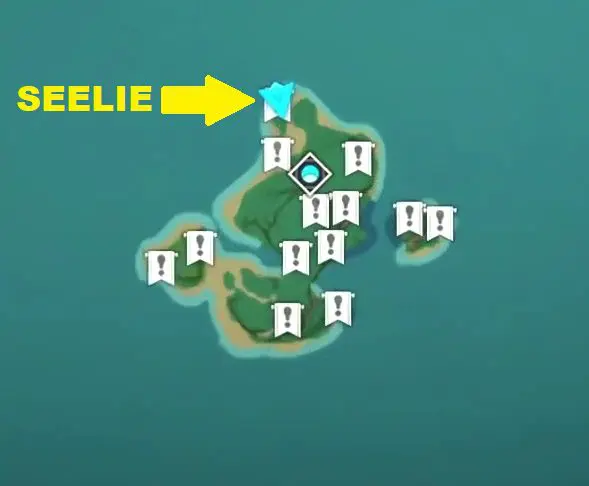
At the northmost point of the island, you will find a Seelie (Location Marked on Second Picture Below). This Seelie will stop at pots locations. Follow it around to find the pots. Make sure to check the surrounding area where the Seelie stops, because it does not stop at the top of all the pots. See the second picture below for all the pots locations.
Luxurious Chest 3: Find Three Seelies
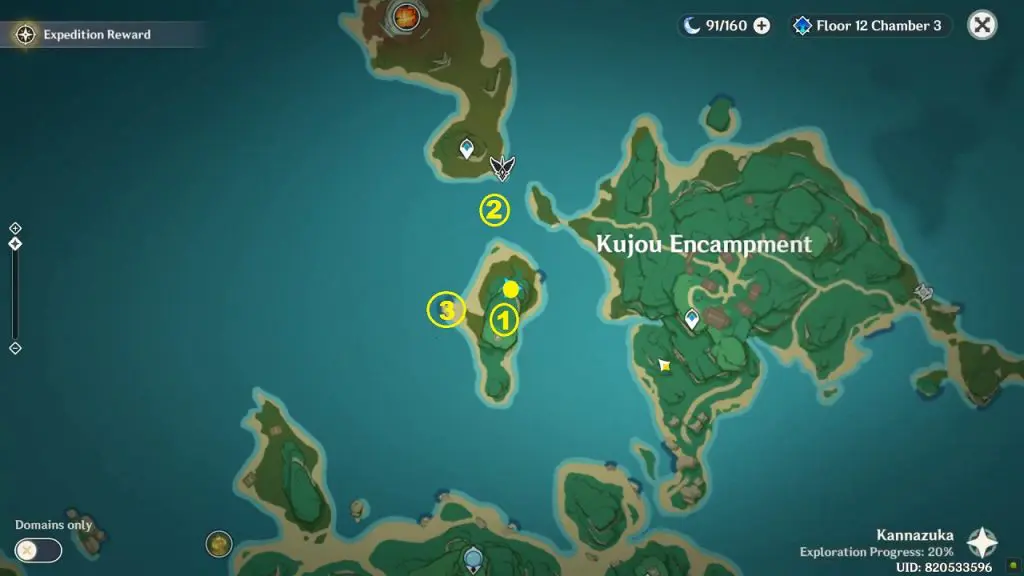
The luxurious chest is on an island west of Kujou Encampment at a location marked with a yellow dot on the map below. You will find three Electro Seelies around the island at locations marked with 1,2, and 3 on the map below. Chase the Seelies and bring them to the Luxurious chest to unlock it.
Seelie 1: Just south of the chest.
Seelie 2: On the water at the north side of the island
Seelie 3: On the beach at the western end of the island

Luxurious Chest 4: Tatarasuna Northen Edge (Behind a Barrier)
You will find a barrier on the water at the northern end of Tatarasuna at the location marked by a dot on the map in the picture below. Inside the barrier, you will get a Luxurious chest. To get inside the barrier you will first need to find three Electro Seelies by solving three puzzles at locations marked by 1,2, & 3 on the map in the picture below.

Seelie 1: Lightning Strike Probe Puzzle
Lightning Strike probe is a device with a compass attached to the top that points towards players charged with electro element. The base of the Lightning Strike Probe is marked with the direction in which the compass needs to be pointed (See the picture below). Use electro element to make the compass point in the correct direction and this will make the device glow, as shown in the second picture below. Once the device starts glowing, it will keep glowing only for a small period of time. To complete the Lightning Strike Probe puzzle you will need to make all three devices glow simultaneously.


In order to solve the puzzle, you will need to get an electro charge and use it to rotate the compass on top of the Lightning Strike probe in the correct direction. You can get imbued by electro by going near Electro Crystal ore as shown in the picture below.

After you are charged with electro, go near a Lightning Strike Probe and stand in the direction where the device base is pointing until the compass points in the same direction and the device starts to glow. Do the same for the other two devices. You have to do this quickly because the device will remain glowing only for a small period of time. To complete the puzzle you will need to make all three devices glow simultaneously.
Once all the three Lightning Strike Probes are glowing simultaneously, an exquisite chest and an electro Seelie will appear at the center. Chase the Electro Seelie until it reaches the electrograna plant near the barrier.

Seelie 2: Block Puzzle
On the north side of the barrier, you will find four blocks. To solve the puzzle you will need to make the same number of feathers glow on all four blocks. Hit the middle two blocks two times each and it will make two feathers glow on all four blocks. An exquisite chest and an Electro Seelie will appear on the completion of the puzzle. Chase the Electro Seelie until it reaches the Electrograna plant.

Seelie 3: Complete Challenge
On the south side of the barrier, you will find a sword as shown in the picture below. Interact with the sword to start a challenge. Defeat the enemies within the time limit to complete the challenge. An exquisite chest and an Electro Seelie will appear on the completion of the challenge. Chase the Electro Seelie until it reaches the Electrograna plant.

Luxurious Chest Puzzle
After you have chased all the three Electro Seelies to the electrograna plant, the option to summon electrogranum will appear. Summon electrogranum and use it to enter the barrier. After entering the barrier, interact with the pillar and switch off the barrier.
In front of the pillar, you will find three blocks. Hit the blocks until the glowing part turns towards the pillar. This will make the Luxurious chest appear. Open the chest to get Traveling Doctor’s Pocket Watch, Silver Sword, Lucky Dog’s Hourglass, Exile’s Goblet, 4 Electro SIgils, and 1800 Moras.


Luxurious Chest 5: Arsenal in Tatarasuna
You will find the Luxurious chest in the Arsenal, which is in the central part of Tatarasuna near the river (Check the image below for location). The Arsenal is locked and 3 Keys to Some Place are required to unlock the Arsenal. The location of the keys is described below.


Key to Some Place #1
Key to Some Place #1 is in the northeast part of Tatarasuna (check the image below for the exact location). The common chest containing the key is in the broken building inside the purple-colored dome (shield). You’ll need electro to cross the shield (enter the dome). There is an electrogranum plant nearby and is pretty hard to miss. Cross the shield –> go downstairs –> take a sharp left and jump down onto the wooden platform –> enter the narrow space to get to the common chest.


Key to Some Place #2
Key to Some Place #2 is in the southeast part of Tatarasuna (check the image below for the exact location). Move north from the teleportation waypoint and jump down from the ledge. Glide down to reach the broken wooden platform with the common chest (containing Key to Some Place #2). This wooden platform is located somewhere above the Arsenal gate.


Key to Some Place #3
Key to Some Place #3 is in the central part of Tatarasuna near the Mikage Furnace (check the image below for the exact location). The common chest containing the key is on the roof of a hut in the Mikage Furnace area. It’s better if you approach the Mikage Furnace from the cliff on its western side. You can jump off the cliff and can easily glide to the common chest.


Once you have the three ‘Keys to Some Place’, open the arsenal gate and get the ‘Katsugakiri Nagamasa‘ blueprint from the Luxurious chest inside it.
Luxurious Chest 6: Shrines of Depths
You will find a luxurious chest inside a Shrine of Depths in Tatarasuna at the southwest of the fast travel point at the location as shown in the picture below. Check the link to know how to get the key for the shrine.
Luxurious Chest 7: Shrines of Depths
You will find a luxurious chest inside a Shrine of Depths in the western portion of Tatarasuna at the location as shown in the picture below. Check the link to know how to get the key for the shrine.
ALSO READ
Genshin Impact 2.0 Complete Walkthrough
All Weapon Blueprints
Narukami Island: All 39 Electroculus Location
Araumi Cleansing Defilement Barrier Guide & Sacred Sakuna Cleansing Ritual
Hayashi of Tanuki in the Forest World Quest – Chinju Forest Destroy the Barrier Puzzle
Cleansing Defilement: Complete the Sacred Sakura Cleansing Ritual Puzzles
Sacrificial Offering: Destroy the Barrier Shrine Puzzle
Orobashi’s Legacy Part 1
Orobashi’s Legacy Part 2
Orobashi’s Legacy Part 3
Orobashi’s Legacy Part 4 & 5